
We will now show how MVC functions in a Dart version of the famous TodoMVC application (http://todomvc.com/), which is used as a standard to compare different web frameworks. This application is developed in spirals in the dartling_todo_mvc project and it is built by using the Dartling framework for the model. Download the code from https://github.com/dzenanr/dartling_todo_mvc_spirals. In the following screenshot, you see a glimpse of the end result (Spiral 6):

The TodoMVC app
The todo items can be added, edited, marked as completed, and deleted; overviews of all tasks, or only the completed or remaining ones can be shown, and the user has undo/redo possibilities after making a mistake. Moreover, it is really useful because the data is stored in local storage (using the JSON format).
Spiral 0 does not have any UI; it contains only a simple model with one concept Task and two properties, title and completed. This is designed in Model Concepts with domain name Todo and model name Mvc, shown in the following figure:
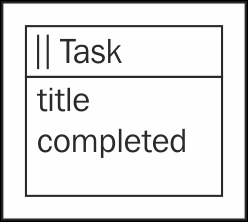
The TodoMVC model
Its JSON representation is exported, and the code is generated by dartling_gen. In the generated code (lib/gen/todo/mvc/tasks.dart), we find classes that extend Dartling base classes:
abstract class TaskGen extends ConceptEntity<Task>
abstract class TasksGen extends Entities<Task>
In the lib/todo folder, developers may specialize the model:
class Task extends TaskGen {
  Task(Concept concept) : super(concept);
}

class Tasks extends TasksGen {
  Tasks(Concept concept) : super(concept);
}
The Task class describes the Task concept and Tasks represents a collection of tasks. There are some basic tests of the model in the todo_mvc_test.dart file of the test folder. In the main function, a repository is constructed and passed to the testTodoMvc function together with the domain name and the model name.
testTodoData(TodoRepo todoRepo) {
  testTodoMvc(todoRepo, TodoRepo.todoDomainCode,
      TodoRepo.todoMvcModelCode);
}

void main() {
  var todoRepo = new TodoRepo();
  testTodoData(todoRepo);
}
The model entries of the MvcEntries type are obtained from the models object of the repository:
var models = repo.getDomainModels(domainCode);
entries = models.getModelEntries(modelCode);
The tasks variable of the Tasks type is the only entry into the model:
tasks = entries.tasks;
All tests are done on the tasks object. The web folder contains a default web application of the model.
In this spiral we start using the MVC pattern; new todos can be entered, and an updated list of todos is displayed. There is a view of todos and a controller to add a new view. A view and a controller are separated into two different classes: the Todos view class in the lib/app folder and the TodoApp control class in the same folder. The web application starts with the main function in the web/dartling_todo_mvc.dart file:
main() {
  var repo = new TodoRepo();
  var domain = repo.getDomainModels(‘Todo’);
  var model = domain.getModelEntries(‘Mvc’);
  new TodoApp(model.tasks);
}
The todo application controller accepts the model’s tasks while referring to the todos view. The newTodo element allows a creation of a new task after its title is entered. The new task is added to the tasks entry of the model:
class TodoApp {
  TodoApp(Tasks tasks) {
    var todos = new Todos();
    InputElement newTodo = query(‘#new-todo’);
    newTodo.onKeyPress.listen((KeyboardEvent e) {
      if (e.keyCode == KeyCode.ENTER) {
        var title = newTodo.value.trim();
        if (title != ‘’) {
          var task = new Task(tasks.concept);
          task.title = title;
          tasks.add(task);
          todos.add(task);
          newTodo.value = ‘’;
        }
      }
    });
  }
}
This new task is also added to the todos view of the model:
class Todos {
  Element _todoList = query(‘#todo-list’);

  add(Task task) {
    var element = new Element.html(‘’’
      <li>
        <label id=’title’>${task.title}</label>
      </li>
    ‘’’);
    _todoList.nodes.add(element);
  }
}
In the add method, a new todo list item is created and added to nodes of the todo list. The new todo and todo list elements are defined in the web/dartling_todo_mvc.html file.
  <section id=”todo-app”>
    <header id=”header”>
      <h1>todos</h1>
    <input id=”new-todo” placeholder=”What needs to be done?” autofocus>
    </header>
    <section id=”main”>
      <ul id=”todo-list”></ul>
    </section>
  </section>
Spiral 1b is an example where a view and a controller are combined within the Todos class. By comparing Spiral 1 and Spiral 1b, you may better understand this type of variation in the MVC pattern:
class Todos {
  Element _todoList = query(‘#todo-list’);
  Todos(Tasks tasks) {
    InputElement newTodo = query(‘#new-todo’);
    newTodo.onKeyPress.listen((KeyboardEvent e) {
      if (e.keyCode == KeyCode.ENTER) {
        var title = newTodo.value.trim();
        if (title != ‘’) {
          var task = new Task(tasks.concept);
          task.title = title;
          tasks.add(task);
          _add(task);
          newTodo.value = ‘’;
        }
      }
    });
  }

  _add(Task task) {
    var element = new Element.html(‘’’
      <li>
        <label id=’title’>${task.title}</label>
      </li>
    ‘’’);
    _todoList.nodes.add(element);
  }
}
The TodoApp class becomes a simple application without controller responsibilities:
class TodoApp {
  TodoApp(Tasks tasks) {
    new Todos(tasks);
  }
}
In Spiral 2, the Spiral 1 will be used as its predecessor. However, in Spiral 6, all views will use the form suggested in Spiral 1b.
Todos are loaded (saved) from (to) a local storage. A todo may be completed. A count of todos left is displayed. There is a new Todo class in the lib/app/todo.dart file to represent a todo in the Todos view. It is a task view with its controller to make the task complete. The SetAttributeAction class of Dartling is used to update the complete property of the Task concept. The domain session is used by Dartling to memorize actions and provide their history, along the lines of the command pattern: (http://en.wikipedia.org/wiki/Command_pattern).
class Todo {
  Task task;
  Element element;
  InputElement _completed;

  Todo(TodoApp todoApp, this.task) {
    DomainSession session = todoApp.session;
    element = new Element.html(‘’’
      <li ${task.completed ? ‘class=”completed”’ : ‘’}>
        <input class=’completed’ type=’checkbox’
          ${task.completed ? ‘checked’ : ‘’}>
        <label id=’title’>${task.title}</label>
      </li>
    ‘’’);

    _completed = element.query(‘.completed’);
    _completed.onClick.listen((MouseEvent e) {
      new SetAttributeAction(session, task, ‘completed’,
          !task.completed).doit();
    });
  }

  complete(bool completed) {
    _completed.checked = completed;
    if (completed) {
      element.classes.add(‘completed’);
    } else {
      element.classes.remove(‘completed’);
    }
  }
}
The Todos view implements Dartling’s ActionReactionApi interface in order to react to actions in the model; it is based on the observer pattern (http://en.wikipedia.org/wiki/Observer_pattern):
class Todos implements ActionReactionApi {
  TodoApp _todoApp;

  List<Todo> _todoList = new List<Todo>();
  Element _todoElements = query(‘#todo-list’);

  Todos(this._todoApp) {
    _todoApp.domain.startActionReaction(this);
  }
The view is registered in the constructor to receive information about data changes. The Todos view must implement the react method to be updated based on actions of the model:
  react(ActionApi action) {
    if (action is AddAction) {
      add(action.entity);
    } else if (action is SetAttributeAction) {
      _complete(action.entity);
    }
    _todoApp.updateFooter();
    _todoApp.save();
  }
The add method from the previous spiral is replaced with the doit method on the new AddAction object in the TodoApp controller:
new AddAction(session, _tasks, task).doit();The session is obtained from the domain object that is passed to the constructor of the controller:
session = domain.newSession();
Changes in the model are saved in a local storage by the save method:
  save() {
    window.localStorage[‘todos’] = stringify(_tasks.toJson());
  }
A count of todos left to be completed is displayed by the updateFooter method.
Tasks are loaded from a local storage by the following code:
    String json = window.localStorage[‘todos’];
    if (json != null) {
      _tasks.fromJson(parse(json));
      for (Task task in _tasks) {
        _todos.add(task);
      }
      updateFooter();
    }
Note that the todos view is updated here directly, because the fromJson method from Dartling uses the add method and not the AddAction class.
In Dartling, if several actions are done at the same time, they are combined into a transaction. To clear (remove) all completed todos, the following code is used in the controller’s constructor.
    _clearCompleted.onClick.listen((MouseEvent e) {
      var transaction = new Transaction(‘clear-completed’, session);
      for (Task task in _tasks.completed) {
        transaction.add(
            new RemoveAction(session, _tasks.completed, task));
      }
      transaction.doit();
    });
In the Tasks class of the model, the completed tasks are selected. This code is added manually, but not typed:
Tasks get completed => selectWhere((task) => task.completed);The react method in the Todos view must now consider both individual actions and transactions:
  react(ActionApi action) {
    updateTodo(SetAttributeAction action) {
      if (action.property == ‘completed’) {
        _complete(action.entity);
      }
    }

    if (action is Transaction) {
      for (var transactionAction in action.past.actions) {

if (transactionAction is SetAttributeAction) {
          updateTodo(transactionAction);
        } else if (transactionAction is RemoveAction) {
          _remove(transactionAction.entity);
        }
      }
    } else if (action is AddAction) {
      add(action.entity);
    } else if (action is SetAttributeAction) {
      updateTodo(action);
    } else if (action is RemoveAction) {
      _remove(action.entity);
    }

    _todoApp.updateDisplay();
    _todoApp.save();
  }
Transaction actions can be found in the past property of the transaction.
There is a button for undo and a button for redo in the controller.
  Element _undo = querySelector(‘#undo’);
  Element _redo = querySelector(‘#redo’);
In the click events, the session.past property is used to make unlimited undos and redos.
    _undo.onClick.listen((MouseEvent e) {
      session.past.undo();
    });

    _redo.onClick.listen((MouseEvent e) {
      session.past.redo();
    });
The reaction to past actions (and transactions) is defined in the controller by the following code.
class TodoApp implements PastReactionApi {
// code left out
    session.past.startPastReaction(this);
The PastReactionApi interface of Dartling provides the following methods, used in the controller, where it is decided whether the undo and redo buttons will be displayed or not.
  reactCannotUndo() {
    _undo.style.display = ‘none’;
  }

  reactCanUndo() {
    _undo.style.display = ‘block’;
  }

  reactCanRedo() {
    _redo.style.display = ‘block’;
  }
  reactCannotRedo() {
    _redo.style.display = ‘none’;
  }
The react method in the view must now consider reactions to the undos and redos:
  react(ActionApi action) {
    updateTodo(SetAttributeAction action) {
      if (action.property == ‘completed’) {
        _complete(action.entity);
      } else if (action.property == ‘title’) {
        _retitle(action.entity);
      }
    }

    if (action is Transaction) {
      for (var transactionAction in action.past.actions) {
        if (transactionAction is SetAttributeAction) {
          updateTodo(transactionAction);
        } else if (transactionAction is RemoveAction) {
          if (transactionAction.undone) {
           add(transactionAction.entity);
          } else {
            _remove(transactionAction.entity);
          }
        }
      }
    } else if (action is AddAction) {
      if (action.undone) {
        _remove(action.entity);
      } else {
        add(action.entity);
      }
    } else if (action is RemoveAction) {
      if (action.undone) {
        add(action.entity);
      } else {
          _remove(action.entity);
      }
    } else if (action is SetAttributeAction) {
      updateTodo(action);
    }

    _todoApp.updateDisplay();
    _todoApp.save();
}Also, a new todo is not accepted if its text is longer than 64 characters. If so, an error message is displayed. In the Tasks class of the model, the preAdd method is defined. This method is called by the add method of Dartling, and if it returns false, the add method will be rejected:
  bool preAdd(Task task) {
    bool validation = super.preAdd(task);
    if (validation) {
      validation = task.title.length <= 64;
      if (!validation) {
        var error = new ValidationError(‘pre’);
        error.message =
            ‘${concept.codePlural}.preAdd rejects the “${task.title}” title, ‘
            ‘because it is longer than 64.’;
        errors.add(error);
      }
    }
    return validation;
  }
After the add action, the following method is called in the controller to display possible errors:
  possibleErrors() {
    _errors.innerHtml = ‘<p>${_tasks.errors.toString()}</p>’;
    _tasks.errors.clear();
  }
The pre and post add and remove actions in Dartling may be used to define business rules in the model. A creation of a new todo is moved from the TodoApp controller to the Todos class that becomes a combination of a view and a controller. It is left for the reader to study the Todos class and understand how filters are used to show a subset of todos.
In Spiral 5, both Todo and Todos classes are views with their corresponding controllers. The TodoApp class in Spiral 5 is still a controller. In Spiral 6, the events that change the model are moved from the TodoApp class to new Header and Footer classes that represent views with their corresponding controllers. In this way, there are four views (with embedded controllers) in the application: Todo, Todos, Header, and Footer. TodoApp becomes only the application class that creates views (with embedded controllers), loads and saves data, and updates displays of the header and footer sections of the web page:
class TodoApp {
  // code left out
  TodoApp(this.domain) {
    session = domain.newSession();
    MvcEntries model = 				  	domain.getModelEntries(TodoRepo.todoMvcModelCode);
    tasks = model.tasks;

    _header = new Header(this);
    _todos = new Todos(this);
    footer = new Footer(this, _todos);

    _load();
  }
// code left out
The Header class handles undos and redos and the completion of all todos. The Footer class displays the remaining number of todos, provides different selections of todos, and clears the completed todos. See the project’s code for details.