Part 1 Learning the Ropes
Back when ships needed favorable winds to get anywhere, new recruits had to learn which ropes to pull to carry out the captain’s orders and set sail. This first Part of the book is for novice sailors—people who feel more comfortable if they can begin at the beginning, while their ship is still safely docked. Just turn the page to sign on for a brief orientation session: You’ll quickly learn the commands, controls, and features of the Photoshop Elements 7 work area. For example, you’ll find out what a tool is and how to choose one from the toolbox. After you have your bearings, we can use shorthand for the steps in later Parts and just say, “Click the Crop tool,” and move on.
If you’re feeling adventurous, don’t worry about sailing ahead to another Part in the book. You can do most of the tasks in any order, and you can always come back to this Part if somehow you get turned around.
Welcome aboard, and fear not: You have nothing to lose but your old film cameras and the long wait for your prints to come back from the lab.

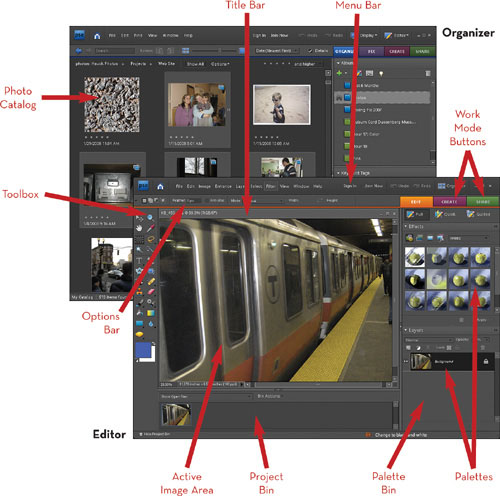
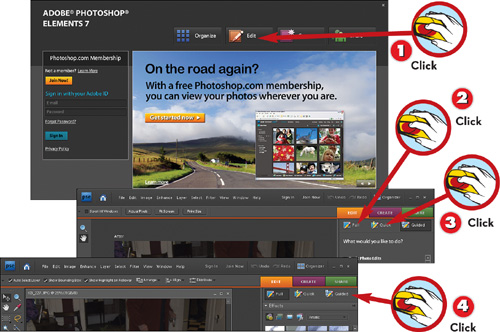
Photoshop Elements has four working modes: Organize, Edit, Create, and Share. To use any of these, you first have to start Elements. The Welcome screen then offers you a path to the mode you want to use.
![]() Double-click the Adobe Photoshop Elements 7.0 icon on the Windows Desktop to start the program.
Double-click the Adobe Photoshop Elements 7.0 icon on the Windows Desktop to start the program.
![]() Click the Organize button to search your photo collection or import new images from your scanner or camera.
Click the Organize button to search your photo collection or import new images from your scanner or camera.
![]() Click the Edit button to work on an existing photo.
Click the Edit button to work on an existing photo.
![]() Click the Create or Share button to design photo projects, order prints, or put your photos online.
Click the Create or Share button to design photo projects, order prints, or put your photos online.
NOTE
More Than a Free Sample
In addition to offering buttons to take you into each different work mode, the Welcome screen invites you to join Photoshop.com, a free Web service that enables you to store and organize your photos online without leaving Photoshop Elements. After you’ve gotten started with Photoshop.com, you can access your entire photo collection from any Web browser. Give it a try!
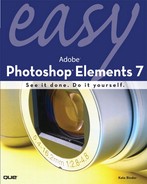
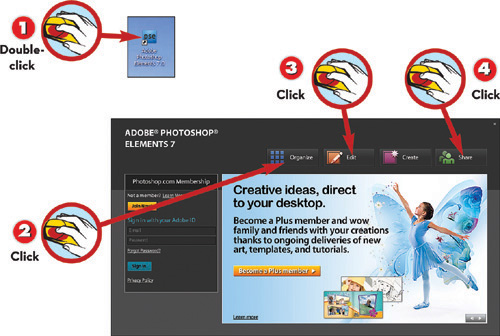
To access photos that are already in your collection, you use the Organizer, the part of Photoshop Elements that handles the program’s Organize, Create, and Share functions. To work on photos that aren’t part of your collection, you open them directly from the Editor.
![]() Choose File, Open.
Choose File, Open.
![]() Navigate to the folder where your image files are stored.
Navigate to the folder where your image files are stored.
![]() Click the file you want to open.
Click the file you want to open.
![]() Click the Open button. The picture opens in the active image area.
Click the Open button. The picture opens in the active image area.
TIP
What Can’t It Open?
Photoshop Elements 7 can open files in all the following formats: Photoshop, BMP, Camera Raw, GIF, Photo Project Format, EPS, Filmstrip, JPEG, JPEG 2000, PCX, PDF, Photoshop Raw, PICT, Pixar, PNG, Scitex CT, Targa, TIFF, and Wireless Bitmap.
NOTE
To Organize or Not to Organize?
Do you need to store your photos in Organizer? Absolutely not. If you have another way of organizing your photos that you’re happy with, by all means stick with it. That said, Organizer is well designed, with a lot of neat features, so it’s worth looking it over to see whether it suits your needs.
Before you can access any of the Organizer’s exciting features, you must get your existing photos into an Organizer catalog. This is an easy process—just tell Organizer where the image files are located, and Elements takes it from there.
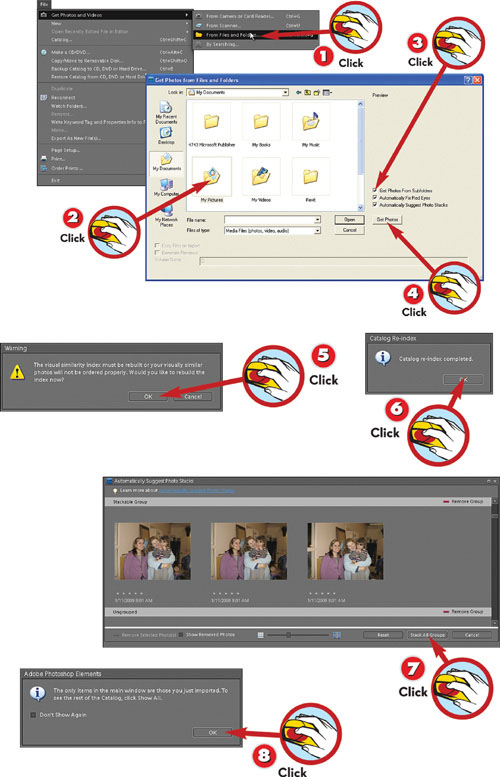
![]() In the Organizer, choose File, Get Photos and Videos, From Files and Folders; alternatively, press Ctrl+Shift+G.
In the Organizer, choose File, Get Photos and Videos, From Files and Folders; alternatively, press Ctrl+Shift+G.
![]() Navigate to the folder that contains your pictures, and click its thumbnail or filename.
Navigate to the folder that contains your pictures, and click its thumbnail or filename.
![]() Click the Get Photos from Subfolders and Automatically Suggest Photo Stacks check boxes.
Click the Get Photos from Subfolders and Automatically Suggest Photo Stacks check boxes.
![]() Click the Get Photos button.
Click the Get Photos button.
NOTE
Where Do Photos Come From?
The Organizer is also the route that photos take on their way from your digital camera into your computer. To learn more, turn to Part 2, “Getting It All Together.,”
TIP
Doing More with Organizer
You can group your photos into albums, assign keywords to them, and even have Photoshop Elements pick out all the faces they contain so that you can add IDs for people. To learn how to make the most of Organizer, turn to Part 10, “Organizing and Presenting Your Photos.,”
![]() If you see a warning dialog, click OK to index the catalog.
If you see a warning dialog, click OK to index the catalog.
![]() If your catalog needed indexing, click OK when the catalog indexing is complete.
If your catalog needed indexing, click OK when the catalog indexing is complete.
![]() Click Stack All Groups to organize similar photos into stacks.
Click Stack All Groups to organize similar photos into stacks.
![]() Click OK. The photos in the folder are added to a new catalog.
Click OK. The photos in the folder are added to a new catalog.
NOTE
I’m Organized, Now What?
Now that your photos are in Organizer, what do you do with them? Start by clicking any photo and then clicking the Fix, Create, or Share buttons at the top of the window to edit or create a project with that photo.
Not all images start out as photographs. Sometimes you just want to paint or draw. For that to happen, you need to start with a blank document rather than opening an existing file. You can choose the size and resolution of your new image file.
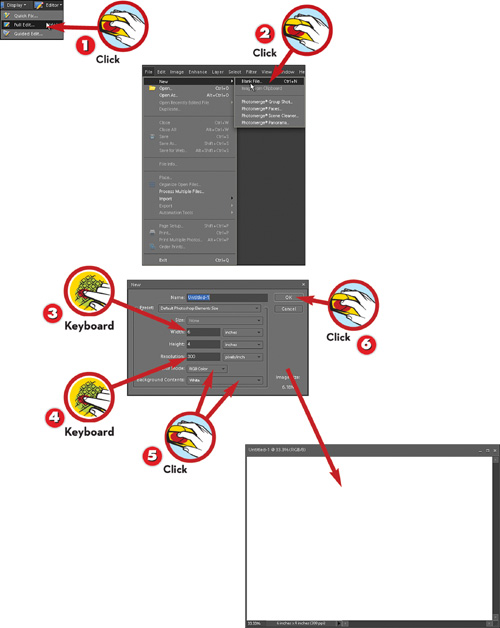
![]() If you’re in the Organizer, choose Editor, Full Edit from the menu bar to switch to Full Edit mode.
If you’re in the Organizer, choose Editor, Full Edit from the menu bar to switch to Full Edit mode.
![]() In the Editor, choose File, New, Blank File or press Ctrl+N.
In the Editor, choose File, New, Blank File or press Ctrl+N.
NOTE
The Color of the Canvas
You can choose a background color for your new image from the Background Contents pop-up menu. White gives you a blank white “page” to draw on, and Background Color makes the canvas whatever color is the current background color in the toolbox. Transparent enables you to overlay your drawing on another image.
TIP
Sizing for a Copied Image
If an image is on the Clipboard, Photoshop Elements automatically inserts the size and resolution of that image in the New dialog box. Click OK; then press Ctrl+V to paste the image into the document.
![]() Enter Width and Height values for the new file.
Enter Width and Height values for the new file.
![]() Choose a Resolution value.
Choose a Resolution value.
![]() Set the Color Mode to RGB Color and choose an option from the Background Contents menu.
Set the Color Mode to RGB Color and choose an option from the Background Contents menu.
![]() Click OK to create the new file. A blank image window opens.
Click OK to create the new file. A blank image window opens.
TIP
Resolved: Choosing a Resolution
Resolution refers to how many pixels—tiny, square image elements—per inch there are in your image. Higher resolution values enable you to print an image at larger sizes without the image becoming blocky. When you’re creating a new image file, enter 72 ppi in the Resolution field for an image that you plan to display only onscreen, or a higher value such as 300 ppi for an image you plan to print out.
When you have a picture file open for editing, you’ll usually want to make it as large as possible onscreen. This gives you the clearest overall view, regardless of the actual image size. Then, you can use the Zoom tool (or the Zoom In command in the View menu) to magnify small areas if you need to work in even finer detail.
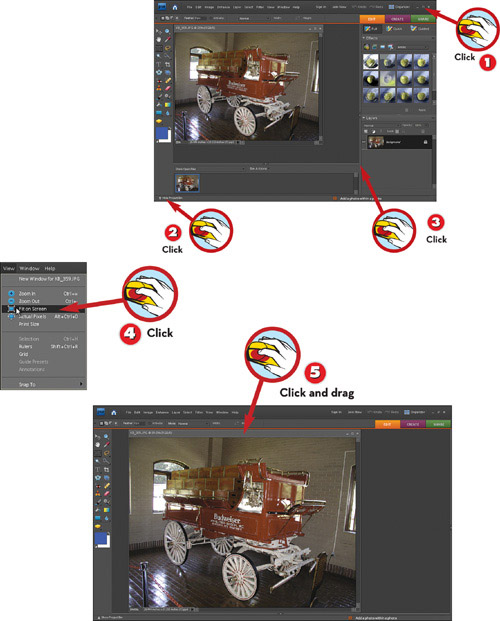
![]() In the Editor, click the program window’s Maximize button so that the Elements window fills the entire screen.
In the Editor, click the program window’s Maximize button so that the Elements window fills the entire screen.
![]() To clear the work area, click the arrow to hide the Project Bin, if it’s open.
To clear the work area, click the arrow to hide the Project Bin, if it’s open.
![]() Click the border between the image area and the Palette Bin to close it, if it’s open.
Click the border between the image area and the Palette Bin to close it, if it’s open.
TIP
Zoom Zoom
If you want to see a larger preview of a photo in Organizer, double-click its thumbnail. To switch back to the main Organizer window, click the Back button at the left end of the toolbar.

![]() From the menu bar, choose View, Fit on Screen or press Ctrl+O (zero). The active image window enlarges to fill the work area.
From the menu bar, choose View, Fit on Screen or press Ctrl+O (zero). The active image window enlarges to fill the work area.
![]() Click and drag the active image window’s title bar to move the window around.
Click and drag the active image window’s title bar to move the window around.
TIP
Open Windows
You can have more than one picture open at the same time. Choose a picture for editing by clicking its title bar to make its window active. (If you can’t see all the title bars, choose Window, Images, Cascade to see them all.)
The tools in the Editor’s toolbox help you work on portions of a picture in a variety of ways. For example, the Zoom tool enlarges your view of a picture. Different edit modes (Full Edit, Quick Edit, and Guided Edit) have different tool sets, but each mode has a toolbox.
![]() Hold the pointer over the Zoom tool without clicking. The tool’s name appears in a tool tip, along with its shortcut key.
Hold the pointer over the Zoom tool without clicking. The tool’s name appears in a tool tip, along with its shortcut key.
![]() Click the Zoom tool or press Z. The pointer changes to a magnifying glass symbol, and settings that affect the tool appear in the options bar.
Click the Zoom tool or press Z. The pointer changes to a magnifying glass symbol, and settings that affect the tool appear in the options bar.
![]() Move the pointer to the center of the area you want enlarged, and click. A magnified view appears in the active image area.
Move the pointer to the center of the area you want enlarged, and click. A magnified view appears in the active image area.
![]() Click again and again to enlarge the view in progressive steps. The magnification percentage appears in the title bar.
Click again and again to enlarge the view in progressive steps. The magnification percentage appears in the title bar.
NOTE
Zoom In
Zooming doesn’t make any changes to the picture itself, just to your view of it in Photoshop Elements so that you can work on fine details.
TIP
Shortcut
When using the Zoom tool, right-click anywhere within the active image area and choose Fit on Screen to quickly view the entire image without having to scroll.
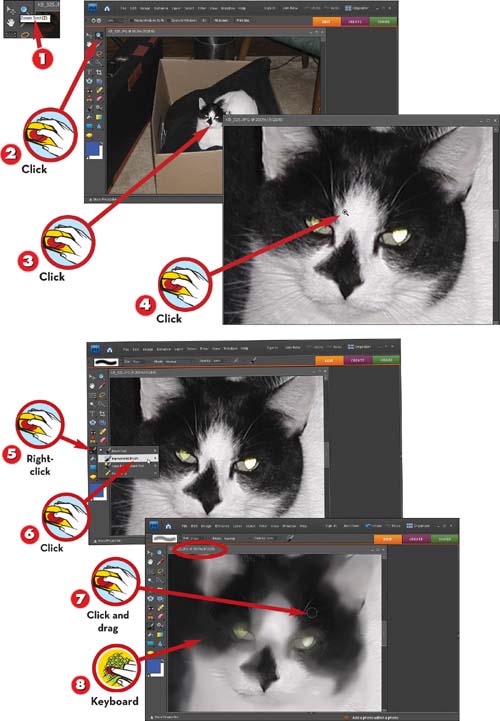
![]() Right-click the Brush tool to view all the available brush tools.
Right-click the Brush tool to view all the available brush tools.
![]() Switch to the Impressionist Brush tool. The pointer changes to the brush tip, and settings for the tool appear in the options bar.
Switch to the Impressionist Brush tool. The pointer changes to the brush tip, and settings for the tool appear in the options bar.
![]() Move the pointer to the area of the picture where you want to use the brush, and then click and drag it around, as if painting, to apply the effect.
Move the pointer to the area of the picture where you want to use the brush, and then click and drag it around, as if painting, to apply the effect.
![]() Because you made a change to the picture, press Ctrl+S to save your work.
Because you made a change to the picture, press Ctrl+S to save your work.
TIP
Best-Quality Image
After you’ve made changes to a JPEG file, for best quality you should use the File, Save As command to convert it to TIFF (.tif) format or save it as a Photoshop (.psd) file.
After you click to choose a tool from the Editor’s toolbox, you can change settings in the options bar that control its effect. Let’s try it with the Horizontal Type tool.
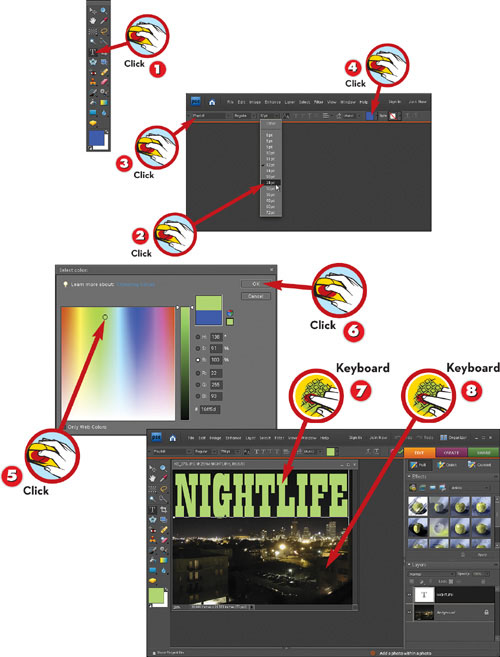
![]() In the toolbox, click the Horizontal Type tool, or press T. Settings for the tool appear in the options bar.
In the toolbox, click the Horizontal Type tool, or press T. Settings for the tool appear in the options bar.
![]() Choose a Font Style and Font Size from the pop-up menus in the options bar.
Choose a Font Style and Font Size from the pop-up menus in the options bar.
![]() Use the Font pop-up menu to choose a new font for your text, such as Playbill.
Use the Font pop-up menu to choose a new font for your text, such as Playbill.
![]() Click the Text Color swatch. The Color Picker opens.
Click the Text Color swatch. The Color Picker opens.
TIP
Click Reset
The first button on the options bar has the same icon as whatever tool you’re using. Click it to see a pop-up menu you can use to reset the options for the current tool or for all tools.
![]() In the Color Picker, click in the color space to choose a color.
In the Color Picker, click in the color space to choose a color.
![]() Click OK.
Click OK.
![]() Click in the image window and type some text, such as NIGHTLIFE.
Click in the image window and type some text, such as NIGHTLIFE.
![]() Press Ctrl+S to save your work.
Press Ctrl+S to save your work.
NOTE
Settings Retained
Settings you make in the options bar remain in effect for a particular tool until you change them again, even if you quit and then restart the program.

Contextual menus pop up at the tip of your mouse cursor when you right-click in the image window. They’re contextual because their contents change depending on which tool you’re using, so the commands are always appropriate to their context.
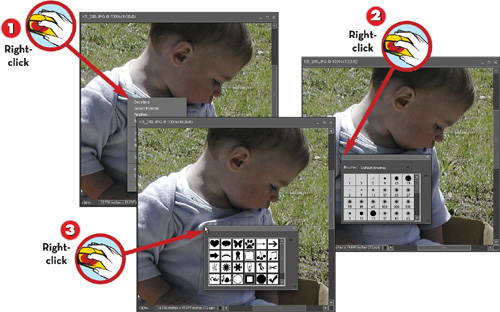
![]() With any selection tool active, right-click in the image area to see a menu of selection commands.
With any selection tool active, right-click in the image area to see a menu of selection commands.
![]() With a painting tool active, right-click in the image area to see a menu of brush shapes.
With a painting tool active, right-click in the image area to see a menu of brush shapes.
![]() With the Custom Shape tool active (its icon is shaped like a heart), right-click in the image area to see a menu of drawing shapes.
With the Custom Shape tool active (its icon is shaped like a heart), right-click in the image area to see a menu of drawing shapes.
NOTE
Keeping Things in Context
Try right-clicking with each tool to see all the contextual menus Photoshop Elements has to offer. Using them is a real time-saver.
TIP
Layer by Layer
When you’re building layered images (see Part 6, “Using Layers to Combine Photos and Artwork,” to learn more), you can quickly switch layers by right-clicking with the Move tool or a selection tool.
The Photoshop Elements Editor has three working modes. In Full Edit mode, all tools and palettes are available to you. In Quick Fix mode, the program’s interface is stripped down to just the controls you need to apply fast, automated edits. And in Guided Edit mode, Photoshop Elements provides step-by-step instructions for using its tools and commands.
![]() After starting up Photoshop Elements, click the Edit button on the Welcome screen to open the Editor.
After starting up Photoshop Elements, click the Edit button on the Welcome screen to open the Editor.
![]() When you’re in Quick Fix or Guided Edit mode, click the Full button to switch to Full Edit mode.
When you’re in Quick Fix or Guided Edit mode, click the Full button to switch to Full Edit mode.
![]() When you’re in Full Edit or Guided Edit mode, click the Quick button to switch to Quick Fix mode.
When you’re in Full Edit or Guided Edit mode, click the Quick button to switch to Quick Fix mode.
![]() When you’re in Full Edit or Quick Fix mode, click the Guided button to switch to Guided Edit mode.
When you’re in Full Edit or Quick Fix mode, click the Guided button to switch to Guided Edit mode.
TIP
Fixing It Quickly
You can still make quick fixes when you’re in Full Edit mode. You can use the Auto commands in the Enhance menu to adjust color, lighting, and contrast (or choose Enhance, Auto Smart Fix to adjust everything simultaneously).

Palettes, floating windows that contain help and commands grouped by category, are a truly handy feature. For example, the Info palette shows color values and measurements for the current image or selected area.
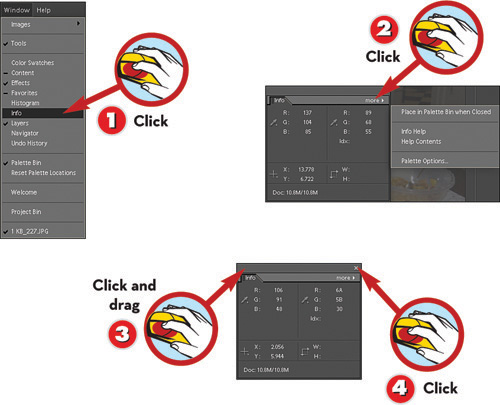
![]() In the Editor’s Full Edit mode, choose a palette name from the Window menu to open a palette. This example uses the Info palette.
In the Editor’s Full Edit mode, choose a palette name from the Window menu to open a palette. This example uses the Info palette.
![]() Click the palette’s More button (or the double-triangle button, if the palette is docked) to see a menu of commands related to the palette’s function.
Click the palette’s More button (or the double-triangle button, if the palette is docked) to see a menu of commands related to the palette’s function.
![]() Drag the palette’s title bar to move it around the screen.
Drag the palette’s title bar to move it around the screen.
![]() Click the palette’s close box to dismiss the palette.
Click the palette’s close box to dismiss the palette.
NOTE
Getting More
The options in the palette menu differ for each palette. Be sure to check them all so that you know which features you can access via each palette’s menu.
Floating palettes are great, but they take up a lot of space on your screen. The Palette Bin on the right side of your screen is a handy place to stash palettes so that they don’t obscure your view of the image you’re working on.

![]() In Full Edit mode, choose Window, Palette Bin to open the bin if it’s not already visible.
In Full Edit mode, choose Window, Palette Bin to open the bin if it’s not already visible.
![]() Click the disclosure triangle in the title bar of a palette in the Palette Bin to expand or shrink the palette.
Click the disclosure triangle in the title bar of a palette in the Palette Bin to expand or shrink the palette.
![]() Drag a palette’s title bar to remove it from the Palette Bin.
Drag a palette’s title bar to remove it from the Palette Bin.
NOTE
Viewing Palettes
To use the Palette Bin effectively, set your screen resolution to at least 1024 × 768. If you work at 640 × 480 or 800 × 600, you might run out of room to expand palettes in the bin, in which case it might be easier to choose palettes individually from the Window menu.
These steps show you where to look if you want to customize how Photoshop Elements shows things in the work area, how it saves files, and other options. As just one of many options, these steps explain how to change the unit of measure in the work area from inches to centimeters.
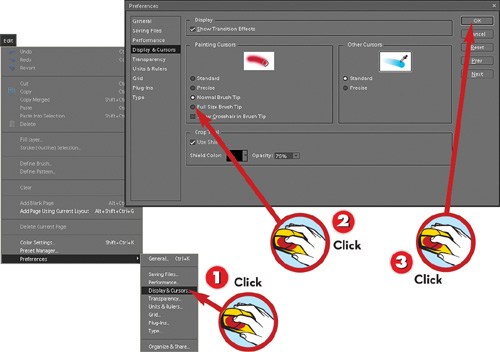
![]() From the menu bar, choose Edit, Preferences and choose one of the categories from the submenu.
From the menu bar, choose Edit, Preferences and choose one of the categories from the submenu.
![]() Set the options you want to change. For example, click Full Size Brush Tip in the Painting Cursors area to make your brush cursor extend to the full size of your current brush tip.
Set the options you want to change. For example, click Full Size Brush Tip in the Painting Cursors area to make your brush cursor extend to the full size of your current brush tip.
![]() Click OK.
Click OK.
All the work you do on a picture in Photoshop Elements will be lost unless you save the file to disk. If you are saving a file for the first time, you can simply press Ctrl+S on the keyboard. If you need to save a file to another location or under a new name, these steps show you how.
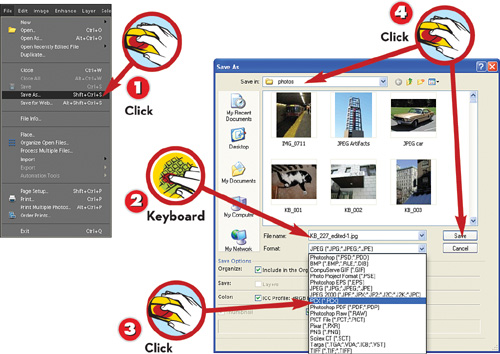
![]() To save a file to a different drive or folder or with a different name, choose File, Save As from the menu bar or press Shift+Ctrl+S.
To save a file to a different drive or folder or with a different name, choose File, Save As from the menu bar or press Shift+Ctrl+S.
![]() Type a name for the new file. (You don’t have to type the filename extension, such as .jpg.)
Type a name for the new file. (You don’t have to type the filename extension, such as .jpg.)
![]() Optionally, choose an option from the Format pop-up menu to change the file type.
Optionally, choose an option from the Format pop-up menu to change the file type.
![]() Use the Save In pop-up menu to store the file in a different folder or on a different drive. Click Save.
Use the Save In pop-up menu to store the file in a different folder or on a different drive. Click Save.
NOTE
File Types
You can keep digital snapshots in the format the camera makes, usually JPEG (.jpg) files. If you plan to make changes to them, however, it’s better to save them as Photoshop (.psd) files.