Part 9 Flattering Your Subjects
In other Parts of this book, we’ve talked about Photoshop Elements being your photo lab and your art studio—but why not also think of Photoshop Elements as a one-stop health and beauty spa? Digital retouching, if not overdone, can perk up your friends and loved ones, making them appear to shed pounds, revitalizing their complexions, and putting that old sparkle in their eyes—all without risky fad diets, treatments, or pills!
But let’s emphasize: Don’t overdo it. As a good rule of thumb, try to soften rather than erase. Leave some lines, freckles, and whatever other imperfections give your friend her unique character and winning charm. Go too far, and you’ll have a slick beauty shot of a lifeless mannequin.
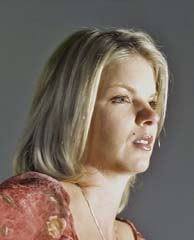
Many of the techniques described in this Part were applied to the photo on the facing page. Retouching included correcting a color cast, softening facial lines with the Blur tool, removing a mole with the Spot Healing Brush tool, adding eyelight with the Brush tool, lightening shadows and darkening blown-out highlights with the Dodge and Burn tools, and intensifying lip and eye color with the Sponge tool set to Saturate.
The transformation took about 10 minutes—and it makes a lovely person even lovelier.


This one’s sure to please—the wrinkle remover. Remember, the lines in the face convey expressiveness, so don’t paint them all out. If you do, you’ll end up with the face of a plastic fashion doll. Ask yourself: Are these crow’s feet or laugh lines?

![]() With a zoomed photo in the Editor’s Full Edit mode, switch to the Blur tool.
With a zoomed photo in the Editor’s Full Edit mode, switch to the Blur tool.
![]() In the options bar, choose Lighten from the Mode pop-up menu.
In the options bar, choose Lighten from the Mode pop-up menu.
![]() Click and drag several times over a facial line to blend it away.
Click and drag several times over a facial line to blend it away.
NOTE
Mode Options
The Blur tool can be versatile, depending on what you choose in the More Options setting. Besides Normal, Darken, and Lighten (used here), the effect can be confined to Hue, Saturation, Color, Lighter Color, Darker Color, or Luminosity.
That’s right—the Spot Healing Brush tool is a painless zit zapper. But its marvels don’t stop there. You can use it to cover up any part of a picture with a texture that Elements creates based on the surrounding pixels. Give it a try to get rid of spots on flower petals, lint on clothes, or any spot you can dab.
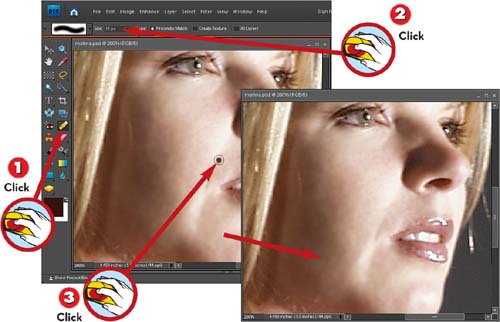
![]() With a zoomed photo in the Editor’s Full Edit mode, switch to the Spot Healing Brush tool, or press J.
With a zoomed photo in the Editor’s Full Edit mode, switch to the Spot Healing Brush tool, or press J.
![]() Choose a brush size slightly larger than the blemish you want to erase.
Choose a brush size slightly larger than the blemish you want to erase.
![]() Click once or twice on the blemish to remove it.
Click once or twice on the blemish to remove it.
NOTE
The Big Jobs
The Spot Healing Brush works best on, well, spots! Use it to retouch small, “clickable” objects surrounded by relatively clear, flat areas of color, such as moles, pimples, and dust motes. Often, you’ll want to retouch larger areas and objects that are right next to other objects you don’t want to affect, such as tattoos and smudges. For these jobs, try using the Healing Brush tool instead. Turn to “Note: Painting Problem Areas Away,” later in this Part, to learn more.
Being able to digitally recolor hair opens up all kinds of possibilities. Try on new looks and print them out to show the colorist at your hair salon. Change your Web photo because an ardent admirer has a thing for redheads. Or go blue, pink, or green without fear of social stigma.
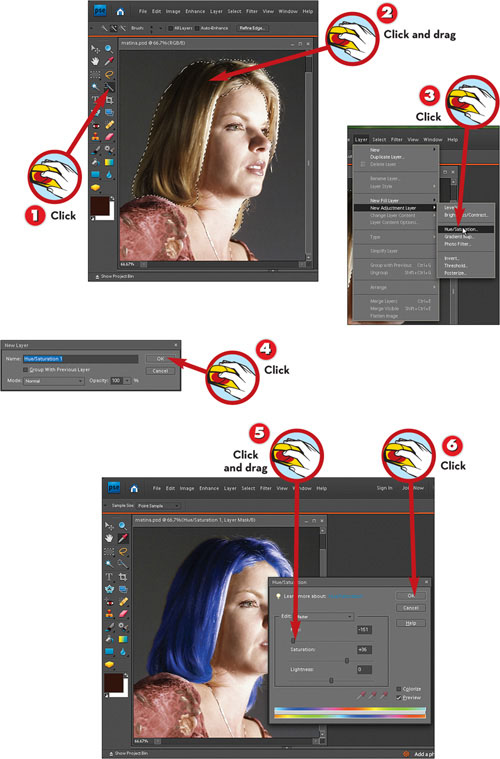
![]() Switch to the Quick Selection tool, or press A.
Switch to the Quick Selection tool, or press A.
![]() Click and drag carefully to select the hair.
Click and drag carefully to select the hair.
![]() Choose Layer, New Adjustment Layer, Hue/Saturation.
Choose Layer, New Adjustment Layer, Hue/Saturation.
NOTE
It’s a Cake, It’s a Sandwich
Part 6 discusses layers in more detail, but in these steps you’re creating a special layer to contain just the Hue/Saturation effect. This adjustment layer doesn’t contain any part of the image. By selecting the area you want to modify before creating the adjustment layer, you restrict its effects to that area.
![]() Adjust the sliders to change the hair color.
Adjust the sliders to change the hair color.
![]() Click OK.
Click OK.
TIP
Want Subtler Color?
To soften the effect of the Hue/Saturation layer on the underlying hair color, decrease the Opacity value for the new layer in the Layers palette.
Unlike the Spot Healing Brush, the Healing Brush tool requires you to paint back and forth across whatever you’re trying to remove from the image. It’s a better bet for fixing larger objects or areas that aren’t completely surrounded by the same color or texture, such as tattoos, stray strands of hair, or distracting jewelry.
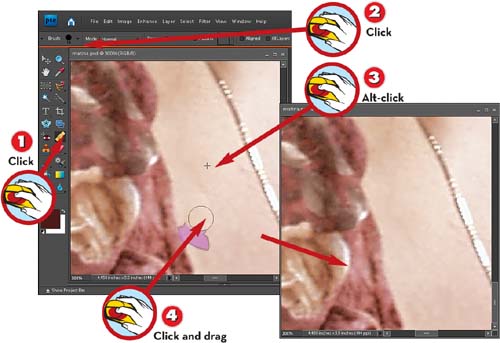
![]() With a zoomed photo in the Editor’s Full Edit mode, switch to the Healing Brush tool.
With a zoomed photo in the Editor’s Full Edit mode, switch to the Healing Brush tool.
![]() Choose a brush size somewhat smaller than the area you want to fill in (in this case a tattoo).
Choose a brush size somewhat smaller than the area you want to fill in (in this case a tattoo).
![]() Alt-click in a clear area of skin to choose a source for the new pixels.
Alt-click in a clear area of skin to choose a source for the new pixels.
![]() Click and drag across the area to paint it with texture copied from the source area.
Click and drag across the area to paint it with texture copied from the source area.
TIP
Odds Are It’ll Be Even
You can use the Healing Brush to even out skin tones. Alt-click to place your source point in the area whose color you want to reproduce; choose Color from the Mode pop-up menu on the options bar.

The Sponge tool doesn’t actually change the color of a selection, it just intensifies (saturates) or reduces (desaturates) it. It comes in handy for brightening up a wardrobe, such as neck scarves, or for toning down a too colorful background that’s competing with your subject.
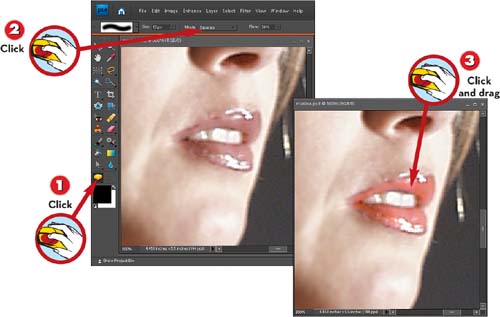
![]() With a photo in the active image area, switch to the Sponge tool, or press O.
With a photo in the active image area, switch to the Sponge tool, or press O.
![]() To enhance color, switch to Saturate from the Mode pop-up menu in the options bar.
To enhance color, switch to Saturate from the Mode pop-up menu in the options bar.
![]() Click and drag over an area to heighten its color.
Click and drag over an area to heighten its color.
TIP
Sponge Options
As do many other tools, the options bar offers a selection of brush tip sizes. The Flow setting controls the rate at which pixels become saturated or desaturated as you paint over them.
We all have an unsightly bulge or two we wouldn’t mind getting rid of, right? Well, forget diet and exercise. With the Liquify filter, you can push that saggy skin right where you’d like it to be. No muss, no fuss!
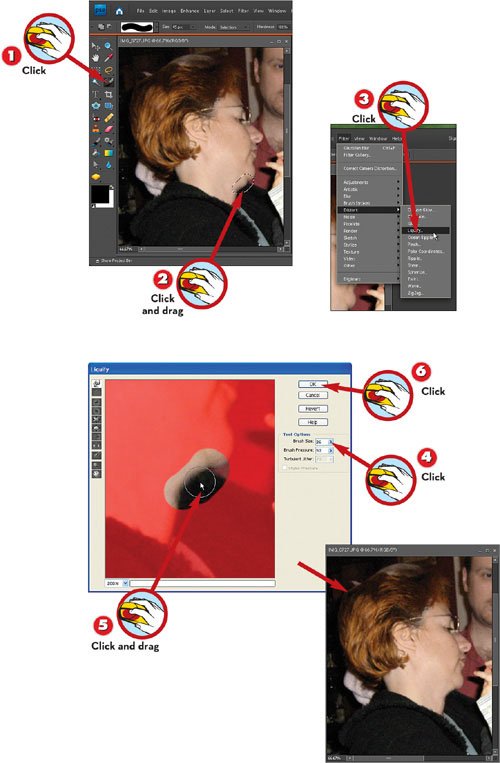
![]() Switch to the Selection Brush tool or press A.
Switch to the Selection Brush tool or press A.
![]() Paint a selection around the contour to be reduced; make the inner edge of the selection along the line you want the contour to follow.
Paint a selection around the contour to be reduced; make the inner edge of the selection along the line you want the contour to follow.
![]() Choose Filter, Distort, Liquify.
Choose Filter, Distort, Liquify.
TIP
Surgical Technique
The trick here is to choose an area that includes either side of an edge, such as a jaw or waistline, and then move it inward—toward the center of the face or body.

![]() Choose a brush one third to one half the size of the area you want to “tuck.”
Choose a brush one third to one half the size of the area you want to “tuck.”
![]() Click and drag toward the inner edge of the selection to reposition the skin.
Click and drag toward the inner edge of the selection to reposition the skin.
![]() Click OK.
Click OK.
TIP
Move by Itty Bits
Take it slow and easy when using the Liquify tool. The smaller your movements with the mouse, the more subtle the effect will be. Watch out for adjacent objects—try to drag so that they won’t be distorted.