
Part 10 Organizing and Presenting Your Photos
Knowing how to crop, clean up, and print your photos is all very well and good—unless you can’t find the images you want when you need them. That’s what Organizer is all about. It’s Photoshop Elements’ “other half,” the half that keeps track of what and where things are. You can use Organizer to catalog your photos and assign them categories and keywords, and it automatically places all your images in a timeline so that you can easily locate the photos you know you took at last year’s Fourth of July party.
Organizer has hidden depths, too: It’s also a creative hub where you can turn your photos into slide shows, themed scrapbook pages, Web photo galleries, or even personalized, one-of-a-kind hardbound books. After all, the whole point of taking wonderful photos is to be able to share them, right?
Organizer can recognize faces all by itself, so you can have it show you all the photos in your collection that include people. This makes for much faster tagging (tags are what Organizer calls categories). You can even assign photos to locations on a map, so you’ll be able to locate all the images in your collection that were taken at your favorite vacation destination or at any other specific place.


Organizer is very good at finding the photos you’re looking for, but sometimes it’s more efficient to group related images together ahead of time, so you can display them all with a single click. These collections of pictures are called albums, and you can create as many as you want.
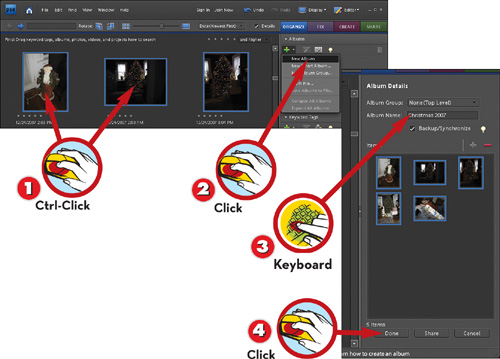
![]() In the Organizer’s Organize mode, Ctrl-click to select the photos you want to include in the new album.
In the Organizer’s Organize mode, Ctrl-click to select the photos you want to include in the new album.
![]() Click the Create New Album button at the top of the Album palette and choose New Album.
Click the Create New Album button at the top of the Album palette and choose New Album.
![]() Enter a name for the album.
Enter a name for the album.
![]() Click Done.
Click Done.
TIP
Ch-ch-ch-changes
To change the name or attributes of an album after you’ve created it, click its name in the Albums palette and then click the Edit button just to the right of the New Album button at the top of the Albums palette.
Keyword tags enable you to locate photos by assigning them categories. For example, you could apply the Family keyword tag to all the images that contain pictures of your family members. Then, viewing those photos (and excluding all the lovely but boring landscape images from your vacation) can be accomplished with a single click.
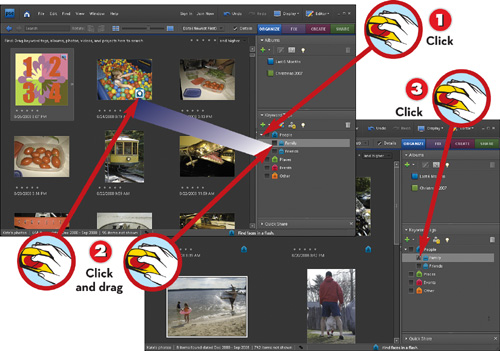
![]() Click the triangle next to a keyword tag category to reveal the tags it contains.
Click the triangle next to a keyword tag category to reveal the tags it contains.
![]() Click a keyword tag and drag it to a photo to apply it to that image.
Click a keyword tag and drag it to a photo to apply it to that image.
![]() To view all photos tagged with a keyword, check the box next to that tag in the Keyword Tags palette.
To view all photos tagged with a keyword, check the box next to that tag in the Keyword Tags palette.
TIP
Tag Sale
Tags are free—make as many as you need to satisfy your sense of order. Click the Create New Keyword Tag button at the top of the palette and choose New Keyword Tag to create your own tags. For example, you might make a tag for club activities and one for vacations.
Organizer provides several ways to locate your photos, including searching by date, by keyword tag, or by visual similarity. This task shows you a few ways to look for photos you can’t seem to locate.
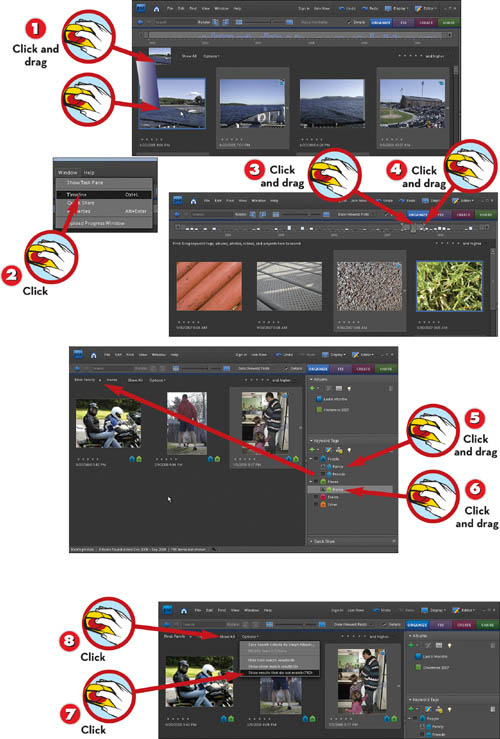
![]() Drag a picture to the Find bar at the top of the Photo Browser to display only images that are visually similar to that picture.
Drag a picture to the Find bar at the top of the Photo Browser to display only images that are visually similar to that picture.
![]() If you don’t see the timeline at the top of the Photo Browser, choose Window, Timeline.
If you don’t see the timeline at the top of the Photo Browser, choose Window, Timeline.
![]() Drag the date marker to view photos taken on the corresponding date on the timeline.
Drag the date marker to view photos taken on the corresponding date on the timeline.
![]() Drag the endpoint markers at the ends of the timeline to narrow down the range of photos shown.
Drag the endpoint markers at the ends of the timeline to narrow down the range of photos shown.
TIP
Second Date
You can also look at a Calendar view of your photos, with the photos for each day stacked up on that box of the calendar page. Choose Display, Date View at the top of the Organizer window, or press Ctrl+Alt+D.
NOTE
A Very Long Timeline
If your timeline doesn’t all show at the top of the Photo Browser, click the arrows at either end to scroll through its entire length.
![]() Drag a keyword tag to the Find bar to display all the images tagged with that keyword.
Drag a keyword tag to the Find bar to display all the images tagged with that keyword.
![]() Drag another keyword tag to the Find bar to display only images tagged with both keywords.
Drag another keyword tag to the Find bar to display only images tagged with both keywords.
![]() Choose Options, Show Results That Do Not Match to see the pictures that don’t use either of those keywords.
Choose Options, Show Results That Do Not Match to see the pictures that don’t use either of those keywords.
![]() Click Show All to display all the images in your photo catalog.
Click Show All to display all the images in your photo catalog.
TIP
More Than Meets the Eye
Show Results That Do Not Match in the Find bar’s Options pop-up menu may be a more useful command than you think. For example, if you use Photoshop Elements’ face-recognition feature to tag images that contain people (turn to the next task, “Tagging Pictures of People Automatically,” to learn how), you can easily locate all the pictures that don’t contain people, making it quicker to find landscapes, still lifes, and animal photos.
Tagging your photos is an important part of getting them organized, but it’s a lot of work. Elements can help out by finding people’s faces wherever they show up in your photos and presenting them to you in a single window so that you can tag photos of people efficiently.
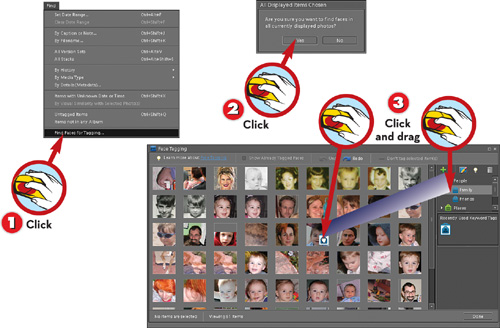
![]() Choose Find, Find Faces for Tagging.
Choose Find, Find Faces for Tagging.
![]() Click Yes.
Click Yes.
![]() After Photoshop Elements finds all the faces, drag the appropriate keyword tag to each photo to apply it to that image.
After Photoshop Elements finds all the faces, drag the appropriate keyword tag to each photo to apply it to that image.
NOTE
Your Choice
Don’t forget, you can create as many tags as you like. You might want to tag photos with people’s names, or perhaps you prefer a more streamlined approach and want to use just “Friends” and “Family.” It’s up to you!
Of course, parents and teachers aren’t supposed to play favorites, but it’s perfectly all right for photographers to do so. In Photoshop Elements, you can assign each picture a rating in stars (just like the movies) from 0 to 5. This provides yet another way to find specific photos when you want them.

![]() Click a photo in the Photo Browser.
Click a photo in the Photo Browser.
![]() Click a star below the image’s thumbnail to assign it a rating.
Click a star below the image’s thumbnail to assign it a rating.
![]() Click a star at the top of the Photo Browser to show only photos that match the specified rating.
Click a star at the top of the Photo Browser to show only photos that match the specified rating.
![]() Choose And Higher, And Lower, or Only.
Choose And Higher, And Lower, or Only.
TIP
It Thrills Me, It Thrills Me Not
Change a photo’s rating at any time by just clicking a different star below the image’s thumbnail.
We’ve seen that Photoshop Elements knows about time (as in the timeline and the Date view); amazingly, it also knows about space. Not outer space, but space as in location. Via the program’s connection to Yahoo! Maps, you can assign a map location to any photo or to a keyword tag.
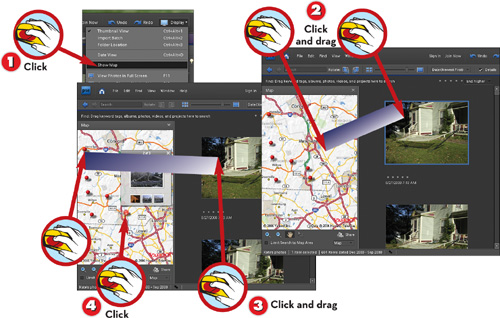
![]() Choose Display, Show Map.
Choose Display, Show Map.
![]() Click a photo and drag it onto the map to create a new location.
Click a photo and drag it onto the map to create a new location.
![]() Drag a photo to a red map pin to assign it an existing location.
Drag a photo to a red map pin to assign it an existing location.
![]() To see the photos associated with a location, switch to the Hand tool and click the red map pin at that location.
To see the photos associated with a location, switch to the Hand tool and click the red map pin at that location.
As your photo collection grows larger, you may find that you want to consolidate similar photos in the Photo Browser. The Organizer provides a simple way to do that: Stack them up. Stacking makes your Browser more useful because you can see more different photos at one time, rather than several very similar images.
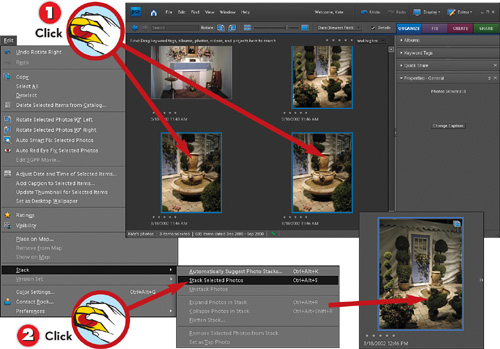
![]() Ctrl-click to select the photos you want to stack.
Ctrl-click to select the photos you want to stack.
![]() Choose Edit, Stack, Stack Selected Photos.
Choose Edit, Stack, Stack Selected Photos.
TIP
Hurry Up!
The quickest way to hide and show the photos in a stack is to click the arrow to its right in the Photo Browser.
If you find yourself performing the same search in the Organizer more than once, stop right there. It’s time to create a smart album, one that remembers search criteria rather than specific images, and updates itself every time you add photos to your catalog, or remove them. You can base a smart album on any kind of search criteria at all.
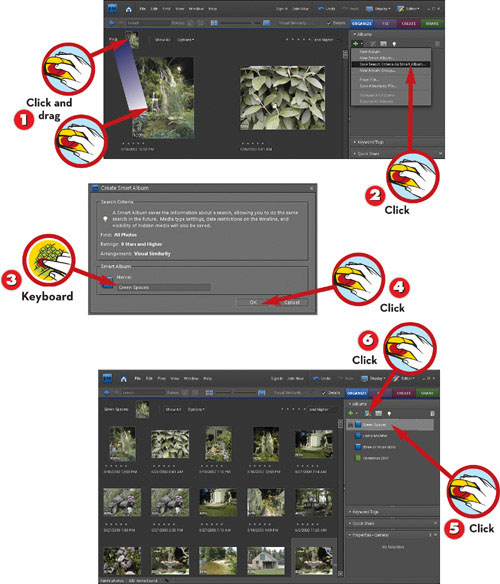
![]() Drag an image to the Find bar and enter any search criteria to search for images to include in the smart album.
Drag an image to the Find bar and enter any search criteria to search for images to include in the smart album.
![]() Click the Create New Album button at the top of the Albums palette and choose Save Search Criteria as Smart Album.
Click the Create New Album button at the top of the Albums palette and choose Save Search Criteria as Smart Album.
![]() Enter a name for the album.
Enter a name for the album.
![]() Click OK to create the new smart album.
Click OK to create the new smart album.
TIP
Changed Your Mind?
To change the search criteria associated with an existing smart album, first perform the search using the criteria you want to assign to the album, then right-click the album’s name in the Albums palette and choose Save Current Search to YourAlbumName Album.
NOTE
A Law Unto Themselves
Smart albums are so smart that they don’t allow you to change their contents unless you change their search criteria. You can’t add a photo to a smart album manually, remove one manually, or reorder the images.
![]() Click the album’s name in the Albums palette to instantly perform the same search at any time.
Click the album’s name in the Albums palette to instantly perform the same search at any time.
![]() Click the Edit Album button at the top of the Albums palette to change its name.
Click the Edit Album button at the top of the Albums palette to change its name.
TIP
Nitty Gritty
If you really want to dig down into the details to search for images in a smart album, start by choosing Find, By Details (Metadata). In the dialog, choose the search criteria for the smart album. Click the plus sign (+) to add a criterion or the minus sign (−) to remove one. You can search based on 30 different criteria, including the camera make and model, the image’s location on the map, and even whether it’s horizontally or vertically oriented.
Managing Your Catalog on Photoshop.com
Photoshop.com is Adobe’s free photo-sharing service, which ties neatly into Photoshop Elements itself. You can use Photoshop.com to share photos with friends, to add photos to your catalog from anywhere, to back up your albums, and more. First, though, you have to sign up for a free membership and upload your images.
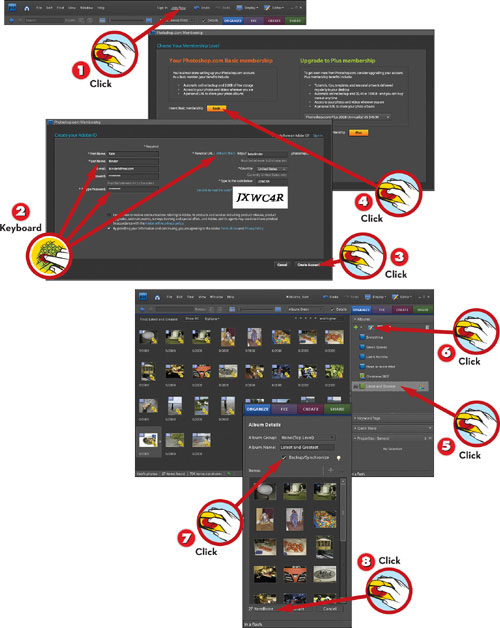
![]() At the top of the Organizer window, click Join Now to establish a Photoshop.com account.
At the top of the Organizer window, click Join Now to establish a Photoshop.com account.
![]() In the dialog, enter the requested information and choose a personal URL for your Photoshop.com subsite.
In the dialog, enter the requested information and choose a personal URL for your Photoshop.com subsite.
![]() Click Create Account.
Click Create Account.
![]() Click Basic to choose a free membership.
Click Basic to choose a free membership.
TIP
It Works Like This
To share images between your Photoshop Elements catalog and Photoshop.com, they must be part of an album (not a smart album) that’s set to be synchronized.
NOTE
The Shortest Route
You don’t have to start Photoshop Elements up completely to change your Photoshop.com preferences. You can access your Photoshop.com site and change backup and synchronization settings via the Welcome screen.
![]() To add an album to your online collection, click its name in the Albums palette.
To add an album to your online collection, click its name in the Albums palette.
![]() Click the Edit Album button.
Click the Edit Album button.
![]() Check the box marked Backup/Synchronize.
Check the box marked Backup/Synchronize.
![]() Click Done.
Click Done.
NOTE
Having Trouble?
If your Photoshop.com site doesn’t contain the photos you’ve marked for synchronization in Photoshop Elements, check the Photoshop Elements preferences (choose Edit, Preferences, Backup/Synchronization) to be sure that there’s a check in the box marked Backup/Sync Is On.
Adding Images via Photoshop.com
Don’t wait until you get home from your vacation to add your latest photos to your collection; upload them to Photoshop.com and stop worrying about lost or damaged media. Once pictures are on Photoshop.com, too, you can share them starting right away, instead of waiting. (See the next task for instructions.)
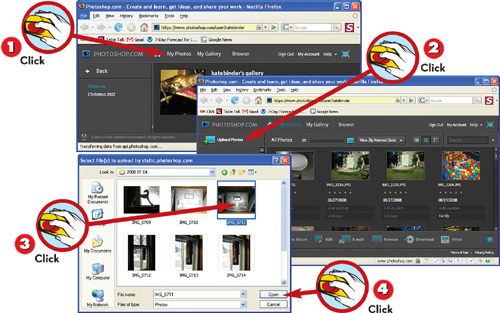
![]() Go to the custom URL you chose when you signed up and click My Photos to see your collection.
Go to the custom URL you chose when you signed up and click My Photos to see your collection.
![]() Click Upload Photos to add new images.
Click Upload Photos to add new images.
![]() Click the name of the file you want to upload.
Click the name of the file you want to upload.
![]() Click Open.
Click Open.
TIP
How Refreshing
When images are uploading, or Photoshop Elements is syncing an album, you can click the Refresh button at the right end of the Photoshop.com toolbar to update your view of the images in your catalog.
NOTE
One Chance to Get It Right
After you’ve created your account, you can’t change your personal URL, so choose wisely. You can, however, update your name, email address, and password by clicking My Account at the top of the Photoshop.com window.
You don’t have to take your computer with you to edit and share the photos in your collection. If you’re signed up with a Photoshop.com account, you can print, email, share, or even edit (using Photoshop Express) your pictures on any computer with a Web connection.
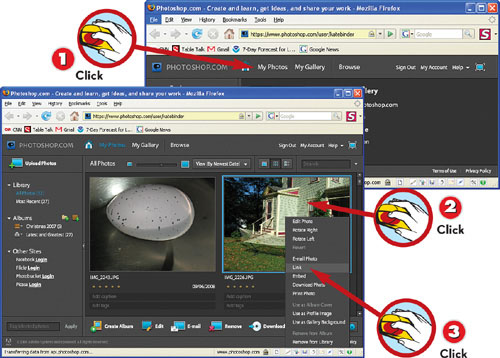
![]() Go to the custom URL you chose when you signed up and click My Photos to see your collection.
Go to the custom URL you chose when you signed up and click My Photos to see your collection.
![]() Click a photo’s thumbnail to work with it.
Click a photo’s thumbnail to work with it.
![]() Click Photo Options and choose a command from the pop-up menu.
Click Photo Options and choose a command from the pop-up menu.
NOTE
Don’t Be Afraid to Delete
When you edit or delete a photo from your library on Photoshop.com, Photoshop Elements doesn’t delete the original version of that image from its own catalog. Instead, it creates a version set that contains both the original and the modified version.
NOTE
Universal Access
Don’t forget that to have access to your images in Photoshop.com, including editing them using Photoshop Express, you’ll need to set your albums to synchronize in Photoshop Elements.