Part 2 Getting It All Together
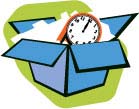
In this Part, you’ll learn how to get pictures into your computer so that you can work with them in Photoshop Elements.
After all, you can’t do much of anything with your pictures until they exist as digital files on your computer’s hard drive. Photos you take with your digital camera, DV camcorder, or camera phone are already stored as digital files, but you must transfer them from the camera’s internal storage to your hard drive.
You can also work with film shots—prints, negatives, and slides—but you must digitize them first. That’s what a scanner does. It scans a print with a beam of light, breaking the image into a collection of individual colored dots, or pixels (picture elements). All digital images are composed of pixels, and the main thing Photoshop Elements does is help you change the colors of thousands or even millions of pixels at once, in interesting and useful ways.
Whether you use the other tasks in this book to work with your shots a little or a lot, you’ll also learn how to create finished images as prints or contact sheets.
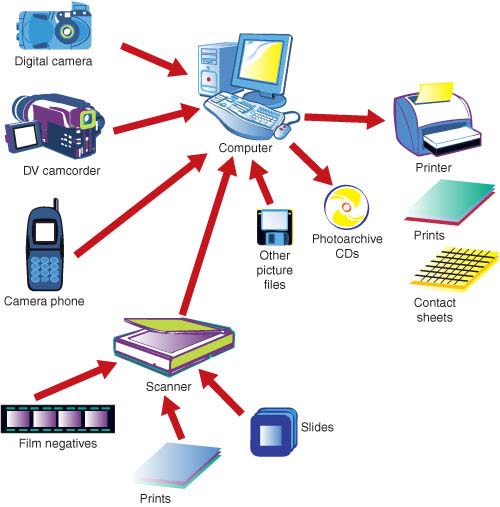
Most digital cameras and camera phones come with their own software for browsing image files and uploading them to your computer. However, you can use the steps described here to transfer files from most picture-taking devices using Photoshop Elements built-in functions.
![]() Connect the smaller end of the data cable to the camera and the larger end to the USB port of your computer.
Connect the smaller end of the data cable to the camera and the larger end to the USB port of your computer.
![]() Turn the camera’s power on.
Turn the camera’s power on.
![]() Double-click the program icon on the Windows Desktop to start Photoshop Elements.
Double-click the program icon on the Windows Desktop to start Photoshop Elements.
![]() In the Welcome screen, click Organize.
In the Welcome screen, click Organize.
TIP
Getting There from Here
If you’re already working in the Editor when you want to import photos, click the Organizer button in the menu bar to switch to Organizer.
![]() Choose File, Get Photos and Videos, From Camera or Card Reader.
Choose File, Get Photos and Videos, From Camera or Card Reader.
![]() Choose your camera from the Get Photos From pop-up menu.
Choose your camera from the Get Photos From pop-up menu.
![]() Choose a setting from the Delete Options pop-up menu.
Choose a setting from the Delete Options pop-up menu.
![]() Click Get Photos.
Click Get Photos.
TIP
What’s in a Name?
If you like to use filenames to identify photos (such as when you’re printing contact sheets), check the Rename Files To box and type a word or two in the text entry field. Elements renames the imported images with that text, plus a sequential number.
Scanning and storing your old snapshots in your computer is not only a wonderful way to reduce clutter and organize those shoeboxes full of prints—Photoshop Elements also has lots of ways to bring back faded color, touch up complexions, and even erase uninvited guests.
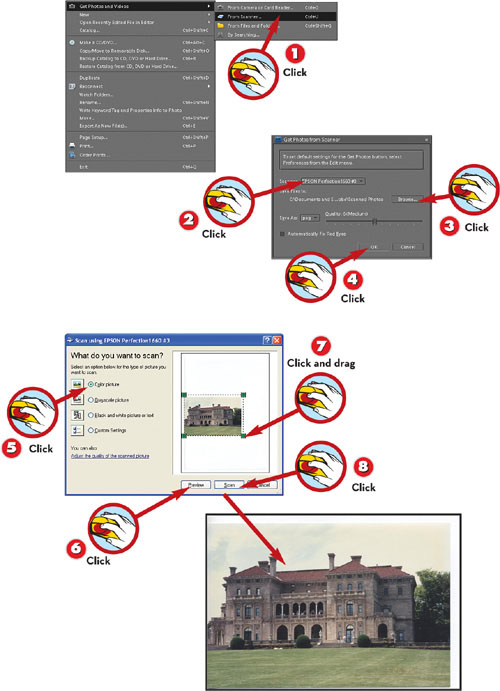
![]() In Organizer, choose File, Get Photos and Videos, From Scanner.
In Organizer, choose File, Get Photos and Videos, From Scanner.
![]() Choose your scanner from the Scanner pop-up menu.
Choose your scanner from the Scanner pop-up menu.
![]() Click Browse if you want to choose another location for the image file that Photoshop Elements will create, and set its File Type and Quality (if saving as JPEG).
Click Browse if you want to choose another location for the image file that Photoshop Elements will create, and set its File Type and Quality (if saving as JPEG).
![]() Click OK.
Click OK.
NOTE
Adding to Your Collection
These steps create a file automatically and add it to your photo collection in Organizer, which displays only the new photo. Click the Back button at the top of the Organizer window to return to viewing your entire collection.
TIP
Where’d It Go?
Photoshop Elements stores scanned images in a folder by themselves, because it doesn’t have any information on where they came from. To place a scanned image in a different folder, click the Browse button in the Get Photos from Scanner dialog and choose a different location.
![]() Choose the kind of picture you want to scan.
Choose the kind of picture you want to scan.
![]() Click Preview.
Click Preview.
![]() Click and drag a corner of the marquee that appears around the image on the scanner bed to adjust the area of the image that will actually be scanned, if needed.
Click and drag a corner of the marquee that appears around the image on the scanner bed to adjust the area of the image that will actually be scanned, if needed.
![]() Click Scan. The scanned print appears in the active image area, ready for editing.
Click Scan. The scanned print appears in the active image area, ready for editing.
TIP
Scanning Secrets
The dialog boxes that you see in step 5 might look different, depending on your scanner model. When choosing a picture type, choose grayscale to capture shading. For photos you might want to print later, click Custom Settings and set the resolution to 300 dpi.
TIP
Crop Now, Crop Later
When you’re scanning, you can adjust the marquee in the preview scan so that you scan only the part of the image you want. Don’t bring the marquee in too close; it’s better to have to crop an image again in the Editor than to risk clipping off part of the image when scanning.
Photoshop Elements can’t capture still photos from uploaded DV files (digital video files with the .mov extension), but you can follow these steps to capture one or more stills as your camcorder plays back recorded video, which achieves the same result.
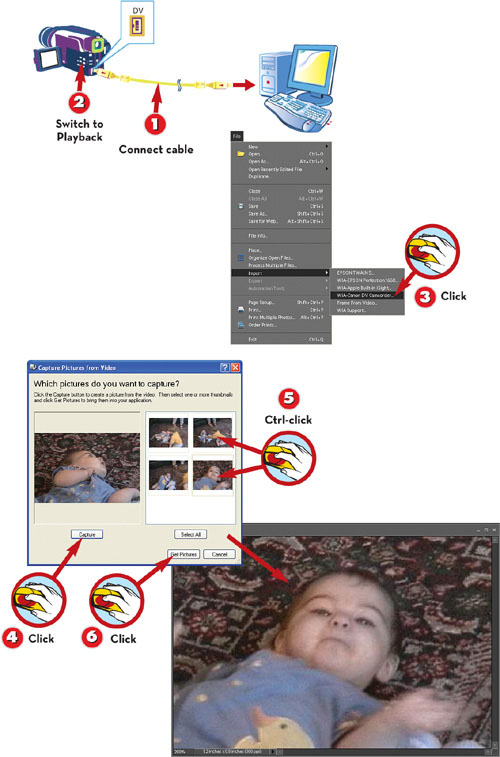
![]() Connect the smaller end of the data cable to the camcorder, and the larger end to the USB or FireWire port of your computer.
Connect the smaller end of the data cable to the camcorder, and the larger end to the USB or FireWire port of your computer.
![]() Switch the camcorder to Playback (or VCR) mode.
Switch the camcorder to Playback (or VCR) mode.
![]() In the Editor, choose File, Import, WIA <camera name>. Press Play on the camcorder to start the video playback.
In the Editor, choose File, Import, WIA <camera name>. Press Play on the camcorder to start the video playback.
NOTE
A Note on Quality
Don’t be surprised if the video still images look fuzzy; because it takes so many images to make up just a few seconds of video, these shots are taken at a rather low resolution. You don’t generally notice it on the TV screen, but it becomes apparent when you grab still images.
![]() Video plays in the preview area on the left. When you see the frame you want, click Capture. (Repeat this step to capture other frames.)
Video plays in the preview area on the left. When you see the frame you want, click Capture. (Repeat this step to capture other frames.)
![]() Press Ctrl while you click each thumbnail you want (or click Select All to get all of them).
Press Ctrl while you click each thumbnail you want (or click Select All to get all of them).
![]() Click Get Pictures. The video stills open for editing in separate windows in the work area.
Click Get Pictures. The video stills open for editing in separate windows in the work area.
TIP
Other Options
For these steps to work with your camcorder, it must be a WIA (Windows Image Acquisition) device. If you have an older DV (Digital Video) camcorder, upload the clips as video files, use a video editor such as Pinnacle Studio to save as a Windows movie (.wmv), and then choose File, Import, Frame from Video instead.
The Windows Clipboard is a reserved area of your computer’s memory designed specifically for exchanging data—such as photos, drawings, or text—among applications. For example, you can open a document in Microsoft Word, select one of the pictures in it, and copy the image into Photoshop Elements.
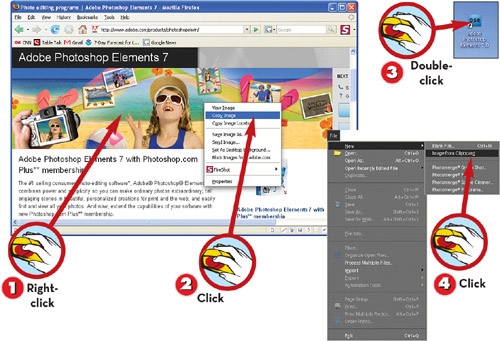
![]() In another application, such as Mozilla Firefox, right-click the image you want.
In another application, such as Mozilla Firefox, right-click the image you want.
![]() From the contextual menu, choose Copy Image or press Ctrl+C.
From the contextual menu, choose Copy Image or press Ctrl+C.
![]() Start Photoshop Elements (or switch to it if it’s already open).
Start Photoshop Elements (or switch to it if it’s already open).
![]() From the Photoshop Elements menu bar (either the Editor or Organizer), choose File, New, Image from Clipboard. A copy of the picture opens in the active image window for editing.
From the Photoshop Elements menu bar (either the Editor or Organizer), choose File, New, Image from Clipboard. A copy of the picture opens in the active image window for editing.
TIP
Native Files
The copied image comes into Photoshop Elements in whatever format it was in the original document; but if you edit it and then try to save, the program prompts you to save it as a native Photoshop (.psd) file. Saving a copy of your image as a PSD file is a good idea because it enables you to continue making edits to the file. If you save as another format, such as JPG or GIF, the changes you make are incorporated into the file, and you can no longer undo them.
Photoshop Elements reports the current print size of the image in the lower-left corner of the work area. With these few steps, you can resize the image to fit exactly on the printed page. This method uses the default paper size currently set for your printer.
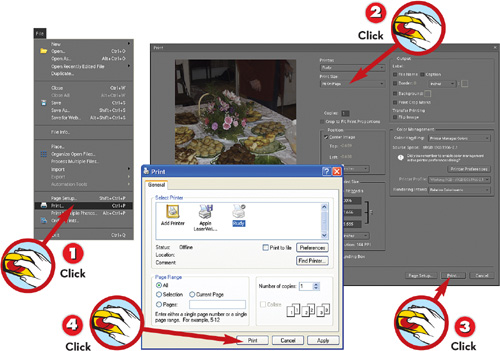
![]() From the Photoshop Elements menu bar, choose File, Print.
From the Photoshop Elements menu bar, choose File, Print.
![]() Choose Fit on Page from the Print Size pop-up menu.
Choose Fit on Page from the Print Size pop-up menu.
![]() Click Print.
Click Print.
![]() Click Print again in the Print dialog box.
Click Print again in the Print dialog box.
TIP
Switch Orientations
The default printer orientation is Portrait (long side vertical). To switch to Landscape (long side horizontal), after step 2 click the Page Setup button, choose Landscape, click OK, and then go to step 3.
A good way to add a white border to your prints, even when you’re using a borderless printer, involves resizing the image to be smaller than the canvas (paper) size by the amount of the margin you want and then centering the image on the canvas.
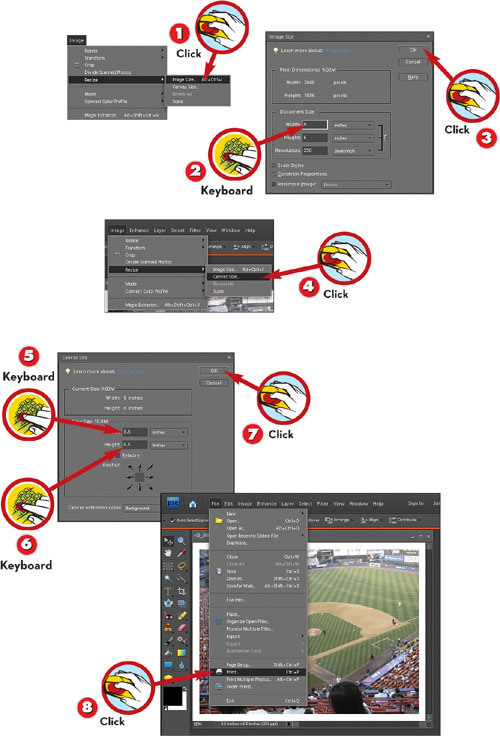
![]() With a picture open in the Editor, choose Image, Resize, Image Size.
With a picture open in the Editor, choose Image, Resize, Image Size.
![]() Type the new image width, such as 8 inches.
Type the new image width, such as 8 inches.
![]() Click OK.
Click OK.
![]() Choose Image, Resize, Canvas Size.
Choose Image, Resize, Canvas Size.
TIP
When to Resample
In step 2, check Resample Image and increase the resolution if the number in the Resolution field is less than 150. To avoid distorting the image, let the program calculate the height.
TIP
Yet Another Way
To add a white border without resizing the canvas, choose File, Print Preview. Check the Show More Options check box; then click the Border button. You can specify the width of the border in inches, millimeters, or points.
![]() In the Width box, type the width of the print paper—larger than the image width—such as 8.5 inches.
In the Width box, type the width of the print paper—larger than the image width—such as 8.5 inches.
![]() In the Height box, type the height of the paper, such as 6.5 inches.
In the Height box, type the height of the paper, such as 6.5 inches.
![]() Click OK.
Click OK.
![]() Load the printer with photo paper and choose File, Print. You’ll need to click Print in the Print dialog.
Load the printer with photo paper and choose File, Print. You’ll need to click Print in the Print dialog.
NOTE
Note the Printable Area
The border becomes part of the image file, so you shouldn’t have to adjust print margins as long as the printable area of your paper matches the canvas size. Use the steps in this task to add borders to the pictures you print with Picture Package, which uses standard print sizes.
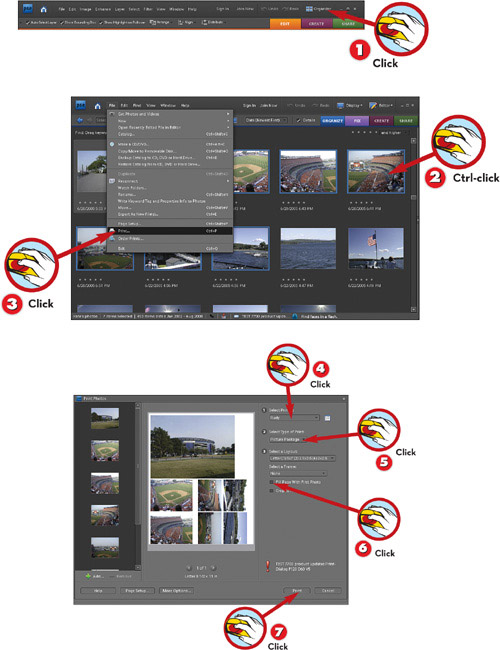
Professional photographers routinely make contact sheets by printing negatives laid directly on photosensitive paper. Photoshop Elements will generate contact sheets that automatically show thumbnails with labels of any group of files you select.

![]() If you’re working in the Editor, click the Organizer button to switch to Organizer.
If you’re working in the Editor, click the Organizer button to switch to Organizer.
![]() Select the photos you want to include in the contact sheet. Press the Ctrl key while clicking images to select multiple images simultaneously.
Select the photos you want to include in the contact sheet. Press the Ctrl key while clicking images to select multiple images simultaneously.
![]() Choose File, Print or press Ctrl+P.
Choose File, Print or press Ctrl+P.
NOTE
Get the Contact
Print and store contact sheets with each of your photo archive CDs. It’s a handy way of browsing the images when they’re no longer on your hard drive.
TIP
Preview First
Save paper by using the preview area in the Print Selected Photos dialog box to see how many photos appear on the last page of your contact sheets. If there’s just one or two, consider reducing the number of columns.
![]() Choose a printer from the Select Printer pop-up menu.
Choose a printer from the Select Printer pop-up menu.
![]() Choose Contact Sheet from the Select Type of Print pop-up menu.
Choose Contact Sheet from the Select Type of Print pop-up menu.
![]() Choose a layout, based on the size you want the photos to be on the contact sheet.
Choose a layout, based on the size you want the photos to be on the contact sheet.
![]() Load your printer with photo paper and click Print.
Load your printer with photo paper and click Print.
NOTE
Useful Captions
For more descriptive captions, rename camera files in Windows Explorer or in Organizer before you generate the contact sheets.
Professional photographers who shoot annual school photos, weddings, and social events offer their subjects picture packages, prints ranging from wallet size to 8 × 10s for framing. Photoshop Elements will print a variety of assorted sizes for you on a sheet of photo paper. It’s sure to please your “customers.”
![]() If you’re working in the Editor, click the Organizer button to switch to Organizer.
If you’re working in the Editor, click the Organizer button to switch to Organizer.
![]() Select one or more photos to include in the picture package.
Select one or more photos to include in the picture package.
![]() Choose File, Print or press Ctrl+P.
Choose File, Print or press Ctrl+P.
NOTE
Just Like a Pro
Have your subjects pick the shots they want from a contact sheet, and then make up their picture packages. Use bright-white, glossy photo paper, and feed one sheet at a time to avoid printer jams.
NOTE
Paper for Your Printer
When you shop for photo paper, you’ll see dozens of brands and types. For best quality, go with the brand that matches your printer and the thickest paper. (Paper is measured in mils; you want 9 or 10 mil.) The paper’s finish—glossy or matte—is strictly a matter of personal preference.
![]() Choose a printer from the Select Printer pop-up menu.
Choose a printer from the Select Printer pop-up menu.
![]() Choose Picture Package from the Select Type of Print pop-up menu.
Choose Picture Package from the Select Type of Print pop-up menu.
![]() Choose a layout. If you’re printing just one photo, check the box marked Fill Page with First Photo.
Choose a layout. If you’re printing just one photo, check the box marked Fill Page with First Photo.
![]() Load your printer with photo paper and click Print.
Load your printer with photo paper and click Print.
TIP
Choose Your Size
If you’re printing more than one photo, drag the photos in the preview area to change which photo is used for each size the layout includes.