Part 6 Using Layers to Combine Photos and Artwork
If you know how animated movies were made in the days before computer generation, you’re already familiar with the concept of layers. Animation artists traditionally used a process called ink-and-paint to draw cartoon characters on transparent sheets of celluloid, or cels. One new cel had to be created for each time a character moved. Cels were then placed over elaborately painted backgrounds, such as witches’ castles or the decks of pirate ships. Painting on separate layers—the animated character on the cel and the background beneath—made it possible to reuse the same background throughout a long scene.
Layers in Photoshop Elements work much the same way. The image you begin with is the Background layer. Every layer you add starts out as transparent until you change its color, change its adjustment properties, or add objects to it.
If you’ve done any of the tasks in other parts involving shapes or text, you were working with layers, whether you realized it or not. Understand that building more complex layered images isn’t for beginners. But, you should learn some of this if you want to graduate to more ambitious tasks.
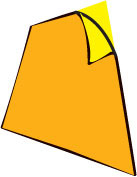
The postcard on the facing page is actually built from 10 layers, including the background. Photoshop Elements permits as many as 8,000 layers—provided you don’t run out of computer memory first!


A new layer is created for you automatically whenever you use the Shape or Type tools—also, whenever you paste (choose Edit, Paste) or choose certain other commands on the Layers menu. If you work with any other tools, you should create a new layer for painting, drawing, or adding new shapes to your photo.

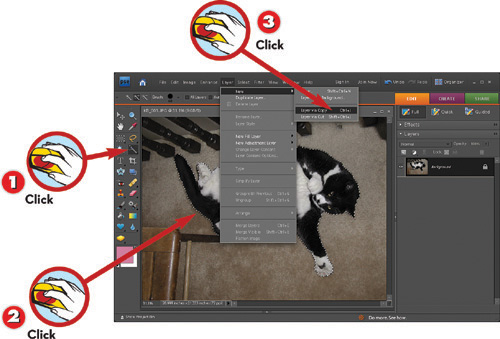
![]() With an image open in the Editor’s Full Edit mode, open the Layers palette if it’s closed (or choose Window, Layers if you don’t see it in the Palette Bin).
With an image open in the Editor’s Full Edit mode, open the Layers palette if it’s closed (or choose Window, Layers if you don’t see it in the Palette Bin).
![]() Click the Create a New Layer button (or choose Layer, New, Layer).
Click the Create a New Layer button (or choose Layer, New, Layer).
![]() Choose a tool, such as the Brush.
Choose a tool, such as the Brush.
![]() Paint on the layer.
Paint on the layer.
TIP
Simplify and Merge
Simplifying changes vector shapes and text (based on geometry) to pixels—editable as dots, not as shapes. Merging both simplifies the active (selected) layer and combines it with the layer beneath. You can’t manipulate text and shapes individually after merging. If you see a warning that the layer must be simplified before proceeding with a tool, choose Cancel and create a new layer using these steps; then switch back to the tool and paint or draw.
Selecting an object on the Background layer, making changes, and then saving your work changes the original image forever. Instead, you can use these steps to copy a selected object to a new layer, leaving the Background layer unchanged.
![]() With an image open in the Editor’s Full Edit mode, click a selection tool, such as Lasso.
With an image open in the Editor’s Full Edit mode, click a selection tool, such as Lasso.
![]() Carefully select the object to be copied to a new layer.
Carefully select the object to be copied to a new layer.
![]() Choose Layer, New, Layer via Copy or press Ctrl+J.
Choose Layer, New, Layer via Copy or press Ctrl+J.
TIP
Cutting a Selection
The command Layer, New, Layer via Cut works just the same way, but it also deletes the selection from the original layer. Especially if the original layer is the Background, use Layer via Copy instead.
TIP
Deleting or Hiding
As long as the original layer is intact, you can always hide or delete the copied layer (choose Layer, Delete Layer or drag the layer’s entry in the Layers palette to the Trash button) to cancel all its changes with a click.
When you moved text and shapes in previous tasks, you might not have realized you were actually repositioning an entire layer, including not only the selection but also the transparent pixels surrounding it. In this image, the cat and the menu board are on separate layers, and the task moves the cat’s layer lower in the image.
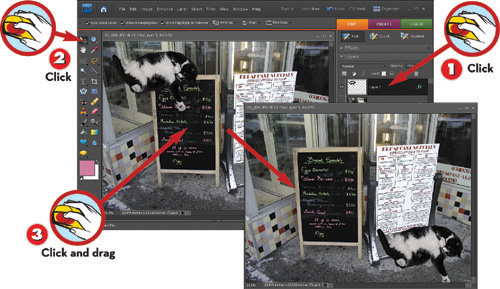
![]() In the Editor’s Full Edit mode, click the name of the layer in the Layers palette.
In the Editor’s Full Edit mode, click the name of the layer in the Layers palette.
![]() Switch to the Move tool.
Switch to the Move tool.
![]() Click and drag the layer to reposition it in relation to the image area (or nudge it with the arrow keys, or Shift-click to constrain it to 45-degree angles as you drag).
Click and drag the layer to reposition it in relation to the image area (or nudge it with the arrow keys, or Shift-click to constrain it to 45-degree angles as you drag).
NOTE
Auto Select Layer
If Auto Select Layer is checked in the Move tool’s options bar, the layer selection (the active layer) changes automatically when you click an object that resides on it. Remember that doing so actually moves the entire layer, not just the object.
The icons and buttons in the Layers palette control various layer behaviors such as locking a layer (preventing changes), creating and deleting a layer, hiding/unhiding a layer, new fill/adjustment layers, and linking layers.
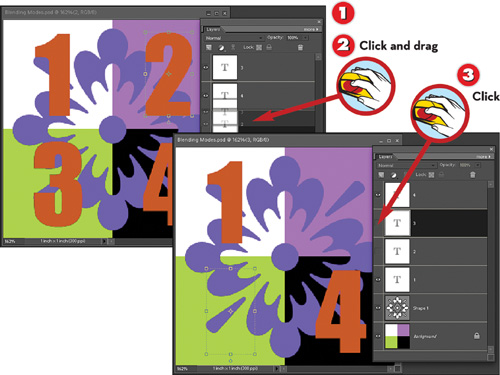
![]() In the Editor’s Full Edit mode, open or undock the Layers palette (or choose Window, Layers).
In the Editor’s Full Edit mode, open or undock the Layers palette (or choose Window, Layers).
![]() To change the order of layers, click and drag the layer name to a new position, higher or lower on the list.
To change the order of layers, click and drag the layer name to a new position, higher or lower on the list.
![]() To hide any layer, causing it not to display or print, click the Eye icon. (To restore its visibility, click the Eye icon again.)
To hide any layer, causing it not to display or print, click the Eye icon. (To restore its visibility, click the Eye icon again.)
TIP
Linking Layers
Link any layer to the active one by Ctrl-clicking to select the second layer and clicking the Link button at the top of the Layers palette. A Link icon appears next to the layer’s name. Some commands and tools affect all linked layers simultaneously.
TIP
Grouping Layers
The purpose of grouping layers is to control visibility of their objects according to a base layer. To group a layer with the one below, choose Layer, Group with Previous or press Ctrl+G.
One way to change how layers look is to adjust the opacity of a fill layer above them. Think of a semitransparent fill layer (less than 100% opacity) as a colored photographic filter—tinting and dimming the layers beneath it. (The more opaque, the less transparent, and vice versa.)
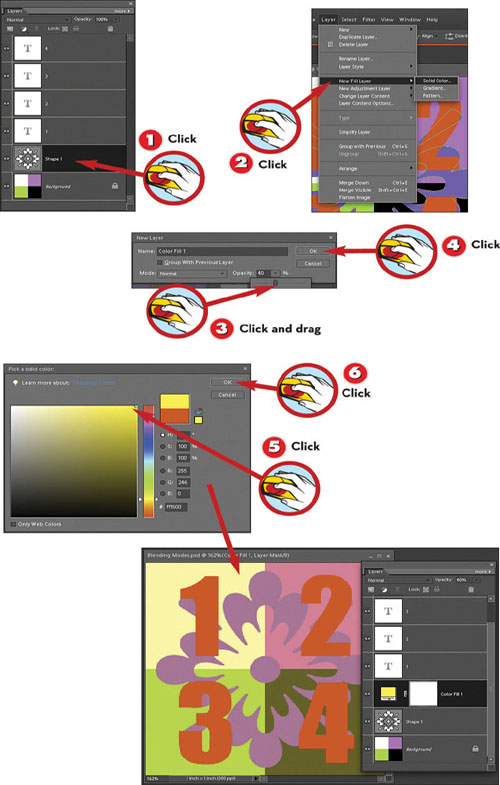
![]() In the Editor’s Full Edit mode, click the layer in the Layers palette above which the new layer will be inserted.
In the Editor’s Full Edit mode, click the layer in the Layers palette above which the new layer will be inserted.
![]() Choose Layer, New Fill Layer, Solid Color.
Choose Layer, New Fill Layer, Solid Color.
![]() Click and drag the Opacity slider to change how transparent the new layer is.
Click and drag the Opacity slider to change how transparent the new layer is.
![]() Click OK.
Click OK.
NOTE
To Bin or Not to Bin
Drag a palette out of the Palette Bin if you want to move it around on the screen. That way you can put it right next to the area of the image you’re working on, or you can close the Palette Bin to enlarge your work area.
NOTE
Well Adjusted
Continuing to add other adjustment and fill layers, each with its own properties, will have a combined effect. Remember that an adjustment layer affects only the appearance of the layers beneath it.
![]() Click OK.
Click OK.
NOTE
Gradient and Pattern Fills
Besides Solid Color, other submenu selections available in step 2 are Gradient and Pattern, which have the same options as the Gradient tool and the Pattern settings of the Paint Bucket tool.
The purpose of flipping or rotating a layer can be either to change the position of the objects on the layer or to vary the effect of a gradient or pattern layer. The Image, Rotate command has a submenu section for such operations performed on entire layers.

![]() In the Editor’s Full Edit mode, click the layer name in the Layers palette to make it the active, or current, layer.
In the Editor’s Full Edit mode, click the layer name in the Layers palette to make it the active, or current, layer.
![]() Optionally, Ctrl-click layer names in the Layers palette to select any other layers that must be included in the operation.
Optionally, Ctrl-click layer names in the Layers palette to select any other layers that must be included in the operation.
![]() Choose Image, Rotate and choose from the second group of submenu commands, such as Flip Layer Horizontal.
Choose Image, Rotate and choose from the second group of submenu commands, such as Flip Layer Horizontal.
TIP
Selections or Layers?
When part of the image within a layer—such as a shape or text—is selected, the second group of commands in the Image, Rotate submenu switches from Layer to Selection. They have the same effect, but only on the selected area.
An adjustment layer has no color of its own, but it does let you control color, brightness/contrast, and other factors on layers beneath without making changes directly to them. The adjustment layer has no effect on layers above it.
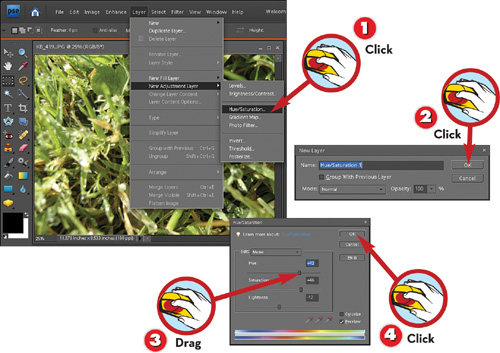
![]() In the Editor’s Full Edit mode, with a layer active, choose Layer, New Adjustment Layer and choose from the submenu commands, such as Hue/Saturation.
In the Editor’s Full Edit mode, with a layer active, choose Layer, New Adjustment Layer and choose from the submenu commands, such as Hue/Saturation.
![]() Click OK.
Click OK.
![]() Make adjustments using the options in the dialog box and see the effect on your image in the background.
Make adjustments using the options in the dialog box and see the effect on your image in the background.
![]() When you are satisfied with the effect, click OK.
When you are satisfied with the effect, click OK.
TIP
Select a Layer First
The new adjustment layer will be inserted just above the layer that’s active when you begin step 1. So, if you want to adjust the background image, select that layer first and then complete these steps.
A blending mode controls how pixel values within a layer are blended with those of the layers beneath. The default is Normal. Other modes include Dissolve, several Dodge or Burn effects, quality of light (such as Soft or Hard), and adding (Exclusion) or subtracting (Difference) pixel values or individual elements of color.
![]() In the Editor’s Full Edit mode, click a layer name in the Layers palette to make it the active layer.
In the Editor’s Full Edit mode, click a layer name in the Layers palette to make it the active layer.
![]() Choose a blending mode, such as Hard Mix.
Choose a blending mode, such as Hard Mix.
![]() Adjust the Opacity setting to control the extent of blending.
Adjust the Opacity setting to control the extent of blending.
TIP
Try ‘Em On
After making a choice from the blending mode list in step 2, press the up- or down-arrow key to step through the other modes and preview their effects on the image.
Copying layer styles is particularly convenient when you’ve made several style changes on one layer and want to apply them with a click to all objects on another layer—also if you’ve taken pains to fine-tune a style, such as having adjusted the angle of a drop shadow.
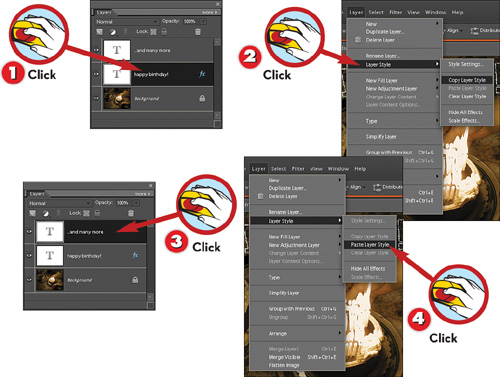
![]() In the Editor’s Full Edit mode, choose a layer that contains a layer style (such as Drop Shadow) from the Layers palette.
In the Editor’s Full Edit mode, choose a layer that contains a layer style (such as Drop Shadow) from the Layers palette.
![]() Choose Layer, Layer Style, Copy Layer Style.
Choose Layer, Layer Style, Copy Layer Style.
![]() Click the name of a layer to which the style will be applied.
Click the name of a layer to which the style will be applied.
![]() Choose Layer, Layer Style, Paste Layer Style.
Choose Layer, Layer Style, Paste Layer Style.
TIP
Fine-Tuning Styles
To fine-tune a layer style on the active layer, such as Bevel or Drop Shadow, choose Layer, Layer Style, Style Settings. Make adjustments by clicking and dragging the sliders, and then click OK.