Good, clean footage is a joy to work with, but producers and clients often ask for a look that is... well, less than clean. For instance: “Make it sweet, glowy, you know, satiny,” or maybe, “grungy and industrial,” or the ever popular, “Just film it up.”
I imagine responding with, “The colorist will take care of that. Let’s just get the content down for the online edit.” However, in real life the effects are all up to me.
I work on events with a short turnaround time: The project that starts in the afternoon often airs at eight. I am logger, editor, audio mixer, graphic designer, edit maintenance, and colorist. Most of you know what I’m talking about. FedEx waits for no one. Tight deadlines and shrinking budgets are a fact of life.
I employ several techniques to achieve a “sweet and glowy” look and other effects quickly by using composite modes, Gaussian Blur, and the Color Corrector 3-way filters.
Composite modes, sometimes called blend modes in other programs, are settings that control how the luma, chroma, and hue of one clip interact with those of the clip layered below it. When you composite a clip with these techniques, the results are immediate and interesting. Stir in some Gaussian Blur, color correct to taste, and you get wonderful visual soup.
So let’s get started with some recipes for good soup!
By using different composite modes, you achieve a variety of looks (FIGURE 8.1A–D).
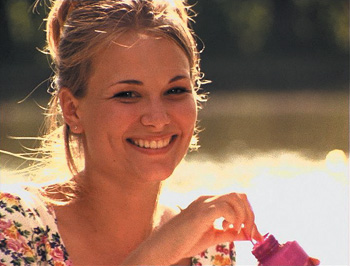


Curious about how to achieve these looks? Here is a quick overview of the basic steps:
Find a clip and edit it into a sequence.
Duplicate the footage and move it to a second layer (Shift+Option-drag).
Add a Gaussian Blur filter to the top layer with a Blur Radius of 10.
Set the Composite mode of the top layer to Soft Light.
If the footage is excessively bright or dark, add a Color Corrector 3-way filter to the top clip and adjust the mids and white levels to taste.
The first steps can be summarized as follows:
In Final Cut Pro, create a new sequence and edit a clip to the Timeline.
Position the pointer over the video portion of the Timeline clip, and press and hold Shift+Option as you drag the clip up one layer to duplicate it.
Release the mouse before you let go of Shift+Option, which leaves you with the duplicate video on top of the original (FIGURE 8.2).

Audio Profile
TOM MEEGAN
Creative director, wovenpixels.com
Visit the companion Web site to hear Tom Meegan discuss how he uses Final Cut Studio to cover some of the largest sporting events in the U.S.
You probably already know how to add a filter via the Effects menu or the Effects tab, so let’s build a favorite so a specific blur setting will be available as a keyboard shortcut.
In the Browser, click the Effects tab.
Choose Video Filters > Blur, and then drag Gaussian Blur to the Favorites bin (FIGURE 8.3). A copy is created because the master effects in the bins are locked.
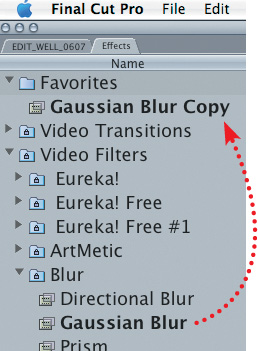
Rename your new filter Gaussian Blur 10.
Double-click the icon of Gaussian Blur 10 to load it into the Viewer. Adjust the Radius setting to 10 (FIGURE 8.4).

Choose Effects > Favorites and, voilá, your new filter is listed with a keyboard shortcut—and its default Radius setting is 10! (FIGURE 8.5.)

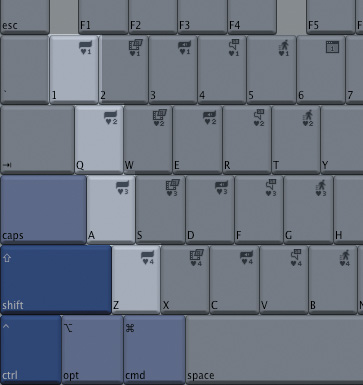
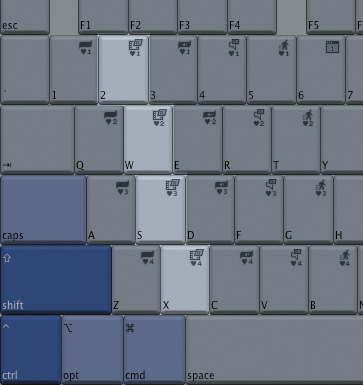
There are keyboard shortcuts for the first four favorites, mapped to Control+Shift+2, Control+Shift+W, Control+Shift+S, and Control+Shift+X. This doesn’t make much sense until you notice the location of the keys on the keyboard (FIGURE 8.6).

For a list of all keyboard shortcuts used by your favorites, see the sidebar “Picking Your Favorites.”
To test out the new filter favorite, follow these steps:
Picking Your Favorites
You can create favorites for video transitions, audio transitions, motion effects, video filter effects, and audio filter effects.
Here are the keyboard shortcuts for:
Video transition favorites

Audio transition favorites

Motion effect favorites
Video filter favorites

Audio filter favorites
That should do it; however, let’s double-check.
Double-click the video on Track 2 to load it into the Viewer window.
Click the Filters tab to make sure the Gaussian Blur is applied with a radius of 10 (see FIGURE 8.7).

Here is what the image on V2 looks like now:
OK, I know, it’s blurry, but wait!
Audio Profile
EDDIE KILGALLON
Keyboardist, Montgomery Gentry, www.montgomerygentry.com
Eddie Kilgallon is keyboardist for the top country band Montgomery Gentry. But when he’s not playing for 50,000 fans, he’s editing videos of the band on the bus. Visit the companion Web site to hear an interview with this multi-talented editor.
Creating a Keyboard Shortcut for a Composite Mode
If you find yourself needing a particular composite mode often enough, turn it into a keyboard shortcut.
Creating keyboard shortcuts for common filters can make your whole workflow flow much faster.
Choose Tools > Keyboard Layout > Customize (or press Option+H).
Click the padlock icon to allow changes.

Type soft into the search window.
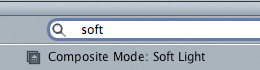
Using your mouse, click the Shift key, then the Control key on the virtual keyboard (or click the Ctrl+Shift tab).

Drag the Soft Light icon in the search window onto the Y key. (You can pick your own keyboard combo, but this is where I put it.)

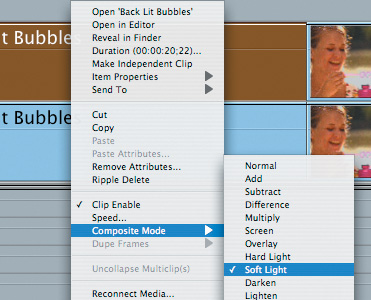
Right-click or Control-click the clip on the top layer to open a shortcut menu (FIGURE 8.8).
Choose Composite Mode > Soft Light (FIGURE 8.9).

The image is better, but it’s still a little dark. To fix that, you can add a Color Corrector 3-way filter.
Select the top clip and apply Effects > Video Filters > Color Correction > Color Corrector 3-way.
Adjust the mids and the white levels to taste to get an image like FIGURE 8.10.

There’s a lot of room for experimentation. For instance, I changed the composite mode to Overlay and reduced the Opacity of the top layer to 73%. Then, I pulled the blacks and the whites toward warmer tones and reduced the saturation (FIGURE 8.11).

Gaussian Blur 10 combined with Soft Light consistently produces pleasant results—it is a great place to start, and often is exactly what the producer means by “silky and satiny,” or the slightly more technical “deep blacks and glowing highlights.”
Playing with these techniques will yield rewards. Before long you will have recipes for a variety of moods.
Here is one more: For weddings or romantic footage, try the composite mode Screen with the Gaussian Blur cranked up to 30 and the blacks pulled down a little bit. FIGURE 8.12 shows how the footage looks after this treatment:

Let’s push this a little bit further by limiting where the composite mode is applied.
Using vignetting—limiting your effect to the center of the frame and letting the edges fall off—tends to focus the viewer’s attention and lend a feeling of nostalgia.
Here’s the CliffsNotes version of the step-by-step:
Create a custom gradient using a radial effect.
Slide your two-track composite effect up to Tracks 3 and 4.
Duplicate Track 3 and place it on Track 1.
Place your gradient on Track 2.
Nest Tracks 3 and 4.
Apply the Color Corrector 3-way filter to Track 1, and darken to taste.
Tweak everything until you and your client are happy.
FIGURE 8.13 illustrates the final effect.

This gradient will determine where the composited effect will be applied. White will be the full effect, and black will be none.
From the Generator menu (the menu with the letter A in the lower-right corner of the Viewer), choose Render > Custom Gradient.
Edit the gradient into the sequence, and then double-click the gradient from the Timeline to load it into the Viewer.
Park your playhead within the gradient and then click the Control tab in the Viewer. This allows you to make modifications in the Viewer while observing the effects in the Canvas.
Change the Shape field from Linear to Radial by clicking the Shape pop-up menu.
Change the Start fields from 360, 0 to 0, 0 (FIGURE 8.14).
Reorganize your clips so that the two clips on Tracks 1 and 2 move up to V3 and V4.
Place the gradient on V2 and extend it so it runs the same length as the two clips on V3 and V4 (FIGURE 8.15).
Copy the original clip from V3 and paste it into V1.


Now that you’ve placed your gradient, it’s time apply the composite mode:
Select Tracks 3 and 4.
Press Option+C.
Name your nest Nested Composite, or something equally memorable.
Right-click your nest and choose Composite > Travel Matte – Luma from the shortcut menu (FIGURE 8.16).

Perhaps you are underwhelmed? I was, too. The vignette isn’t working. Time to customize. I added a Color Corrector 3-way to the clip on V1 as well as the nest on V3, darkened V1, then lightened V3 (FIGURE 8.17).

Then, I played with the size, shape, and width of the gradient on Track 2 (FIGURE 8.18).

I love the digital nature of composite modes because they are either on or off. There is no initial tweaking to get started. The unexpected looks I see as I turn composite modes on and off open my mind to the possibilities, leading me to try new things with the filters and the parameters I can tweak. Here are some ideas:
Animate parameters on Radial Blur or apply a Wind Blur to the top layer.
Apply anything selected in Effects > Video Filters > Stylize to either layer.
Try the Strobe and Blink filters.
Nest, then duplicate the nest on top of itself. Add another composite mode and a different filter. Repeat.
Don’t be afraid to make the footage look terrible as you experiment. It won’t be long before you have a sense of what the different composite modes do and how they interact with different footage and filter mixtures.