
One of the great advantages of using Final Cut Studio is the tight integration between Final Cut Pro and the companion applications such as Soundtrack Pro. Through the sharing of media and XML metadata, Final Cut Studio allows a workflow that is so seamless it’s hard to tell where one application ends and another begins. However, when the intent is to archive a Final Cut Pro project or bring it to an online session, particular care must be paid to the handling of Soundtrack Pro audio file projects. I’ll offer some suggestions to properly manage these projects and avoid common pitfalls.
Unlike Final Cut Pro projects, which are independent of their media, Soundtrack Pro audio file projects are a hybrid of both media and project. The Soundtrack Pro audio file project file, or STAP for short, is actually a project bundle or package, and it contains various types of media. To some extent the user can determine how much and what kind of media the STAP contains by making choices at the point of project creation and again when the project is first saved. If you plan on moving a Final Cut Pro project containing embedded STAP files to another system, you need to send and save the STAP files in a particular way to ensure success.
To send a clip to a Soundtrack Pro audio file project, follow these steps:
In a Final Cut Pro project, select a clip in the Timeline and do one of the following:
From the File menu, choose Send To > Soundtrack Pro Audio File Project.
Right-click the audio clip in the Timeline and choose Send To > Soundtrack Pro Audio File Project from the shortcut menu (FIGURE 17.1).
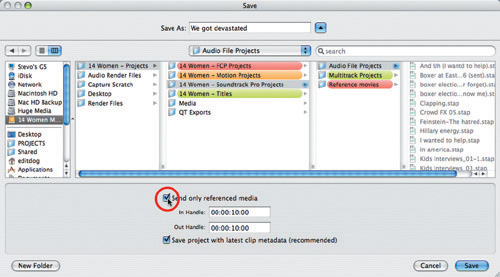
In the Save dialog, enter a unique name for the audio file project and click Save. Final Cut Pro sequences often contain multiple affiliates from the same master clip, so you must save each sent clip with a unique name if you want to be able to distinguish one audio file project from another in the reconnection process.
Select the “Send only referenced media” checkbox. This will also help with media management, especially if you send two or more affiliate clips of the same master clip (FIGURE 17.2).
Choose a destination for the audio file project. Since it contains media, a folder on your scratch disk or media drive is preferable to the system drive. It is strongly recommended that you save all audio file projects to their own folder, separate from Soundtrack Pro multi-track projects or captured media.
Click Save.

When you send a clip to Soundtrack Pro, a QuickTime reference movie of the clip and a copy of your audio file, plus any handles, is saved inside the audio file project package. This QuickTime reference movie is what allows you to view the video in Soundtrack Pro while editing the audio non-destructively.
Editor’s Note
If you only need to listen to the audio, and your video files need a lot of time to render, deselect the Include Video check boxes. This will send the audio without including the video.
To show the contents of an audio file project package, do the following:
In the Finder, navigate to the Soundtrack Pro audio file project.
Right-click the file and choose Show Package Contents from the shortcut menu (FIGURE 17.3).
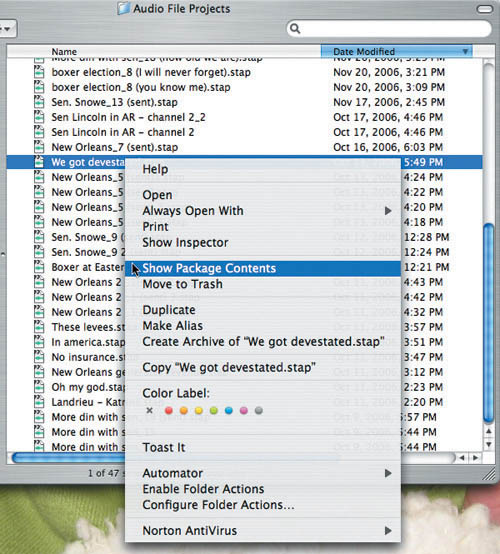
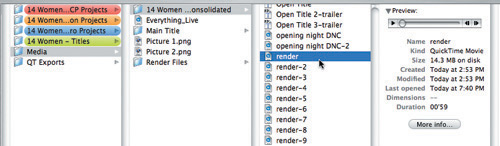
The package will open in a new Finder window. It contains the QuickTime reference movie, a file to help it integrate with a Soundtrack Pro multi-track project, and a file called render.mov (see FIGURE 17.4).

When you begin editing the file in Soundtrack Pro, the processes, effects, and EQ you add, such as normalization, noise reduction, and filters, are saved as actions in the Action tab (FIGURE 17.5).
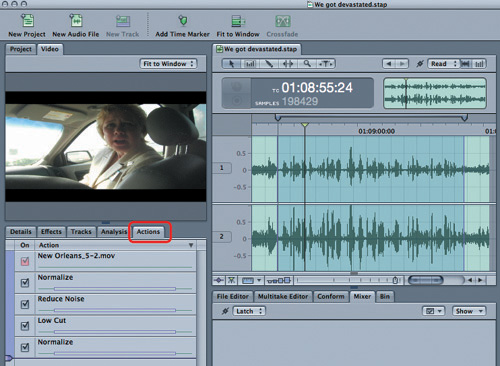
Files representing these actions are placed inside the project package, alongside the reference movie, while a Metadata file keeps track of change history so you can reorder, disable, or re-enable actions at will. When you save the audio file project, the combined result of all your actions is rendered into the render.mov file, and it is this file that the clip in the Final Cut Pro sequence references. Every time you save in Soundtrack Pro, the render.mov file is updated, and Final Cut reconnects to and plays the updated audio in the sequence (FIGURE 17.6).

When you save the project for the first time, you will be presented with a crucial choice in the Save Audio File Project Preference dialog (FIGURE 17.7).

Note
Choose Include Source Audio if you use the Media Manager to archive the Final Cut Pro project or take the project offline and recapture to an online resolution.
If you are cutting an uncompressed or native resolution project and do not plan to recapture media or move the project to another system, choose Reference Source Audio. However, if you plan to archive the project or create an offline sequence for recapture using Media Manager, you must choose to include the source audio.
Referenced vs. Included Audio
Two audio file project packages are pictured here. The first contains referenced source audio; the other contains included source audio.
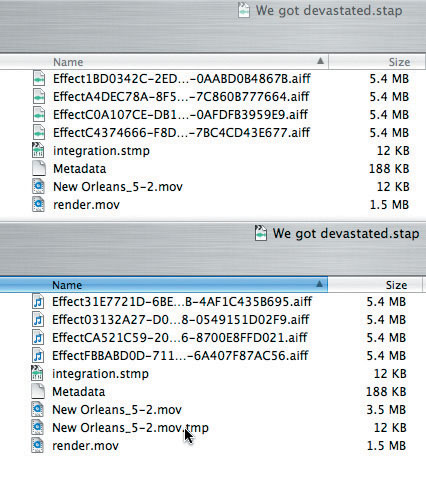
Notice that the first package contains a small 12 KB reference movie that points to the original media file in the FCP capture scratch. The second, with an included source audio package, contains a 3.5 MB self-contained movie.
So, unlike in the top project, the audio in the second package will still play if it is moved to a different system or in a case where the original FCP media is deleted or lost. The drawback is that the self-contained movie takes up more space inside the project package, which is why it is wise to send only the referenced media, plus handles, instead of the whole media file. The advantage is that the package is now a self-contained unit that can be archived or moved to another system and reconnected to a Soundtrack Pro multi-track project or FCP project at a future date.
When you use Media Manager in Final Cut Pro to create an offline sequence for recapture, only media from tape sources is taken offline. Audio from other sources, including audio file projects, remains online and connected in your Browser and sequence (FIGURE 17.8).

Of course, if you delete the low-res media or take the project to another facility, all the STAP-linked clips will go offline again, unless you bring all the audio file projects with you and they include the source audio.
To prepare a sequence containing STAP clips for an online session, do the following:
If possible, add a color label to every clip you sent to Soundtrack Pro, which will make it easier to reconnect the clips later.
Use Media Manager to create an offline version of your FCP sequence. Choose clip names from the “Base media file names on” pop-up menu (FIGURE 17.9).
In the Finder, copy the folder containing your STAP files to an external hard drive, along with the online project file created by Media Manager and any assets you cannot recapture from tape—like fonts, graphics, audio files, and nonstandard plug-ins.
Bring the drive to the online session. Copy the project file to the desktop, and the STAP folder and all other media files to the device used for capture scratch.
Proceed to the steps for reconnecting the STAP clips in the next section.

When archiving or consolidating a Final Cut Pro sequence with Media Manager, it is just as important to have saved all STAP files to a common folder with source media included. This may seem redundant, since the whole point of using Copy or Move in Media Manager is that it will consolidate all the necessary media inside a common folder. The problem is, every STAP clip in the FCP sequence references a file inside its project package called render.mov, and while FCP will increment the render.mov files it extracts from each package, it doesn’t do a good job reconnecting the STAP clips to their respective files. Even worse, the media managed render movies are all unplayable (FIGURE 17.10).
The lesson, learned from painful experience, is that Media Manager does not yet play nice with STAP media, which is why it is vital to save all STAP projects you create into a common folder.
When it comes time to open a Final Cut Pro project file created by Media Manager, whether you used the Make Offline command or the Copy or Move commands, you will likely encounter numerous errors, such as the one shown in FIGURE 17.11.

My advice is to manually reconnect any offline STAP clips once the project loads into FCP.
Warning
You may have to wait a long time for FCP to search in vain and give you the above error message for every STAP clip in your sequence, so be patient, and just click Cancel every time you are prompted.
When a consolidated FCP project loads, it will look something like FIGURE 17.12.
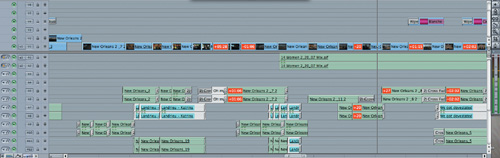
Offline projects intended for recapture will have all clips offline. If you labeled the STAP clips with a color label ahead of time, they will be easy to spot in the sea of white offline clips. If you didn’t label the STAP clips, recapture the sequence using Batch Capture first, then proceed to the next step.
To manually reconnect STAP files, follow these steps:
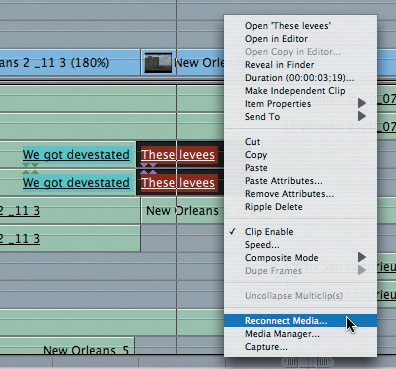
In the Timeline, right-click or Control-click an offline STAP clip and choose Reconnect Media from the shortcut menu (FIGURE 17.13).
In the Reconnect Files dialog, click Locate. The file listed in the Files to Locate pane may or may not be helpful, so make sure you can see the name of the clip that you are trying to reconnect in the Browser or Timeline (FIGURE 17.14).
Navigate to the folder containing your STAP files, select the STAP file that matches your clip name, and click Choose.
The file will be listed in the Files Located pane.
Click Connect to connect to the file.
Repeat steps 1 through 4 for every STAP clip in the sequence.

You must reconnect each STAP clip one at a time. Reconnecting multiple clips will not work, because you do not want to reconnect to the media-managed render files in the consolidated Media folder. Even though all the STAP files are in one folder, the filename FCP is looking for is not the STAP filename, it’s render.mov. Only by directing FCP to each STAP file one at a time can it reconnect to the correct render.mov file inside each project package.
If you take steps to name and save each clip you send from Final Cut Pro as a unique Soundtrack Pro audio file project inside a common folder, you will find it relatively easy to reconnect any sent clip to its STAP file.
Whether you’re taking the STAP folder to an online session or saving it as part of an archived (i.e. media-managed) project, you will find that you are able to manage the media better manually than if you let the computer do it (at least until the kinks are worked out).