
Before you start using Color for serious work, you’ll want to consider whether or not your current system is going to meet this software’s unique demands. Is your computer fast enough? Do your graphics card and computer displays need updating? And what about your hard drive storage? These are all important questions.
As you contemplate how much of an investment you want to make in your system, you need to understand what Apple means when they talk about real-time effects particular to Color. All adjustments that you make in Color update the image and the video scopes in real time (or, if you have a control surface, you can even use its controls to make adjustments during playback). However, the more rooms you enable in Color (in Color, using more “rooms” applies more effects to any given shot), the more processor intensive the shot becomes.
When making grading decisions, it’s vital to see the full-resolution image as you work, and so Color has been designed to sacrifice frame rate, when necessary, to maintain high image quality as you make adjustments and play shots and sequences back in the application. When correcting standard definition video on a fast enough system, you have to do some serious color correction to experience a reduction in frame rate. However, high definition video exposes the outer boundaries of your system’s performance much more quickly, especially once you start combining multiple effects on the same shot.
For example, I’m currently using an 8-core Mac Pro with an ATI X1900 card and a Kona LHe video capture and output card. My storage is a 10-drive array using a port-multiplied eSATA interface and enclosures. In a purely unscientific test of color correcting 1080p, 23.98 fps video encoded using the Uncompressed 10-bit 4:2:2 codec (setting Color’s Internal Pixel Format to 12-bit), my system exhibited the following performance:
16 fps, using a single primary
14 fps, using a primary and two secondaries (one vignette, one HSL qualifier)
10 fps, adding Color FX on top of it all with blur and vignette
Now, this system is not the end-all, be-all. For example, anecdotal feedback on the message boards indicates that performance could be improved by upgrading the drive storage to a striped pair of Xserve RAIDs. But it serves to illustrate the kind of high definition performance you might expect from a reasonably equipped Mac Pro system.
Before you start going nuts with Color, it’s important to consider the capabilities of your computer. Those of you who are upgrading your Final Cut Studio bundle on older machines may discover that, while perfectly adequate for many of the other applications in the Studio, your current setup lacks the horsepower to support Color’s demands for real-time effects processing.
The good news is that if you’ve been waiting for an excuse to upgrade your old Power Mac G4 Quicksilver to a shiny new Intel-based Mac Pro, this is it. Although Color will run capably on PCIe-based G5 computers with suitable graphics cards, it runs much more efficiently on Apple’s newer Intel-based Mac Pros. I’ve used Color on both a quad-core G5 and the newest 8-core Mac Pro, and although the G5 does nicely for standard definition projects, the Intel-based Mac Pro is clearly the better machine for working in high definition (as far as RAM goes, I always recommend at least 4 GB).
The model of computer you’re using is only part of the story. Like Motion, Color is a GPU-based (graphics processing unit) application. This means that all the effects you apply to your projects in Color are performed by your computer’s graphics card, rather then the CPU (central processing unit). This doesn’t mean that having a newer computer isn’t important. The latest and greatest Mac Pro tower computers have faster overall PCIe and memory bus architectures then the G5 Power Macs, all of which translates into more data being moved from hard drive to graphics card to video card, which translates into more real-time performance. Apple’s quad-core systems run Color just fine, though I think the 2.66 GHz model is the best bang for the buck. On the other hand, if you find yourself lusting over an 8-core Mac Pro, know that you’ll be using those extra cores more with Compressor and Shake than you will with Color.
Because of Color’s reliance on GPU processing, you’ll absolutely want a high-end video card. The ATI X1900 is an excellent choice, due to its high price-to-performance ratio and support for all the Internal Pixel Format bit depths that are selectable in Color. You should note that Color does not support computers with more than one graphics card, so those of you desiring three or more computer displays connected to your machines all at once will have to settle for two if you want to use Color.
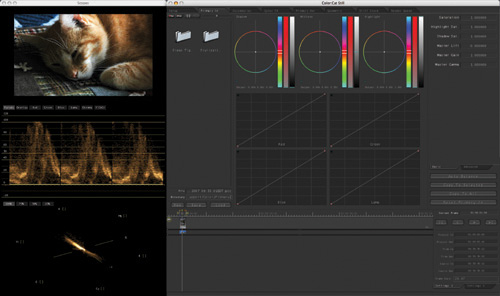
As far as displays go, Color has been designed to present its interface on two displays, with the majority of the correction controls on the main display, and an image preview and three video scopes on a second display. If necessary, you can also run Color in single-display mode, in which case a narrower scopes window with a smaller image preview and only two scopes sits to the left of a shrunken version of the interface (FIGURE 18.1). Personally, I think two 23-inch Cinema HD monitors are the best way to present the Color interface, and they will also provide plenty of room for working with the other applications in the suite when you’re not using Color.
To view your video on a broadcast monitor (and as I’ve said in many past columns, you will want to use a broadcast monitor), you’ll also need an approved PCIe-based third-party video interface. These include AJA’s Kona and Blackmagic’s DeckLink line of cards. Unfortunately, FireWire interfaces are not supported for monitoring as they are with Final Cut Pro or Motion. Although this limitation is acceptable for professional users who really ought to be monitoring using Y’PbPr, SDI, or HD-SDI, one hopes that Apple will add this functionality for the low-end crowd in future versions.
When putting together a system, there’s one other issue you need to take into consideration. Color’s real-time performance depends as much on the speed of your hard drive storage as it does on CPU and GPU performance. It doesn’t matter how fast the rest of your computer is if your storage system can’t feed it data fast enough. In general, you’ll want at least 50 MB/second performance for good standard definition performance, and 320 MB/second for optimal uncompressed high definition and 2K performance.
Editor’s Note
For comparison purposes, a single FireWire 400 drive delivers 20 to 25 MB/second of data. A single FireWire 800 drive delivers 45 to 50 MB/second of data. And a single SATA drive delivers about 75 to 90 MB/second of data. All these numbers assume the drive is less than 50 percent full.
This means that for standard definition, you may find that a striped array of three internal hard drives in your Mac Pro is perfectly sufficient. However, many high-end users typically rely on one or more Fibre Channel–based Xserve RAIDs to obtain the performance they need to work with uncompressed HD and 2K media.
Another possibility for those on a budget may be to investigate high-performance eSATA-based storage solutions. In particular, a variety of port-multiplying eSATA interface cards allow you to stripe drive arrays of 5, 10, and even 20 hard drives together in order to deliver high-speed throughput. There are many eSATA interface cards available, with varying performance and capability, and you should do your homework before going that route.
However, you should be aware that the more drives you use in a simple RAID 0 drive array, the greater risk you place on your media. All it takes is one drive failure in a RAID 0 array to lose all of the data that’s been striped across all the drives. To minimize risk, many users set up Xserve RAID and eSATA drives as RAID 5 arrays. With RAID 5, one of a group of drives is used to store redundant information such that it is possible to restore an entire RAID volume in the event any single drive goes bad, simply by replacing it and setting the array to rebuild itself. RAID 5 configurations are not typically as fast as RAID 0 configurations with the same number of hard drive mechanisms, but shops that are working on schedule-critical programs may require this kind of rapid-recovery insurance. Not all eSATA interface cards support RAID 5, so if this is something you require, you’ll want to do some homework.
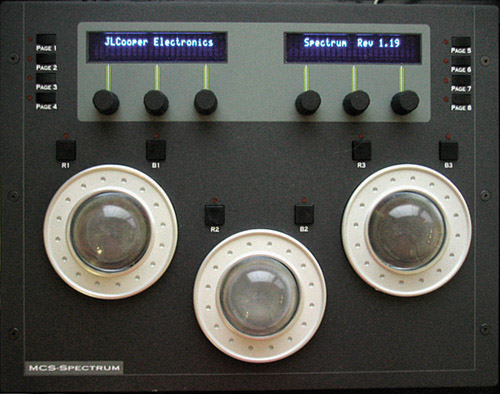
Unlike Final Cut Pro, Color supports a variety of control surfaces available from Tangent Designs and JL Cooper that are dedicated to grading. These typically consist of a set of three trackballs (sometimes called “joyballs”) that control the shadow, midtone, and highlight color balance controls. Three accompanying rings adjust the black point, midtone, and white point contrast controls, and additional knobs, buttons, and transport controls let you adjust other parameters in Color’s interface (FIGURE 18.2) using the JL Cooper MCS-Spectrum color correction control surface).
The advantage of a control surface is that you can adjust multiple aspects of the video simultaneously. Once you’ve gotten used to it, the increase in productivity is significant, not only in terms of speed, but also in terms of the sophistication with which you can make corrections for parameters that interact with one another. If your business is doing paid work for clients, you owe it to yourself and their schedules to get a control surface. On the other hand, these control surfaces can be somewhat pricey. If you’re working on your own projects, and speed is not an issue, then learn the keyboard shortcuts and modifiers that Color offers, and you can do perfectly well without a control surface.
For the best experience in Color, you need to make sure that your system is up to the task. Although this excludes the cheapest systems that Apple offers from professional use, the cost of putting together a capable system is certainly far lower than it has been in the past, and it is quite accessible to the midrange user.
When you start using Color, the first screen will ask you to add scratch disks. To set the scratch disks, follow these steps:
Click the Browse button in either the opening dialog or the Setup room.
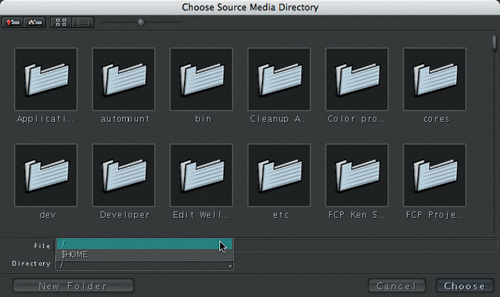
In the navigation dialog, click the “up directory path” button in the upper-left corner (drive icon with red arrow up) until you’re all the way at the top of your drive hierarchy.

Scroll down the list of folders until you find Volumes, then double-click it.
You should now see all the hard drive volumes that are currently mounted on your computer presented as individual folders (or items if you’re in list view).
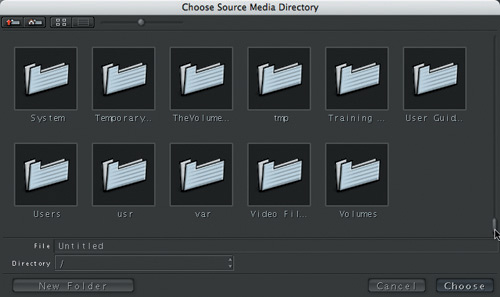
From the list of available drive volumes, double-click the one you want to use to open it.
Create a new folder to store your media, and double-click it to open it as well.

Click Choose.
Repeat this process to create a new folder to store render files.
Steps 4 through 6 are essential because, unlike other Mac OS X apps, the Choose button only sees the current directory path, which ends with the directory that’s currently open. Directories that are selected but not open are not considered to be part of the current path. This isn’t the way the file dialogs work in any of the other Final Cut Pro Studio applications. But the Volumes directory is in fact a standard bit of OS X-ness that’s good to know about, especially for applications like Color and Shake, which treat the file browsing experience in a much more Unix-like fashion.
One other note: Color really likes big screens. Apple lists the minimum resolution for Color as 1680 × 1050, and they mean it. Color will run on a smaller monitor, but trying to use it on a 1280 × 768 monitor is an exercise in futility.