Why do so many video editors dread audio work? Perhaps it’s the fear of the unknown. Maybe it’s a psychological avoidance of things that aren’t visual and fun. It’s possible someone else has always handled the dreaded “A” word. Whatever the reason, there is good news! Audio for video can be both visual and fun, thanks to Soundtrack Pro.
Working with your audio is like going to the dentist. Sometimes audio just needs a little cleaning. Sometimes there are audio cavities or decay that require more invasive procedures. Sometimes you need a whole new set of teeth or, in production terms, dialog replacement or a re-shoot. For this article we’ll focus on routine cleaning.
The first step is to assess the audio. You don’t need fancy equipment, just a set of ears and some objective thinking. How does it sound? Is it great? Is it good enough to edit picture? Is it a disaster? Bad audio is like a cold: No project is immune, regardless of the budget. I’ve been a freelance editor over 17 years and I’ve dealt with nearly every audio snafu known to production, including low levels, feedback, power line hum, college radio stations contaminating the signal, excess noise, audio drop out, squeaky dolly wheels, squeaky voices, overdrive, airport traffic, clipping, bleeding sound, and dead microphones. If it’s a big-budget project, they can easily afford a reshoot or dialogue replacement. For all other projects that are on a smaller scale, you have to work with what you’ve got.
Assuming you don’t have to re-shoot, what’s next? Audio priorities are simple and vary slightly depending on the type of project. For example, a documentary using hidden cameras and microphones will likely have more noise and need more work. However, on the upside, audiences are forgiving because they understand it’s a covert recording. Ironically, if the recording is too good the piece loses its authentic feel. Commercials and narrative projects, on the other hand, are expected to have great audio, so audiences are much less forgiving of errors. In fact, weak audio is the most obvious indicator of amateur status for student and independent films. If the audio is great, they’ll be judged on other more important criteria like story and acting.
Tip
Prioritize audio cleanup. Start with adjusting overall levels, then work your way to the effects and sweetening.
So, what are the priorities? Let’s focus on cleanup priorities for dialog.
Audibility. Can you hear the dialog? Is it low? Try raising the overall level of the audio file or track. If it is too loud, turn it down.
Clarity of spoken words. There are two types of clarity that need to be assessed and possibly cleaned up. Most of your cleanup will fall into this category.
Clarity of content. Can you hear and understand the individual words? Often a word or two is garbled, slurred, left out, out of place or otherwise indiscernible. If so, you’ll need to find a donor word—preferably a match—and perform a dialogue transplant.
Clarity of sound. Are certain words or phrases hard to hear due to levels? Is there noise, hum, distortion, clicks and pops, or something else contaminating the sound? If so, you’ll need to use filters or other processes to clean it up for better clarity.
Consistency. Are the dialog levels consistent throughout the piece? Is the background ambience, room tone, or noise consistent or does it cut in and out with each edit?
Sound enhancement in the mix. This is like icing the audio cake. Once the sound has been edited, clarified, and made consistent, you can move on to making it better using filters or equalization (EQ). Sometimes the goal is to make the sound worse, such as filtering a voice to sound like a telephone, small radio, or robot.
Stretch timing (if voiceover or narration). This is where you tweak the timing of phrases to better fit the edited picture. This can be done at any time within the audio editing process. Soundtrack Pro includes a handy waveform stretching tool.
Now that you know the priorities and where to start, let’s focus on the most common cleanup task—clarity. First, you need to know where to work.
Editing audio clips in a Soundtrack Pro Multitrack project is very similar to editing audio in Final Cut Pro. If you know how to cut, copy, paste, move, blade, keyframe levels, and delete clips in the Timeline of Final Cut Pro, you can do virtually the same things in a Soundtrack Pro Multitrack project’s Timeline. In fact, many of the keyboard shortcuts are the same.
Like Final Cut Pro, when you edit clips in the Soundtrack Pro timeline you are performing non-destructive editing of clips. You can also apply audio level and panning keyframes (automation) to tracks. A difference between the programs is that Final Cut Pro only lets you place filters on either individual clips or nested sequences, while Soundtrack Pro allows you to apply filters to the overall project, a bus (collection of tracks), an individual track, or, using the Waveform editor, a single clip.
The Waveform Editor is an extremely effective tool and offers nearly unlimited power to fix, enhance, change, improve, or manipulate audio files. If that wasn’t enough, you can choose to wield that power to destructively or non-destructively change your audio files.
Editor’s Note
Destructive editing permanently changes the audio of the source file. Non-destructive editing changes a copy of the source file, without altering the original audio file.
Cleaning up audio in the waveform editor can be a small job or a big one, depending on the project. It is often the case that independent projects, documentaries, or corporate videos can take a lot more time because you may be working with inexperienced directors, poor equipment, and non-professional talent, all of which can affect audibility, clarity and consistency.
Note
Non-professional doesn’t mean they are rude, show up late, or that they aren’t professionals in their occupation. They could be an athlete, a bride or groom, a school principal, CEO, or even Governor (assuming he or she is not an actor). The non-professional status refers to their speaking voices and lack of vocal training. Non-professional speakers tend to wreak audio clarity havoc with uhhs, umms, errs, flubs, and staggered pauses, not to mention the ability to leap many decibels in a single sentence.
Editing audio in the waveform editor is just like it sounds—you are editing the actual waveform within a clip, rather than tiling together pieces of clips that were sliced with the blade tool.
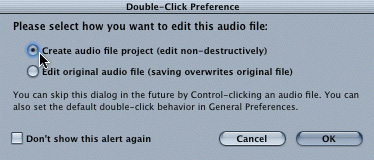
To open a clip as an audio file project, simply double-click the clip (FIGURE 15.1) and choose Create audio file project from the Preference dialog (FIGURE 15.2).

In Soundtrack Pro 2, you can edit a clip either in the File Editor in the lower pane of the multiclip window or using the Waveform editor. Whichever you use, the process is the same.
Note
When you create an audio file project from a clip in the timeline, the entire audio file is included in the project, not just the portion in the timeline. Loading the entire clip is the same as showing additional media (handles) outside of your In and Out points in Final Cut Pro.
Tip
You can quickly zoom in or out of the timeline or waveform by pressing the up and down arrows. Press Shift+Z to scale the entire waveform to fit in the window.
Once the waveform editor is open, you can edit words just as you would in a word processor (FIGURE 15.3). It’s really that easy. Select any portion of the waveform down to the smallest space and cut, copy, paste, silence, or delete. Keep in mind that deleting a selection in the waveform editor works like a ripple delete in Final Cut Pro—it not only removes the selection but also moves over everything to the right of the deletion. This is great for removing gaps, uhhs, and excess words in voiceover and narration audio, but is not recommended if you are working with synced dialogue because, since the picture isn’t affected by the edit, your audio and video will move out of sync.

To delete a gap, word, or phrase in the waveform editor:
Click-drag the pointer to make a selection (FIGURE 15.4)
Press Delete (FIGURE 15.5).


Replacing a word with a different take is another simple and common task.
Locate the “good” take that you want to use. This could be in a different audio file or audio file project.
Drag a selection around the words you’d like to copy, but don’t actually copy.
Choose Edit > Adjust Selection to Zero Crossing > Inward, or press Shift+I (FIGURE 15.6).
This tightens the selection In and Out points at the sample level so they start and end at the zero crossing.
Adjust Selections To the Zero Crossings to Avoid Pops
Before you copy, it’s important to adjust your selection to the zero crossing. The zero crossing is the dark horizontal line in the middle of the waveform, which represents the point where the audio has absolutely no volume (FIGURE 15.7).
This audio secret is well known among audio engineers and dialog editors, but less commonly known among video editors. Have you ever sliced up audio with the Razor Blade or Add Edit functions in Final Cut Pro and heard the cut when you played it back? There’s a little pop sound because you aren’t cutting with precision. It’s like doing knee surgery with a machete. You cut the knee all right, but your precision will be questionable and the whole procedure far too messy.
Editing audio waveforms at the zero crossing is cutting at the sample level at the exact point where the waveform crosses the center (zero).
Choose Edit > Copy or press Cmd+C.
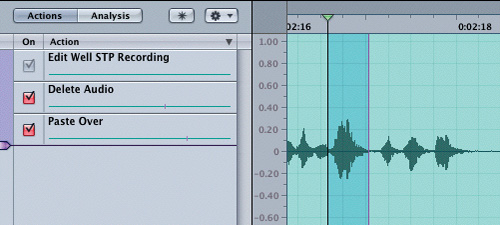
On the original audio file project, select the word or words that you wish to replace. This technique is actually called Paste Over in Soundtrack Pro (FIGURE 15.8).
Press Command+I to adjust the selection to the zero crossing points.
Choose Edit > Paste or press Command+V.


Voila! Just like using a word processor (FIGURE 15.9).
Once the content of the dialog, voiceover, or narration has been cleaned up for clarity of content, you can move on to tweaking the levels.
Tip
Tweak levels of individual words in the waveform editor to make the file more consistent before mixing. Automating levels in the mixing process is great for overall levels, but it’s difficult to move levels up and down for specific words or partial words. If you fine-tune levels first in the waveform editor, then you can focus on the overall sound during the mix.
As I mentioned earlier, working with non-professional talent often leads to fluctuating volume levels within a sentence, or sometimes within a word. Professionals may fluctuate their voice levels for inflection as part of a performance. The non-professional does it because of nerves, lack of experience, or poor breath control.
Note
It is common for non-professional talent to take a big breath and start talking very loudly, then gradually fall quieter until they run out of air and take another breath. Then they are loud again. Fortunately, it’s easy to fix in the waveform editor; tedious, but easy.
You can use the waveform editor to raise or lower the amplitude (loudness) of any selection, thus allowing you to tweak the most difficult dialogue.
In the waveform editor, select a word or phrase that is much louder, or quieter, than the rest of the sentence (FIGURE 15.10).
Adjust the selection to the zero crossing.
Control-click the scale on the left edge of the waveform editor and choose Decibels from the pop-up menu (FIGURE 15.11).
Now you can see precisely how loud the waveform really is and adjust accordingly. Not only that, you can see the difference in decibels between words (FIGURE 15.12).
Choose Process > Adjust Amplitude, or press Shift+Command+L.
The Adjust Amplitude control dialog opens.
Type the number of decibels you’d like to raise or lower the selection. In this case I tried -6 to lower the amplitude by 6 dB (FIGURE 15.13).
The entire audio selection raises or lowers its volume relatively by the amount you specified in the dialog; in this case, -6 dB. (FIGURE 15.14)

Figure 15.14. Compare the audio here (after the level adjustment) to the audio in Figure 15.12. This audio has dropped in level, making it blend more smoothly with the rest of the clip.


Tip
Once you have adjusted the levels of individual words for consistency, you can normalize the entire waveform. This technique is not recommended for dialogue, but works well for voiceover or narration.
That’s it. Now you have your own bag of tricks that you can use as a video editor to clean up audio in Soundtrack Pro’s waveform editor. Keep in mind that you can send an audio clip from the Final Cut Pro Browse or Timeline to the waveform editor as well. Hopefully this will take some of the guesswork out of your audio workflow, and arm you with a few powerful tools to make the audio cleanup process less painful.
Repair Audio with Soundtrack Pro 2
Do you have an audio clip that needs some help? Please visit the companion Web site to learn four techniques you can use to:
Improve low audio levels
Replace umms and ahhs with ambient noise
Remove power line hum
Reduce background noise
Audio Profile
JAMES WALSH
Owner, JPI Creative Group, www.jpicreativegroup.com
Jim Walsh has been an editor for over 24 years, starting long before computer-based systems were invented. In this conversation, available on the companion Web site, he discusses the evolution of this industry and shares tips for other editors.