
You can place Excel data in other programs. In Word, for example, you can use Excel worksheet data to present quarterly reports or other financial documents. In PowerPoint, you can use Excel worksheet data to illustrate your presentations.
You can add Excel worksheet data to Word or PowerPoint by using the Copy and Paste commands. The Copy command copies the Excel data. The Paste command places the copy in another document. When you copy and paste, if you make changes to the original Excel document, you must go into the Word or PowerPoint document and update it as well.
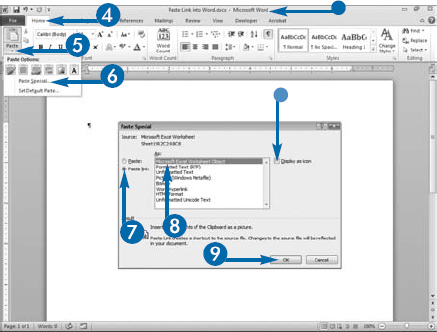
You can also place Excel data in Word or PowerPoint by using a paste link. When you use a paste link, if you alter Excel data from Word or PowerPoint, Office automatically updates the Excel source document. The opposite is also true. When you alter paste-linked data in Excel, Office automatically updates the linked Word or PowerPoint document. Paste linking enables you to keep your documents in sync because you do not have to worry about coordinating the changes in one document with changes in the other document. To paste link your documents, use the Paste Special command. You have two options when paste linking data: paste link as a picture or as an icon. Choosing picture displays a picture of your worksheet. Choosing icon displays an icon.
To edit a paste-linked Excel worksheet in Word or PowerPoint, double-click the worksheet picture or icon. When you do, Microsoft Word or PowerPoint automatically opens the document in Excel and makes all the Excel commands available so you can edit the document.
Paste Link into Word


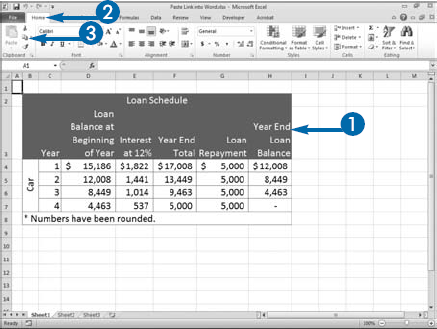
Switch to the Word or PowerPoint document.


The Paste Special dialog box appears.

Click the Display as icon option if you want to display your document as an icon (


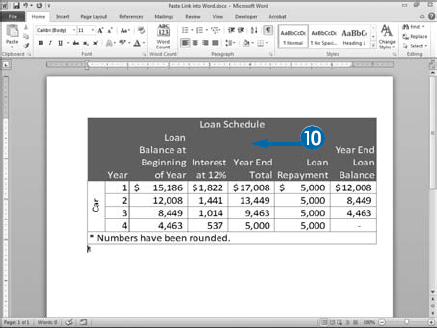
A picture of the worksheet appears in Word.
If you chose Display as Icon, the icon appears.

Your worksheet opens in Excel and you can make any necessary edits.
When you have completed your edits, save and close your Excel document and return to your Word document.
Extra
If you paste linked your worksheet as a picture and you want to display it as an icon instead, or vice versa, right-click the icon or picture. A menu appears. Click Linked Worksheet Object and then click Convert. The Convert dialog box appears. Select Display as icon (
You can paste link a Word document into Excel. You select the data in Word you want to paste link, click the Home tab, and then click the Copy button. You then move to Excel and click the Home tab, click the down arrow under Paste, and then click Paste Special. The Paste Special dialog box appears. Click Paste Link, click Microsoft Office Word Document Object, and then click OK. Your Word document appears in Excel, and you can double-click your Word document to edit it.
As you present a PowerPoint presentation or change a Word document, you can edit Excel worksheets without leaving PowerPoint or Word. This means you can demonstrate different business scenarios as you give your PowerPoint presentation or do sophisticated mathematical calculations while in Word. To use this feature, you must embed your Excel worksheet into your PowerPoint or Word file.
When you embed an Excel worksheet, the embedded Excel worksheet becomes part of the PowerPoint or Word document and is accessible only through PowerPoint or Word. There is no link between the embedded document and the original document and, in that way, embedding differs from paste linking. When you make changes to an embedded Excel document, the changes only affect the PowerPoint or Word document. When you make changes to a paste linked Excel document, the changes affect both the original Excel document and the Word or PowerPoint document. See the previous section, "Paste Link into Word," for more information on paste linking.
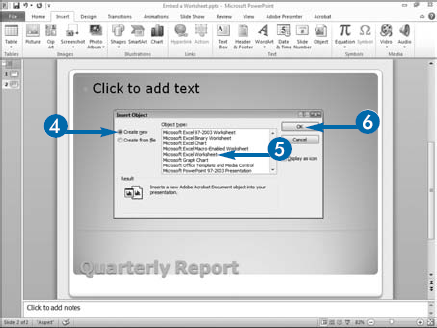
You can embed an existing Excel file or generate a new file entirely within PowerPoint or Word. To embed an Excel file, use the Insert Object dialog box. You can choose to have embedded worksheets display as a picture or as an icon. As with paste-linked worksheets, if you choose Display as Icon, Excel gives you several icons from which to choose. You just click the Change Icon button and then select an icon.
If you choose to embed an existing file, you can use the Insert Object dialog box to browse for the file.
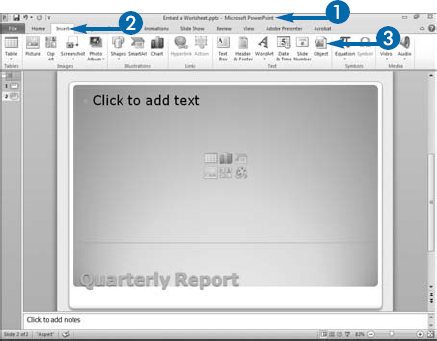
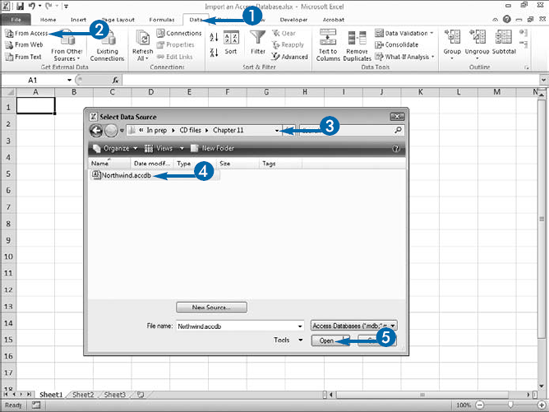
Embed a Worksheet
Note: This example uses PowerPoint. You can follow similar steps to embed your document in Word.
The Insert Object dialog box appears.
Alternatively, click Create from file to open an existing workbook.
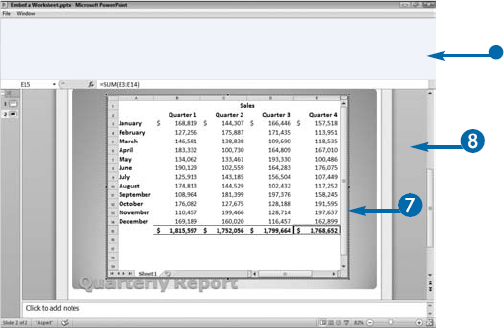
All the Microsoft Excel commands are available to you.
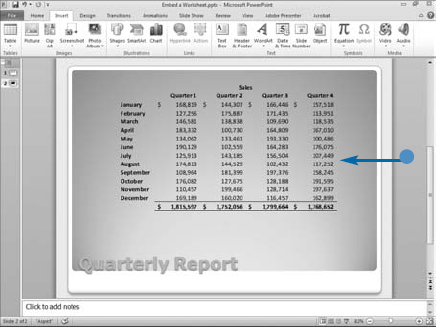
Your completed worksheet appears in your PowerPoint presentation.
You are probably familiar with the many benefits of hyperlinks on Web pages. When you click a link, you jump to a new Web page with more links, creating an enormous and seamless web of information. Like most Office applications, Excel also lets you create links. These links can take users to a place in the same workbook, to a document created by another Office application, or even to a Web page. For example, creating a hyperlink to a Word document provides an alternative to annotating worksheets by using comments and text boxes. Unlike comments, a linked Word document can be of any length and complexity. Unlike text boxes, hyperlinks do not obstruct worksheets or distract readers.
Hyperlinking a document is different from paste linking. Instead of pulling data created by another application into Excel, a hyperlink jumps you from a worksheet to a related document.
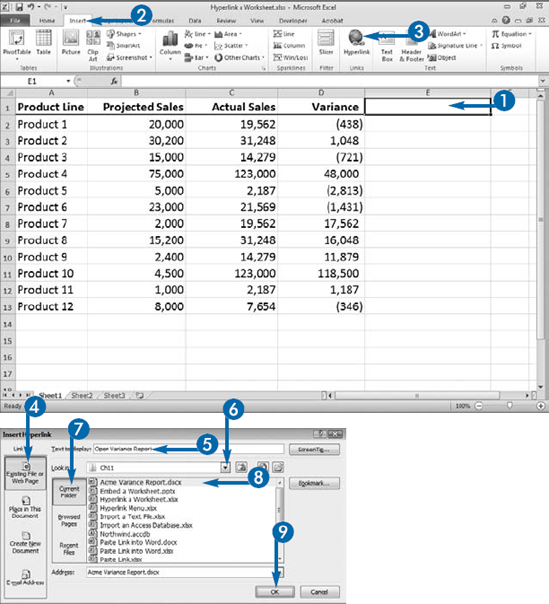
To create a hyperlink, use the Insert Hyperlink dialog box. In the Text to display field, type the text you want to appear in the hyperlinked cell. The ScreenTip button opens the Set Hyperlink ScreenTip dialog box. Use this dialog box to enter the text that appears as users move the mouse pointer over the hyperlink. By default, the address of the linked-to file appears. In the Address field, type the filename of the file to which you want to link or the Web address of the Web page to which you want to link. The Edit Hyperlink dialog box has buttons to help you find the file or Web page you want. Click Current Folder to search the current folder, click Browsed Pages to review files you have browsed, and click Recent Files to review files you have recently opened.
Hyperlink a Worksheet
The Insert Hyperlink dialog box appears.
You can click the ScreenTip button to enter the text that appears when you hover your mouse pointer over the hyperlink.
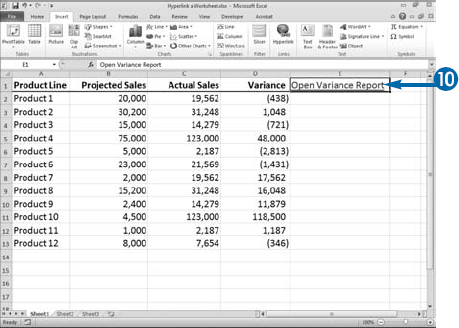
The linked-to document appears.

Office returns you to Excel.
To remove the hyperlink, right-click the linked worksheet cell and then click Remove Hyperlink.

Once you place data in Excel, you have complete access to Excel's data analysis and presentation tools, including functions, PivotTables, and charts. Excel gives you two options for placing Web-based tabular data in Excel. You can copy and paste the data from the Web into Excel or you can use a Web query.
Both techniques enable you to view and edit numbers, but querying a Web site has advantages. When you import data as a Web query, you can filter the data and view only records of interest. A Web query also enables you to refresh data if it is subject to updates.
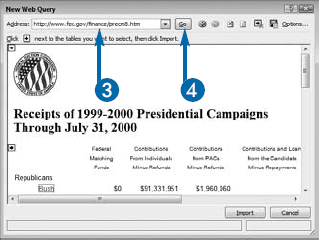
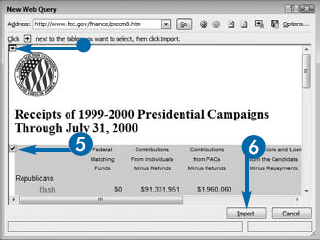
The New Web Query dialog box works much like any Web browser. You type the address of a Web site and view the associated Web pages. The dialog box analyzes each Web page and breaks the page into individual tables of data. Yellow arrow buttons display next to each section of the Web page. You click the buttons to identify the portion of the Web page you want to import. Excel only imports the text portion of the Web page. If you want to capture any of the graphics, you must do so by using the Copy and Paste commands.
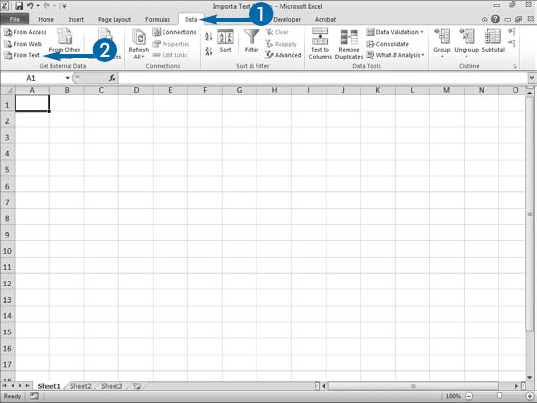
You must tell Excel where to place Web data. By default, Excel selects the active cell. If the existing worksheet contains data, Excel adds enough columns to hold the imported data. Any existing worksheet data moves to the right, into new columns. Alternatively, you can select the New worksheet option to create a new worksheet for the data. If you create a new worksheet, Excel inserts the worksheet in the current workbook.
Query a Web Site
The New Web Query dialog box appears.
This example uses
www.fec.gov/finance/precm8.htm.The Web page appears in the dialog box.
A check mark indicates you want an element.
An arrow indicates you do not want an element.
If you select Existing worksheet, enter the cell that represents the upper-left cell of the data area.
The selected Web elements appear within Excel, ready for analysis, charting, and so on.
Click Refresh All on the Data tab to refresh your data.

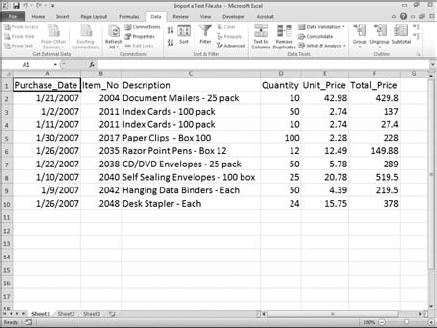
Many software applications have an option you can use to export the application's data to a text file. You can import text files from other applications into Excel by using the Text Import Wizard. You can then use Excel's sophisticated data analysis capabilities to analyze the data. In fact, once you have imported the data, you can use it in a PivotTable, create charts with it, or manipulate it just as you would any other Excel data.
The Text Import Wizard can handle any delimited or fixed-width file. A delimited file uses a comma, semicolon, tab, space, or other character to mark the end of each column. A fixed-width file aligns each column and gives each column a defined width. A space usually separates the columns.
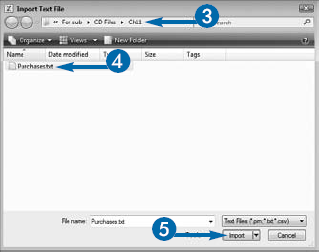
You start the import of a text file by using the Import Text File dialog box to locate the file you want to import. Text files created by other software applications may be in one of many popular file formats. You can identify the file format by the file extension. Programs usually use commas to delimit files with a .csv extension. Another popular extension is .txt. The exporting program usually delimits .txt files with tabs.
After you locate your file, Excel opens the Text Import Wizard. You must tell Excel whether you are importing a fixed-width file or a delimited file. If you are importing a fixed-width file, you tell Excel exactly where each column begins by clicking the location in the Data Preview window. Excel inserts a break line. You can adjust the location of the line or delete the line.
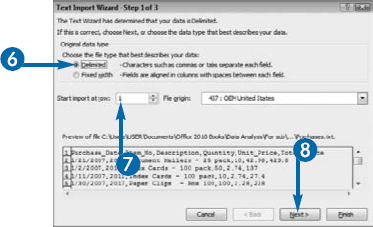
You can use the Start Import at Row field to specify the row that you want to begin the import with. If your data has titles or other information you do not want to import at the top of the file, you can skip those rows. Excel uses the Preview window to provide you with a preview of the import file. The Preview window numbers each row.
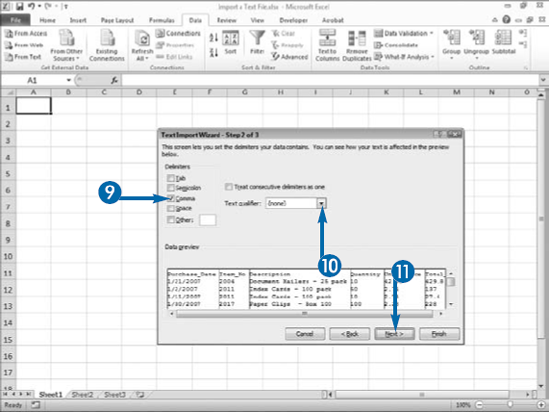
If you are importing a delimited file, you tell Excel the type of delimiters the file uses on the second page of the Text Import Wizard. You can specify more than one delimiter. Some delimited file formats surround text data with a text qualifier, such as single or double quotes. You can use the Text Qualifier field to tell Excel whether your data has a text qualifier and, if so, what the qualifier is.
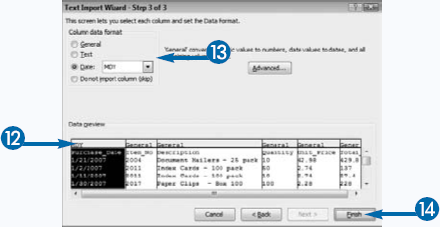
After you have defined the layout of your data, you must define the data type contained in each column. You have three options: general, text, and date. General converts numeric data to numbers, dates to dates, and everything else to text. If you have numeric data that is text, use the text option to have Excel convert the data to text. If you have dates, click the date option and specify the format you want to use. If there is a column you do not want to import, click the Do not import column option.
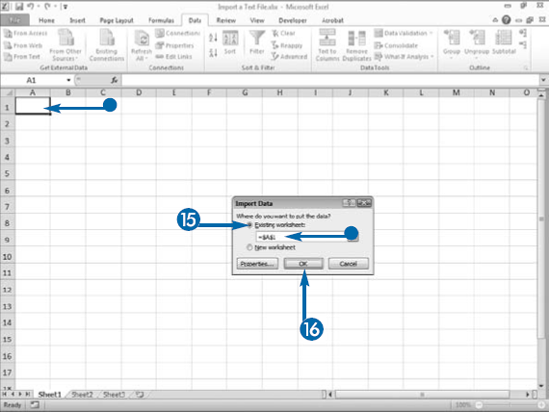
In the Import Data dialog box, you must tell Excel where you want to place your imported text file. You can choose an existing worksheet or a new worksheet. If you choose Existing worksheet, you must specify the starting cell. If you choose New worksheet, Excel begins the data placement in cell A1 of a new worksheet.
Apply It
Excel has an option you can use to break cells into columns. The feature works a lot like the Text Import Wizard. You select the cells you want to divide and then click the Data tab. In the Data Tools group, click Text to Columns. The Convert Text to Columns Wizard appears. Select whether your cells are delimited or of fixed width. Click Next.
If your cells are delimited, on page 2 of the wizard, select the delimiter and enter the text qualifier. Click the Treat consecutive delimiters as one check box (
If your cells are fixed width, on page 2 of the wizard, click in the Data Preview box to place a line between columns. Click Next. Assign formats to each column, select a destination for the output, and then click Finish. Excel breaks your cells into columns.
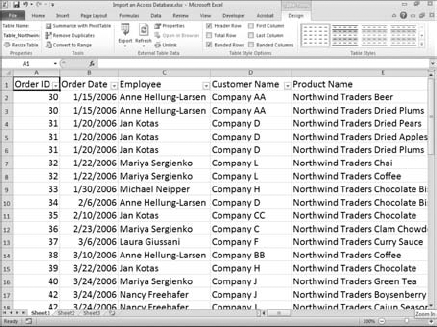
Many organizations use more than one application to manage tabular data. Excel is best for managing, analyzing, and presenting numbers. Databases such as Access help you store, filter, and retrieve large quantities of data of every type. With Excel, you can apply easy-to-use data analysis techniques to complex Access databases.
Instead of using worksheets, in Access, you must carefully organize your information into data tables, each of which stores information about one part of the entity of interest to you: customers, products, employees, transactions, and so on. To help keep track of these tables in Access, you create unique identifiers, called keys. Access can automatically assign keys to each customer, product, employee, transaction, and so on. The keys link tables to each other.
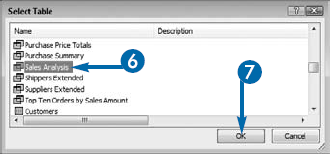
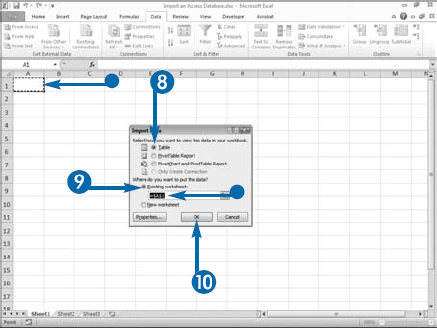
You can import an Access data table and analyze your Access data in Excel. You start the import process by selecting the Access database from which you want to import data. Excel presents you with a list of the tables found in that database. You select the table you want to import. You then choose how you want to view the data. You can choose from Table, PivotTable Report, and PivotChart and PivotTable Report. The Table option brings the data into your worksheet as a table. See Chapter 8 to learn more about tables. The PivotTable Report option connects to your table and makes your data ready for you to use in a PivotTable report. It does not import the table as a list. See Chapter 9 to learn more about PivotTables. The PivotChart and PivotTable Report option connects to your table and imports your data, ready to be used in a PivotChart and PivotTable. It does not import the table as a list. See Chapter 10 to learn more about PivotCharts.
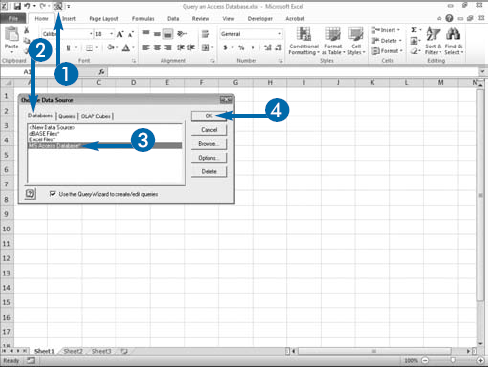
The Query Wizard is part of Microsoft Query, a separate application that comes with Microsoft Office. Microsoft Query makes it easy for you to generate queries in Structured Query Language (SQL), a standard in the corporate world.
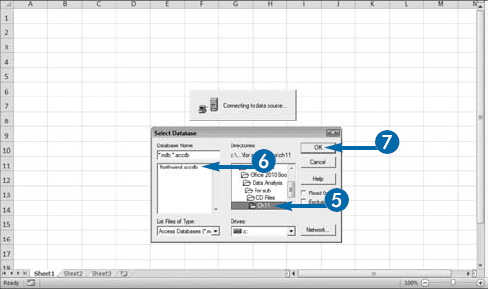
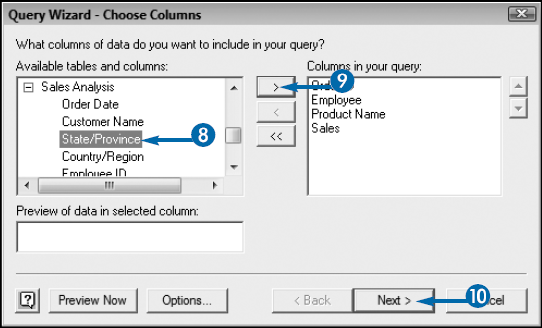
The Query Wizard provides a point-and-click interface for importing tables or selected columns into Excel. You start the process in the Choose Data Source dialog box by selecting MS Access Database as your data source and telling Excel you want to use the Query Wizard to create or edit queries. You then locate the database you want to use. The Query Wizard displays a list of tables and columns found in the database. You can select one or more tables and/or columns to query. You can also preview the data in the individual fields of your tables. Your columns will appear in Excel in the order listed in the Columns in Your Query field in the Choose Columns dialog box. You can adjust the order of the fields.
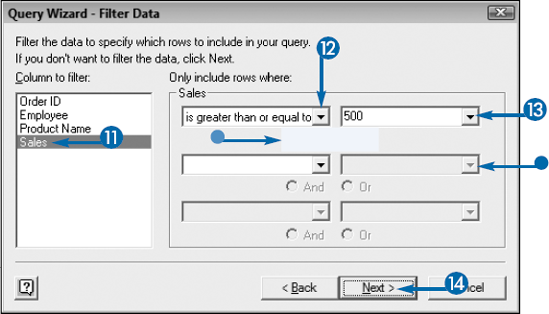
Once you have selected the columns or tables you want, you can filter and sort. The Query Wizard provides 16 comparison operators. In addition, you can create multiple filters by using And and Or.
Use Or when you want the wizard to select data that meets either of the specified conditions. For example, ask the wizard to select all dresses that are blue or all dresses that have red buttons. The wizard returns every blue dress and every dress with red buttons. Alternatively, ask the wizard to select all dresses that are blue and have red buttons. The And selection criteria are more restrictive. The wizard returns only items that meet both selection criteria: blue dresses with red buttons.
Query an Access Database
Note: You must install the New Database Query button
The Choose Data Source dialog box appears.
The Query Wizard - Choose Columns dialog box appears.
If you want to open more than one table, repeat Steps 8 and 9.
The Query Wizard - Filter Data dialog box appears.


You can apply additional filters.
You can use And and/or Or (


Extra
You use the Choose Data Source dialog box to import an Access database. To open the Choose Data Source dialog box, you click the New Database Query button on the Quick Access Toolbar or you click the Data tab, click From Other Sources in the Get External Data group, and then click From Microsoft Query.
If you import fields from more than one table, you may need to tell Microsoft Query how to join the tables. Microsoft Query provides a sophisticated interface to help you. On the final page of the wizard, if you click View Data or Edit Query In (
Filtering data improves performance when you are working with large databases. Using Microsoft Query can speed up performance. If you work with large databases and want to apply numerous filters and sort orders, MS Query is worth learning.
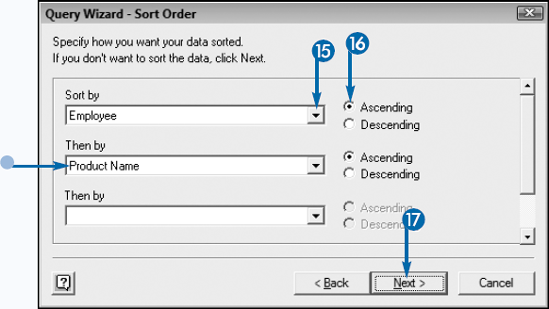
With the Query Wizard, you can sort your data and create sorts within sorts. For example, you can alphabetize a list of employees and products as follows: first in alphabetical order by employee, then in alphabetical order by product.
After you import the data into Excel, you can use Excel's tools to further sort and filter. You can go beyond the wizard and directly manipulate the Access tables.
On the final page of the Query Wizard, click View Data or Edit Query in Microsoft Query and then click Finish for a graphical view of the underlying data tables. You can work directly with criteria fields, add tables, and connect tables by shared fields. You can also run and view queries. When you have finished, you can save the query. Saved queries become available in Excel for viewing, analyzing, charting, and so on.
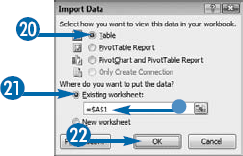
You can choose how you want to view your data in Excel. You can view it as a table, a PivotTable report, or a PivotChart and PivotTable report. The Table option brings the data into your worksheet as a table. See Chapter 8 to learn more about tables. The PivotTable Report option connects to your table and makes your data ready for you to use in a PivotTable report. It does not import the table as a list. See Chapter 9 to learn more about PivotTables. The PivotChart and PivotTable Report option connects to your table and imports your data, ready to be used in a PivotChart and PivotTable report. It does not import the table as a list. See Chapter 10 to learn more about PivotCharts.


Optionally, you can add additional sort criteria.

The Query Wizard – Finish dialog box appears.

Click View data or edit query in Microsoft Query and then click Finish for a graphical view of the underlying data tables.
Click here to save your query.


If you chose Existing worksheet, click and drag to select a range, or type a range.

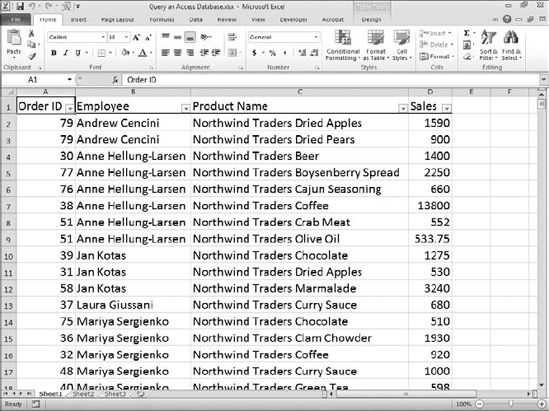
Your Access data appears in Excel.
Extra
By saving your query, you can quickly retrieve data. To save, click Save Query on the final page of the Query Wizard. The Save As dialog box appears. In the Save In field, locate the folder in which you want to save your query. Name your query in the Filename field. Click Save. Excel saves your query.
To retrieve a saved query, click the Data tab and then click Existing Connections in the Get External Data group. The Existing Connections dialog box appears. Click the name of your saved query. Click Open. The Import Data dialog box appears. Click a radio button (
Refreshing updates the data so you can see any changes made to your data in Access since the last refresh. To refresh your data, click the Data tab and then click Refresh All. Excel refreshes your data.
To delete a saved query, click the New Database Query button on the Quick Access Toolbar to open the Choose Data Source dialog box. Click the Queries tab. Click your query and then click Delete.