
2. Using FileMaker Pro
Getting Started
It’s time to roll up your sleeves and actually put FileMaker Pro to use. Most of this book deals with being a FileMaker developer—someone focused on the programming side of creating and managing FileMaker solutions. However, development makes up only a small percentage of the overall time a given database is used. Much of the time a FileMaker solution will simply be in use and its users will care nothing for scripting, calculations, or the vagaries of user interface design. They will simply be involved in working with a developer’s creation and will not need to know anything of the programming side of FileMaker.
This chapter introduces you to how to make the most of FileMaker databases that have already been built. All FileMaker databases—often called solutions, systems, or applications—have certain common elements, and becoming adept at using FileMaker Pro solutions will not only help you manipulate and analyze data better, but will assist you in extending what you can accomplish with that data.
When it comes to getting started with FileMaker, you need to know a few basics. Installing FileMaker Pro is automated, as is the case with most software today. Whether you have a CD with FileMaker on it or have downloaded the software from filemaker.com, you’ll find an installer on the disk or disk image. If there is a Read Me file, do just that before you continue.
Even after you have installed FileMaker, you might find a minor barrier before you can use it. Automated software updates might present you with a window after you launch FileMaker and before you can get to work. Software updates occur whenever updates are available.
The Quick Start screen is what you normally see when FileMaker starts. From there, you can open or create databases and get help. After you look at these aspects of FileMaker, it will be time to move on to actually working with databases and their components.
Most software is sold as a download, which means that fewer and fewer cartons, manuals, and CDs need to be produced and stored. This provides savings to users and vendors, and uses fewer raw materials and provides less trash when products are discarded in favor of new ones. In this environment, registration is increasingly important to prove your ownership of a product. If you have a credit card receipt, you might be able to track through the process of the purchase to prove that you did, indeed, purchase a product, but if you have registered the product, the process is immensely easier. Some people are hesitant to register because they are afraid of receiving too much unsolicited commercial email, but FileMaker, like all responsible companies, respects your wishes in this regard. Just make certain to check the communication options you prefer in the registration process.
Registration
You can choose to register your copy of FileMaker; this also provides FileMaker with personal information, including your address, which can be used to notify you of new products, updates, and the like. During the registration process, you can indicate to FileMaker what sorts of communications—if any—you would like to receive about FileMaker products. FileMaker can also use the information from the registration process to find out more about the people who use FileMaker and the purposes to which they intend to put the product.
Registration is required for the use of free trial software. You might also be prompted to register your software during the installation process.
If you choose not to register at this time, you can always decide to register later by choosing Register Now from the Help menu. Registration is optional, meaning you never have to register.
Software Updates
You might be prompted to download updates to FileMaker software. This accounts for a screen that you might see when you first launch FileMaker Pro. The choice of downloading the update is up to you—as is the choice of whether to perform this automatic check, as shown in Figure 2.1. Choices in this dialog are part of your preferences, which you can get to in OS X from the Preferences command in the FileMaker application menu. In Windows, the Preferences command is at the bottom of the Edit menu. This is one of the few interface differences between the two operating systems in FileMaker Pro.
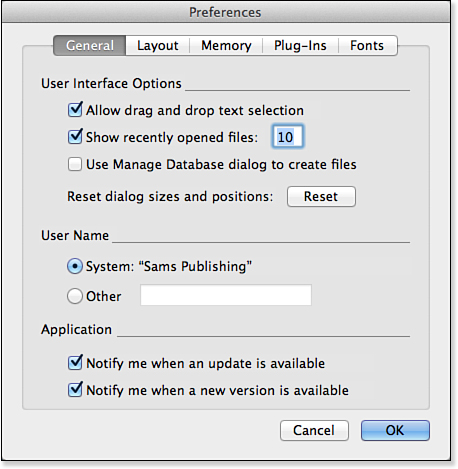
Figure 2.1. You can control checking for software updates.
Many people automatically check for software updates right after the installation of a new application. For any product, some minor revisions are often released shortly after the main release of the product, and it makes sense to start your adventures with a new version of the software with the latest code.
Using the Quick Start Screen
When you launch FileMaker Pro, you see the Quick Start screen—generally the first screen after registration and software updates (if any) are disposed of. The Quick Start screen provides a simple interface to a variety of FileMaker Pro tools, as shown in Figure 2.2.
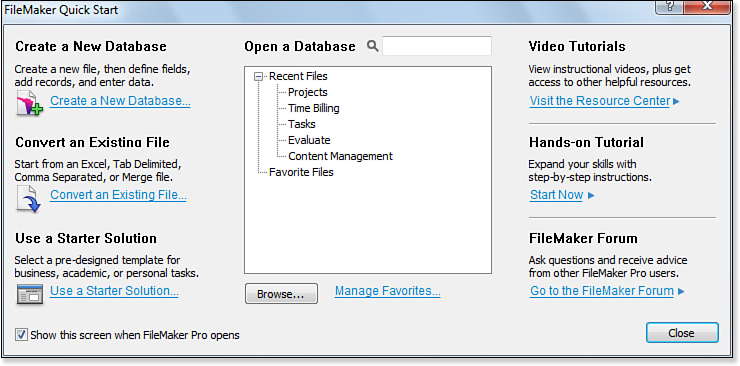
Figure 2.2. The Quick Start screen is your gateway to FileMaker Pro.
At the left, three icons let you choose from tools to create a database, open a database, or get assistance. The Quick Start screen opens to whichever view you last selected.
As you can see from the check box at the bottom left of the Quick Start screen, you can choose not to have this screen shown at startup. If you choose that option, you can always reopen this screen by choosing Quick Start Screen from the Help menu.
You can create a database from scratch or from one of the Starter Solutions; you can also choose to create a database directly from an existing document in a non-FileMaker format, as shown in Figure 2.2. The Starter Solutions are a set of FileMaker Pro databases that you can use as is or with modifications for your own customized solutions. FileMaker categorizes the Starter Solutions into a variety of areas (some are in more than one area). In addition to the Quick Start Screen, you can choose File, New From Starter Solution to create a database from a Starter Solution.
Until FileMaker Pro 12, the Starter Solutions used a common user interface. Those Starter Solutions served as the basis of many solutions that have been developed over the years. With FileMaker Pro 12, a wider variety of interfaces has been created to show you the various possibilities from which you can choose.
In the center of Quick Start, you can open files and servers that you have recently used. You can use a Browse button to open your standard Open File dialog.
![]() For more information about opening remote files, see “Working in FileMaker Pro,” p. 39.
For more information about opening remote files, see “Working in FileMaker Pro,” p. 39.
Getting Help
For FileMaker users, help consists of a variety of tools ranging from online help to the FileMaker website and books such as this one. For most people, help begins with the Help menu, shown in Figure 2.3.
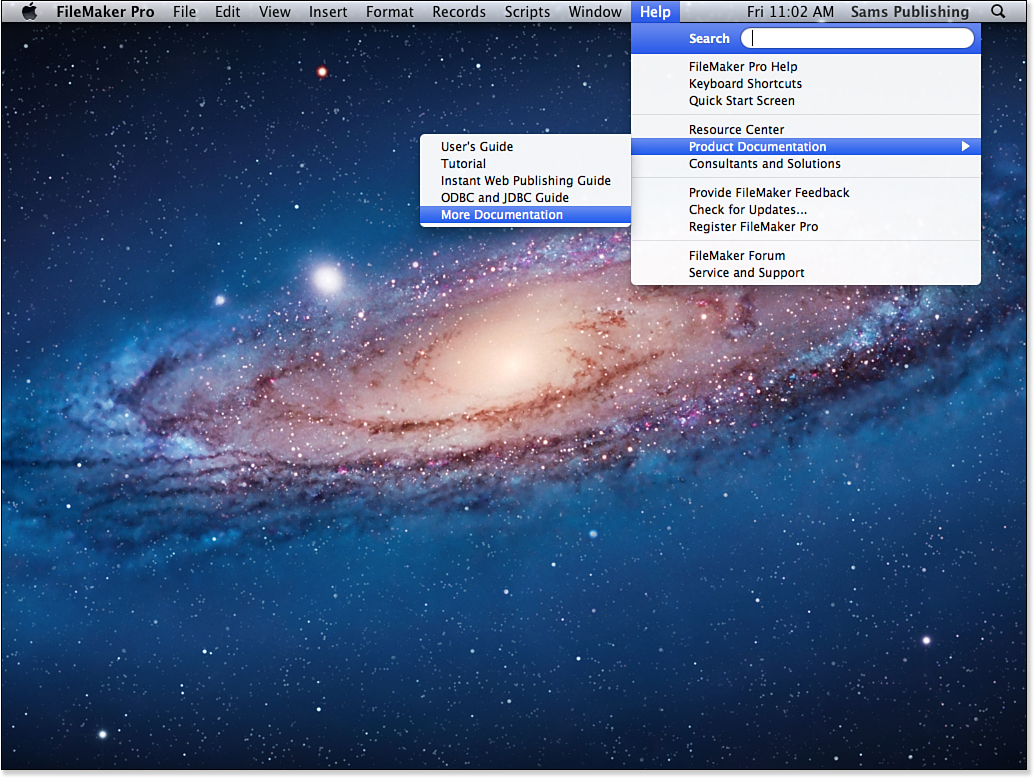
Figure 2.3. FileMaker Pro’s Help menu is just the beginning of built-in assistance. It provides you with a variety of assistance, ranging from simple keyboard commands all the way to developing your own solutions.
The Resource Center command takes you to the FileMaker website where additional information is provided.
In addition to the Help menu, you will find Learn More links on many of the FileMaker dialogs. They are discussed at the appropriate points of this book.
As you look at recent files, you can select one to add to your Favorite Files (either local or remote). Just select it and click the Manage Favorites link. This technique can save you a lot of time, particularly if a file is on a remote server and it would take several mouse clicks to select the server, the appropriate folder, and then the file.
Understanding FileMaker Pro Features
FileMaker is a vibrant ecosystem of software products, developers (at FileMaker and at third parties), designers of FileMaker databases, and the users thereof. The heart of this ecosystem is FileMaker databases, which can include user interfaces, scripts, and other elements that work with the FileMaker software to help people manipulate the databases. On the software side, there are two major products, each of which has two versions:
• FileMaker Pro and FileMaker Pro Advanced let you build and use databases (in database-speak, the schemas of your databases); you also can build interfaces, scripts, and other elements with these products. These are the only tools that let you create FileMaker databases.
In addition to building databases, you can share them with other people over a network with these products. Sharing is limited to nine other people (but read on for details of FileMaker Server).
• FileMaker Go lets you access your databases from iOS devices. You can use iTunes or email to install your FileMaker databases on an iOS device, and then you can use the database anywhere. You also can use FileMaker databases that are published on the Web using FileMaker Pro or FileMaker Server from FileMaker Go. This scenario means that changes you make to the database are reflected immediately across the Web or network, and those changes show up on other FileMaker Go clients as well as in the view of the database that people see in FileMaker Pro.
• FileMaker Server and FileMaker Server Advanced let you share databases over a network with up to 250 people running FileMaker Pro. You also can publish FileMaker databases so that people can access them over the Web with web browsers (in other words, they don’t need to have their own copies of FileMaker Pro). FileMaker Server Advanced has no fixed limit on users: The actual number is restricted only by your hardware, but 250 has been tested.
FileMaker Server allows web publishing with ODBC/JDBC and PHP. This lets people access your solutions with a web browser. This means that if someone wants to access a FileMaker database that you publish, they can do so with FileMaker Go on an iOS device, but on other mobile devices, the built-in browser can do the trick.
FileMaker Server Advanced implements an additional technology called Instant Web Publishing, which lets people use their browsers to access screens that look very much like the actual FileMaker Pro interface (very, very much like the FileMaker Pro interface).
There is an additional component of FileMaker that you can create using FileMaker Pro Advanced. After you have created your FileMaker database and its interface, you can generate a runtime solution with FileMaker Pro Advanced. That solution can run on OS X or Windows (you must create separate copies for each operating system), and users can get almost the entire FileMaker Pro experience without installing a copy of FileMaker Pro. No restrictions on the distribution of this software exist, but there are some restrictions on the features that are supported. Perhaps the most significant feature that is not available in a runtime solution is networking: Runtime solutions are single-user solutions.
Understanding FileMaker Databases
FileMaker databases have evolved over the years. Today they consist of several components, not all of which might be present in every database you use:
• A database contains one or more tables that actually contain the data. The next section describes tables in more detail.
• A database can contain references to tables in other FileMaker database files or in other databases accessed via ODBC.
• A database can contain layouts that provide the user interface with which to access tables either in this database file or in other locations.
• There might be scripts that contain commands created to automate various processes. Scripts are often connected to layout elements, such as buttons, but they can be invoked automatically when a database is opened or closed, as well as when certain other events occur (or are triggered).
• The database includes security features in the form of user identifiers and passwords as well as descriptions of what privileges each set of users has to access the database and its components.
• A variety of other, smaller components that support these major features are also part of the database.
With the exception of tables in other files or databases referenced from a database, all the database elements are stored in a single file that can be moved from place to place.
![]() If you have references to other files, you might break these links if you move the database file. For more information, see Chapter 7, “Working with Relationships.”
If you have references to other files, you might break these links if you move the database file. For more information, see Chapter 7, “Working with Relationships.”
Understanding Tables
Before FileMaker 7, no serious distinction was made between database files and tables; this was one way in which FileMaker differed from other relational databases. Beginning with Version 7, FileMaker could handle multiple tables within a single database file. The number of tables that a single database file can contain is essentially limitless.
A table is a collection of data—the records and fields described in the following section. Data in a given table is all in a single logical format. The simplest case of a Starter Solution is Contacts: It contains a single table called Contacts.
A large part of the power of a relational database such as FileMaker Pro is its capability to relate data in one table to another. The Projects Starter Solution, for example, contains three tables: Projects, Tasks, and Personnel. As you might expect, tasks are part of projects, and personnel are assigned to tasks. This is all governed by the design of the database: FileMaker keeps the relationships organized.
Tables need not be in the same database file to be related to one another, but it makes sense to combine tables that are closely related in a single database file. For example, if you have a complex Contact Management database, you might have tables for names, for addresses, and for phone numbers, with all those tables being related to one another to combine the data for a single contact. In FileMaker Pro, every layout is based on a single table, although it can use data from other tables as well.
![]() To dig deeper into working with multiple tables and understanding relational data models, see Chapter 6, “Working with Multiple Tables,” and Chapter 5, “Relational Database Design.”
To dig deeper into working with multiple tables and understanding relational data models, see Chapter 6, “Working with Multiple Tables,” and Chapter 5, “Relational Database Design.”
Understanding Records and Fields
A table stores information about many items with similar data characteristics: many to-do items, many contact items, and so forth. Each of these items is called a record (sometimes data record), or, in relational database parlance, a row. Each record or row has data elements that are called fields, or, in relational database parlance, columns. Fields for a contact record can include a name, an address, and the like; for a to-do item, fields might contain a due date and the name of the task to be done.
Particularly if you use the row/column terminology, it is easy to think that you are talking about a spreadsheet, but a database is much more powerful than a spreadsheet. Much of that power comes from two major aspects of a database:
• You can describe the database so that the data it contains must adhere to strict rules. Numbers must be numbers, if you choose to enforce such a rule, and values must be within a specific range of values if you choose another type of rule.
• Furthermore, you can set up rules to relate data within the database so that, for example, the person charged with carrying out a to-do item must be someone who is already entered into the contacts database. You’ll see how to create such relationships shortly.
The combination of these two aspects of databases—along with many more—make them more powerful than spreadsheets.
The FileMaker Pro User Interface
The FileMaker Pro interface consists of basic elements:
• Layouts display data and let you edit it.
• Modes change the behavior and appearance of the interface to let you browse data, find specific data, display reports for printing or interactive use on the screen, and create or modify layouts.
• Views are available in both Browse and Find modes. They let you see one record at a time, a list of records, or a spreadsheet-like table view of records.
Each of these interface elements is described in this section. In a later section, the Status toolbar and associated menu commands are described. They let you control the user interface itself, switching among layouts, modes, and views as well as navigating through your database.
Figure 2.4 shows the FileMaker Pro user interface with the Status toolbar at the top of the window (you can show and hide it). The main part of the window is a layout displaying data from the Assets Starter Solution.
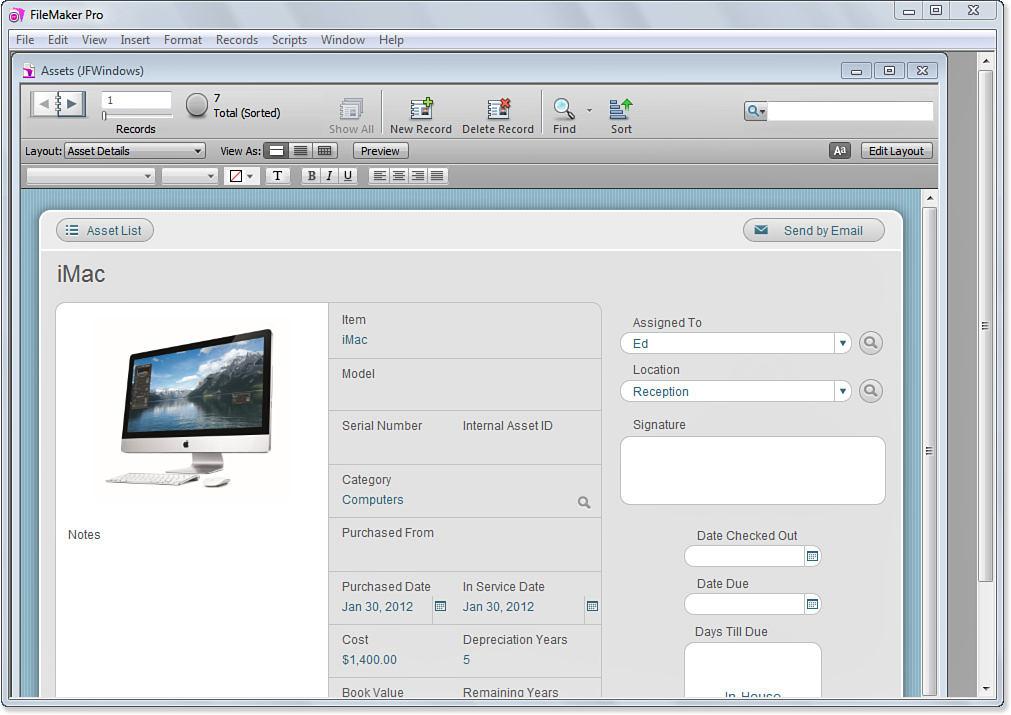
Figure 2.4. The FileMaker Pro user interface provides a Status toolbar at the top of the window.
There are two parts to the status toolbar, one above the other. The main part of the Status toolbar shown in Figure 2.4 has navigation tools, buttons to create and delete records, as well as buttons to find and sort data. Below it, the narrower Layout bar lets you select layouts and control how to view the data (as a form, list, or table). Buttons let you enter Preview mode, show or hide the Formatting bar, or edit the layout. These features are described in more detail in “Using the Status Toolbar,” later in this chapter.
Layouts
Most FileMaker Pro databases open to a data-entry layout, such as that shown in Figure 2.5. Generally, you have access to fields, commonly designated by a field border of some kind, including rounded corners, where you can set the corner radius (beginning in FileMaker Pro 12). Fields are usually labeled. FileMaker Pro provides some specialized data-entry tools, such as the calendar shown in Figure 2.5.
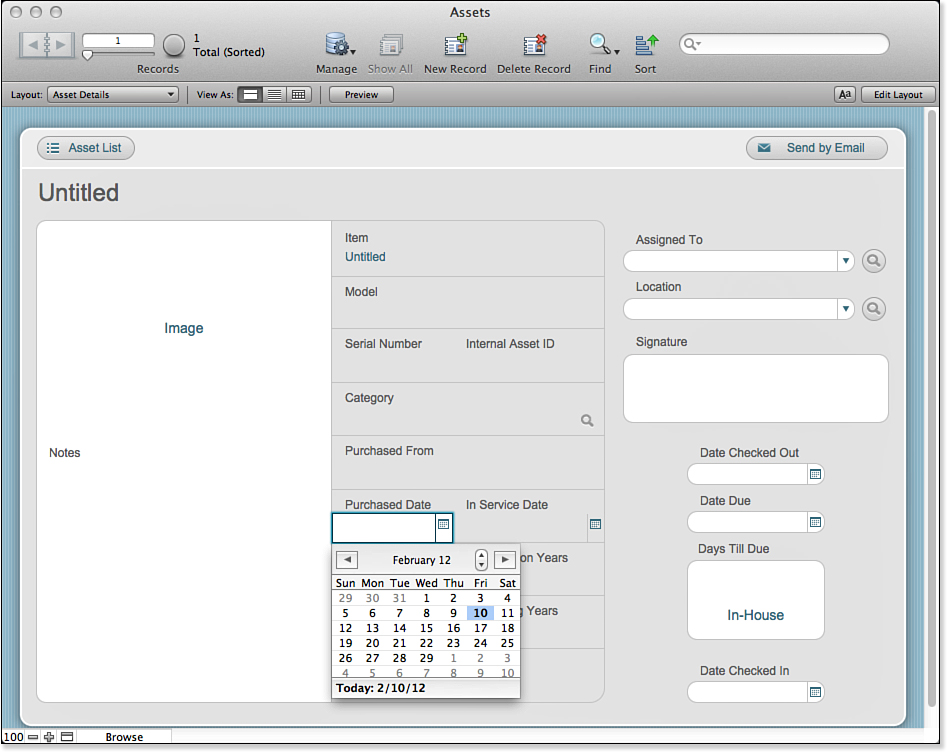
Figure 2.5. FileMaker Pro has specialized data-entry tools.
Figure 2.6, based on the Meetings Starter Solution, shows a tab control at the right of the layout. There are two tabs: Topics and Action Items. Each tab displays its own set of data when it is clicked. This makes for a very efficient use of the screen.
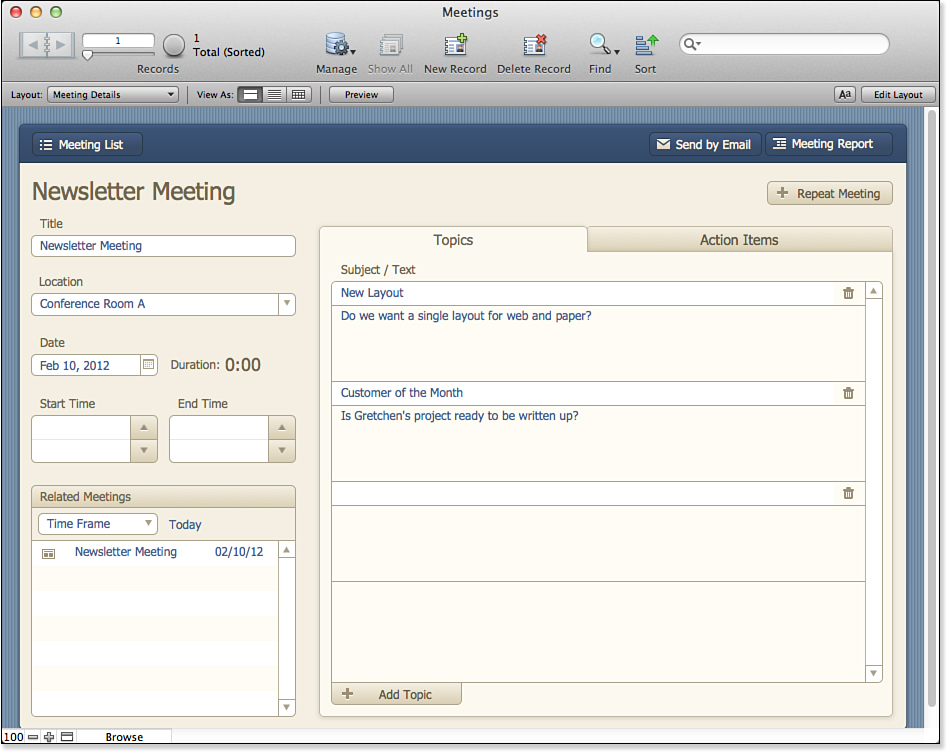
Figure 2.6. Use a tab control to save space.
Developers often provide tooltips that appear when you hover the mouse pointer over a specific layout element.
![]() For information on creating Layouts, see Chapter 4, “Working with Layouts.”
For information on creating Layouts, see Chapter 4, “Working with Layouts.”
FileMaker Pro Modes
At any given time, you interact with your FileMaker Pro databases via one of four modes. At times, developers choose to tailor a layout for use with a specific mode, but more often than not, you can use layouts effectively with all four modes. To switch between modes, use the View menu or the Status toolbar, described later in this chapter. To familiarize you with the four modes, here’s a simple description of each:
• Browse mode—Browse mode is FileMaker Pro’s primary mode, where all data entry occurs, and generally is the principal mode you’ll use in a given solution.
• Find mode—Here, you create and then perform find requests to search for specific sets of records.
• Preview mode—When preparing to print from FileMaker Pro, you can opt to switch to Preview mode to see what a given layout will look like after it is printed.
Certain aspects of reports such as subsummaries were only available in Preview mode until FileMaker Pro 10. Now, you can interactively modify data in reports in Browse mode and see the subsummaries dynamically respond to the changes.
![]() The primary information on reports, including interactivity in FileMaker Pro 10, is provided in Chapter 10, “Getting Started with Reporting and Charting.”
The primary information on reports, including interactivity in FileMaker Pro 10, is provided in Chapter 10, “Getting Started with Reporting and Charting.”
• Layout mode—It is in Layout mode that a great deal of development occurs. Here, developers can manipulate all the elements of a given layout, including controlling all the things that appear on that layout.
Views
In addition to the modes of FileMaker Pro, there are three views as well. A view is a particular way of displaying record data on the screen. To change among them, use the View menu. As you will see later, layouts can have headers and footers; the view refers to the layout shown between the header and footer. These are the three views:
• Form view—This view enables you to see and manipulate only one record at a time, as shown previously in Figure 2.5.
• List view—Here, you can display multiple records. At any given moment, you are working with only one specific record while still being able to scroll through the rest (see Figure 2.7). A black bar at the left of the Layout area shows you which record is active.
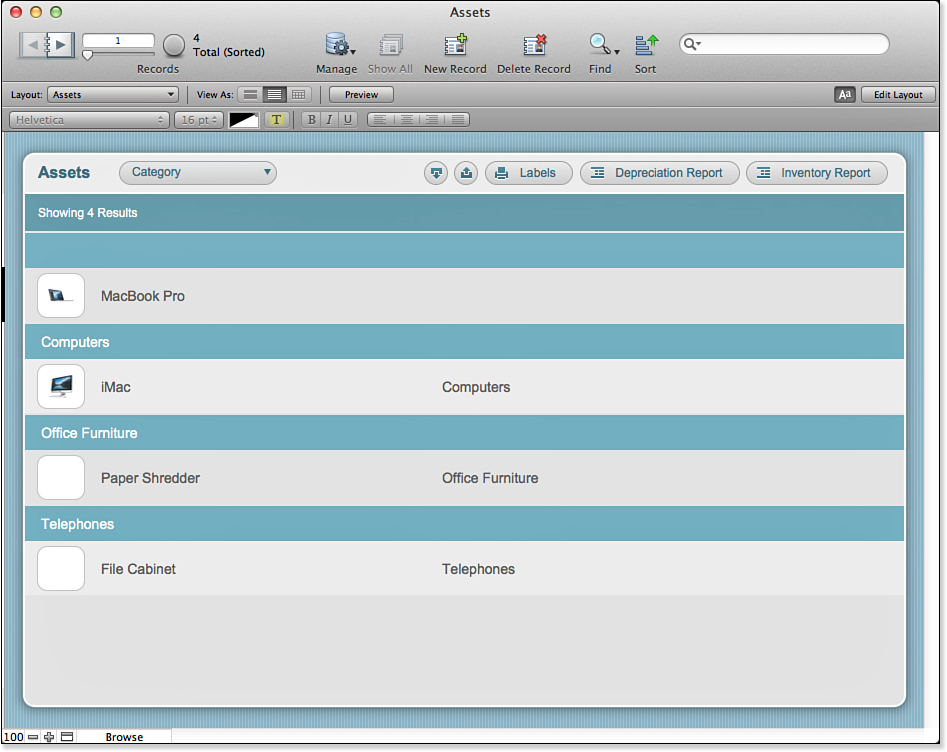
Figure 2.7. List view lets you work with more than one record at a time.
• Table view—Table view simply displays the raw data for a given record (depending on what fields have been placed on a layout). It looks quite similar to a spreadsheet application (see Figure 2.8). You can move, resize, and sort the columns by clicking the column headers.
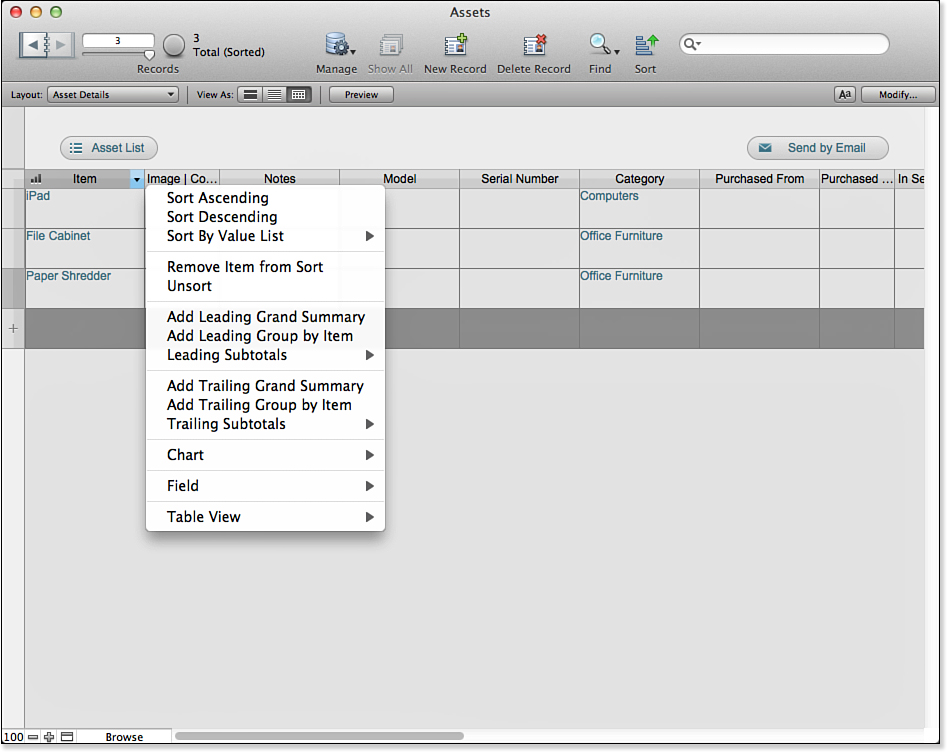
Figure 2.8. In Table view, you can resize, move, and sort with column headers.
Buttons
Notice that we’ve largely been talking about fields on layouts. Most FileMaker Pro solutions also include buttons. Figure 2.5, earlier in this chapter, shows a few examples.
Buttons can come in all shapes and sizes in FileMaker Pro. Text can be a button, a field can be a button, and even just a mysterious blank area in the middle of a layout can be a button (although that is a very poor interface).
In Figure 2.6, the top of the layout contains buttons named Meeting List and Send by Email. Buttons such as these can invoke standard FileMaker Pro commands or scripts that you write yourself.
Today, FileMaker solutions are often designed for use not only on desktop and laptop computers but also on mobile devices, such as iPhone and iPad. As you start to design your own layouts, remember that on mobile devices there are no menu commands; in these cases, your buttons make your solution easier to use.
In general, it is a good idea to avoid decoration in layouts—interface elements that do not immediately suggest that they are useful. For example, a small envelope and arrow icon next to an email field can be configured as a button to send email to the associated address. This is not decoration, and, because the layout contains no irrelevant decoration, the user can reasonably assume that the envelope and icon mean something.
Buttons trigger actions, often by launching scripts that developers write; these actions are usually specific to a given FileMaker database. Buttons can perform dozens of actions, such as creating a new record, deleting a record, navigating to another layout, performing a calculation, performing a find request, controlling windows, and even spell-checking and emitting a simple beep. The possibilities are endless.
You’ll have to become familiar with the specifics of a given FileMaker Pro solution to come to understand what its buttons do. A good interface suggests what items are hot; furthermore, information the developer can provide, such as tooltips for each button, should assist you. If all this fails, the person who built the system should have those details or should have provided some form of training or documentation.
Using the Status Toolbar
The Status toolbar replaces the old Status Area and provides much more powerful control and feedback. The Status toolbar at the top of FileMaker Pro windows combines controls and information displays in a compact structure. Most of the objects in the Status toolbar accomplish tasks that can also be accomplished with menu commands and their keyboard equivalents.
The View menu, shown in Figure 2.9, lets you control how the current window is displayed.

Figure 2.9. The View menu controls the user interface.
The Status toolbar itself can be shown or hidden for any window. Simply select the window and choose Status Toolbar from the View menu.
As you can see in Figure 2.9, you can control the visibility of the Status toolbar separately from the visibility of the Formatting bar. In Figure 2.10, you can see the Formatting bar at the top of the window; the Status toolbar is hidden.
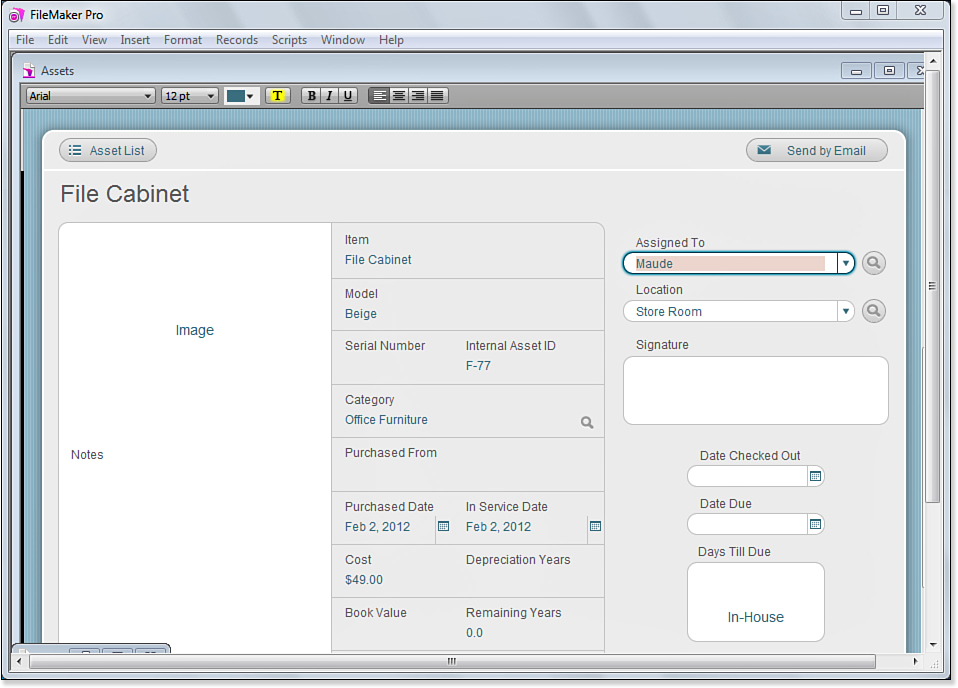
Figure 2.10. The formatting bar lets you format selected text.
The formatting bar is available only when text is selected. This means that its controls are dimmed if you select a field containing a graphic. In Browse mode, which you use to enter data, only a single text field can be selected at a time. Whatever text you have selected in that field is affected by the controls in the formatting bar.
If you select a text field and do not select any text within it, you will set the formatting for the insertion point and any text that you subsequently type. To change the formatting of all the text in a text field, double-click in the field to select the field and all its text.
Customizing the Status Toolbar (OS X)
Toolbars are an important part of the OS X interface; they are supported deep within the operating system.
When an application provides a toolbar, it generally enables you to customize the toolbar. You do this by choosing View, Customize Status Toolbar (the command is available only when the Status toolbar is shown). You will see a sheet with the customization options, as shown in Figure 2.11.
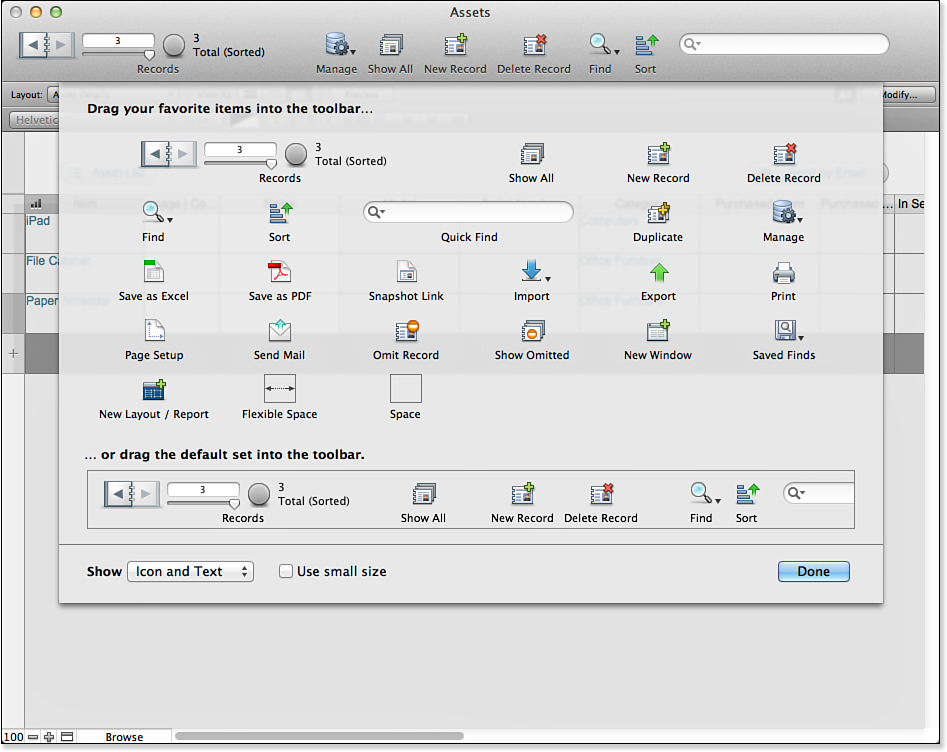
Figure 2.11. Customize the Status toolbar in OS X.
You can rearrange the items in the toolbar by dragging them back and forth. Remove items by dragging them out of the toolbar, and add new ones by dragging them up into the toolbar. If you want to revert to the original toolbar, the default set at the bottom of the customized display moves as a single unit when you drag it to the toolbar.
Just above the default set are two important special items: a space and a flexible space. You can insert them as many times as you want into the toolbar to organize it.
Finally, at the bottom of the customization display, you can choose small or large icons, icons alone, icons and text, or text only.
Each icon can appear only once in the toolbar. You do not have to worry about putting too many icons into the toolbar. If the window is narrower than the toolbar is wide, a double arrow appears at the right of the toolbar, and the icons that do not fit are shown off to the right of the window as text only, as Figure 2.12 demonstrates with the New Record and Delete Record commands. In addition, commands (icons or text) are dimmed if they are irrelevant.
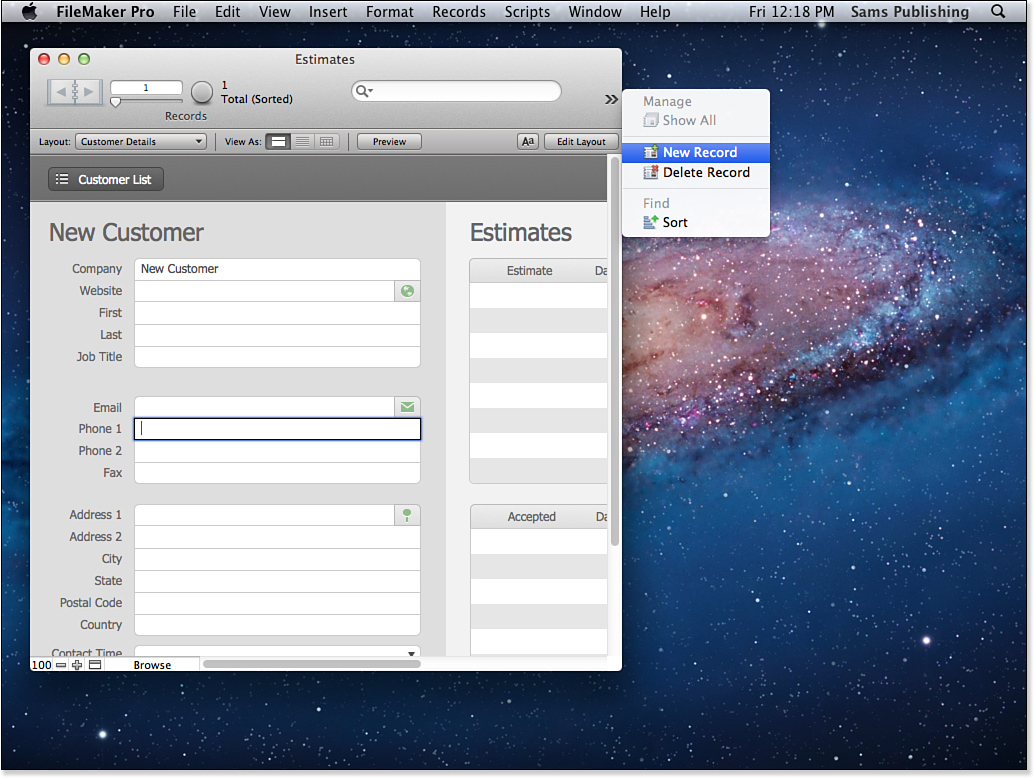
Figure 2.12. Toolbar commands can extend beyond the window.
Your settings for the Status toolbar apply to the database; all windows for that database reflect your settings for its toolbar. Toolbars for windows based on other databases are not changed.
Customizing the Status Toolbar (Windows)
Toolbars are one of the few areas in which the Windows and OS X interfaces differ. As you can see from the figures in this chapter, the Status toolbar itself looks much the same on both operating systems, but the way in which you customize it differs.
On Windows, you begin by choosing View, Customize Status Toolbar, just as on OS X. This opens the dialog shown in Figure 2.13.
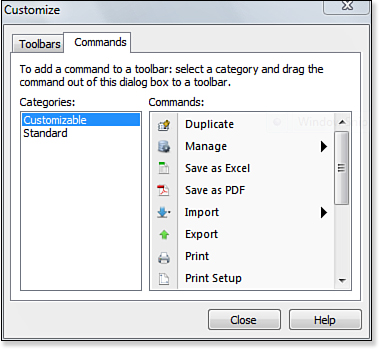
Figure 2.13. Customize the Status toolbar on Windows with Customizable commands.
The first tab, Toolbars, lets you select the toolbar to customize. There is currently only one choice: Status. The second tab, Commands, shown in Figure 2.14, lets you choose either the customizable commands or the standard commands; the standard commands are shown in Figure 2.14
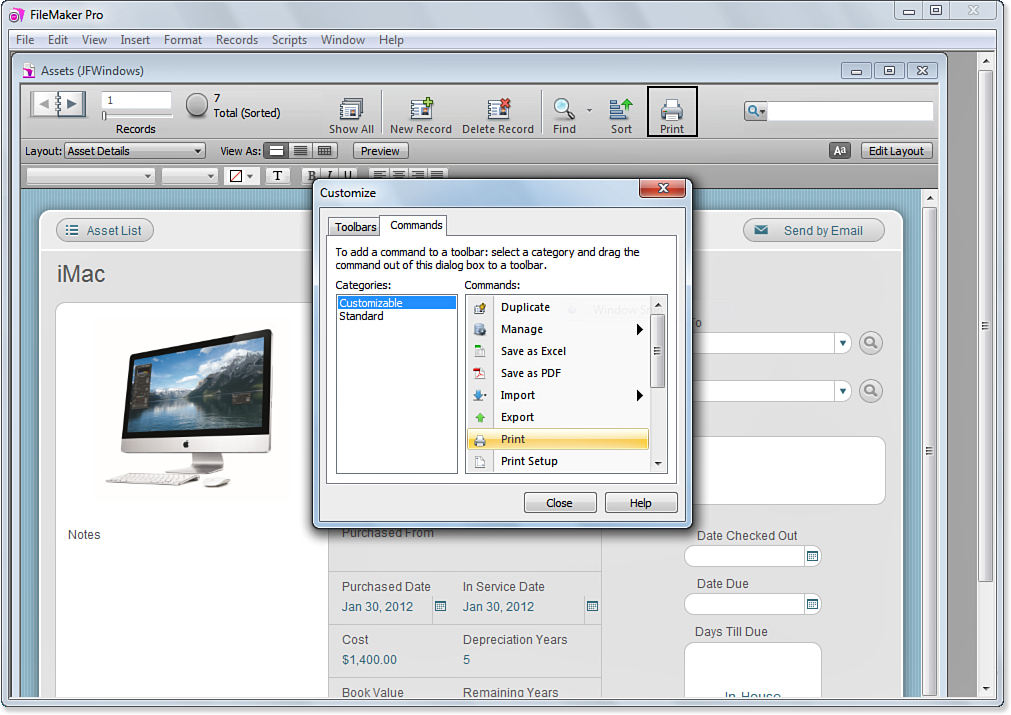
Figure 2.14. Customize the Status toolbar on Windows with Standard commands.
In either case, drag the command up into the toolbar.
Working in FileMaker Pro
The following sections walk you through working in some typical FileMaker Pro situations and address many of the common tasks you must be able to perform.
![]() For more information on using other tools to access the data, see the chapters in Part IV, “Data Integration and Publishing,” which begins on p. 519.
For more information on using other tools to access the data, see the chapters in Part IV, “Data Integration and Publishing,” which begins on p. 519.
Over the past few revisions of FileMaker Pro, functionality has been added that lets you create databases in FileMaker but access them through other applications. With web publishing, you can use a browser to access FileMaker data. You can use ODBC import and export to share data with SQL-compliant applications, and you can even import and export Excel spreadsheets. This section focuses on working with FileMaker data using FileMaker Pro itself.
Opening a Database
The first step in working with FileMaker Pro, obviously, is opening a database. FileMaker Pro databases can live in various places. They can sit on your own computer, just as any other document might; they can be hosted by another computer; or they can be served by FileMaker Server. On any of those computers, they can be housed on shared volumes or external devices (although there are constraints for the FileMaker Server database locations).
Local Files
Opening a local file is a simple matter of double-clicking its icon in either your Windows environment or the OS X Finder. You can also use FileMaker Pro’s File, Open command or the Quick Start screen, as described previously.
You can use the Open command to navigate to any database file to which you have access—whether it is on your own computer, somewhere else on your network, or on the Internet—if you can get to it from the Open File dialogs shown in Figure 2.15.
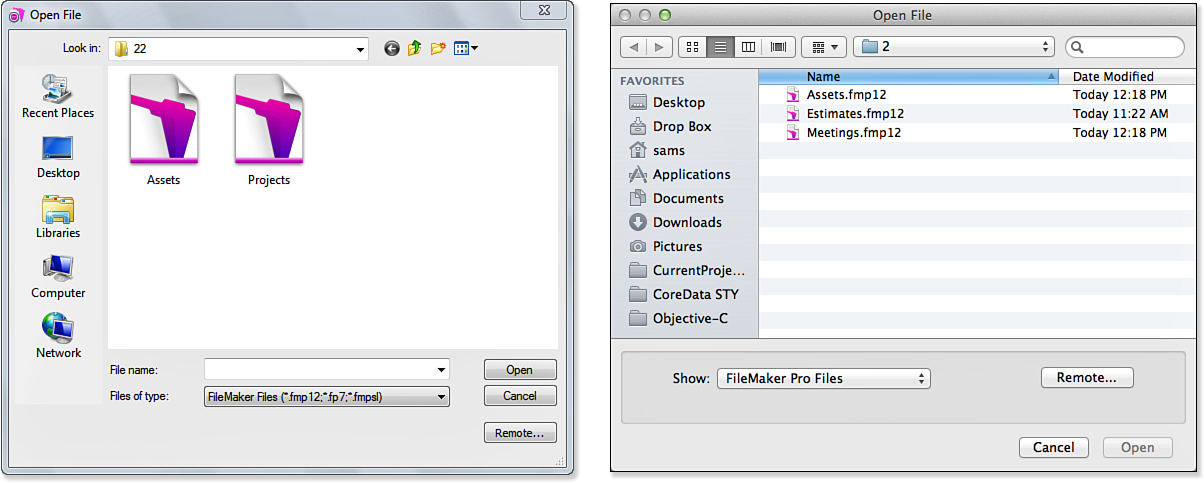
Figure 2.15. Use the Open command to open a FileMaker Pro database.
Note that in addition to the Open button, there is also a Remote button; it is discussed in the next section.
Remote Files
Working with remote files requires connecting to a server. That server could be a database hosted on FileMaker Server (the software that allows you to host a FileMaker database for use across a LAN or WAN by up to 250 users) or a FileMaker database file that is set to multiuser and running in FileMaker Pro on another person’s workstation. After you connect to a remote database, everything works just as it would with a local connection (although over a busy network, there might be a slight lag in response). The only distinction that you will note is that the title of the window shows not only the name of the database but also—in parentheses—the name of the server on which it is hosted. Compare the title of the window shown in Figure 2.16 remotely with the same database shown in Figure 2.7.
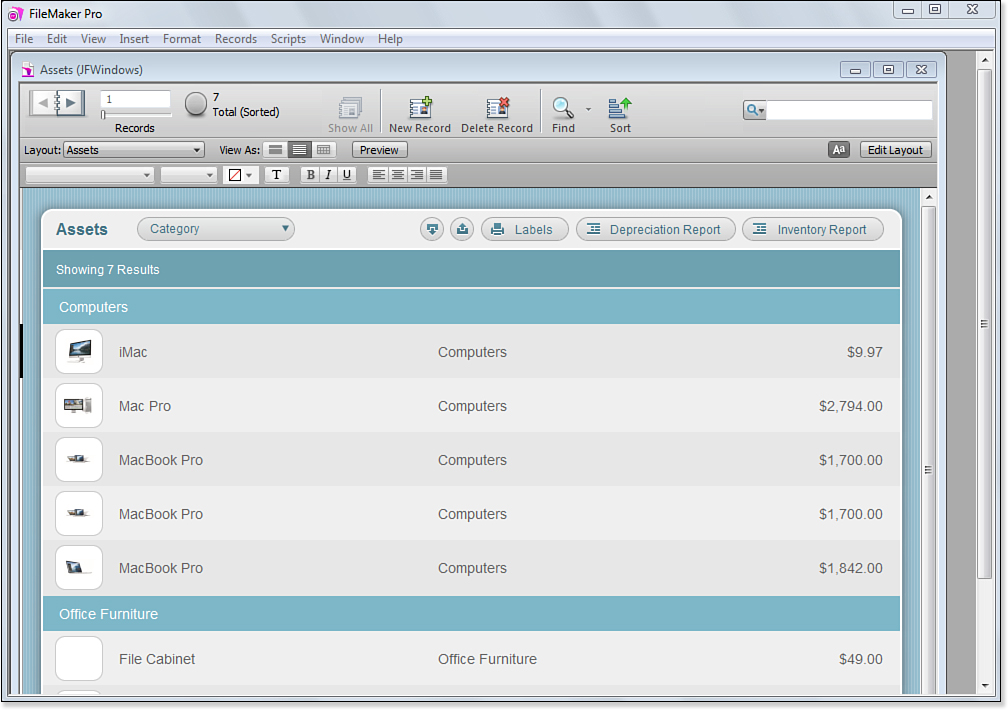
Figure 2.16. A FileMaker Pro database opened remotely shows the name of the host in its title.
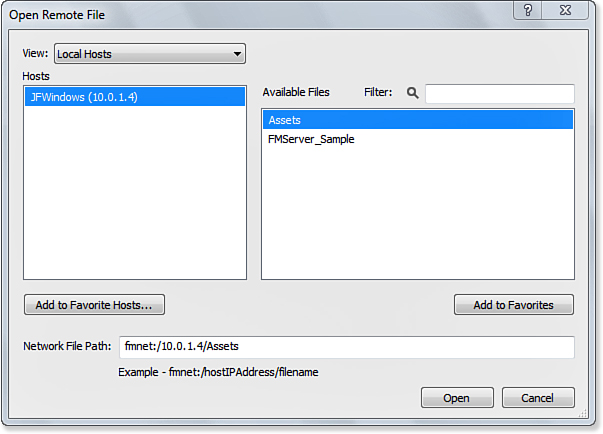
Figure 2.17. Use the Open Remote File dialog to open a database on a LAN, in a corporate domain, or (with a proper IP address) across the Internet.
![]() For more information on FileMaker Server, see Chapter 27, “FileMaker Server and Server Advanced.”
For more information on FileMaker Server, see Chapter 27, “FileMaker Server and Server Advanced.”
To open a remote database, click the Remote button in the Open File dialog, or choose Open Remote from the File menu. As you can see in Figure 2.17, you can choose from those hosts available to you locally (those on your network, within your domain in corporate environments, or accessible on the Internet), or you can navigate to a particular server via a Lightweight Directory Access Protocol (LDAP) server. You can also view servers and databases that you have previously marked as favorites. Finally, you can type in the address of a file in the box at the bottom. Make certain in this case to use the prefix fmnet.
When you choose Local Hosts, you will first see a list of all the FileMaker servers running on your local network. It might take some time for FileMaker Pro to locate all these servers, so be patient. After you click a hostname (either a local host, an LDAP host, or a Favorites host), FileMaker Pro interrogates that host for the list of databases to display in the list at the right of the dialog. This, too, might take some time. As you navigate through hosts and to an individual database, the fmnet address at the bottom of the dialog fills in automatically.
If you add a database or a FileMaker host to the favorites, it shows up not only in the Favorites of this dialog, but also in the Favorites for the Quick Start screen (shown previously in Figure 2.4). When you select a host or database, you can click Add to Favorites to open the dialog shown in Figure 2.18. It is a good idea to rely on favorites—particularly for remote databases where the network file path might be a lengthy string of numbers and/or words that are easier to select from a Favorites list than to retype.
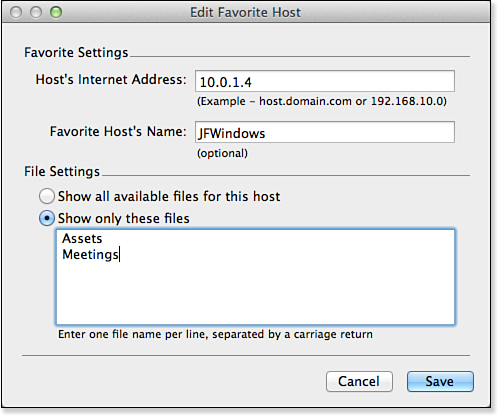
Figure 2.18. Use Favorites to organize your databases and hosts.
If you are browsing files on a remote FileMaker server, you will see all the opened FileMaker databases that the developer has specified should show up in the Open Remote dialog. You will not see closed databases or those marked not to be listed in this dialog.
If you want to open a database not shown in the list, you can quickly create the appropriate fmnet address. Select, with a single click, a database shown in the list and simply erase the name of that database from the end of the address; then type in the name of the database that you want to open.
Working with Records
The steps involved in creating and deleting records in FileMaker Pro are simple. Under the Records menu, choose New Record, Delete Record, or Duplicate Record. Notice also that there’s a Delete All Records option. For now, let’s explore how to take care of simple data entry. Many solutions (including the Starter Solutions) provide buttons—usually at the top of the layout—to create and delete records; some might also provide a duplicate record button.
If you are in the midst of entering data in a record and want to undo the entry, use the Revert Record command under the Records menu. A record is saved—or committed—automatically when you click outside a field for the first time (or in another field), change modes, change layouts, or press the Enter key. FileMaker Pro uses the term commit to indicate when a record is posted, or saved, to your database. Using the Revert Record command before committing a record allows you to roll back all the changes you’ve made, returning that record to its last committed state.
The flow of processing in FileMaker Pro differs from that of a web interface. In a web-based application, including FileMaker’s Instant Web Publishing and Custom Web Publishing, all data is shown on the screen and is sent when you click a Submit button—that is the moment when data is committed. When working directly with FileMaker, you might be committing (or submitting) data many times as you work on the record. In practice, this is usually not a serious issue, just a reflection of the differences in how two technologies handle the issue of data updates.
![]() If Revert Record doesn’t seem to do anything, see “Reverting Records” in the “Troubleshooting” section at the end of this chapter.
If Revert Record doesn’t seem to do anything, see “Reverting Records” in the “Troubleshooting” section at the end of this chapter.
![]() If you have trouble with data you believe to be lost, see “Data Loss” in the “Troubleshooting” section at the end of this chapter.
If you have trouble with data you believe to be lost, see “Data Loss” in the “Troubleshooting” section at the end of this chapter.
Keep in mind that even though there’s an Undo command in the Edit menu, it doesn’t work at the record level. After a record is committed (saved to the database), it and its changes are a part of your database. However, until you click out of the field, you can undo and redo changes to your heart’s content. Also remember that after you delete a record, it’s gone forever.
Working with Fields
If you are used to other productivity applications or have ever filled out a form on the Web, you should find data entry quite familiar in FileMaker Pro. Fields generally look like embossed or bordered areas with labels off to one side or the other, underneath, or above the field. Keep in mind that developers control the look and feel of their systems, so it’s entirely possible that someone could build a database with no labels, fields that are the same color as their background, and white text on a white background. When a field is being actively edited, its border is highlighted (generally darker), and the other fields on a given layout are shown with less prominent highlights, indicating that you’re in the midst of editing a record (see Figure 2.19). Editing fields is as easy as clicking into them, typing some text, and clicking out again. (As with many aspects of FileMaker, these behaviors are customizable in Layout mode.)
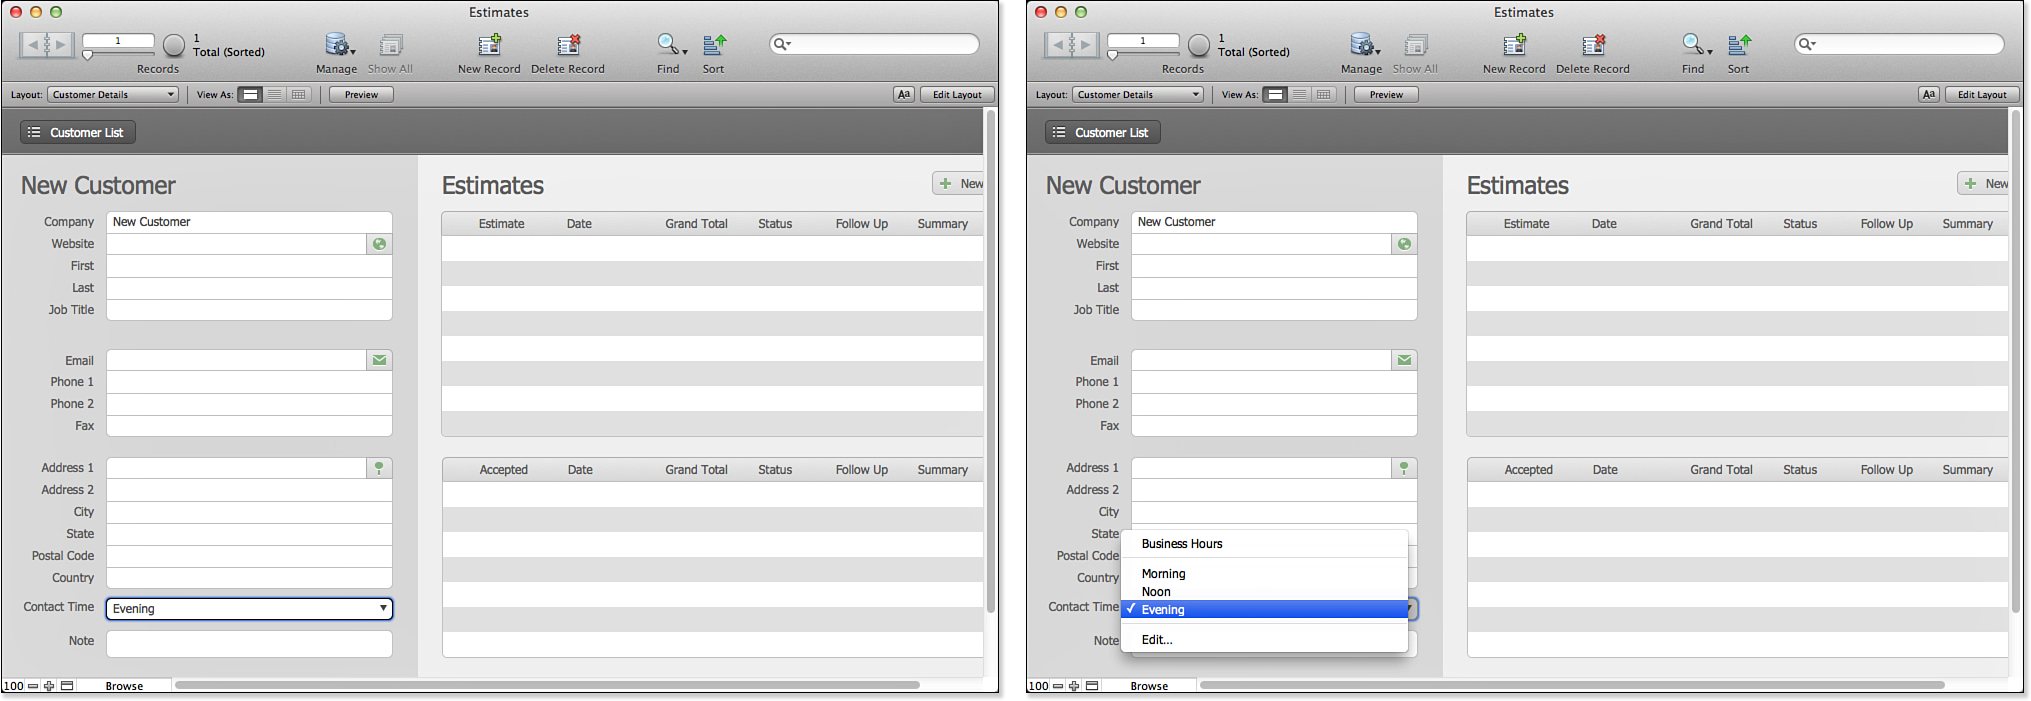
Figure 2.19. A downward-pointing arrow might indicate a drop-down field.
You never need to save a FileMaker Pro database. As users commit records, those records are automatically stored in the database file. If you want to save a copy of your database or create a duplicate for backup purposes, the Save As option under the File menu will serve.
FileMaker includes spell-checking for text fields, although you can turn it off if you want. When a field is active—when the cursor is in the field itself—FileMaker underlines in red any words it concludes are misspelled. If you right-click (or Control-click on a Mac with a one-button mouse) the word, you can choose from among possible other spellings or save a word to your local dictionary file.
Moving from field to field can be managed on your keyboard if you simply press the Tab key. Some solutions also support the Return and Enter keys. You can, depending on how the developer of a database has set things, tab from button to button or tab panel to tab panel. To execute an action associated with an active button or tab, press the Enter key or spacebar on your keyboard.
![]() For a discussion of how to control object behavior from a development perspective, see “Working with Fields,” p. 44.
For a discussion of how to control object behavior from a development perspective, see “Working with Fields,” p. 44.
You’ll work with a few different formats of fields in FileMaker Pro:
• Edit box—This allows standard keyboard entry and sometimes includes a vertical scroll bar.
• Drop-down list—When first clicking into a field, you are presented with a list of options from which you can select. Alternatively, you can type directly into the field.
• Pop-up menu—A pop-up menu is similar to a drop-down list, except that a pop-up menu does not allow typing directly into the field.
• Check box set—Check boxes allow multiple values per field.
• Radio button set—These are similar to check boxes, with the difference that they are mutually exclusive. A user can select only one value at a time.
• Pop-up calendar—Some date fields might open to show a calendar that you can page through from month to month. To input a date into your date field, click a specific day.
Shift-clicking allows a user to select multiple values in certain input types, such as pop-up menus and radio buttons. Selecting multiple values in a pop-up menu or in radio button sets is generally a bad idea. You will end up with unpredictable results because you’re making an exception to a formatting choice meant to allow for only one value in a given field.
As the FileMaker Pro interface has evolved, new interface elements have been introduced. Many of the traditional interface elements immediately reveal their functionality: Radio buttons, for example, are instantly recognizable. Some newer features now allow developers to provide hints of functionality that the interface provides. Often this is done by using a light gray for some of the interface elements. Drop-down menus are good examples of this. Even when the drop-down menu is not selected, the small downward-pointing arrow at the right of the field is visible. For the purpose of this book, the arrow is shown darker than it would be in most interfaces; it is usually quite subtle. And do remember that this is the developer’s option: There might be no indication of the field’s capabilities until you click in it and activate the drop-down menu.
A date field can contain a pop-up calendar, as shown in Figure 2.20. As is the case with the drop-down menu shown later in Figure 2.21, the little calendar icon at the right of the date field might be shown in light gray even when the field is not active.
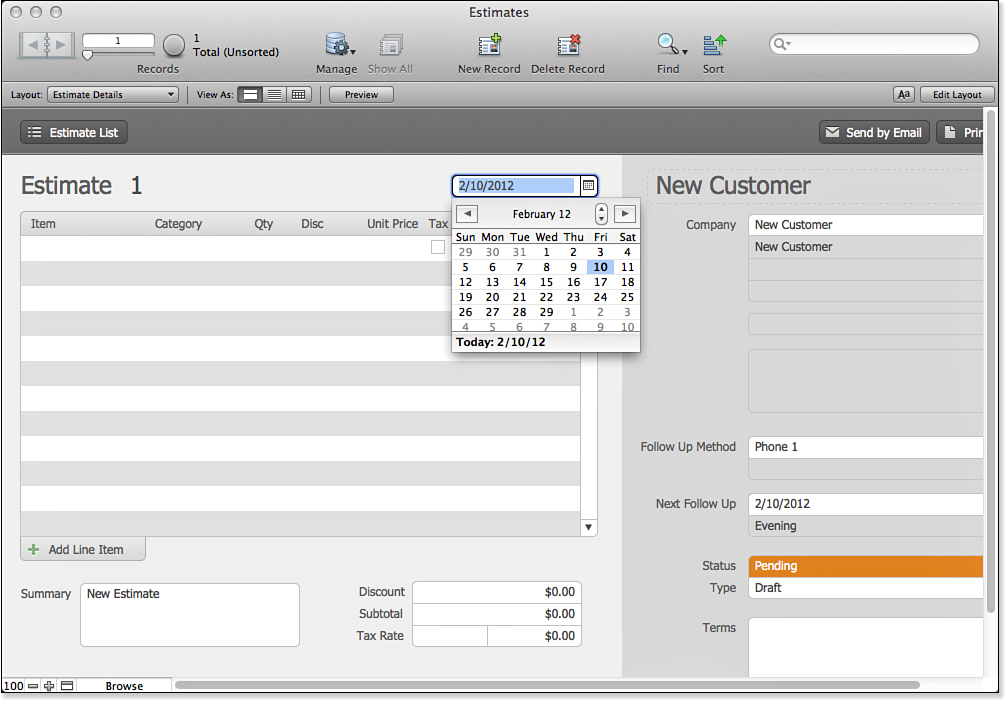
Figure 2.20. Pop-up calendars can ease entry of dates.
Data in Formatted Fields
You might find it helpful to understand how multiple-value data is stored in fields: Remember that check boxes, radio buttons, drop-down lists, and pop-up menus are all nothing more than data-entry assistants. The actual data stored is a collection of values delimited by line returns. This means that you can accomplish the same result, from a data perspective, by simply entering a Return-delimited list of values into your fields. This is an important point for you to remember when performing find requests, which we cover later in this chapter.
![]() To understand more about how multiple values in a field can lead to relational data structure problems, see Chapter 5, “Relational Database Design.”
To understand more about how multiple values in a field can lead to relational data structure problems, see Chapter 5, “Relational Database Design.”
Modifying Value Lists
Often, you might need to add new values to a value list—the list that is used to create drop-down lists and pop-up menus, check boxes, and radio button items. Developers have the option of including an Edit option at the bottom of a drop-down list or pop-up menu. Selecting Edit brings up a dialog that you can use to change or add to a list as needed (see Figure 2.21). You can add a separator line to the list by using a single hyphen, as shown in the figure.
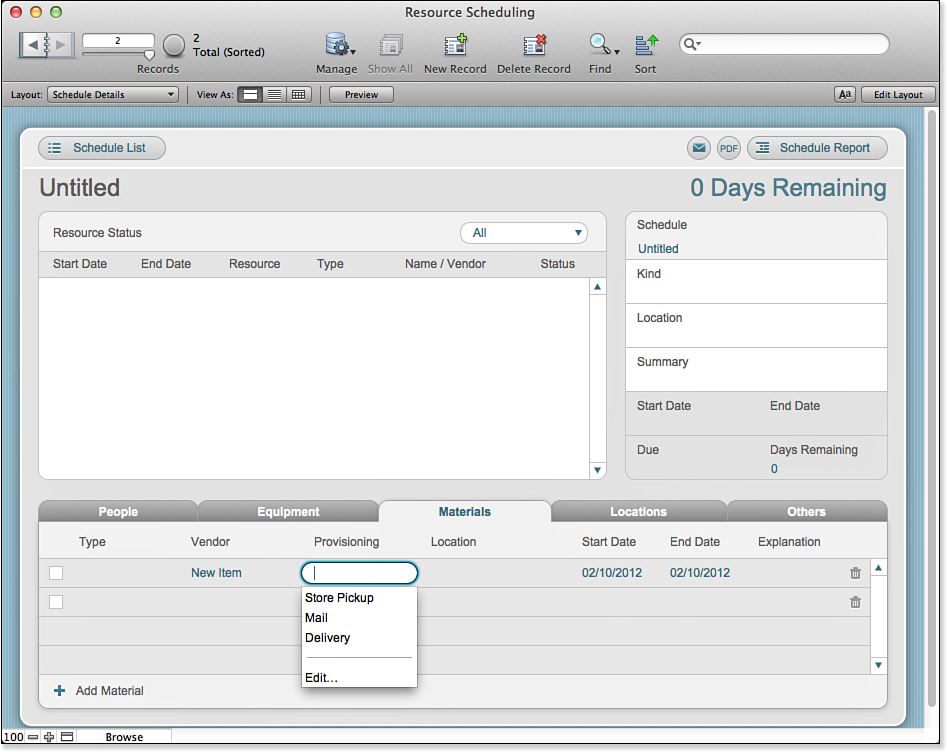
Figure 2.21. Editing value lists is a simple way to fine-tune a database to your specific needs without having to dig into programming.
To edit the items in a value list, simply type text into the Edit Value List dialog, followed by a carriage return.
Keep in mind that just because you replaced an old menu item with a new category—for example, “autos” became “cars”—doesn’t mean that you changed the actual values stored in your database’s records. Remember that field formatting is nothing more than a data-entry assistant. By changing the assistant menu, you have not changed any data stored in your database.
Using the “Other” Value in Value Lists
Radio button sets and check boxes work a bit differently than drop-down lists and pop-up menus. Developers do not have the choice to add an edit function to these formats; rather, they can include an Other option. This allows users to enter virtually any custom text they want, from a single value to hundreds of lines of text. Regardless of the value, the check box or radio button option visibly displayed is Other; however, the data stored and included in the field’s index includes whatever your other data is. In contrast to adding values to a value list and changing the options available on all records, the Other function simply enables you to enter custom text into a specific record’s field.
As you can guess, developers often disable this feature. Data can get buried behind another entry and can be difficult to account for. Just remember that all you’re doing is using field formatting to help in entering consistent data. These fields are no different from standard fields that accept text data.
FileMaker Pro is adept at converting data from one type of field to another. If you have a calculation that requires a number, FileMaker Pro happily takes the contents of a text field and converts it to a number. Often this is exactly what you want, although the default conversion of “ten” to a number will not give you the result you might expect.
Despite the built-in conversions, you will get the best performance out of FileMaker Pro if you use the strictest representation of data. If data is a number, use a number field. Dates should be date fields, not free-format text fields.
Field Types
In addition to enabling you to control how data is entered into a field, FileMaker Pro databases use specific field types for different types of information. Field types are independent from the field formatting discussed in the preceding section. For example, it’s entirely possible to format a calculation field as a check box. Calculation fields are different from standard fields; they do not accept data entry and instead present the results of a formula. Although you, as a user, might expect to be able to click on a check box, if you do so, FileMaker Pro prompts you and explains that calculation fields are not modifiable.
It’s incumbent on the developer to sensibly identify, for a given system’s users, which fields expect what sort of data. Often field labels make this clear. For example, you can often expect a Price field to be a number, and an Invoice Date field will no doubt be a date type. You can also use cues (such as the icon for a pop-up calendar) to distinguish fields.
The following list describes the field types available in FileMaker:
• Text—The most common data type, text fields allow a user to enter approximately 2GB of information, including carriage returns. Sorting by a text field is alphabetical.
• Number—Number fields store up to 800 digits, 400 on either side of the decimal, and sort as typical numbers.
• Date—Dates are managed in FileMaker by the Gregorian calendar, 1/1/0001 through 12/31/4000. It’s a good practice, but not required, to use four-digit years when doing data entry. Sorting is by year, month, and day, with the sequence of elements determined by the system settings in effect on your computer at the time the database file was created. This matters only if you commonly deal with date sequences that vary (year/month/day, day/month/year, and so forth). If that is the case, consider using separate fields for month, day, and year to avoid ambiguity.
• Time—Time in FileMaker is stored in hours, minutes, and seconds, like so: HH:MM:SS. Sorting is based on a typical 24-hour clock.
• Timestamp—A timestamp is a tool generally used by database developers to identify exactly when a record was created or modified. It combines a date with a time and looks like “6/28/2008 2:00 AM.” For the user, you might occasionally want to use a timestamp when performing a find.
• Container—Container fields hold just about any binary information, be it an image, a movie, a PDF document, a Word document, or a file archive. You cannot use these fields for sorting purposes. Container fields are capable of holding files of up to 4GB in size, making it possible to use FileMaker Pro for managing all sorts of digital assets.
Data entry for container fields is slightly different from other types: You need to either paste a file or image into the field or use the Insert menu.
• Calculation—A calculation field stores the result of a formula, which might be based on other fields or related information in your system. The resultant data is assigned a type so that one can return a date, time, and so on. It’s even possible for a calculation field to return container (binary) data.
Calculations can also format data: From FileMaker Pro’s standpoint, there is no difference between a calculation that adds two fields and one that rounds a number to two decimal places and then turns the result red. You will find out more about this in the chapters about layouts and about sharing FileMaker Pro databases.
The data in calculation fields is not modifiable by an end user; you can, however, access calculation fields for performing finds, sorts, and so on.
• Summary—Summary fields are similar to calculations, but they return information from your found set, or current group, of records. A summary field performing a Total operation, for example, totals a field across your current set of records. Other functions include averaging, totals, maximum, and minimum.
Layouts have front-to-back ordering of elements. Mouse clicks are handled by the frontmost object underneath the mouse. If you place a field that is not editable on top of a field that is editable, you can often provide very intuitive and sophisticated interfaces without troubling the user.
For example, if you place an editable phone number field on a layout, you can create a calculation field of exactly the same size and shape on top of it and specify that the calculation field is not editable. Clicking the calculation field does nothing; the mouse click passes through to the next object that accepts mouse clicks at that spot—the editable phone number field. The user can enter an unformatted phone number; then, when another field is selected, the calculation is performed, adding punctuation to the phone number, and it appears that the phone number field itself has been formatted. Actually, the raw phone number field is simply obscured by the formatted phone number created by the calculation.
Saving and Retrieving Information in Container Fields
Container fields work differently than other fields. You cannot type data into them; rather, you have to insert whatever file or media you want to store or display in them.
Note that a container field can do more than just store documents. For many image types, it can display the image within FileMaker; for many sound types, it can play the sound within FileMaker; and for QuickTime movies, it can allow users to play the files. Whether you store something as a document or as a media type that FileMaker can play depends on how you save the information to the container field. There are three general ways to store a file or media in a container field:
• Paste—You can place an image or a document on your Clipboard and simply paste it into a container field. FileMaker makes its best guess as to what kind of information is on your Clipboard and either stores a document or displays an image, a sound, or a QuickTime movie.
• Insert—Using the Insert menu, you can choose from among Picture, QuickTime (movie), Sound, and File. If you choose from the first three, FileMaker displays the media in question. If you choose File, FileMaker loads a document.
• Import—Under the File menu is the Import Records menu item from which you can further choose to import a file or a folder. If you choose to import from a folder, you can point FileMaker to a directory of images or files and load them into a container field. You can also import container data directly from other FileMaker files.
In both the case of inserting a single media file and the case of importing many, you have the choice of inserting only a reference to the file or of inserting the document itself. In the case that you insert a document itself, that document is physically stored in FileMaker and is accessible by all users. They can select the container field in question and choose Export Field Contents from either the Edit menu or the contextual menu available from the field itself. In addition, as you see in Figure 2.22, you have the option to compress a file that you are inserting.
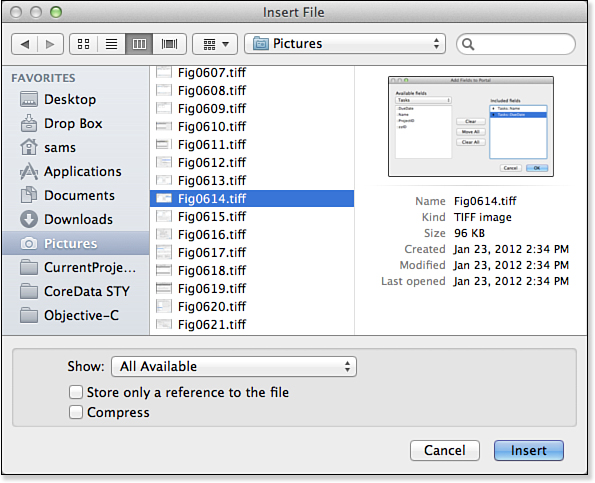
Figure 2.22. Insert files and (optionally) compress them.
If you choose instead to store only a reference to the file, the file is stored physically elsewhere—for example, on a shared hard disk. To have access to the file, users must have access to the same shared directory on which the actual file sits. In this case, you are performing the same sort of task as saving a shortcut or an alias to the file: It remains on whatever storage device you found it.
The benefit of leaving documents on an external storage device and storing only references within FileMaker is that these documents require far less space within FileMaker for storage. Storing images and other files outside of the database itself is a common strategy used by efficient database management systems including FileMaker.
![]() See “Container,” p. 89, to see how you can manage external storage and other settings for files stored in container fields. (This feature was implemented in FileMaker Pro 12.)
See “Container,” p. 89, to see how you can manage external storage and other settings for files stored in container fields. (This feature was implemented in FileMaker Pro 12.)
Global Storage
Field data in your database generally pertains to a specific, individual record. The baseball team field for your San Francisco record holds the data “The Giants,” whereas for Chicago, it’s “The Cubs.” In some cases, however, a developer opts to define a field as globally stored. Developers often use a shorthand, globals, to describe these sorts of fields. The value in that field is constant throughout the database, regardless of which record is currently under inspection. Some common examples might be fiscal year start and end dates, your company name, report headers, or a fixed commission rate. As a user, you might not always be able to tell which fields in your database are defined to store global values and which are record specific.
An important point to keep in mind about global fields is that their behavior varies depending on how you’re hosting a database. If you’re using a database on your own local machine, with sharing set to single user, all global data is preserved from session to session. In other words, the next time you open the database, your global details remain from the last time you worked with the system.
If you’re working with a database hosted on a server, all global information is session specific. It might contain default values, but if you change some data in a global field, other users of the system do not see that change, nor is it preserved for the next time you use the database. If a developer has added global storage to a field in your system, it is quite likely that there are routines to manage what information it holds when necessary.
Before the introduction of script parameters and script variables, it was impossible to create certain types of scripts without the use of global fields. As a result, older FileMaker Pro databases use global fields more often than modern ones.
Data Validation
Data integrity is one of the primary concerns of any database developer or of the team using a given system. If duplicate records appear where they should not, misspellings and typos plague your database, or worse yet the wrong data is entered into the wrong fields, your system will soon become unreliable. For example, if you run a monthly income report, but in a few of your transaction records someone has entered a date value where in fact a transaction amount belongs, your monthly totals will be incorrect.
FileMaker Pro—or any application, for that matter—cannot read users’ minds and fully safeguard against bad data, but developers do have a wide range of tools for validating information as it is entered. If your organization can come up with a business rule for validation, a developer can apply that rule to a given field or fields. Consider the following examples:
• Transaction amounts can be only positive numbers, can have only two decimal places, and cannot exceed 100,000.
• Employee hire dates may be only equal to or later than 1/1/2001.
• Data in a given field must match established values in a status value list containing the values open, closed, and on hold. The field will not accept any other status descriptions.
• Company names in the database must be unique.
Understanding that these rules are in place will help you understand the underpinnings of your database application. When a validation check occurs, the system might prompt you with an appropriate message (see Figure 2.23).
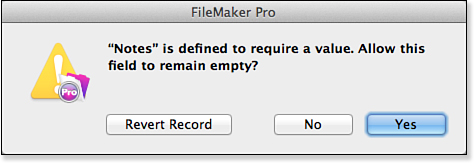
Figure 2.23. This is an example of a default validation message. If you choose Revert Record, whatever data you’ve entered into the field reverts to the state it had before you started editing.
In addition to the default dialog shown in Figure 2.23, developers can create their own custom text, as shown in Figure 2.24.
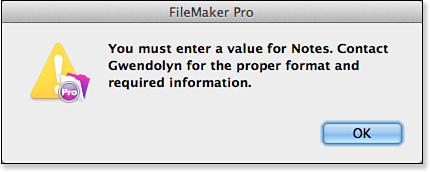
Figure 2.24. This is an example of a customized validation message.
If you choose Yes rather than Revert Record, your data is accepted as is and overrides the validation requirement. In some cases, you might not have the option of posting an override, and the Revert Record button will not be shown.
![]() To explore additional thoughts on addressing data problems, see “Data Integrity” in the “Troubleshooting” section at the end of this chapter.
To explore additional thoughts on addressing data problems, see “Data Integrity” in the “Troubleshooting” section at the end of this chapter.
Never, ever, under any circumstances, no matter what happens, use data to describe data conditions. Values of 0, 99, and –1 are values, not shortcuts for data conditions. You can use validation rules to prevent the storage of invalid data, and having done so, you can rely on the fact that the data is data. If you need to store imperfect data, consider using pairs of fields: as-entered data (which may be invalid) and validated data (which is always valid if it exists). FileMaker Pro correctly handles missing data (empty fields); anything other than valid data or missing data belongs elsewhere in the database.
Millions of dollars were spent at the end of the twentieth century tracking down what came to be known as the Y2K problem, much of which arose from the fact that programmers decades earlier assumed that it was safe to use 00 to indicate missing data for a year. The fact that 00 in the peculiar arithmetic of two-digit years was the result of 99 + 1 did not occur to many people until it was necessary to review every line of code in critical applications to see whether this had happened.
Working with Related Data
One of FileMaker’s core strengths is how it allows you to view and work with related information from a different but connected contextual set of records from other tables.
The Tasks Starter Solution has related tables for assignees and attachments. A project can consist of one or more tasks; a task can be assigned to one or more assignees. And because these relationships have been set up in the database, it is easy for the FileMaker Pro layouts to display them and allow them to be edited.
Figure 2.25 shows the tasks table in the database. At the right of the layout is a portal that shows the people assigned to that task. A portal lets developers display related information to users.
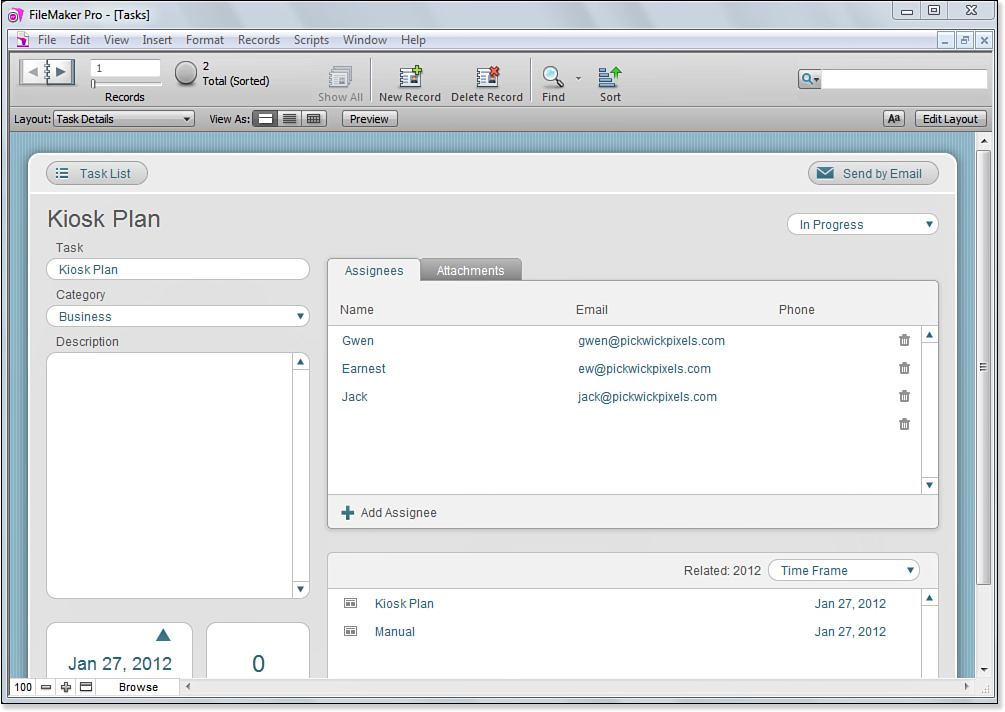
Figure 2.25. The Form View – Tasks layout contains a portal of related contacts.
You can have multiple relationships, and they can be displayed in multiple portals. Figure 2.26, for example, shows the Resource Scheduling Starter Solution. Tabs at the bottom display portals with relationships from each project to people, equipment, materials, locations, and other items.
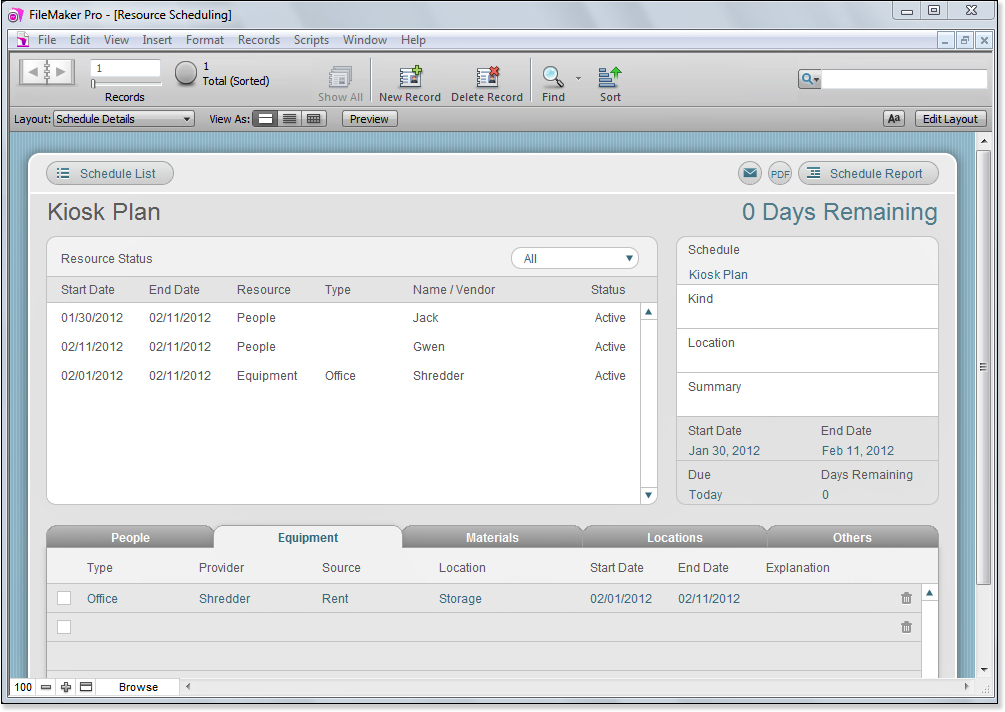
Figure 2.26. Tabs can display multiple relationships in multiple portals.
Relationships are bidirectional. This means that, just as you can display the people for a project, you can turn it around and display the project for a person if the database is so configured. As you will see in Chapter 3, for the case in which the same people are assigned to several projects, there is a slightly more complex database structure (it is referred to as a many-to-many relationship.)
Understanding the Mechanics of a Portal
A portal is simply a view into another table and includes rows of specific related records. Developers determine the rules by which records appear in portals, and at times the records displayed can dynamically change or a portal might display other records in the same table you’re currently viewing.
Most portals have a scroll bar on the right. They feel a bit like List views and act much the same way. To browse through your related records, simply scroll up and down through the list. Data entry works the same way it does in other areas of FileMaker: Simply click into a field and enter whatever data is appropriate.
At times, developers include buttons in portals. When they place a button within a portal, the button in question appears on each portal row, and each row’s button will act on that row’s data or record. Common buttons are a delete button (often a red X, a trash can, or a red circle with a slash through it at the right of the portal row) to delete that portal row and a disclosure button (often a triangle at the left of the row) or a checkbox at the left of a portal row. Figure 2.26 shows both of these interface elements.
Your developer might have turned off the ability to add or delete portal rows, in which case there should be an alternative means of adding related records, such as a + and perhaps explanatory text so that you know what you’ll be adding. Likewise, your developer might have disabled the ability to create new records using the first available row. In addition, as you will see in the discussion of related records in Chapter 7, not all relationships are simple. In the case of complex relationships (nonequijoins, to be specific), FileMaker Pro cannot allow this method of adding rows to portals because the relationship would be ambiguous. For several of these reasons, portals increasingly allow the creation of new portal rows with a button outside the portal.
Creating and Deleting Portal Rows
To create a new portal row—which then creates a new child record—scroll to the first empty row of a portal. If there are blank fields, click any of the blank fields there. Child records is a term often used to describe related, hierarchically dependent records—for example, Company and Employee. Employee records are considered children of Company.
If a developer allows for it, you can delete a portal row by following these steps:
1. Click outside the fields of a given portal on the row background. (You might have to mouse around a bit.) You should see the row become highlighted.
2. Press the Backspace or Delete button on your keyboard. You can also use Records, Delete Record or the Delete Record command on the Status toolbar. You are prompted as to whether you want to delete that one related record. Click Delete or Cancel to close the dialog box.
It’s important to remember that the developer of a given file must have turned on this portal behavior. It is increasingly considered good practice to explicitly provide a delete row icon in a portal row, rather than asking users to understand the mechanics of deleting portal rows.
Portal Sorting
Sorting records is covered later in the chapter. For now, simply note that a developer determines by what means a portal sorts and that there is no way for you, as a user, to change a portal’s sort order unless the developer creates a specific mechanism allowing for that option. A developer can build a dynamically sortable, command-driven portal in various ways, but this is not the default behavior in FileMaker Pro.
Finding Data with FileMaker
Up to this point, we’ve discussed working with a single record and the fields on a given form layout, but at all times FileMaker holds a found set of records—anywhere from none to all the records in the table that is the basis of the current layout.
This is an important point to remember: Even though you might be able to see the contents of only one record’s fields (more than likely in Form view), you can still work with either all the records in your table or a subset of such. Think of it as working with a deck of cards. There are 52 total cards in your deck, some of which are in your hand, and one of which is frontmost (visible). Your current record would be akin to that front card and your found set like those cards in your hand. In FileMaker, many functions apply to a found set. A good example is sorting: You are ordering only those records in your found set.
Many FileMaker Pro databases offer layouts tailored to be viewed either in Form view, where one record encompasses the information on the screen, or in List view, where layouts display multiple records at once. The figures in this chapter have shown both styles. Today, with the knowledge that FileMaker databases may be used on a wide variety of devices, many people are adhering rather strictly to this list/form structure. It is a familiar interface paradigm on the Web, and it is easily adaptable to desktop and mobile devices.
Figure 2.27 shows the Assets Starter Solution in Form view on an iPad running FileMaker Go; Figure 2.28 shows the corresponding List view.
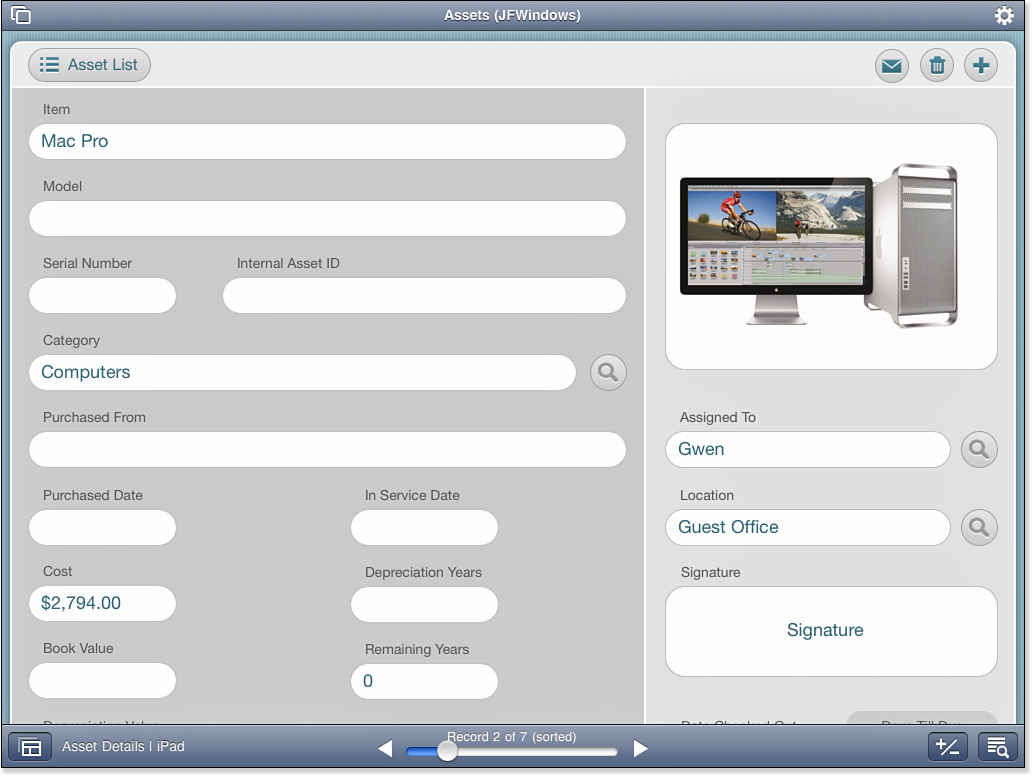
Figure 2.27. Assets Starter Solution in Form view on an iPad running FileMaker Go.
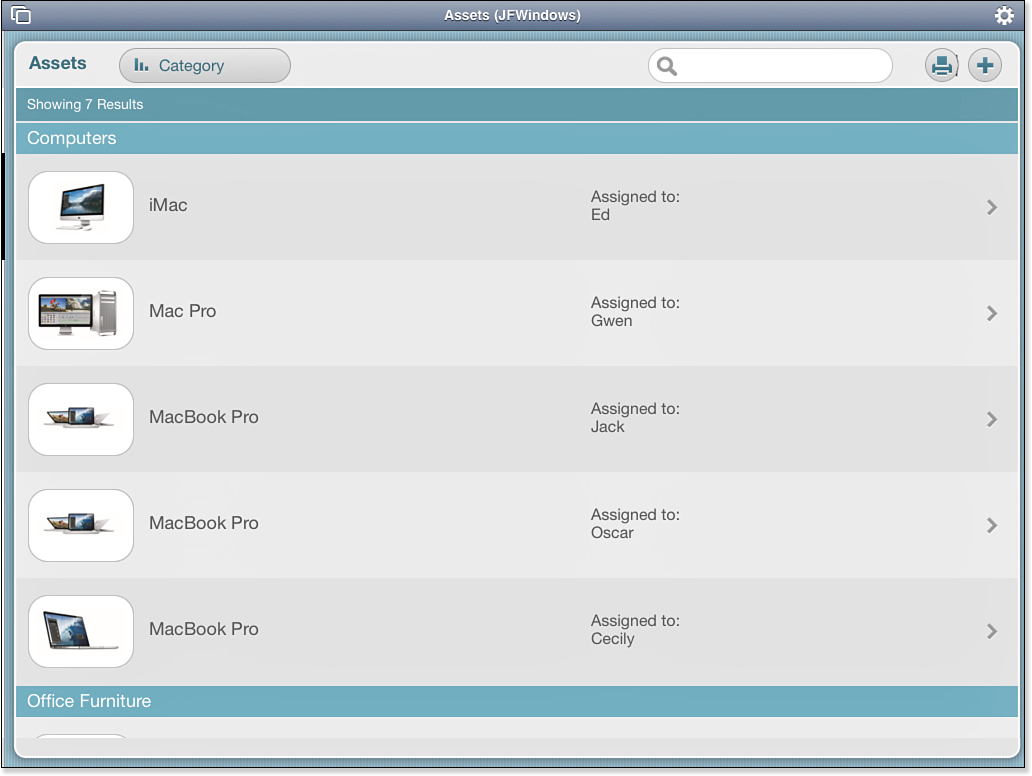
Figure 2.28. Assets Starter Solution in List view on an iPad running FileMaker Go.
Working with groups of records is important mainly for comprehension and processing of your information. Data entry occurs on one individual record at a time, unless you’re importing or performing some other function that applies across multiple records. It’s in the reporting and analyzing stage that working with multiple records becomes necessary.
One of the first ways to work with a group of records is simply to scan the list visually. Summary fields might lie at the bottom of a List view and can total numeric data based on a current found set, or perform other summary operations such as counting or averaging.
For a quick example of how this might work, imagine a sales database. If you were to find or search for all records in January, your summary fields could total January’s sales. If you were to find again for the year 2013, your totals would be annual. The value of the summary field varies depending on your found set. If you perform different find requests, the information on your screen can deliver different results, specific to a given group of records.
Summary fields are quite powerful, but they require processor time. If you have a large found set of thousands of records, waiting for a summary field to evaluate can take some time. You can press the Esc key (or Command in OS X) to cancel the summary, or simply avoid scrolling or viewing that portion of a layout. Summary fields evaluate only when they are visible on the screen.
One last important note about found sets: They can be composed of records from only one table. You cannot, for example, display records from an automobile table and a manufacturer table in the same List view or Table view, although they can be shown as related fields to the main table’s records.
Using Quick Find
At the right of the Status toolbar in Browse mode, a search field lets you perform a Quick Find. Type the word or phrase you’re searching for, and FileMaker searches for it in the current layout’s table. FileMaker doesn’t care what field the data is in: it will find “York” equally well in a field for city name, a field for last name, and a field for plays in Cricket. You type it, FileMaker Finds it.
Using Find Mode to Perform a Find Request
You can also use Find mode to search for data in specific fields. This lets you work with found sets of records.
To create or change your found set in FileMaker, you must perform a find request or search. This entails getting into Find mode and entering some set of search criteria into the field (or fields) by which you want to search. FileMaker takes you back into Browse mode after your search is complete.
To perform find requests in FileMaker, you have to use one of three options to change to Find mode: the Find icon at the right of the Status toolbar, the menu on the bottom left of your application window, or the View menu. Developers might also opt to put various Find buttons into their systems. When you have entered Find mode in any of these ways, the Status toolbar changes, as shown in Figure 2.29.
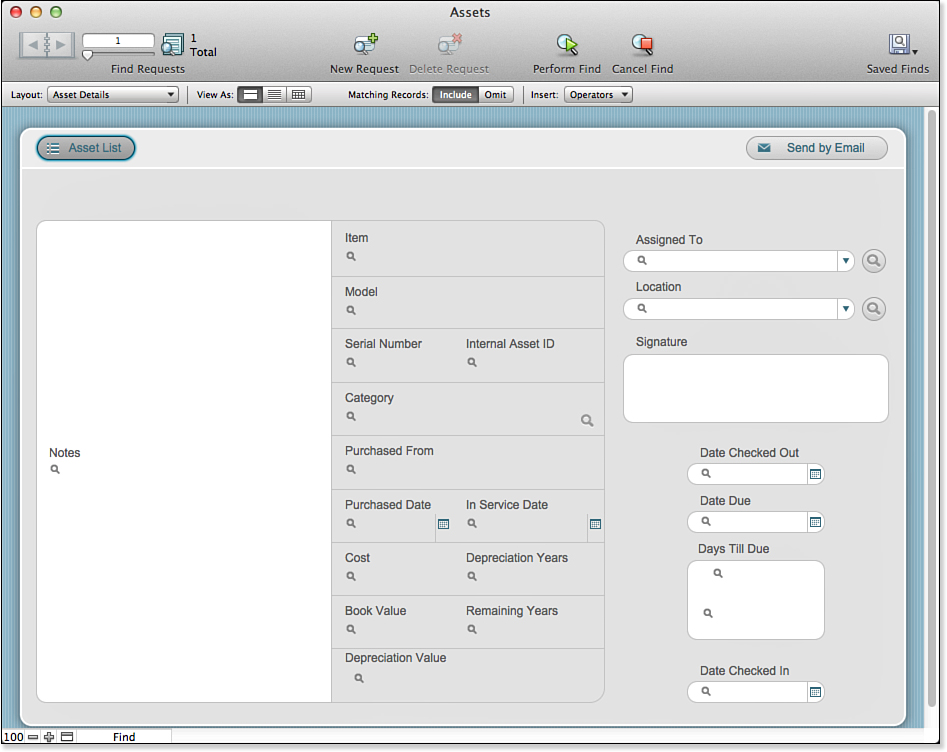
Figure 2.29. The Status toolbar changes when you click the Find icon.
At the left of the Status toolbar, the Records section that is visible in Browse mode changes to a Find Requests section. Instead of paging through records, you can now page through find requests. Similarly, instead of seeing the number of records, you now see the number of find requests.
To the right, icons let you create new find requests and delete old ones; others let you perform a find or cancel it to return to Browse mode. At the bottom right of the Status toolbar, buttons let you indicate that a find request should return records that match the request or that it should omit records that match the request. Logical operators for the find requests are also available. All of these are described in this section.
After you’re in Find mode, you create a find request that describes the criteria by which you want to search. You enter data into fields just as you would in Browse mode, but instead of creating or modifying records, these requests serve as instructions for finding your data. You can add a new request, create multiple requests, and delete requests from the Status toolbar or from the Requests menu that replaces the Records menu in Find mode.
FileMaker Pro shows a small magnifying glass in data-entry fields when in Find mode, as you see in Figure 2.29. As soon as you click in the field, the magnifying glass disappears and you can type your find criterion. This prevents users from accidentally entering data in Browse mode when they think they are in Find mode. For example, you can type iMac into the Item field. Figure 2.30 shows the results of the find. Notice that you can tell from the Status toolbar that you’re automatically back in Browse mode. At the left of the Status toolbar, you can see that one out of seven records has been found (that is the found set).
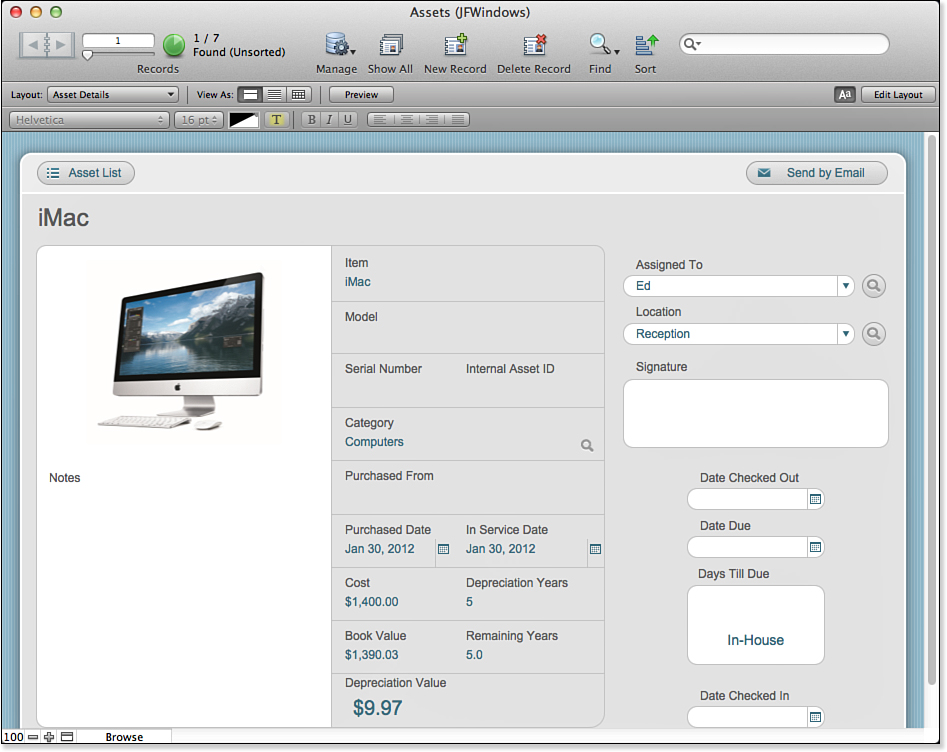
Figure 2.30. FileMaker matches the find criterion “iMac” in the Item field against the data in the database after you click Find to find all assets with “iMac” in the field item.
If you perform another find, the records matching your new request replace your found set.
You can perform a complex find by entering data into more than one field. FileMaker Pro finds all the records with both of those find criteria. In database parlance, this is called an and query. Figure 2.31 shows a request with two criteria: MacBook is entered in the Item Name field, and oscar is entered in the Assigned To field in the portal. Both of these conditions must be fulfilled for a record to be found.
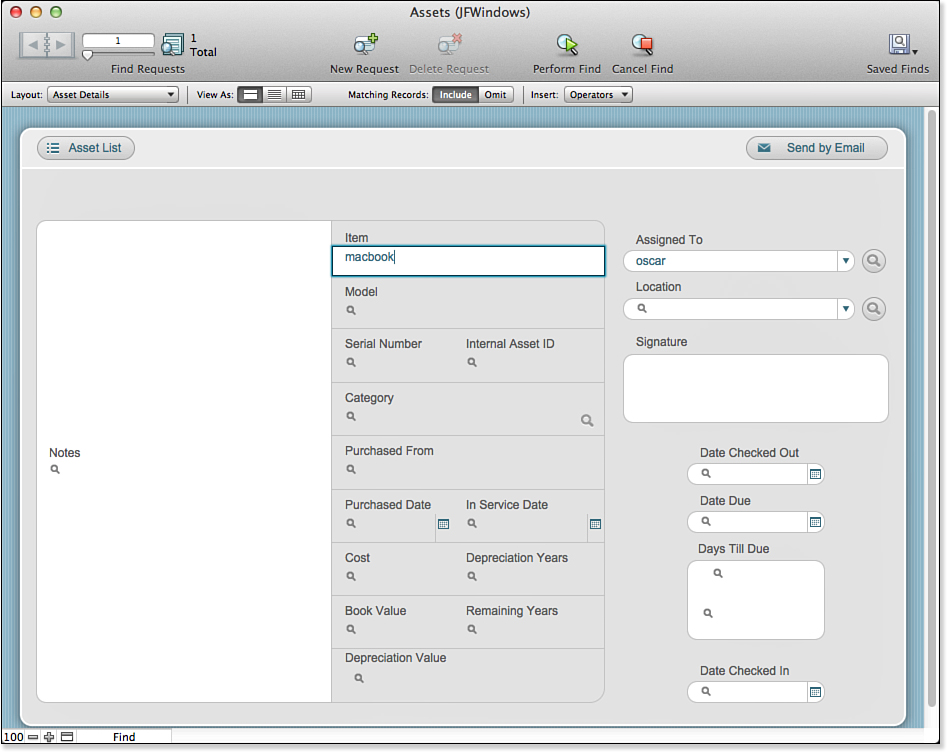
Figure 2.31. A find request with multiple fields specified retrieves data in which all the criteria are met—an and query.
Note that by default, FileMaker doesn’t require strict matches (MacBook, for example, matches MacBook Pro). Also, by default, capitalization doesn’t matter. You control this behavior with search operators, as described in the following section.
Search Operators
In addition to text that you type in, you can use operators to construct queries. Figure 2.32 shows the Operators menu in Find mode.

Figure 2.32. Special symbols enable you to search for a wide range of match criteria.
The less than, less than or equal, greater than, greater than or equal, and exact match symbols should be obvious. An entry of >3 finds all records with a value 4 and above. An entry of <=100 finds all records with a value of 100 or lower (including zero and negative numbers).
You need not use the Operators menu at all: < and = typed from your keyboard work just as well as inserting the composite symbol from the pop-up menu in the Status toolbar.
The ellipsis (...) for ranges is a commonly used search symbol. The search criterion 1/1/2003...12/31/2006 returns all records for the span of four years. (Two or three periods from your keyboard work just as well.)
Use * and # for wildcards. The # symbol is for one digit exactly. An entry of 5# finds all whole numbers from 50 to 59. The # alone finds just numbers 1–9. A 1#1 criterion finds 101, 121, 131, and so on, but not 211 or 1211.
The ~ for relaxed search looks intriguing, doesn’t it? Some fuzzy logic, perhaps? No such luck. It’s used to search for common base characters in two-byte Asian phonetic alphabets. It doesn’t do anything for any other languages.
Shortcuts for Fast Finding
The right-click (Control-click for Macs using a one-button mouse) contextual menu for a field in FileMaker will show three “fast match” commands: Find Matching Records, Constrain Found Set, and Extend Found Set. Here, FileMaker performs a find request on the data in the field in question. If, say, you right-click a field containing the term porch and choose Find Matching Records, your found set changes to show all porch records. Likewise, you can constrain and extend your found set based on the value in the field. We’ll cover these concepts in the next section.
FileMaker also has some date-searching capabilities that save time. You can type 2005 in a date field and FileMaker correctly interprets that to be a */*/2005 search that results in all the records for a given year. Likewise, you can enter 1 through 12 in a date field and FileMaker assumes that you’re searching for records within that month for a given year.
Finally, you can search for the names of the days in a date or timestamp to pull up records specific to the days of the week.
Multiple Find Requests
FileMaker Pro also enables you to perform complex searches involving multiple find requests. To find both the MacBook and the Oscar records, a user would simply enter Find mode, type MacBook into the item field, and then create a new record/request. Just as you can create new records in Browse mode, you can create and delete requests in Find mode. This process is identical to creating a new record in Browse mode. In the second record, a user would enter Oscar in the assigned to field.
A user can flip between requests, using the book icon in the Status toolbar, and can delete requests as necessary. As soon as the user is satisfied with a series of requests, clicking Find on the left performs the find and returns the user to Browse mode with a new found set.
Multiple find requests can also include requests meant to be omitted. Use the Include and Omit buttons in the Matching Records section of the Status toolbar to do this. Thus, you could find all painting tasks for the house—or by omitting house from painting tasks, you could find those that refer to the garage, garden shed, and other non-house areas. Whereas typing find criteria into multiple fields in a single request produces an and query (all the criteria must be true), using multiple requests creates an or query—all the criteria in the first request must be true or the criteria in the second request must be true, and so forth.
Figure 2.31 shows a typical and find request: It searches for records that contain an item named “MacBook” and an assigned-to named “Oscar.” If you create two separate requests, one of which searches for the item and the other of which searches for the Assigned To name, you will have an or request. Because they are separate requests, they find all records where the item name contains MacBook or the Assigned To name contains Jack. In general, or queries return as much or more data than and queries because they are less restrictive.
If you are analyzing data in a database with FileMaker Pro, it is important to be able to categorize the data properly. For example, imagine that, in a school enrollment database, you find 15 students enrolled in Nineteenth Century History and 25 students enrolled in Physics—two facts you could determine with simple find requests. It might be more useful to know that of 15 students enrolled in Nineteenth Century History, 12 are also enrolled in Physics—something you could determine by constraining the Nineteenth Century History found set.
Constrain and Extend Requests
Performing find requests is all well and good, and as you can imagine, they can become quite complex. Instead of developing complex find requests, you can work through the complexity in stages. Rather than clicking the Find button in the Status toolbar, choose Requests, Constrain Found Set. FileMaker Pro performs this new find request on only the existing found set rather than on the entire database.
Using Requests, Extend Found Set works in a similar fashion by retaining the existing records and simply adding more to them. This way of working helps you simplify complex queries. It also is a powerful way for you to explore and analyze the data in your database.
Modify Last Find
Modify Last Find is a great feature for find requests. In Browse mode, choose Records, Modify Last Find. You are placed in Find mode with the last set of find requests you performed. This capability is handy if you want to continue to play with a particularly complex set of find requests or are simply performing a series of similar requests.
Finding on Multiple Layouts
FileMaker’s find functionality is flexible. While you are in Find mode, it is entirely possible to change layouts. As long as all the layouts on which you enter your requests are associated with the same source table, your find performs just as though you had a layout with all the fields on it you needed. Finding is not layout specific.
Finding is, however, always table specific. Some more advanced FileMaker Pro solutions comprise multiple tables. Although it is possible to search across related information in FileMaker Pro, your find results will always display a found set of records from a single table.
![]() To learn more about working with multiple tables, see Chapter 6, “Working with Multiple Tables.”
To learn more about working with multiple tables, see Chapter 6, “Working with Multiple Tables.”
Omitting and Showing All Records
After performing a find, you can opt to omit individual records from the resultant found set. Choose Records, Omit Record to omit a single record or Omit Multiple to omit a specified number of records. To restore your found set to the full set of records in your current table, choose Records, Show All Records.
With the Status toolbar, use the button shown in Figure 2.33 to switch between the found and omitted records. Choosing whether to find or omit records while you are constructing find requests in Find mode is done with the Matching Records choice; after you have performed the find, use this icon in Browse mode to switch between the found and omitted records. For example, you can find all records assigned to Oscar and omit those that have not been checked out (in other words, they might have been assigned to Oscar but he has returned them).
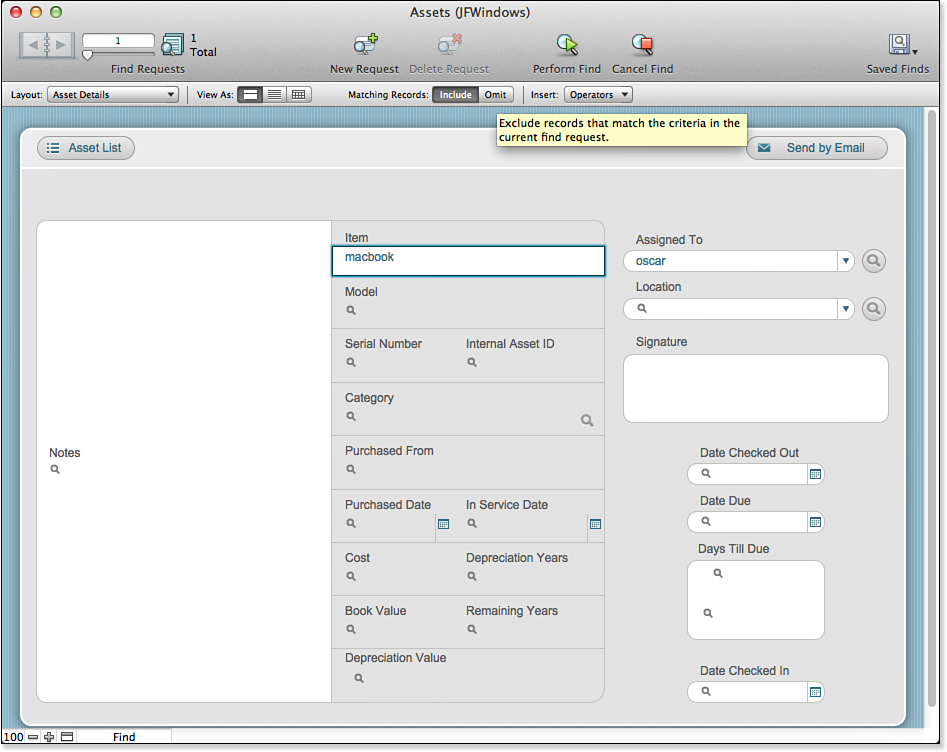
Figure 2.33. Switch between found and omitted records.
Saving Find Requests
You can save find requests for future use. This is particularly helpful with complex find requests. The Save Finds icon at the right of the Status toolbar brings up the menu shown in Figure 2.34.
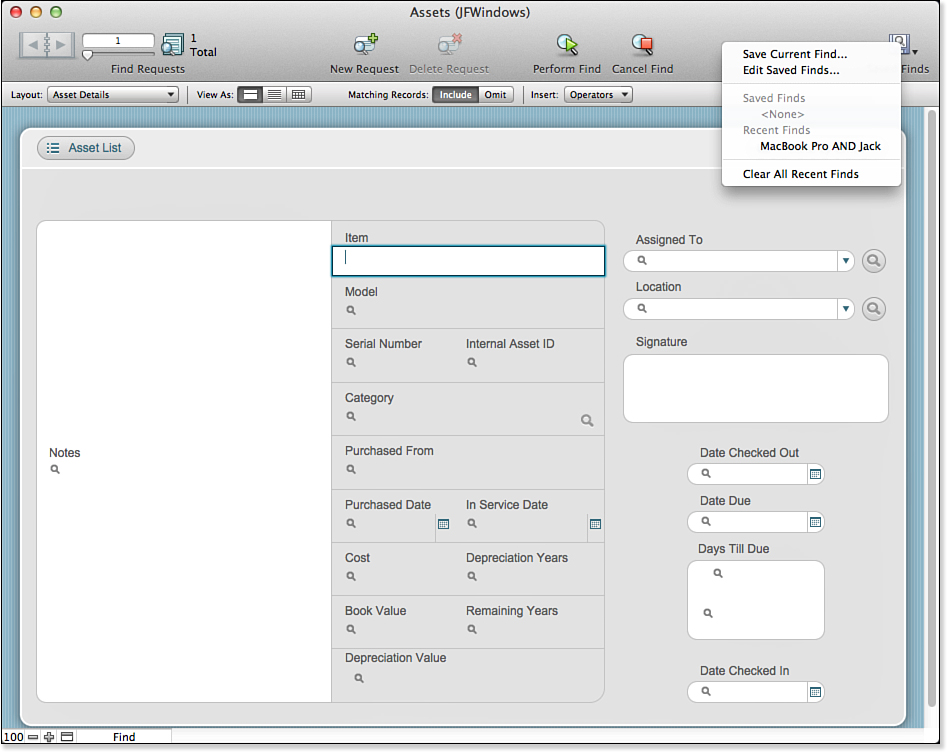
Figure 2.34. You can save finds in FileMaker Pro.
If you choose to save a find, you are prompted to name it, as shown in Figure 2.35.

Figure 2.35. Save finds by name.
The Advanced button in the lower left lets you open the details of the saved find. At first, all you see is the find command you have just performed, as shown in Figure 2.36.
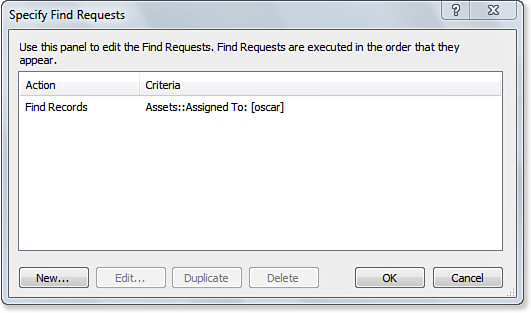
Figure 2.36. See the find you have just performed.
You can edit the find command, as shown in Figure 2.37, to customize it before you save it.
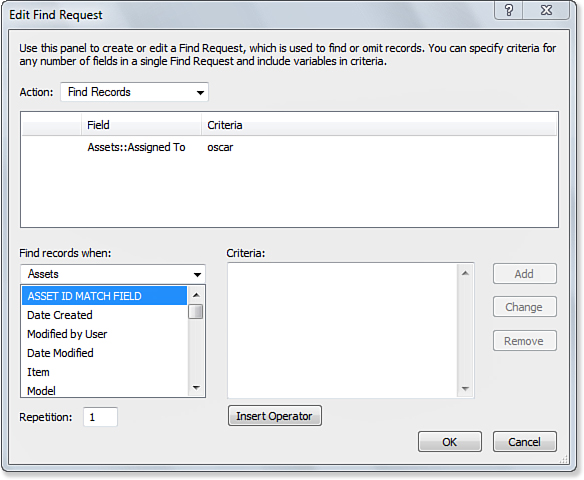
Figure 2.37. You can modify the find before you save it.
Sorting
When you’re working with multiple records, an obvious requirement is the capability to sort them so that they are arranged in a logical order.
Before you go further, a few words of caution are in order. Sorting is perhaps the most overused feature in databases such as FileMaker Pro. Sorting is expensive in terms of computer resources and, particularly in the case of shared databases, can slow down performance for everyone. Many people think nothing of sorting a large database so that the records are in alphabetical order (last name first, first name last, or whatever). They then scroll through the list view to find the record they want and proceed to edit the record using a form layout.
In almost every case, it is much, much faster to eschew the sort and simply use a find request to find the record you wanted. Doing so takes fewer computer resources, and you do not have to spend your time scrolling through the alphabetized list. Sorting is essential for printed reports, but for routine data manipulation, finding is often what you should be doing.
If you do need to sort data, it can be very useful to precede the sort with a find. Find the general set of records in which you are interested and then sort it. Doing so substantially lessens the demands on the computer.
FileMaker doesn’t store its records in a sorted order; it stores them in the order in which they were created. When you first open an unsorted table, the records follow that order. There aren’t any real mysteries here; for a view of the Sort Records dialog, see Figure 2.38. By default, the Sort Records dialog shows only those fields available on your current layout, but you can use the menu in the upper left of the dialog to choose from among all the fields in your database (including those related to the records in your found set).
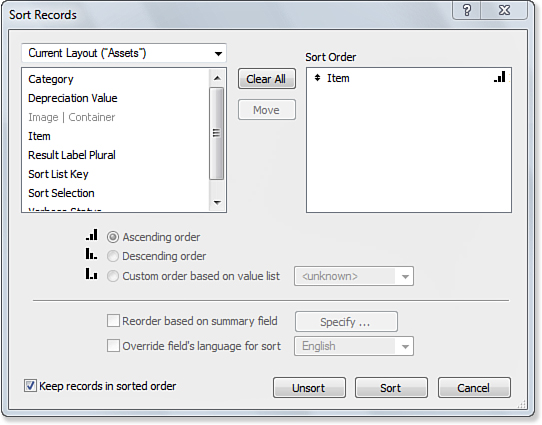
Figure 2.38. You can control how a field is sorted: ascending by type (alpha or numeric generally), descending, or in custom order by value list.
To sort the records from a table in your database, move fields from the left side of the dialog into the right. There, you can choose to have a field sort ascending, descending, or based on the order in which values appear in a specific value list. Choosing Descending, for example, sorts a number field from largest to smallest.
If you move multiple fields into the dialog, FileMaker sorts all records by the first field. In cases where records contain the same values in the first field, FileMaker then uses the second field as an additional criterion.
By adding multiple fields to your sort criteria, you are specifying secondary sorts: First sort by last name and then by first name, for example.
Sorting by value list enables you to set up your own order in which things should appear. For example, if you have a workflow process that flows from Pending to Approved to Complete, you can have your records sort in that order rather than alphabetically.
Often, sorts are attached to buttons so that you don’t have to enter the sort specifiers each time. For example, in the Assets list view shown in Figure 2.39, you can sort assets by item, category, or status.

Figure 2.39. Attach sort scripts to interface elements.
![]() Sorting by summary field is a bit tricky. See “Using Summarized Reports,” p. 295.
Sorting by summary field is a bit tricky. See “Using Summarized Reports,” p. 295.
Printing
Printing is straightforward in FileMaker. Choose File, Print. In the subsequent dialog that appears, you have the choice to print your found set, just the current record, or a blank record showing field names.
If you’d like to see what something will look like before wasting paper on something you don’t want, use Preview mode via the Preview button in the center of the Status toolbar, or the View menu. Choose the layout from which you want to print and change to Preview mode.
After you’re there, you can see where page margins will fall, and the Book icon enables you to step through the pages you will send to the printer. Keep in mind that Preview mode shows you what will be sent to the printer if you choose to print current records.
Presenting Data with Summary and Subsummary Reports
One prevalent type of report is a summary or subsummary report. A subsummary report enables you to group records that share some bit of common data.
You should design reports for the most restrictive printer on which they will be produced, which means adjusted paper sizes, color, and the like so that they will always look correct.
In Figure 2.40, you see the report that the Assets Starter Solution actually provides. It contains subsummary parts that organize the data by category. Totals can be provided for subsummary parts if the report designer specifies, and, as you can see, FileMaker can generate a chart for the data. The report is accessed from a script attached to the button Inventory Report. It is very common to provide reports that are generated by a script that selects data (perhaps with a find) and then sorts it in preparation for the report. The script then pauses, and a Exit Preview button is displayed in the Status toolbar. Very few commands are available while the script is paused, but printing is one of them. If the report looks right, you can print it and then click Exit Preview to go on with your work. The script normally returns you to another layout.
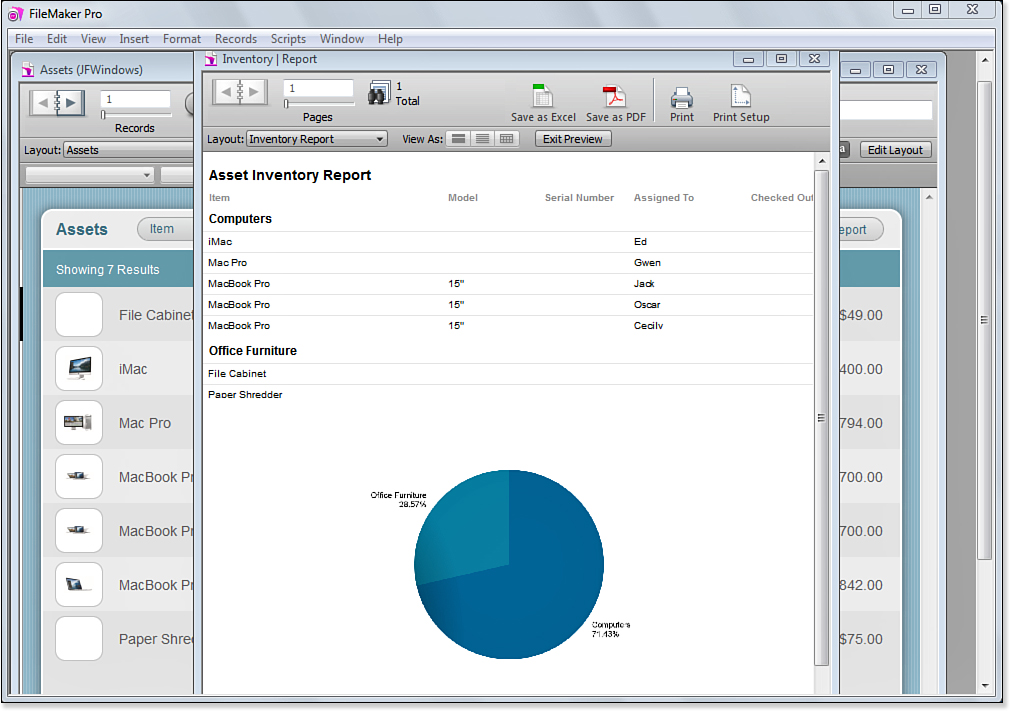
Figure 2.40. A summarized report can be more comprehensible than detailed data.
Developing summarized reports very early in your database design process can be useful. Although you might want a totally interactive database, many people are used to seeing information on paper. Also, as you design a report that is sorted and contains subsummaries, the structure of the report sometimes makes omissions of categories and data fields obvious.
FileMaker Pro has the capability to display subsummary and summary data in Browse mode while you are viewing data in Table or List view.
![]() More information on how to display subsummary and summary data is included in Chapter 4, “Working with Layouts.”
More information on how to display subsummary and summary data is included in Chapter 4, “Working with Layouts.”
Importing and Exporting Data
Having to manually type every bit of data into a database can be an excruciating experience. Fortunately, FileMaker has excellent capabilities for importing data from a wide variety of sources. Later chapters cover integration with other systems. For now, keep in mind that there are options other than spending all day at the keyboard.
Importing data moves data from one environment to another in a batch mode, and that is what the following sections summarize. FileMaker Pro now also provides a number of ways to share data in real time. You can use ODBC to access external SQL data sources in real time. You can also add SQL tables to your database graph, and you can even add supplemental fields to the external tables—your FileMaker database stores the supplemental fields.
![]() To explore how to bring data, including a directory of images, into your FileMaker Pro solution, see Chapter 22, “Importing Data into FileMaker Pro.”
To explore how to bring data, including a directory of images, into your FileMaker Pro solution, see Chapter 22, “Importing Data into FileMaker Pro.”
![]() To learn about ODBC connectivity and exporting, see Chapter 23, “Exporting Data from FileMaker.”
To learn about ODBC connectivity and exporting, see Chapter 23, “Exporting Data from FileMaker.”
Saving PDF and Excel Documents
Often you will want to prepare a report in FileMaker and create an electronic document you can then share with your colleagues. From the File menu, you can now save directly to PDF or Excel without having to use any third-party software.
Notice that you can automatically attach your documents to an email or even use FileMaker to compose an email message from data within your database. This function depends on your having an email client installed on your computer or having access to an SMTP server.
![]() For more information on saving PDF documents and sending email from FileMaker, see “Delivering Reports,” p. 309.
For more information on saving PDF documents and sending email from FileMaker, see “Delivering Reports,” p. 309.
Using the Web Viewer
No overview of FileMaker’s features would be complete without a discussion of the Web Viewer. First introduced in FileMaker Pro 8.5, the Web Viewer provides a way to display data from the Web on a FileMaker Pro layout. As long as an Internet connection exists, the data can be live, and the user can interact with it much as with a browser.
The Web Viewer does not replace a browser, but it does provide a very significant set of features to users of FileMaker Pro. Because the address used to set up the Web Viewer is a calculation, you can display a Web Viewer that presents a map of a customer location from your database. You can display a client web page containing contact information so that you do not have to continually update your Contact Management database with new telephone extensions and mail stops.
![]() For more information on the Web Viewer, see Chapter 13, “Using the Web Viewer.”
For more information on the Web Viewer, see Chapter 13, “Using the Web Viewer.”
Troubleshooting
Most of the trouble you’ll run into as a user will be with issues specific to your own database solutions. The best advice we can offer both developers and users is to work together! When you run into problems, knowing your developer will be a great first step.
Data Loss
I’ve noticed that I’m suddenly missing some data. What happened? What can I do?
One of the most critical aspects of your database is what gives it its name: your data. A wide range of possible problems can affect your data, but the most dangerous is accidentally deleting a record...or worse yet, discovering that you had the wrong found set when performing a Delete All Records command. FileMaker doesn’t have an undo function, so if you delete a record, it’s gone forever. Be sure that you haven’t simply altered your found set to exclude the records you’re looking for. Go to Records, Show All Records to recall all the data in your table.
Back up your data. We can’t stress this point enough. FileMaker Server deployment best practices and backup routines are easy to learn. If you’re not using FileMaker Server, you can make timestamped copies of your files and store them on CD or on another computer. By far the best backup strategy is to use an automated procedure. That way, no one has to remember to do anything. It always seems to be the case that the only time you do not back up your data is the one time your hard disk fails.
Also, make certain you have practiced recovering data (backing it up and then restoring it to disk). It is common for someone to note a data loss and proceed to take all sorts of steps to recover the data (inadvertently destroying data in the process). And then, at the end of the day, it turns out that there was no data loss—all the day’s data was entered with an incorrect date.
Data Integrity
How do I ensure that the data I have in my database is “good” data?
Making sure that good data is entered into your database is vital. If you properly put people’s names in the first name and last name fields of a contact database, but your office assistant decides to enter nicknames and other random tidbits, your data will be compromised.
In addition, duplicate data is a problem that plagues all databases everywhere. If you’ve already created a record for, say, Uryas Forge, you won’t want to create a second record for him. What happens if his phone number changes? You’ll change one record, but not the other.
Dealing with bad data is a challenge and almost always requires the power of the human brain. Become adept at running find requests. Use the ! mark to find duplicates and use * characters for wildcard characters.
You can also work with your developer to put validation in place, or even build an approval process by which new data is added to your system in phases, with raw data in one set of fields and confirmed data in another. Alternatively, you can add a single check box field to each record that indicates whether the data has been reviewed.
Reverting Records
What does Revert Record do?
As you enter data into fields, that information is not saved (committed) until you exit the record in question. You do so by clicking outside any fields or by changing modes, changing layouts, and so on. Before the record is committed, you can choose Records, Revert Record. This command undoes all the data you’ve entered while working with active fields. If you’ve tabbed from field to field, it reverts all those not yet saved. If you have created a new record, it even reverts the entire new record if you haven’t yet committed it.
FileMaker Extra: Becoming a FileMaker Pro Power User
Manipulating data can illuminate a wide range of information and can allow business users to draw conclusions they might not have been able to perceive anecdotally. For example, in our consulting firm, we were able to analyze our time entry data and calculate the average amount of time we need for testing. This helped greatly for future estimating.
Becoming adept at using FileMaker Pro enables you to understand what information you can pull from the system, but, most important, it enables you to know what to ask for. In working with a developer, you can guide that person’s priorities (or your own) based on a solid understanding of the platform.
Technique 1: Using Your Keyboard for More Speed
This advice is obvious. Entering (Command-F) [Ctrl+F] brings you into Find mode. Tabbing takes you from field to field. The (Return) [Enter] key executes default values in dialog boxes, performs finds, and so on. (Command-up arrow) [Ctrl+up arrow] and (Command-down arrow) [Ctrl+down arrow] page through your data. You’ll become much faster with FileMaker Pro if you take the time to learn your key commands. FileMaker’s online help details all the key commands available.
Technique 2: Working with Table View
User interfaces have their purpose and more often than not greatly assist data entry and working with a given solution. But if you just need to look at the raw data in your system, you can opt to change to Table view from any layout in FileMaker Pro, assuming that your developer hasn’t disabled the option. This gives you a bird’s-eye view of your information. Don’t forget that clicking a column header sorts for that column. A second click re-sorts in descending order.
Technique 3: Replacing Data
You’ll often run across cases in which you need to globally replace some data with other data. For example, perhaps you’ve changed a value list of vehicle types to read “auto, bike, boat, plane,” rather than “bike, boat, car, plane.” If you leave things alone after changing the value list, you’ll have both “car” and “auto” data in your system. Enforcing the consistent use of terms is important in maintaining your data integrity. To quickly take care of migrating from an old value to a new one, follow these steps:
1. Choose Records, Show All Records; otherwise, your change is applied to only your current found set.
2. Place your cursor into the field in question.
3. Choose Edit, Find/Replace to open the Find/Replace dialog box (see Figure 2.41).
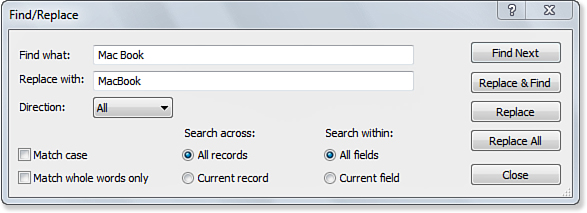
Figure 2.41. Find/Replace can step through your records or be applied across the entire database. Be careful: You cannot undo these functions!
4. Type your old and new values.
5. Choose All from the Direction drop-down menu so that your entire database will be covered.
In the case of a field that is shown with a pop-up menu, you’re out of luck. FileMaker Pro doesn’t recognize a cursor in a pop-up menu. You need to do a little development (covered in Chapter 3, “Defining and Working with Fields and Tables”), copy the field to an open spot on your layout, and change its formatting to a pop-up list. Then don’t forget to delete the layout field when you’re finished.
6. Depending on your preferences, choose Current Field or apply your change to entire records. We recommend changing just the selected field because that’s much safer than accidentally changing all instances of a text string.
7. Click Replace All.
It’s important to note that this is a function that you cannot undo! Be sure that you know what you’re doing with your data.
Technique 4: Inserting Specific Information
The Insert menu is an often-ignored source of handy time-saving commands. From a single menu choice or keyboard command, you can insert the current time, the current date, or your username into an active field.
In addition to that, Insert, From Index enables you to select from all the values in a given field from all records in a database. If you can’t quite remember the spelling of a given item, or you simply want to be perfectly consistent, this is a great way to see the data in your system and make a compatible selection. This works only if the field in question allows indexing.
![]() To learn about field indexing, see “Storage and Indexing,” p. 104.
To learn about field indexing, see “Storage and Indexing,” p. 104.
Finally, there’s a handy way to pull data from another record in your database. If three or four fields need to contain data identical to another record in your database, visit the source record first and then, via a List view or Table view, jump to the destination record by clicking the appropriate row. Click into the specific fields you want and choose Insert, From Last Visited Record.
Technique 5: Getting to Know Your Entire Database
This item isn’t so much a technique as it is just common sense: One of the best ways to make the most of a FileMaker database is to learn how it works. Review all the layouts in your system, take a look at the fields you see, and explore other files (if there are others) in the solution. Be sure to discuss with your developer how the information fits together.
Technique 6: Using Multitiered Sorts
Sorting can be a fairly powerful way to derive meaning and see patterns in data. To make the most of the Sort Records dialog, don’t forget that you can provide multiple sort criteria. For example, in a contacts database, you could sort by Last Name, First Name, City, descending by Age, and finally by Pet Name.
You can also sort by the custom order of a value list. If you have, say, a status field managed by a value list of “open, pending, closed,” you can sort by that order.
Technique 7: Using Multiple Windows
FileMaker provides you with a Window menu. If you’d like to work with multiple layouts at once, choose Window, New Window, and then navigate to the second layout in question by using either the Layout pop-up menu in the Status toolbar or the buttons provided by a developer.
Multiple windows are also useful when you open two windows looking at the same List view layout: It’s possible for you to have two separate found sets. Imagine finding all the invitees of an event in one window and all the people you’ve not yet invited in the other.
If you are designing a solution that might be used on FileMaker Go, remember that multiple windows cannot be opened at the same time on iOS devices (you move from one to the other with the control at the left of the toolbar at the top of the screen).
Technique 8: Applying Text Styling and Tabs
You can apply a wide range of formatting options to text within FileMaker Pro fields: bold, italic, font choice, color choice, and so on. FileMaker Pro preserves this information, and you can copy and paste formatted text with other applications.
There is another neat trick in FileMaker Pro: In any field, you can establish an internal tab placement and apply tabs by using (Command-Tab) [Ctrl+Tab]. Choose View, Ruler. When you click into a field, a horizontal ruler appears above it, into which you can click to establish tabs. Double-click a tab to set its properties: left, center, right, align to character, and whether to use a fill character.