
The idea behind blue-green deployment is that instead of updating existing instances of an application, you create complete brand new production environment side by side with the existing one. Then, if it looks good, you switch the traffic to this new environment. If nothing breaks, you delete the old one. The new environment is called green, while the existing one is blue. As you might have guessed, the idea goes hand in hand with Immutable Infrastructure concept and extends it beyond single server to complete clusters of machines.
There are two ways to achieve this with Terraform:
- The manual approach
- The Auto-scaling groups approach
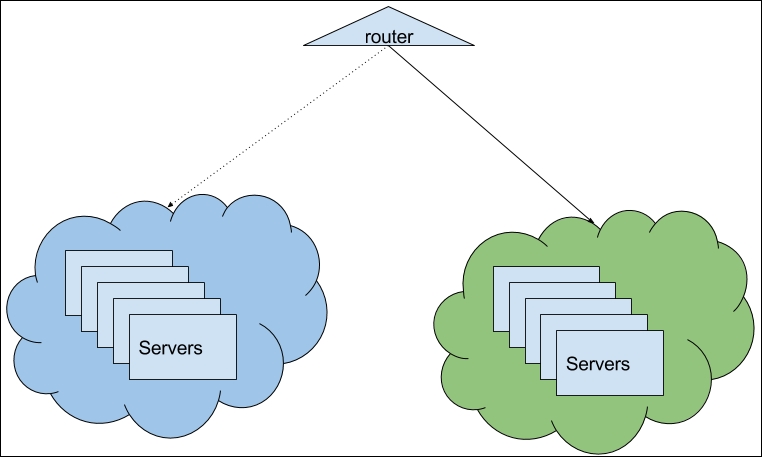
We will go with the first one. Doing things manually is not the best way to do things, but if you are in a non-AWS environment, you might not have a better choice. Elastic Load Balancer in our application module will play the role of the router in the preceding. We need to do these steps:
- Create a new group of instances.
- Switch traffic to the new group.
- Remove the old group.
Start with copying over the configuration of aws_instance.app-server:
resource "aws_instance" "app-server-v2" {
  ami = "${data.aws_ami.app-ami.id}"
  # ...
}
Apply the template so Terraform creates this new group. After it was created, you can verify that it works--run quick smoke tests, execute some Inspec tests, and so on. If it looks good, then it's time to switch traffic by modifying the ELB config:
resource "aws_elb" "load-balancer" {
  # ...
  instances = ["${aws_instance.app-server-v2.*.id}"]
  count = "${var.instance_count > 1 ? 1 : 0}"
}
Then modify the provisioner:
resource "null_resource" "app_server_provisioner" {
  triggers {
    server_id = "${join(",", aws_instance.app-server-v2.*.id)}"
  }
  connection {
    user = "centos"
    host = "${element(aws_instance.app-server-v2.*.public_ip, count.index)}"
  }
  # ...
}
It will take few seconds to apply this change. Note that there is no interruption of the service: all traffic just started flowing to new instances of app-server-v2 group. It's time to destroy the old one by removing it from the module and applying the template again.
You could keep the name of new instance group as app-server-v2, but it also can be rather confusing for people not aware of the update. We can easily rename it. First, do it inside the module template itself. Don't apply it just yet: it will destroy all instances because the state file is not aware of renaming. To rename it inside the state file, we can use the terraform state mv command:
$> terraform state mv module.mighty_trousers.aws_instance.app-server-v2 module.mighty_trousers.aws_instance.app-server
Run the terraform plan command to verify that your instances are safe.
This approach works well if you don't use AWS or for some reason you avoid using Auto-scaling groups. There are few manual steps, but as always you can codify them relatively easy. If you do use AWS and you don't mind learning yet another feature of it, then you might be much better of by using Auto-scaling groups
AWS Auto-scaling groups (ASG) allow you to adjust your infrastructure needs to the load. They can automatically increase in size as your usage grows and decrease back to a certain amount of machines when traffic spike is gone. With ASG, you don't create instances by hand: you only need to specify launch configuration--consider it a template, an instance will be created from. In addition, ASG allows configuring scaling based on metrics from CloudWatch or Simple Queue Service (SQS). We won't use this feature though, as we are looking only for blue-green deployments implementation.
Auto-scaling group can have ELB in front of it, so it balances all the traffic to instances in this group. If we want to implement blue-green deployment, we have to use it. This means that our previous attempt to save costs with automatic resolution of the need for ELB is going away:
resource "aws_elb" "load-balancer" {
  name = "application-load-balancer"
  subnets = ["${var.subnets}"]
  security_groups = ["${aws_security_group.allow_http.id}"]
  cross_zone_load_balancing = true
listener {
    instance_port = 80
    instance_protocol = "http"
    lb_port = 80
    lb_protocol = "http"
  }
  health_check {
    healthy_threshold = 2
    unhealthy_threshold = 2
    timeout = 3
    target = "TCP:80"
    interval = 30
  }
}
Remove the aws_instance configuration and replace it with launch configuration:
resource "aws_launch_configuration" "app-server" {
  image_id = "${data.aws_ami.app-ami.id}"
  instance_type = "${lookup(var.instance_type, var.environment)}"

  security_groups = ["${concat(var.extra_sgs, aws_security_group.allow_http.*.id)}"]
  key_name = "${var.keypair}"

  user_data = "${data.template_file.user_data.rendered}"

  lifecycle {
    create_before_destroy = true
  }
}
Now we need to define Auto-scaling groups that uses this launch configuration to figure out how to start instances:
resource "aws_autoscaling_group" "app-server" {
  vpc_zone_identifier = ["${var.subnets}"]
  name = "app-server-asg - ${aws_launch_configuration.app-server.name}"
  max_size = "${var.instance_count}"
  min_size = "${var.instance_count}"
  wait_for_elb_capacity = "${var.instance_count}"
  desired_capacity = "${var.instance_count}"
  health_check_grace_period = 300
  health_check_type = "ELB"
  launch_configuration = "${aws_launch_configuration.app-server.id}"
  load_balancers = ["${aws_elb.load-balancer.id}"]
  lifecycle {
    create_before_destroy = true
  }
}
Try to apply the template now, and you will note that Terraform waits for scaling group creation a bit too long. If you would check AWS Management Console, you would note that although both instances and ASG are created, creation of ASG is not considered to be finished. This happens because instances fail health checks we defined for ELB. They fail because we removed the provisioner--we don't install Apache anymore, so there is no web server running on port 80!
Now the real tricky part is that we cannot use Terraform provisioners if we use the ASG approach. Terraform can SSH only to machines it knows about, but it knows nothing about instances created through Auto-scaling groups. These instances are completely out of Terraform's control! It's even a bit sad because that means a big part of our infrastructure is not managed as code: we only manage launch configuration and ASG with Terraform, but not actual servers.
But it is also a good thing if we want to achieve Immutable Infrastructure: now we don't have any other choice except to replace complete machines. We could even remove a key pair attribute in order to launch configuration to ensure that instances are only replaced and not updated.
Eventually, Terraform will time out with the following error:
* aws_autoscaling_group.app-server: "app-server-asg -
terraform-201611210821196780533872ad": Waiting up to 10m0s: Need at least 2
healthy instances in ASG, have 1
We need to fix it, and there are multiple solutions to this problem:
- Edit user data to install Apache
- Recreate AMI with Packer, making Apache installation part of image baking
- Allow a configuration management tool to install it
Let's not bore ourselves with second and third options and keep it simple. Make the modules/application/user_data.sh.tpl file look like as follows:
#!/usr/bin/bash
yum install ${packages} -y
echo "${nameserver}" >> /etc/resolv.conf
cat << EOF > /tmp/setup.pp
package { 'httpd':
  ensure => installed
}
service { 'httpd':
  ensure  => running,
  require => [
    Package['httpd'],
  ],
}
EOF
puppet apply /tmp/setup.pp
We've embedded complete Puppet manifest into user data, so it will be run after instance boot. If you run the terraform plan command, it will show you something like the following:
-/+ module.mighty_trousers.aws_autoscaling_group.app-server
    arn:                            "arn:aws:autoscaling:eu-central-1:236110368157:autoScalingGroup:8da68b51-5793-453b-a8fb-8b6cefc447b7:
autoScalingGroupName/app-server-asg - terraform-201611210821196780533872ad" =>
"<computed>"
    # ...
    name:                           "app-server-asg - terraform-201611210821196780533872ad"
=> "<computed>" (forces new resource)
-/+ module.mighty_trousers.aws_launch_configuration.app-server
    name:                        "terraform-201611210821196780533872ad" => "<computed>"
    # ...
    user_data:                   "810cb11319ecdc0f8d9e8a373763ffbac105d184" => "e3aa616aef2387ebb482c6524aa996c436b74d5b" (forces new resource)
Plan: 2 to add, 0 to change, 2 to destroy.
Changing user data forces launch configuration recreation. And changing the name of ASG forces recreation of ASG. It doesn't destroy ELB though, and now far the best part: remember we used create_before_destroy for Auto-scaling groups? Well, combined with wait_for_elb_capacity, we will get following sequence from Terraform:
- The new launch configuration is created
- A new ASG is created
- New ASG creates two new instances
- The ASG is not considered created till both instances pass ELB health checks
- Once they pass them, the old ASG is removed
- Traffic flows to new ASG!
See what's happening? Every time we change something to launch configuration, change will be rolled out in a form of completely new group of instances and traffic will be switched to these instances automatically once they pass health checks. It's exactly the same result we achieved with manual approach earlier, but fully automated and without any additional scripting from our side. That's how you do proper blue-green deployments on AWS with Terraform.
Of course, you have two downsides, already mentioned earlier:
- Your servers are not captured in code
- You cannot use Terraform provisioners any more
But if for your use case benefits of blue-green deployment are greater than these two downsides, then Terraform will do perfect job for you.
There is no way you can put ASG instances into your Terraform state. But what about other changes to your AWS infrastructure that are not managed by Terraform? There are two features of Terraform that can help here.