Remember how we started this book with a discussion of Infrastructure as Code concepts? Well, if we want to go further treating infrastructure as a real code, then we could (and even should) apply all the same best practices currently existing in software development, and Continuous Integration is a big part of it. The idea behind CI (in case you missed all the buzz about it a few years ago) is to be able to test, build, and deploy your code regularly and automatically. The way it works is by using special software that takes care of all the tasks of making your software ready for production. You only need to define which tasks exactly are part of your CI and how to execute them.
Do you remember that we chose GitLab over GitHub for some features that GitHub lacks? The most important feature that GitLab has completely integrated into all development workflows and that GitHub doesn't have at all is GitLab CI. Yes, you can use Travis CI or Jenkins or anything else with GitHub, but that will mean that you need to support an extra tool. With GitLab, you have CI in place from day one, ready to be used for any of your repositories, and for free. GitLab CI has fewer features than, let's say, Jenkins, and as of now it can be tricky to implement complex pipelines with it, but for simpler use cases, especially where there are few dependencies between different components, it's perfect.
CI builds in GitLab run inside GitLab Runners: these are any machines that you've configured to be able to run builds. GitLab (https://about.gitlab.com/), a free hosted version of GitLab, provides these runners for free (via partnership with DigitalOcean, a VPS hosting company) and we are going to use them. Let's take a look at this picture:
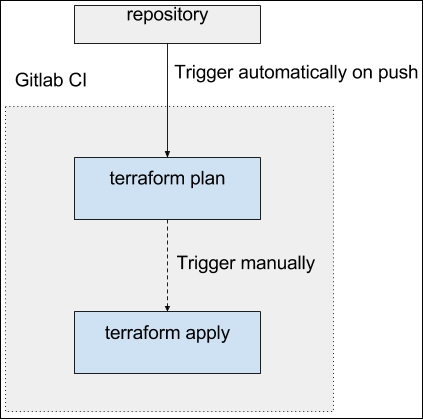
Our goal for now is to only run the terraform plan command in CI on every change and makes the apply step manual. If we were to run apply automatically as well--for example, on each merge to the master branch--then we would also achieve the Continuous Delivery setup. Being able to do it for infrastructure depends a lot on what kind of updates you perform and how much you trust the tool to do it. What if five Pull Requests (or Merge Requests) merged and applied one after another. Would this completely break your whole AWS setup? Production deployments of changes to Terraform templates are better being performed manually, but nothing stops you from doing it automatically for staging environments.
Let's get back to the packt-terraform-book repository, because that's the one that actually has the deployed code in it. In order to enable GitLab CI, we simply need to add the .gitlab-ci.yml file to the repository. This file will specify all the builds stages and steps that we need. Create this file with the following content:
image: alpine:latest
test:
  script:
    - echo "Terraform!"
Then push it to GitLab. If you open the GitLab web interface and click on the Pipelines tab, you will notice that there is one pipeline running with one stage test in it. This step doesn't do anything useful just yet, but we have our CI up and running just by adding a single file!
Pay attention to the first line that specifies the image key: by default GitLab runs all the builds inside Docker containers, and in this case, we told it to run the Alpine Linux container. Alpine is a very lightweight Linux distribution with zero overhead. It's very fast to start and use, but it also requires you to preinstall more tools by yourself.
Luckily, the tools we are going to use are written in Go, which means that they are normally distributed as precompiled binaries. Still, to download and unpack these tools we need at least curl and unzip programs. And to download the remote modules, we need Git and SSH. Let's install these tools and then install Terraform and Terragrunt:
before_script:
  - apk add --update curl unzip git openssh
  - curl -O https://releases.hashicorp.com/terraform/0.7.13/terraform_0.7.13_linux_amd64.zip
  - unzip terraform_0.7.13_linux_amd64.zip
  - curl -LO https://github.com/gruntwork-io/terragrunt/releases/download/v0.6.2/terragrunt_linux_386
  - mv terragrunt_linux_386 terragrunt
  - chmod +x terragrunt
test:
  script:
    - ./terraform -v
    - ./terragrunt -v
It takes roughly 50 seconds each time we run a build just to download and install required packages. Any CI tool allows us to use some kind of cache for these operations. GitLab CI is not an exception here, and you can play around with its cache features as an exercise. For this example, though, we will leave it as it is and proceed to actually using our template.
Make sure that the .terragrunt file looks like this (except for the S3 bucket name; this is going to be different if you run it yourself):
lock = {
  backend = "dynamodb"
  config {
    state_file_id = "mighty_trousers"
  }
}
remote_state = {
  backend = "s3"
  config {
    bucket = "packt-terraform"
    key = "mighty_trousers/terraform.tfstate"
    region = "eu-central-1"
  }
}
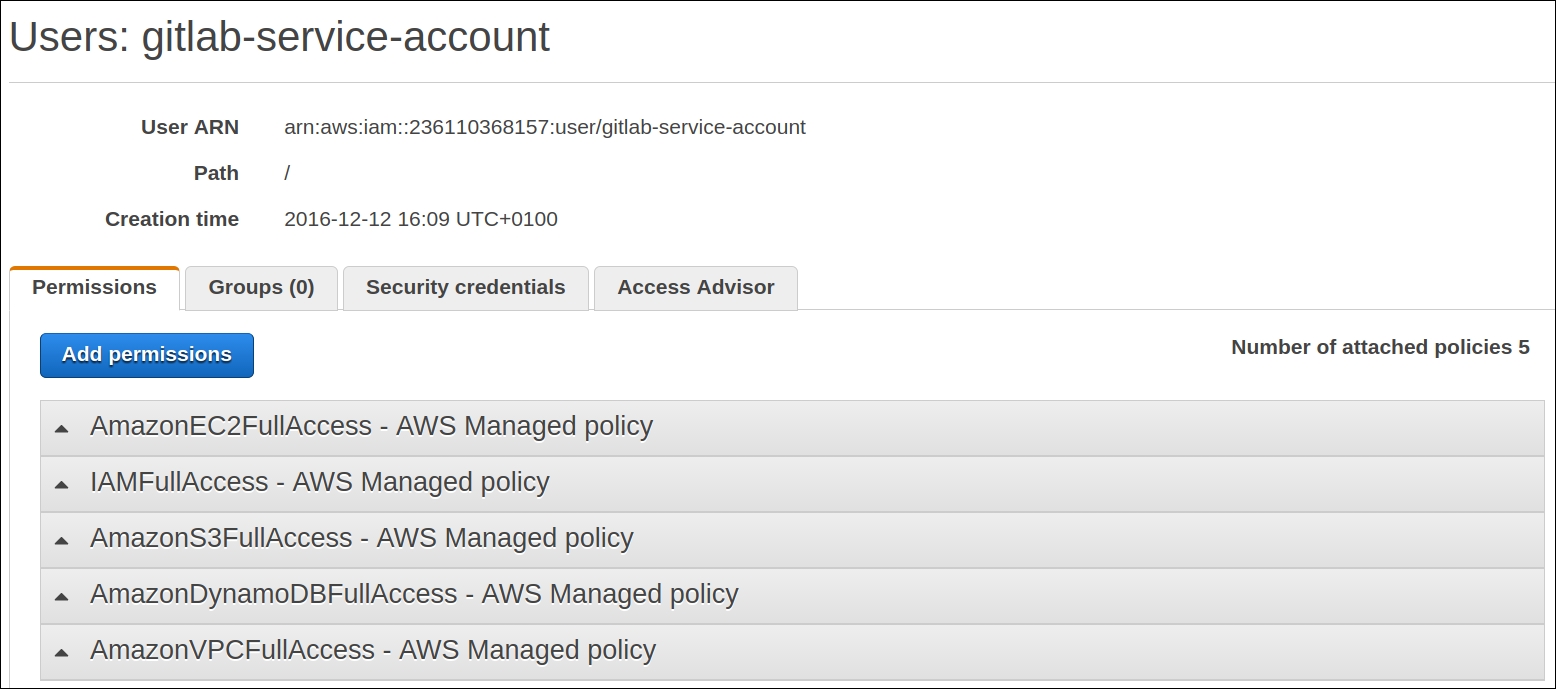
If we try to run the terragrunt plan command in GitLab CI, it won't work. That's because we did not configure the GitLab CI to be able to talk to AWS APIs. If were running our own GitLab CI Runners on top of EC2, then we would use IAM roles to provide access to these APIs. But as we are using free runners on top of Digital Ocean, we have to provide access keys. We should not use our personal keys: let's create a separate service user in AWS IAM and generate keys for it.
Open the users tab in the IAM interface and click on Add another user. Then, fill in the name of the user and make sure that you tick the Programmatic access checkbox:

Give this user full permission to EC2, VPC, DynamoDB (for Terragrunt lock), S3 (for remote storage access), and IAM. You will be right if you say that these are too broad a set of permissions. In the real world, you should narrow them down to only a small set of essential policies.
After creating a user, AWS will show you secret and access keys for it. We need to use them inside GitLab. Go to the Variables section of Settings page and define two new variables, AWS_ACCESS_KEY_ID and AWS_SECRET_ACCESS_KEY, with the values that AWS just gave to you:

These variables will be available as environment variables inside GitLab CI builds. As Terraform picks AWS variables for access and secret keys automatically, we can hope that GitLab CI is now ready to execute Terraform runs. Modify the test stage steps in .gitlab-ci.yml to look like this:
test:
  script:
    - export PATH=$PATH:$(pwd)
    - ./terragrunt plan
Push this change to GitLab, head to the GitLab Pipelines view and observe what happens next.
If everything was set up correctly, then you will get a plan of what Terraform would do:

This is pretty awesome, if you think about it for a moment. All of your infrastructure code is stored and versioned securely in the git repository. All your changes are planned and presented in a nice UI, right inside the same tool you use for code storage. What is missing is an Apply state. Let's add it to .gitlab-ci.yml and mark it as manual. We should refactor this file a bit as well:
plan:
  stage: "test"
  script:
    - export PATH=$PATH:$(pwd)
    - ./terragrunt plan

apply:
  stage: "deploy"
  when: "manual"
  only: ["master"]
  script:
    - export PATH=$PATH:$(pwd)
    - ./terragrunt apply
After you push it, GitLab will start the pipeline, and it will also present each stage in a nice graph:
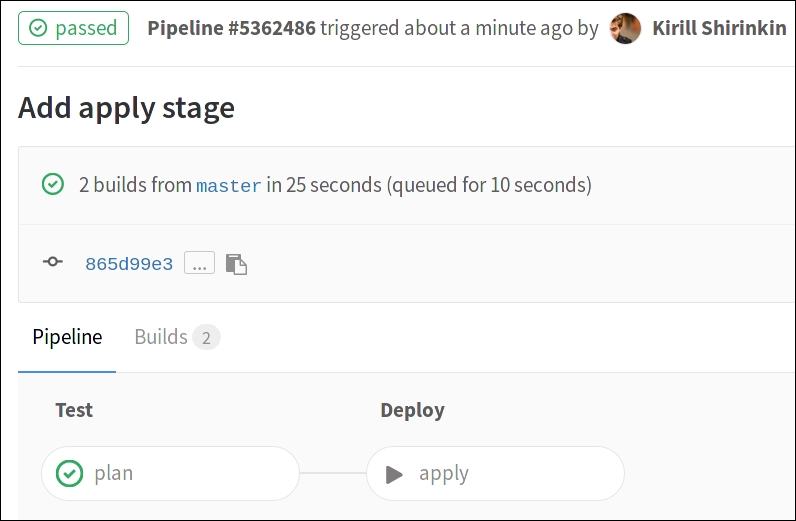
After carefully examining the plan (or test) stage, you can trigger the apply manually and watch GitLab CI doing it. The state file will be stored in S3, still available to you if you have to do Terraform tasks locally. By using Terragrunt, you ensure that no one else is running the terraform apply command at this moment; the state is locked via Terragrunt and DynamoDB. We also marked the apply stage to be available only on the master branch, so it's impossible to trigger it for a Pull Request.
As a result, once a colleague of yours makes a new Pull Request, the plan stage will be executed. A person with the privilege to merge this pull request can review both changes to the template and the result of plan stage and if everything looks fine, merge it with master, watch the plan stage again, and then manually trigger apply. It's a Continuous Integration, only for your infrastructure.
Trigger the apply stage, wait for it to complete, and then trigger the whole pipeline manually from the GitLab interface:

The plan stage should report that there is nothing to change now. Destroy it from your local machine with the terragrunt destroy command to avoid losing money on the stack just created.
The GitLab CI and Terraform combination is just one of many possible ones, depending on your choice of source code control and CI/CD tool. You can achieve the same with many other tools, and you will get the same, pretty nice result: an ability to treat your infrastructure as a complete deliverable software component, versioned with SCM and built and deployed with CI. Managing production infrastructure this way is only one (though already highly beneficial) application of this workflow. We could come up with many other ones.
For example, we could create review apps with Terraform. Review apps are something you create for each Pull Request to be able to do QA on every feature: sometimes expensive, but always nice thing to have. Terraform could take care of creating complete production-like infrastructure for every review application and then another pipeline step could deploy the actual code to this infrastructure and then sending a notification to the QA team to verify that the feature was implemented as expected. And after the review is done? Use the terraform destroy command to destroy it!
You could also build a complete self-service tool for your organization that allows anyone to create complete environments with a few clicks, removes all the struggle of managing state file, thinks about Terraform templates, and so on. During the creation of a tool like this at one client of this book author, the final service was proudly named TerrorFarm, as a combination of farm of servers and terraform, of course (and a bit of a terror, due to unpredictable nature of some Terraform applications).