
We have created a way to make sushi. Now it's time to serve the customer. We create the customer queue in this task.
The customer graphics is generated from Adobe Flash. It contains two frames: normal and angry. The following figure shows the two states of the customer:
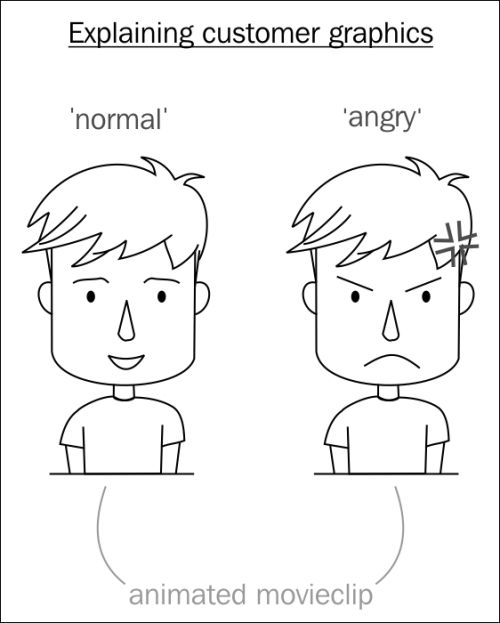
The reason why we use a canvas for the customer view is because with it we can optionally add animation to both the frames. For example, an angry sprite can be an animated movie clip that animates an angry bubble.
The customer asset is generated in the assets.js file from Flash and can be found in the code bundle. The bundle also includes the source of the Flash document to easily modify the graphics.
Let's work on the following steps to add the customer and queue logic to our game:
- In the
view.jsfile, we define a function to set up the customer view:function initCustomerView() { // Canvas game.canvas = document.getElementById('canvas'), game.stage = new cjs.Stage(game.canvas); cjs.Ticker.setFPS(60); // add game.stage to ticker to make the stage update automatically. cjs.Ticker.addEventListener('tick', game.stage); cjs.Ticker.addEventListener('tick', game.tick); game.view.queueLeft = new cjs.Container(); game.stage.addChild(game.view.queueLeft); game.view.queueRight = new cjs.Container(); game.stage.addChild(game.view.queueRight); } - Then, we create a
Customerclass in a dedicated file calledcustomer.js. The constructor takes two parameters, namely, style number and queue choice:function Customer(number, leftOrRight) { cjs.Container.call(this); // super call Container. this.number = number; // randomize a sushi this.wants = randomWants() ; // has eaten the sushi and leaving? this.hasEaten = false; // queued or was shown in front of the queue? this.hasShownUp = false; // how much time was wasted in waiting? this.hasWaitForTicks = 0; // queue index, 0 for left and 1 for right queue. this.queueIndex = 0; if (leftOrRight === 'right') this.queueIndex = 1; this.on('tick', this.tick); } // customer extends createJS Container. Customer.prototype = Object.create(cjs.Container.prototype); - The
randomWantsfunction is an internal function that generates a random sushi request:// customer's helper functions function randomWants() { options = ['sushiSalmonRoe', 'sushiOctopus', 'sushiSalmon', 'sushiEgg']; var index = Math.floor(Math.random() * options.length); return options[index]; } - In each tick, we check the waiting time of the customer. When the customer waits for too long, it changes its own state to angry:
Customer.prototype.tick = function() { this.hasWaitForTicks += 1; if (this.hasWaitForTicks === 300) { // turns angry this.graphics.gotoAndStop('angry'), } if (this.hasWaitForTicks> 500) { // waited too long this.remove(); } if (this.hasEaten) { this.remove(); } }; - When we remove a customer, we remove it from two places. They are the queue array and the EaselJS display list:
Customer.prototype.remove = function() { // remove customer this.parent.removeChild(this); game.removeFromQueue(this.queueIndex); }; - A customer isn't displayed immediately when he or she is created. We only display the first customer in the queue. Therefore, the game tick function in the
game.jsfile will display the customer in front of the sushi stand. We define the following method to display the customer:Customer.prototype.showUp = function() { this.graphics = new lib['Customer'+this.number](); this.graphics.gotoAndStop('normal'), // normal state at first this.graphics.on('click', customerOnClick.bind(this)); this.addChild(this.graphics); // bubble that shows what sushi the customer wants. var bubble = new lib.Bubble(); bubble.x = -40; bubble.y = -120; this.addChild(bubble); // set the type bubble.sushiType.gotoAndStop(this.wants); this.hasShownUp = true; // mark the flag }; - Make sure to export the
Customerdefinition to the game scope for other logic to access it:game.Customer = Customer;
- When a customer is clicked on, we send the sushi in hand to the customer. If the sushi in hand matches the sushi request, the customer leaves happily:
function customerOnClick() { // check if is what customer wants var isEqual = game.helper.arrayIsEqual(game.sushiOnHand, game.receipes[this.wants]); if (isEqual) { this.hasEaten = true; } game.trashSushi(); } - Let's move to queue management. We define two arrays to store customer queues:
game.queues = [];
game.queues[0] = [];
game.queues[1] = [];
- We need to remove the first array element once the customer is served and he or she leaves the queue:
game.removeFromQueue = function(index) { game.queues[index].shift(); }; - We create a timer interval to generate a new customer and put him/her in the queue:
game.tick = function() { var durationForNewCustomer = 500; if (cjs.Ticker.getTicks() % durationForNewCustomer === 0) { game.summonNewCustomer(); // queue 0 var customer = game.queues[0][0]; if (customer && !customer.hasShownUp) { customer.showUp(); } // queue 1 var customer = game.queues[1][0]; if (customer && !customer.hasShownUp) { customer.showUp(); } } }; - Now, we need a logic code to summon a new customer:
game.summonNewCustomer = function() { // left or right? var leftOrRight = 'left'; var queueIndex = 0; if (Math.random() >= 0.5) { leftOrRight = 'right'; queueIndex = 1; } var customer = new game.Customer(1, leftOrRight); game.queues[queueIndex].push(customer); if (leftOrRight === 'left') { game.view.queueLeft.addChild(customer); } else { game.view.queueRight.addChild(customer); } }; - When the canvas is resized, we reposition the two customer queues with the following method:
// 0.35 and 0.8 positions shows both queues in better spacing.
var leftPos = 0.35;
var rightPos = 0.8;
function repositionCustomer() {
  game.view.queueLeft.x = game.canvas.width * leftPos;
  game.view.queueLeft.y = game.canvas.height;
  game.view.queueRight.x = game.canvas.width * rightPos;
  game.view.queueRight.y = game.canvas.height;
}
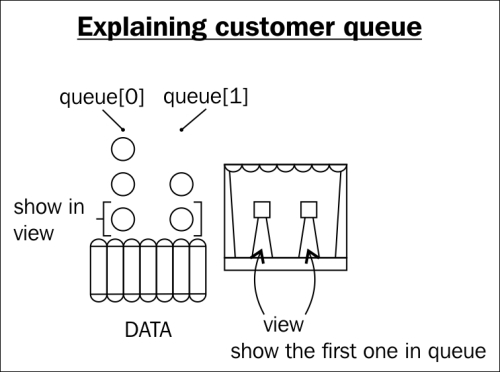
The following figure explains how the customer view is represented in both data and view. In view, we only see two customers at the most. However, in data, we generate more customers and put them in queues. Once the customer at the first position is served, we move the second one to the front of the shop, and display the customer in the view.
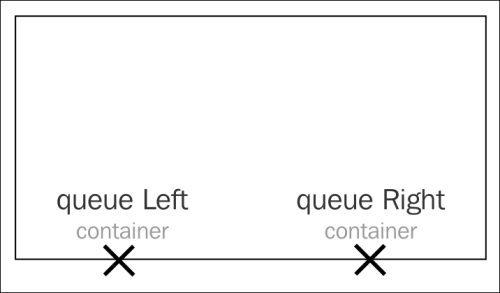
The following figure shows how we put two containers in the customer view. The queues in view are containers with their position defined. The benefit is that we don't need to handle the position of the customer. We just need to add the customer sprite into the correct queue container.
First, we listen for the element resize event. Then, we reposition customers based on the new game dimension. Since all customer sprites are added to either the left or right queue container, we only need to reposition these two containers. The left queue is 35 percent from the left edge and the right queue is 80 percent from the left edge.