We are in the process of creating a building. We let the player choose the type of building in the previous task. In this task, we allow the players to choose where to place the selected building on the floor. There is a half-transparent building image following the cursor when selecting a tile to place the building. If the place is unavailable, we put a red overlay on top of the ghost building.
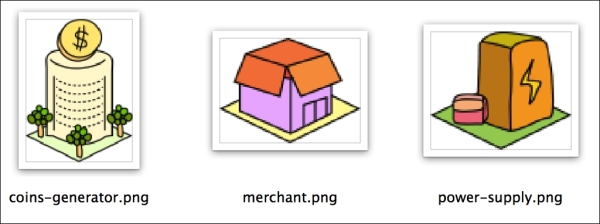
We need the three building image files to be placed on the floor. Include the following three image files in the images folder of our project. The red overlay is added programmatically.
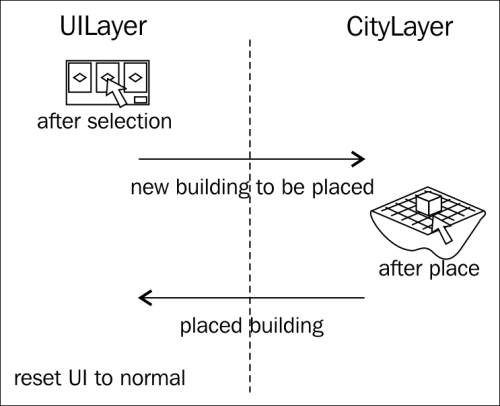
This task involves both the UI layer and the city layer. We will use event dispatching for communication between these two components. There will be two custom events: newBuildingToBePlaced and placedBuilding. The following figure illustrates the event communication between both the layers in order to place the selected building on the floor:
Before we start following the steps for completing this task, we want to have two more helper functions. These functions convert coordinates between the screen and isometric system. Let's insert the following code inside the helper.js file:
// ISO <-> Screen conversion.
;(function(game, cjs){
  game.isoMaths = {
    screenToIsoCoord: function(screenX, screenY) {
      var ix = Math.floor( (screenY * game.Tile.width + screenX * game.Tile.height) / (game.Tile.width * game.Tile.height) );
      var iy = Math.floor( (screenY * game.Tile.width - screenX * game.Tile.height) / (game.Tile.width * game.Tile.height) ) + 1;
      return {x: ix, y: iy};
    },
    isoToScreenCoord: function(isoX, isoY) {
      var sx = (isoX - isoY) * game.Tile.width / 2;
      var sy = (isoX + isoY) * game.Tile.height / 2;
      return new cjs.Point(sx, sy);
    }
  };
}).call(this, game, createjs);Let's complete this task with the following steps:
- We have three more images to place in the city layer now. Define them in the
view-sprites.jsfile using the following code:// Buildings View ;(function(game, cjs){ (game.CoinsGenerator = function() { game.Tile.call(this, 'images/coins-generator.png'), this.regX = 0; this.regY = 94; }).prototype = Object.create(game.Tile.prototype); (game.Merchant = function() { game.Tile.call(this, 'images/merchant.png'), this.regX = 0; this.regY = 43; }).prototype = Object.create(game.Tile.prototype); (game.PowerSupply = function() { game.Tile.call(this, 'images/power-supply.png'), this.regX = 0; this.regY = 51; }).prototype = Object.create(game.Tile.prototype); }).call(this, game, createjs); - Let's move on to the
game.jsfile. In theCityLayerconstructor function, we add the following code that initializes the data of the map. We needthisto compare when drawing the buildings:// 2D array that holds the type of building in string this.data = game.helper.create2DArray(this.rows, this.cols);
- Next, we define a new code block for the
Buildingdefinition. We also create an empty array that will store the building instances:;(function(game, cjs){ game.Building = function(isoX, isoY, viewClassName) { this.name = viewClassName; this.x = isoX; this.y = isoY; }; game.buildingsList = []; }).call(this, game, createjs); - The
setupMouseInteractionfunction is quite a long function. We set up a ghost building to temporarily illustrate where the building is going to be placed. We also define three event-handling callbacks. The skeleton of the temporary building is as follows:CityLayer.prototype.setupMouseInteraction = function() { // a ghost building var ghostBuilding = new game.CoinsGenerator(); ghostBuilding.alpha = 0.5; ghostBuilding.visible = false; this.addChild(ghostBuilding); // change ghost building visual based on the building choice. var _this = this; game.on('newBuildingToBePlaced', function(){ // initial logic for every new building placement }); // mouse move on city layer game.stage.on('stagemousemove', function(e) { // mouse over logic }); this.on('click', function(e){ // click logic }); }; - We defined three functions in the previous step without content. In the following three steps, we will define their logic accordingly. The following is the code to handle the
newBuildingToBePlacedevent inside the city layer:game.on('newBuildingToBePlaced', function(){ _this.removeChild(ghostBuilding); ghostBuilding = new game[game.buildingTypeToBePlaced](); ghostBuilding.alpha = 0.5; ghostBuilding.visible = false; _this.addChild(ghostBuilding); }); - Next, we will work on the following code of the mouseover event in the city layer. It shows the ghost building on the tile where the cursor is pointed. We also overlay a red filter on the ghost building when the pointing tile is unavailable:
function showGhostBuilding(x, y) { ghostBuilding.visible = true; // from screen cursor to city layer local x/y. var localPt = _this.globalToLocal(e.stageX, e.stageY); // from screen's x/y of city layer to isometric x/y. var isoCoord = game.isoMaths.screenToIsoCoord(localPt.x, localPt.y); // back from iso x/y to screen x/y (get tile x/y). // in order to get the screen x/y at tile reg point. var tileScreenCoord = game.isoMaths.isoToScreenCoord(isoCoord.x, isoCoord.y); ghostBuilding.x = tileScreenCoord.x; ghostBuilding.y = tileScreenCoord.y; ghostBuilding.filters = []; var isTileAvailable = (this.data[isoCoord.y] && this.data[isoCoord.y][isoCoord.x] === 'Tile'), if (!isTileAvailable) { // overlay a red color by using filter ghostBuilding.filters = [ new cjs.ColorFilter(1, 0, 0, 1), // red ]; } ghostBuilding.cache(0, 0, 100, 100); // we need to cache the Display Object as bitmap for the red filter. } game.stage.on('stagemousemove', function(e) { // mousemove happens all the time, and if we are not creating new building, we don't need any logic here. And make sure the ghost building is invisible. if (!game.isCreatingNewBuilding) { ghostBuilding.visible = false; return; } }); - Then, we craft the on-click event handling. The coordinate conversion is similar to the mousemove event:
this.on('click', function(e){ var localPt = this.globalToLocal(e.stageX, e.stageY); var isoCoord = game.isoMaths.screenToIsoCoord(localPt.x, localPt.y); var isTileAvailable = (this.data[isoCoord.y] && this.data[isoCoord.y][isoCoord.x] === 'Tile'), if (game.isCreatingNewBuilding && isTileAvailable) { var needCoins = game.BuildingsData[game.buildingTypeToBePlaced].needCoins; // deduce money game.coins -= needCoins; var event = new cjs.Event('placedBuilding'), event.buildingType = game.buildingTypeToBePlaced; game.dispatchEvent(event); // trigger the event game.isCreatingNewBuilding = false; ghostBuilding.visible = false; var newBuildingData = new game.Building(isoCoord.x, isoCoord.y, event.buildingType); game.buildingsList.push(newBuildingData); // redraw the city tiles and buildings after changes. this.redraw(); } }); - Now, we initialize the interaction setup we just created inside the
CityLayerconstructor function:this.setupMouseInteraction();
- We need to refine the
redrawfunction to take the building data into the logic of the code:CityLayer.prototype.redraw = function() { var newDataMap = game.helper.create2DArray(this.rows, this.cols, 'Tile'), // construct the 2D map data with building list. for (var i=0, len=game.buildingsList.length; i<len; i++) { var b = game.buildingsList[i]; var className = b.name; newDataMap[b.y][b.x] = className; } // loop the 2D array for visualization for (var i=0; i<this.rows; i++) { for (var j=0; j<this.cols; j++) { if (this.data[i][j] !== newDataMap[i][j]) { this.tiles.removeChild(this.viewMap[i][j]); var className = newDataMap[i][j]; // sprite based on the selected building type var tile = new game[className](); tile.x = (j-i) * game.Tile.width / 2; tile.y = (j+i) * game.Tile.height / 2; this.tiles.addChild(tile); this.viewMap[i][j] = tile; } } } this.data = newDataMap; // Reorder the building based on Y this.tiles.sortChildren(function(b1, b2) { if (b1.y > b2.y) { return 1; } if (b1.y < b2.y) { return -1; } return 0; }); }; - Inside the
UILayerconstructor function add the following lines of code:var _this = this; // for event handler to refer 'this' game.on('placedBuilding', function(){ _this.cancelBuildBtn.visible = false; _this.newBuildingBtn.visible = true; }); - After the player chooses a building from the building creation panel, the
readyToPlaceBuildingfunction is invoked. We dispatch the event to let the city layer know that we have a new building to be placed:UILayer.prototype.readyToPlaceBuilding = function() { ... // existing code goes here. game.dispatchEvent('newBuildingToBePlaced'), }; - To make the custom event dispatch and listening work, we need to initialize the game object to have the
EventDispatchercapabilities. We initialize it inside thegame.startfunction:cjs.EventDispatcher.initialize(game);
The BuildingsList is a list containing all the buildings and their current state. The state includes the building type and the isometric coordinates. Later, we will add more variables to the building data, including the construction statistics.
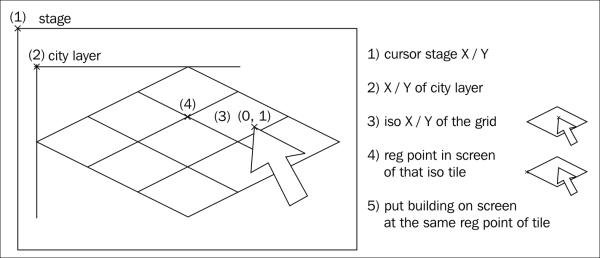
When the mouse moves over to the floor, we have the coordinates of a 2D screen. We need a conversion between the screen and isometric coordinates for the cursor movement and clicks. By calculating the isoX and isoY coordinates that the cursor is pointing to, we can get the selected tile in the isometric world. We defined each building's registration point on the isometric grid. From the registration point of the selected tile, we know where the ghost building or the new building should be placed. Let's recap the code to archive this conversion:
var localPt = _this.globalToLocal(e.stageX, e.stageY);
var isoCoord = game.isoMaths.screenToIsoCoord(localPt.x, localPt.y);
var tileScreenCoord = game.isoMaths.isoToScreenCoord(isoCoord.x, isoCoord.y);
The following figure illustrates the steps to convert a stage's x and y coordinates into the city layer's isometric world and the final registration point in the screen coordinates:
We have two data maps for comparison: the old one from the last frame and the current one. We only redraw the building that has just changed between the last frame and current frame. For any building changes, we remove the old building sprite on that tile and draw a new instance there.
By avoiding redrawing the entire map every time, we avoid making too many deletions and creations of the display objects in a short period of time. This helps improve the performance. It also helps to avoid a blank screen when all the tiles are being removed from every frame.
We define the building sprite in the sprite-view.js file for each type of building that needs to be visualized on the city layer. The following is the merchant sprite definition:
(game.Merchant = function() {
  game.Tile.call(this, 'images/merchant.png'),
  this.regX = 0;
  this.regY = 43;
}).prototype = Object.create(game.Tile.prototype);
Because of the variation in the dimensions of the building drawn, each building view has its own image path and registration point. By encapsulating this information into a class, we can simply create a building instance by name without worrying about misplacing it on the wrong registration point.
When choosing an invalid place, we show a red overlay on the ghost building image to indicate the invalid place to a player. This overlay is done by the filter:
ghostBuilding.filters = [
  new cjs.ColorFilter(1, 0, 0, 1),
];
Every display object has a list of filters. There are filters on color adjustment, hue, blur, and so on. In the following link, you will find a demonstration on how to apply multiple filters to an image:
http://www.createjs.com/#!/EaselJS/demos/filters
In order to make the filter work, we must cache the display object. It is like prerendering the display objects and effects into one bitmap.
For reference, please refer to the following documentation for more effects that we can apply to a display object:
Let's take a deeper look at the mouse event and screen coordinates translation.
We used the stagemousemove event to track the movements of the mouse. There are several events related to the mouse move event in EaselJS. They are mouseover, rollover, and stagemousemove. There are a few differences among the following events:
stagemousemove: This is any mouse move event that takes place on the canvas element. This event is fired whenever the mouse is inside the canvas area and moving. When we want to track smooth mouse moving, we need this event. For example, you need this event in order to draw a linein drawing game.mouseover: This event occurs when the cursor enters the target display object. If the target is a container and the cursor moves among its children objects, themouseoverevent is fired.rollover: This event is similar to themouseoverevent except that it takes the target as one object and doesn't count the movement between its children. The event will fire once when the cursor enters the target.
The EaselJS documentation has an example explaining the difference between various types of events: http://createjs.com/Docs/EaselJS/classes/DisplayObject.html#event_rollover. The the following video also demonstrates how mouseover detects each part inside the container and how rollover only detects the container as a whole object:
We heavily use a container to group the display objects in EaselJS. Each container has its own coordinate reference point. The coordinates (0, 0) are set at the registration point of the container and all the children objects follow it. These are the local coordinates.
For global coordinates, it means the coordinates on stage. The (0, 0) point is located at the top-left corner of the stage. When we handle coordinates inside a specific display object, we need an isolated coordinate system that is independent of the stage. EaselJS provides the localToGlobal, globalToLocal, and localToLocal methods. That's where we need to translate the coordinates from a global stage to the local stage, and vice versa. Sometimes we even need to translate it between two display objects using the localToLocal method.
We need to create the depth illustration by placing the buildings in the correct order. When we redraw, we may add a new child in front of the screen, which should be behind a certain building. We can reorder all the tiles' z index after every redraw. EaselJS Container provides a sortChildren method to let us define the reorder criteria. We use the y position to determine the z order.