Before moving to the core game logic, we decorate the game's layout with graphics.
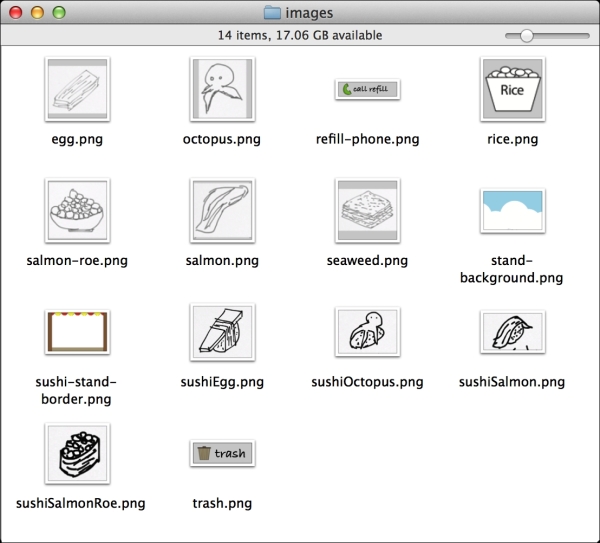
The required graphics assets are shown in the following screenshot. Let's put the image files into the images folder:
In these steps, we add the graphics to beautify our DOM elements:
- First, we add the background and border image to the customer view:
#customer-view { background: url(../images/stand-background.png) center center no-repeat; background-size: cover; border-style: solid; border-width: 26px 32px 42px 32px; border-image: url(../images/sushi-stand-border.png) 26 32 42 32 repeat; } - The border's width affects the canvas's size. In the
view.jsfile, we add the following function to get the border width style from the computed style:var getBorderWidths = function(element) { // get computed style. var style = getComputedStyle(element); // return the 4 values as object. return { top: parseInt(style.borderTopWidth), right: parseInt(style.borderRightWidth), bottom: parseInt(style.borderBottomWidth), left: parseInt(style.borderLeftWidth) }; }; - After we define the
getBorderWidthsfunction, we need to modify theresizeCanvasmethod to adjust with the border's width based on the values:var resizeCanvas = function() { var w = getBorderWidths(customerView); game.canvas.width = customerView.offsetWidth - w.left - w.right; game.canvas.height = customerView.offsetHeight - w.top - w.bottom; }; - We then define graphics for the phone button:
#phone { background: #D8D8D8 url(../images/refill-phone.png) center center no-repeat; background-size: contain; } - We also define the trash button that discards our sushi:
#delete-sushi-btn { display: block; width: 100px; height: 30px; background: url(../images/trash.png) center center no-repeat; background-size: contain; } - Next, we define the ingredient's graphics:
.ingredient { background-position: center center; background-repeat: no-repeat; background-size: contain; } .ingredient[data-type='rice'] { background-image: url(../images/rice.png); } .ingredient[data-type='egg'] { background-image: url(../images/egg.png); } .ingredient[data-type='octopus'] { background-image: url(../images/octopus.png); } .ingredient[data-type='salmon'] { background-image: url(../images/salmon.png); } .ingredient[data-type='salmon-roe'] { background-image: url(../images/salmon-roe.png); } .ingredient[data-type='seaweed'] { background-image: url(../images/seaweed.png); } - We then add the sushi graphics to the sushi classes:
.sushi {
  width: 100%;
  min-height: 100px;
  background-position: center center;
  background-repeat: no-repeat;
  background-size: contain;
}
.sushiSalmonRoe {
  background-image: url(../images/sushiSalmonRoe.png);
}
.sushiSalmon {
  background-image: url(../images/sushiSalmon.png);
}
.sushiEgg {
  background-image: url(../images/sushiEgg.png);
}
.sushiOctopus {
  background-image: url(../images/sushiOctopus.png);
}
We have decorated our game's layout with graphics. Let's take a look at the CSS properties we used in this task.
The background-size property specifies the size of the background image. We can use numeric values or the cover and contain keywords.
We used background-size: cover for the customer view, but we used background-size: contain for the buttons. The cover will scale the background image and fill the DOM element with the image. When the aspect ratio is not the same between the element and the image, the image is scaled and cropped. In contrast, the contain value scales the image to fit inside the element. When the aspect ratio is not the same, there would be an empty space on the side.
The key difference is that the cover image would be cropped in order to fill the element, while the contain value would always show the entire image and leave an empty space.
The background image of the customer view is a sky that can be cropped without worrying about losing any important information. On the other hand, the ingredients' graphics are important and we don't want any part of it being cropped because of the element resizing. That's why we used the contain value instead of the cover value for background-size of the buttons.
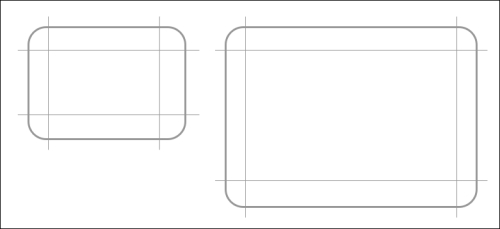
We used border-image to decorate the customer view. The benefit of border-image is that it takes care of resizing. It is a 9-slice scaling in style sheet. This property takes the image URL and the 9-slice setting as a value. The following figure shows how the corners keep the dimension and the edges scaled when the DOM element dimension is changed. There are several repeating options available when the edge scales; they are stretch, repeat, and round.
Mozilla Developer Network provides a detailed usage on the border-image property:
https://developer.mozilla.org/en-US/docs/Web/CSS/border-image
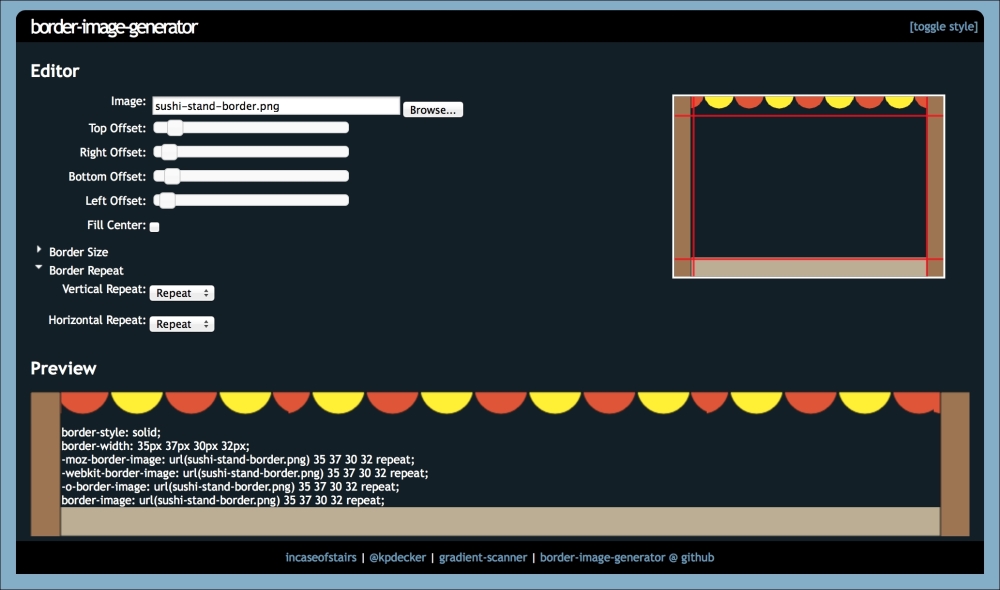
However, it is still difficult to set the slice offset without any visual feedback. The online tool, http://border-image.com/, would help in generating the code from the image visually. The following screenshot shows the tool that lets a user drag the offset with both the slider controls and guidelines loaded on the image. Once the dragging is done, we can copy the CSS code generated at the bottom text area. The border of the code area is exactly the preview of the code. We encourage you to check out that website and play with the border-image property to understand how to use this property better.