
In the previous section, we placed the tiles in HTML directly, and then moved the temporary code for the creation of tiles from HTML to JavaScript.
Although the tiles are created programmatically, it is a one-time creation only. The tiles do not move. No new tiles are created after the initialization.
What we will do in this task is continuously create tiles based on a predefined pattern, and keep moving the existing tiles down.
In this task, we are going to create tiles based on the data provided by the user instead of having the tile patterns hardcoded.
Before we start, let's remove the temporary code that creates testing tiles in JavaScript. The startOver function is reverted to the following state:
gameScene.startOver = function() {
  game.view.runway.reset();
  game.isGameOver = false;
};
We need to prepare the data for the tiles so that the game can loop and create more tiles.
We have used an integer value in both HTML and CSS to represent different types of tiles. Now, we need the same integer representation in JavaScript.
You can imagine the following runway data as a map represented by an integer value. This is essential because everything first happens in data and then we visualize the data in view. Let's put the following code in the runway.js file:
// runway data
;(function(){
  var game = this.spaceRunner || (this.spaceRunner = {});
  game.data = game.data || {};
  game.data.runway = [
    [0,   1,   2, 0],
    [0,   1,   2, 0],
    [0,   1,   2, 0],
    [0,   1,   2, 4],
    [0,   1,   2, 0],
    [0,   1,   2, 0],
    [0,   1,   2, 0],
    [0,   1,   2, 0],
    [4,   1,   2, 0],
    [0,   1,   2, 0],
    [0,   1, 100, 0],
    [0,   1,   2, 0],
    [0,   1,   2, 0],
    [0,   1,   2, 0],
    [0,   1,   2, 0],
  ];
}).call(this);By performing the following steps, we start working on the Game loop:
- Game loop is an important topic. Every 800 milliseconds, a new row of tiles is created and existing tiles are moved down. In the
gameScene.jsfile, we append the following code to thestartOverfunction. It starts two loops: timeout andrequestAnimationFrame:gameScene.startOver = function() { ... /* existing code goes here */ this.round = 0; setTimeout((this.tick).bind(this), 800); requestAnimationFrame((this.onFrame).bind(this)); }; - Before the
onFramefunction ends, it requests another animation frame to trigger another position update:gameScene.onFrame = function() { game.view.runway.updateTilesPosition(); requestAnimationFrame((this.onFrame).bind(this)); } - Let's move to the
runway.jsfile and add theupdateTilesPositionfunction to the existing runway view object. What it does is update all the tile placements using the CSS style:game.view.runway = { ... /* existing runway code here */ updateTilesPosition: function() { for(var i=0, len=this.tiles.length; i<len; i++) { var tile = this.tiles[i]; tile.updatePosition(); } }, - Go back to the
gameScene.jsfile and add the followingtickfunction to thegameSceneobject:gameScene.tick = function() { this.round += 1; game.view.runway.tick(this.round); if (!game.isGameOver) { var duration = Math.max(801-this.round, 100); setTimeout((this.tick).bind(this), duration); } }; - In the existing runway view object, we add the logic related to the integer map and the Game loop. This view object has reference to all the created tiles:
game.view.runway = { ... /* existing runway code here */ runwayIndex: 0, tick: function(round) { // move existing tiles for(var i=0, len=this.tiles.length; i<len; i++) { var tile = this.tiles[i]; tile.moveDown(); } // increase the runway Index this.runwayIndex += 1; if (this.runwayIndex >= game.data.runway.length) { this.runwayIndex = 0; } // create new tiles var row = game.data.runway[this.runwayIndex]; for(var i=0, len=row.length; i<len;i++){ this.createTile(row[i], i * game.TILE_HEIGHT, 0); } } }; - Inside the
Tiledefinition, we define a new method,movedown, to change the tile position:Tile.prototype.moveDown = function() { this.y += game.TILE_HEIGHT; if (this.element && this.y > game.BOUNDARY) { game.view.floor.removeChild(this.element); this.element = undefined; } } - We don't want to move a tile forever after it is out of the viewable screen area. Therefore, we will set a boundary in the
setting.jsfile:game.BOUNDARY = 1000;
We have created a loop that continuously creates tiles from the top and the tiles keep moving. The tile types are based on our integers map defined in JavaScript.
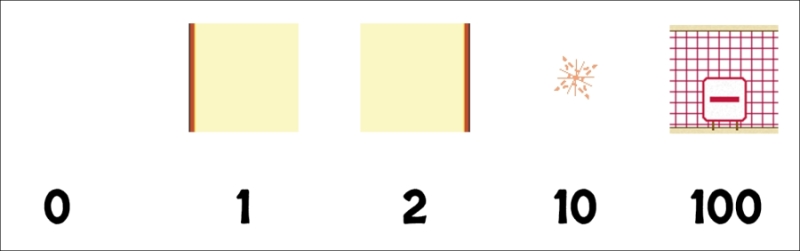
We use an integer to represent each type of tile. In our code, we used the following integer-type mappings:
0: empty
1: left runway
2: right runway
10: star in the space
100: obstacle
It is up to the development team to decide which integer values represents each type. Just make sure that no two types of tiles share the same integer. The following figure shows the mapping of our tile and integer values:
In my experience, I would suggest grouping the integer by types. For example, normal tiles have a single digit; a decoration tile starts from 10 and obstacle tiles start from 100.
There are two benefits of grouping by types:
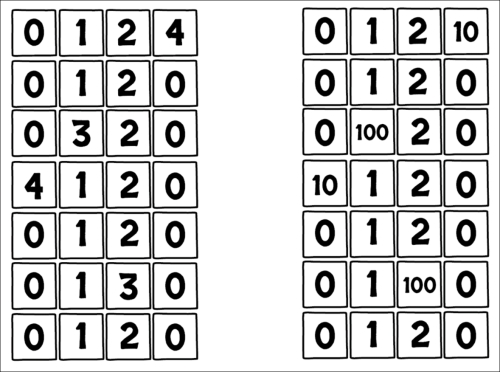
- When you look at your integer map, you can instantly have a sense of what your map looks like. Where are the blocks? Where is the runway edge? Are there any broken tiles? You can answer these questions easily if you have grouped the integer by types. Have a look at the following map; which map in the following figure do you find easier to distinguish?
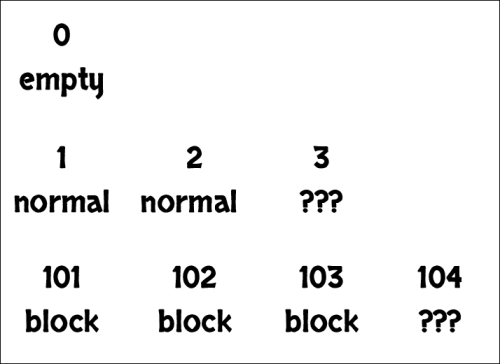
- You may want to extend the types later. For example, now you need ten types of obstacles and five types of runway terrains. Imagine you just increase the tile ID every time you introduce a new tile. This way, you will end up messing up the integers' sequence, as shown in the following figure:

We use a single digit for normal tiles and the obstacle starts at 100. It is logical to think that 101, 102, and so on, will be another type for an obstacle. The new map will be similar to the following figure:
The timeout loop is used for data and logic updates, while the animation frame is used to redraw the view.
The setTimeout or setInterval function is used to keep a time interval that keeps updating things in the game, such as a timer and a game score that is based on time or the movement of game objects.
The requestAnimationFrame function, on the other hand, is useful to draw loops. The browser executes the callback when computer usage is relatively low, and the browser will automatically slow down the frequency of the callback when the CPU is under heavy load.
The tick function is the main Game loop controlling the runway movement. It does several things, which are listed as follows:
- Increases the loop count
- Updates the runway movement, which updates the position of the tiles and determines any collision
- Updates the duration to trigger the next tick
- Registers another
setTimeoutfunction with a duration
We need a way to illustrate a running and moving scenario. In this simple game, we animate the running by moving each tile down one grid at a time.
We update the y position in the timeout loop but draw the new position in the request animation frame callback.
We decrease the timeout duration between each timeout callback. This makes the game run faster gradually, and thus increases the game difficulties from time to time:
var duration = Math.max(801-this.round, 100);
The duration starts at around 800 milliseconds and it decreases gradually until it reaches 100 milliseconds.
In both the setTimeout and requestAnimationFrame function calling, we used the following binding syntax:
(this.tick).bind(this)
It makes sure that this inside the tick function refers to the current this—gameScene.
It doesn't work without the bind function because there is no context in both the setTimeout and requestAnimationFrame functions.
For more detail on this context, please refer to the following two articles from the Mozilla documentation that explain the bind method and the usage of the this operator:
https://developer.mozilla.org/en-US/docs/Web/JavaScript/Reference/Global_Objects/Function/bind
https://developer.mozilla.org/en-US/docs/Web/JavaScript/Reference/Operators/this