In this task, we would like to define an essential game object—tiles. We use tiles to construct the running floor, and the types of tiles include the runway terrain and obstacles.
We will put our code in several places. Make sure that you have the following files ready before you start:
setting.jstile.jsplayer.js
First, let's put the game objects inside the game scene in the HTML file. There is an element that represents the floor, an element that represents the player, and a few temporary elements that represent the tiles, these are given in more detail in the following steps:
- The tile elements come with an inline style for placement on the floor:
<div id="game-scene" class="scene"> <div id="floor" class="floor"> <div id="player"></div> <!-- temporary code to be removed in next task --> <div class='tile tile-1' style='transform: translate3d(100px, 0, 0)'></div> <div class='tile tile-2' style='transform: translate3d(200px, 0, 0)'></div> <div class='tile tile-1' style='transform: translate3d(100px, 100px, 0)'></div> <div class='tile tile-100' style='transform: translate3d(200px, 100px, 0)'></div> <div class='tile tile-1' style='transform: translate3d(100px, 200px, 0)'></div> <div class='tile tile-2' style='transform: translate3d(200px, 200px, 0)'></div> <!-- end temporary code --> </div> </div> - It is time for the visual part. Let's move on to the CSS file (
game.css) and append the following code. The following styling rules define how the running floor and the tiles look visually:.floor { position: relative; width: 400px; height: 100%; margin: auto; background: url(../images/space-runner-bg.png) 0 0; } .tile { position: absolute; width: 100px; height: 100px; } .tile-0 {} .tile-1 { background: url(../images/runway.png); } .tile-2 { background: url(../images/runway2.png); } .tile-100 { background: url(../images/block.png); } .tile-4 { background: url(../images/star.png) center center no-repeat; } - We have an HTML element with a
#playerID to represent the player. Later, we will need to reference that player element in another JavaScript module. To make things clearer, we will create an object dedicated to the player code, which currently only includes the reference to the player element. Put the following player module in theplayer.jsfile:// Player module ;(function(){ var game = this.spaceRunner || (this.spaceRunner = {}); var player = game.player = {}; player.element = document.getElementById('player'), }).call(this); - In the
setting.jsfile, we set the width and height of each tile for the JavaScript logic:;(function(){ var game = this.spaceRunner || (this.spaceRunner = {}); game.TILE_HEIGHT = game.TILE_WIDTH = 100; }).call(this);
We have accomplished the task by putting the essential game objects in the game scene, and created related CSS visual styles.
We use JavaScript to create tiles on the floor dynamically. Before creating the tiles in logic, let's create some dummy tiles to explore how we present the tiles.
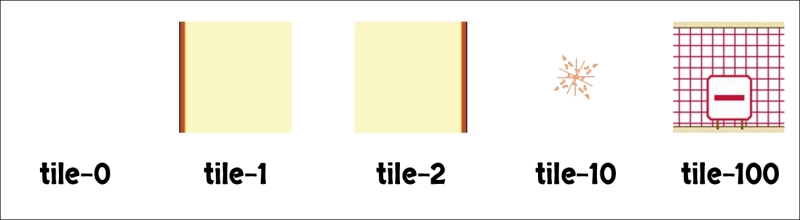
We will use tile-<id> to represent a specific tile pattern. The following screenshot shows the tile patterns we have in the game. Here, tile-0 is an empty tile, tile-1 and tile-2 are used for the runway, tile-10 is for decoration, and tile-100 is the obstacle.
We will use the class attribute so that it is easy to change the tile graphics in the CSS styling file. In addition, on the logic side, it is easy to use classList to switch the tile ID.
For example, if we want to set a tile to the pattern tile-10 in JavaScript, we can use the following code:
tileElement.classList.add('tile-10'),We will use class to represent which type of tile an HTML is. Sometimes, we can use the HTML5 data- attribute to embed element-specific data. For example, the following HTML represents a gold coin object having an amount value of 50:
<div class='gold coin' data-amount='50'></div>
Keep in mind that we put a lot of effort to separate logic, data, and view. The following figure shows how different parts are separated; data, view, and the logic controlling these parts. Separating the data and view helps make our code easier to maintain:

You may notice that we only tell the JavaScript and HTML what ID the tile is, but we never define how they look there. All visual properties are defined in CSS.
As a DOM element-oriented game, HTML is where we define the game objects—scenes, player, tiles, and the user interface.
CSS is the visual part of these elements. It defines the visual look, dimension, and position of the elements.