In this first task, we will prepare the scenes, which act as a container for all our game objects.
Before creating the scene flow, we prepare the basic scenes definition.
The scene is set up in the same way as the previous project. However, this time we simplified it into two scenes only. Add the following code in the game.js file:
;(function(){
  var game = this.spaceRunner || (this.spaceRunner = {});

  // Main Game Flow
  game.flow = {
    startGame: function() {
      game.gameOverScene.hide();
      game.gameScene.startOver();
    },
    gameOver: function() {
      game.gameOverScene.show();
    }
  };

  // Entry Point
  var init = function() {
    console.log("Welcome to Space Runner Game.");
    game.isGameOver = true;
    game.gameScene.setup();
    game.gameOverScene.setup();
  };
  init();
}).call(this);
Then, we move to the scene.js file to define a scene object. This scene object has basic abilities such as showing and hiding itself. Moreover, it provides a hook for the scene implementation to add initialization logic in the setup function and the onShow function:
;(function(){
  var game = this.spaceRunner = this.spaceRunner || {};

  // Generic Scene object.
  var scene = game.scene = {
    node: document.querySelector('.scene'),
    setup: function(){},
    onShow: function(){},
    show: function() {
      this.node.classList.remove('out'),
      this.node.classList.add('in'),
      this.onShow();
    },
    hide: function() {
      this.node.classList.remove('in'),
      this.node.classList.add('out'),
    }
  };
After this, comes the GameOver scene, which is a clone instance of the basic scene object. It adds logic to the setup function for the restart button:
  // Gameover Scene
  var gameOverScene = game.gameOverScene = Object.create(scene);
  gameOverScene.node = document.getElementById('gameover-scene'),
  gameOverScene.setup = function() {
    document.getElementById('back-to-menu-button').onclick = function() {
      game.flow.startGame();
    };
  };

}).call(this);
Game scene is an object that extends from the generic scene:
// game scene module
;(function(){
  var game = this.spaceRunner || (this.spaceRunner = {});

  var gameScene = game.gameScene = Object.create(game.scene);
  gameScene.node = document.getElementById('game-scene'),
  gameScene.onShow = function() {};

}).call(this);
We need CSS styles for the scenes element and the in/out transition. The CSS for scenes is exactly the same as seen in Project 2, Card Battle!. Please refer to the task Creating the game scenes in Project 2, Card Battle!, for the CSS style.
Since it is an HTML-oriented game, we first work on the game's HTML file by performing the following steps:
- We construct the scenes and game objects in the HTML file:
... <section id="game" class="row"> <div id="game-scene" class="scene"> </div> <div id="gameover-scene" class="scene out"> <p><a href="#" id="back-to-menu-button" class="button"></a></p> </div> </section> ... - The following CSS (
game.css) rules are for the game over scene. In the game over screen, we need a background and a restart button:.button { position: absolute; width: 100%; height: 100%; top: 0; left: 0; } #gameover-scene { background: rgba(0, 0, 0, .5) url(../images/gameover.png); } - Next, we initialize the game with a temporary code that toggles the game into the game over state after a 3 seconds delay:
gameScene.setup = function() {

  this.startOver();
};
gameScene.startOver = function() {

  game.isGameOver = false;

  // temporary code to test game over scene
  setTimeout(function(){
    game.flow.gameOver();
  }, 3000);
  // end temporary code
};
It's time to check whether the code works. When we open the HTML file in a web browser, the game should start at the game scene. Wait for 3 seconds after starting the game and the game switches to the game over scene. Then, try to click anywhere in the game and it will lead us to the game scene again.
We completed the task of setting up the scene. We have defined two scenes: the game play scene and the game over scene. We have created a button in the game over scene that starts the game again. We have also added a temporary code to trigger the game over scene after a delay of 3 seconds. After the game logic flow is ready, we will remove the temporary code that triggers the game over state.
Scene management provides a central place to control the game flow so that we can change the game state whenever needed.
There are two scenes in this game: the game scene and the game over scene.
The game autostarts when it is loaded. When the player hits any obstacles, the game ends with an overlay of the game over scene.
The game over scene has a half-transparent background. When the game over scene appears, we want the game scene to stay so the player can know how the game ends.
The following figure shows how the game scene is unchanged and the game over scene moves in from the right-hand side:
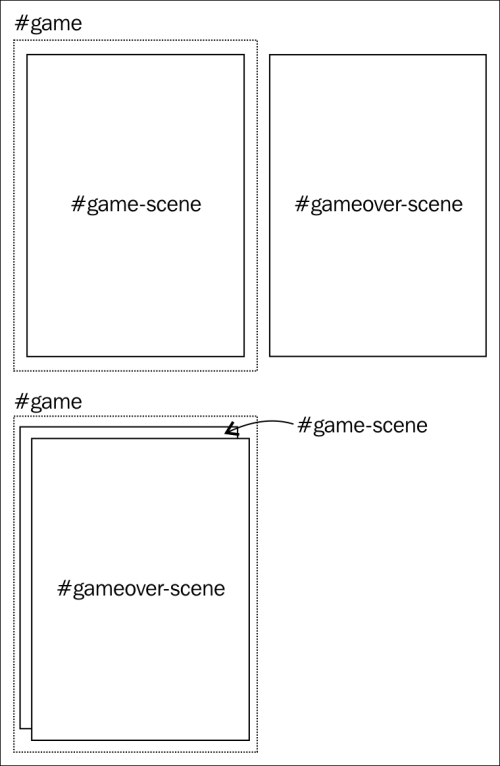
That's why the game flow only controls the visibility of the game over scene.