In the previous project, we built a space defender game and also learned how to use vector graphics. In this project, we will still work on the canvas and CreateJS library. We will use an engine called Box2D to create a simulated physics world. In this world, we will create a ball-shooting game with some obstacles in the playing court. We will vector graphics from Adobe Flash and attach the graphics to the physical objects from the last project.
In this project, we focus on the physics engine. We will build a basketball court where the player needs to shoot the ball in to the hoop. A player shoots the ball by keeping the mouse button pressed and releasing it. The direction is visualized by an arrow and the power is proportional to the duration of the mouse press and hold event.
There are obstacles present between the ball and the hoop. The player either avoids the obstacles or makes use of them to put the ball into the hoop. Finally, we use CreateJS to visualize the physics world into the canvas.
You may visit http://makzan.net/html5-games/ball-shooting-machine/ to play a dummy game in order to have a better understanding of what we will be building throughout this project.
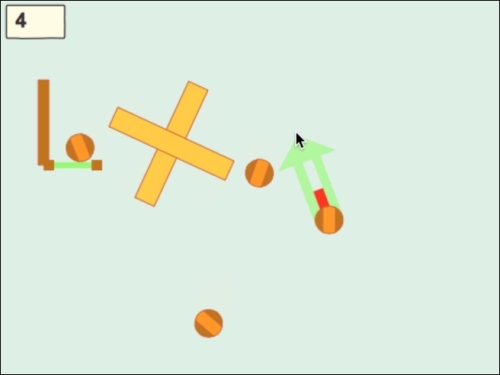
The following screenshot shows a player shooting the ball towards the hoop, with a power indicator:
When we build games without a physics engine, we create our own game loop and reposition each game object in every frame. For instance, if we move a character to the right, we manage the position and movement speed ourselves.
Imagine that we are coding a ball-throwing logic now. We need to keep track of several variables. We have to calculate the x and y velocity based on the time and force applied. We also need to take the gravity into account; not to mention the different angles and materials we need to consider while calculating the bounce between the two objects.
Now, let's think of a physical world. We just defined how objects interact and all the collisions that happen automatically. It is similar to a real-world game; we focus on defining the rule and the world will handle everything else. Take basketball as an example. We define the height of the hoop, size of the ball, and distance of the three-point line. Then, the players just need to throw the ball. We never worry about the flying parabola and the bouncing on the board. Our space takes care of them by using the physics laws.
This is exactly what happens in the simulated physics world; it allows us to apply the physics properties to game objects. The objects are affected by the gravity and we can apply forces to them, making them collide with each other.
With the help of the physics engine, we can focus on defining the game-play rules and the relationship between the objects. Without the need to worry about collision and movement, we can save time to explore different game plays. We then elaborate and develop the setup further, as we like, among the prototypes.
We define the position of the hoop and the ball. Then, we apply an impulse force to the ball in the x and y dimensions. The engine will handle all the things in between. Finally, we get an event trigger if the ball passes through the hoop.
It is worth noting that some blockbuster games are also made with a physics engine. This includes games such as Angry Birds, Cut the Rope, and Where's My Water.
We will divide the project into the following eight tasks:
- Creating the simulated physics world
- Shooting a ball
- Handling collision detection
- Defining levels
- Launching a bar with power
- Adding a cross obstacle
- Visualizing graphics
- Choosing a level
Similar to the previous project, we create a project folder that contains the index.html file and the scripts and styles folders. Inside the scripts folder, we create three files: physics.js, view.js, and game.js.
The physics.js file is the most important file in this project. It contains all the logic related to the physics world including creating level objects, spawning dynamic balls, applying force to the objects, and handling collision.
The view.js file is a helper for the view logic including the scoreboard and the ball-shooting indicator.
The game.js file, as usual, is the entry point of the game. It also manages the levels and coordinates between the physics world and view.
We also need a vendors folder that holds the third-party libraries. This includes the CreateJS suite—EaselJS, MovieClip, TweenJS, PreloadJS—and Box2D.
Box2D is the physics engine that we are going to use in this project. We need to download the engine code from https://code.google.com/p/box2dweb/. It is a port version from ActionScript to JavaScript.
We need the Box2dWeb-2.1.a.3.min.js file or its nonminified version for debugging. We put this file in the vendors folder.
Box2D is an open source physics-simulation engine that was created by Erin Catto. It was originally written in C++. Later, it was ported to ActionScript because of the popularity of Flash games, and then it was ported to JavaScript. There are different versions of ports. The one we are using is called Box2DWeb, which was ported from ActionScript's version Box2D 2.1. Using an old version may cause issues. Also, it will be difficult to find help online because most developers have switched to 2.1.