
7
A Python Client for Explainable AI Chatbots
In the previous chapters, we have explored several interactions between all types of users and machines. It is now time to introduce chatbots in our explainable AI (XAI) process. Progressively, personal assistants will replace keyboards. As more and more connected objects enter the Internet of things (IoT) market, chatbots will emerge as a useful communication tool.
In this chapter, we will implement a Python client to write a flexible XAI program for a user to interact with a Dialogflow AI expert agent. We will start by installing the Python client for Dialogflow on a local machine.
We will then create a Dialogflow agent on Dialogflow using Google's intuitive interface. The agent will simulate a human support agent that will answer user requests. The local Python client cannot communicate with Google Dialogflow online without APIs and services.
Activating the Google APIs and services will provide a private key that we will install on the local machine. This private key will be accessed through our Python client program when we open a session.
Our Python client program will then communicate with Dialogflow. We will create a test dialog in Python. We will then add an intent to Dialogflow, creating a training phrase and a response. This intent will be tested. Once the intent works, we will add a follow-up dialog to our intent.
Our dialog will now be ready to interact with the output of a Markov decision process (MDP) in real time. We will be simulating a decision process in which a trained MDP model produces outputs. However, other sources of data will conflict with the decisions of the machine learning program. Real-time data often creates problems for trained machine learning algorithms.
The user will be able to interrupt the machine learning algorithm to ask the chatbot to explain what is going on and why these conflicts are occurring. The chatbot will provide explanations and recommendations.
Finally, we will explore a conversational user interface (CUI) XAI dialog with Dialogflow. We will also deploy our chatbot on Google Assistant.
This chapter covers the following topics:
- Installing the Python client for Google Dialogflow
- Creating a Google Dialogflow agent
- Enabling Google APIs and services
- Implementing the Google Dialogflow Python client
- Adding XAI to the Google Dialogflow Python client
- Creating a dialog function in Python and Dialogflow
- The architecture of an XAI dialog
- Training phrases of the intent
- The responses to an intent
- How to follow up an intent
- Inserting interactions in the MDP
- Interacting with Dialogflow with the Python client
- CUI XAI dialog using Google Dialogflow
- A Jupyter Notebook XAI dialog
- Testing the XAI agent on Google Assistant
We will first start by building a Python client program for Google Dialogflow.
The Python client for Dialogflow
You can create an XAI dialog only using the cloud version of Google Dialogflow. You can even load your data online and access it from there with Jupyter Notebooks, as we will do in the subsequent sections of this chapter.
However, in some cases, a company might refuse to upload any form of data it considers sensitive on a cloud platform such as Google, Amazon, Microsoft, IBM, or others. Sensitive information such as blueprint data on the research of a new type of airplane or pharmaceutical research sometimes involves investments of hundreds of millions of dollars. In those cases, the company might accept using Dialogflow if the data remains in the company but Dialogflow will only make general explanations and recommendations.
In cases where a project does not contain sensitive data, the Python client for Dialogflow provides flexibility.
In this section, we will install the Python client for Dialogflow, create a Dialogflow agent, and enable the APIs and services. We will then write a Python program that communicates with Dialogflow.
The goal of this chapter is not to specifically use Python and Dialogflow but to learn how to implement XAI chatbots. The Google framework in this chapter, Google's APIs, and interfaces are constantly evolving. Furthermore, the trend is to migrate services to pay-as-you-go cloud platforms. Focus on the method, the ideas, and the way to implement XAI interactive interfaces that you can adapt to any present or future framework.
Let's start by first installing the Python client for Google Dialogflow.
Installing the Python client for Google Dialogflow
Installing the Python client for Google Dialogflow might vary from one environment to another.
It is recommended to install the library in a virtual environment using virtualenv: https://virtualenv.pypa.io/en/latest/.
Once you have chosen your environment, either virtual or not, run the following command to install the Python client:
pip install dialogflow
If you want to use other installation strategies, you can go through the documentation at https://dialogflow-python-client-v2.readthedocs.io/en/latest/
We now need to create an agent in Google Dialogflow.
Creating a Google Dialogflow agent
To create an agent, sign in to Google Dialogflow at https://dialogflow.com/
If you are new to Google Dialogflow, follow the instructions to sign in.
Once you are signed in, you can create an agent. If you are new to Google Dialogflow, you will see a CREATE AGENT button on the welcome window. If you already have created agents, scroll down the agent list in the menu on the left, and choose Create new agent.
Choose a name for your agent. In my case, its name is XAI. Dialogflow will create everything we need for the agent automatically. When it's finished, we will have the cloud environment we need:
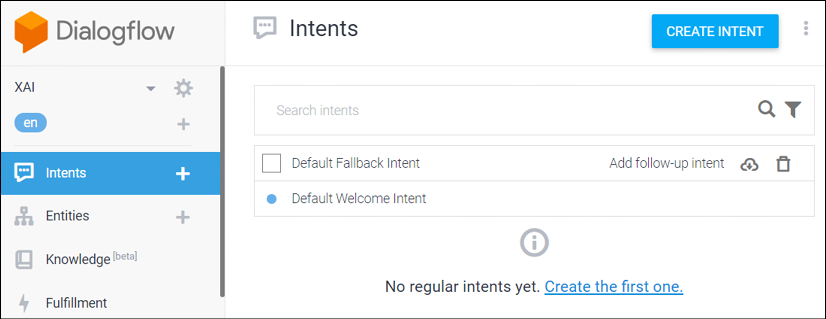
Figure 7.1: The agent interface is displayed with its menu
Once the agent is created, a menu of possible actions appears.
We will now check the main default settings by clicking on the gear icon at the top left of the window:

Figure 7.2: Accessing the settings of the agent
The main default options for your agent are displayed. I recommend you do not change them until you have a dialog up and running:
- DESCRIPTION: This is optional. You will fill it in later once everything is working.
- DEFAULT TIME ZONE: Your default time zone will appear automatically.
- Project ID: Your unique project ID number.
- Service Account: The service account code for integration purposes.
Among the other options, you will see a logging option checked:
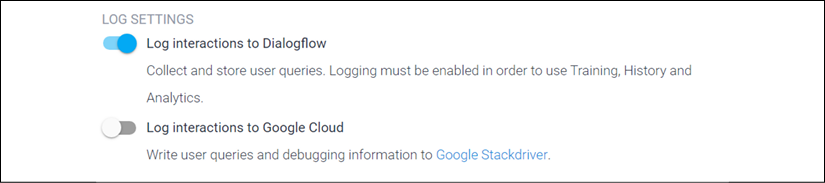
Figure 7.3: Logging activated
Make good use of the options! Some logging data might require a privacy policy you will have to share with your users. As we saw in Chapter 2, White Box XAI for AI Bias and Ethics, if you are going online with this agent, you should check your legal obligations with your legal advisor first.
In the Languages tab, the default language should be English — en:

Figure 7.4: Default language
Our Python client will communicate in English with Dialogflow. Do not change the language until you have finished this chapter and verified that everything works as described.
We have now created an agent and changed no options at all.
To test the agent, click on the test console at the top right and enter Hi:

Figure 7.5: Test console
The test console is a precious tool to use every time we enter new information. We need to make sure our chatbot works before letting others use it.
The agent's default response will appear:
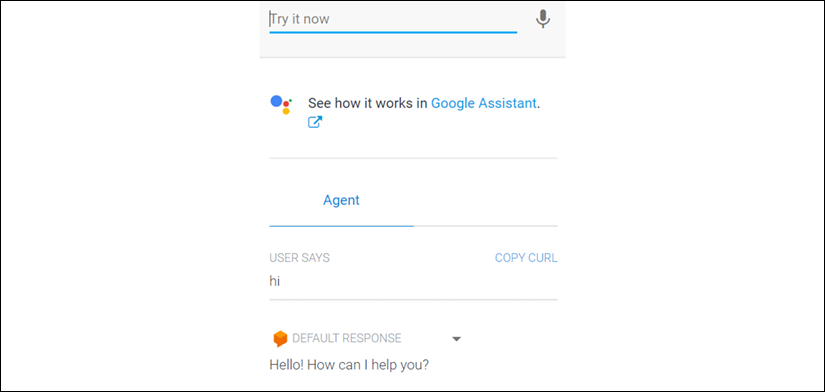
Figure 7.6: Testing a dialog
The default response in my case was, Hello! How can I help you?
We will now enable the APIs and services before adding any other dialogs to the agent.
Enabling APIs and services
The primary goal of this chapter is still to write an XAI Python client. As such, at first, we will change none of the options and add no new dialogs until our basic Python client works.
The Python client requires APIs and services to be activated:
Warning
Read the conditions to activate the APIs and services for your account before continuing this section. Make sure you understand how Google Cloud Platform billing works and keep any possible cost to the lowest amount possible if you do not obtain free access. Google Cloud Platform account policies are beyond the scope of this book. The policies chosen by a user are personal choices.
- Once you are ready and logged into Dialogflow, go to your Google Cloud Platform: https://console.cloud.google.com/.
A link to your service account will appear on the general settings page of your project:
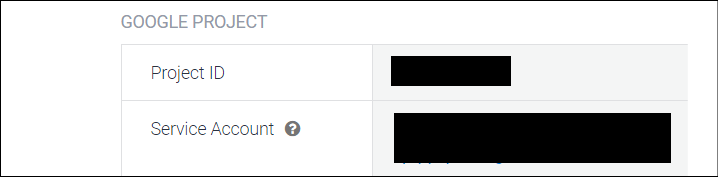
Figure 7.7: Project properties
- Click on the Service Account link, and you will see a page with your email and a link to your service account details under Email:
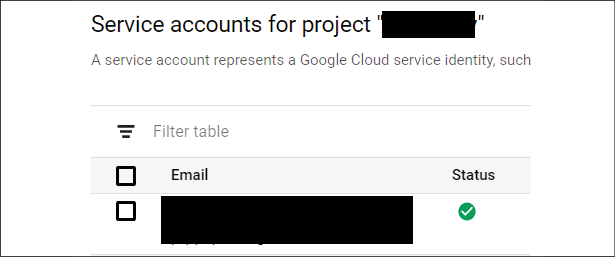
Figure 7.8: Service account
Note
The interface may evolve as Google improves its products and services. However, the principles remain the same to obtain the information we need for our Python client.
- The integration link below Email will lead you to a dialog integration page. On this page, your service account status should be active:
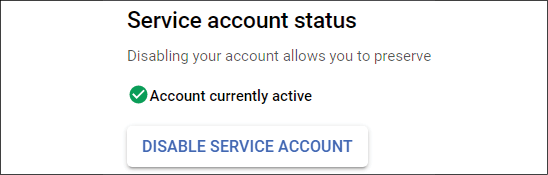
Figure 7.9: Service account status
- Your Python program will require a private key to access your Dialogflow agent. We thus need a JSON file containing a private key on our machine. To obtain this file, first, click on the EDIT button to enter the editing mode:

Figure 7.10: Dialogflow integrations
- Then click on + CREATE KEY:

Figure 7.11: Creating a key in Dialogflow integrations
- Make sure the key type is JSON and then click on CREATE:
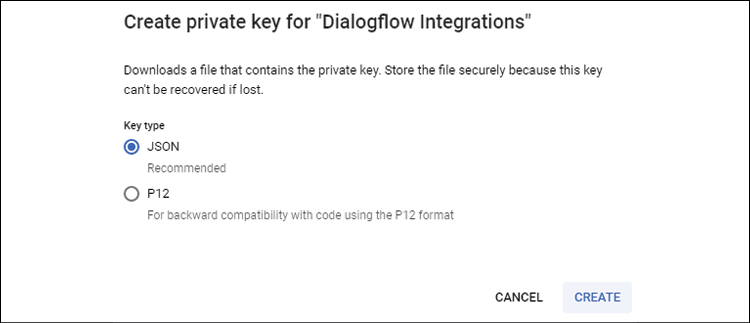
Figure 7.12: Private key
- You will now be able to save the key to your computer, and a confirmation window will appear:

Figure 7.13: Private key saved message
- Once the file is on your computer, you can rename it
private_key.json, for example. We can now write our Python client to access Dialogflow from our machine.
The Google Dialogflow Python client
In this section, we will write a dialog for one of our agent's intents on Dialogflow. An intent means literally what you intend to obtain from a dialog. As in all dialogs, person A says something, and person B will provide a response. In our case, person A is our Python program and person B is the Dialogflow agent.
We are creating an automatic dialog between two machines through an intent.
An intent works as follows:
- Input: It expects the query named
training_phrase. It is named "training phrase" because Dialogflow uses machine learning to train the intent with different types of spelling, misspelling, and pronunciation. An intent can contain many training phrases for the same meaning to adapt to the different ways we send queries for the same message. - Output: If the intent detects one of the possible inputs, a training phrase, then it will send a response. An intent can contain several responses for the same meaning to make the dialog resemble human dialogs.
We will be using python_client_01.py for this section:
- Let's build a Python client program by first importing the
dialogflow_v2API library:import os import dialogflow_v2 as dialogflow from google.api_core.exceptions import InvalidArgumentDo not use the v1 version of Dialogflow's API because it is obsolete.
- Now, we must enter our credentials. Refer to the names and codes we created in the previous section:
os.environ["GOOGLE_APPLICATION_CREDENTIALS"] = '[YOUR private_key.json]' DIALOGFLOW_PROJECT_ID = '[YOUR PROJECT_ID]' - Use English to start with since the default agent was set to English:
DIALOGFLOW_LANGUAGE_CODE = 'en' # '[LANGUAGE]' - You can invent your
SESSION_IDand enter it here:SESSION_ID = '[MY_SESSION_ID]' - We now send a query to Dialogflow, starting with the one we tested online:
our_query = "Hi"
The query and response code represents a standard example that should work fine with our default agent.
The program starts by creating the session variables:
# session variables
session_client = dialogflow.SessionsClient()
session = session_client.session_path(DIALOGFLOW_PROJECT_ID,
                                      SESSION_ID)
Then it creates our query:
# Our query
our_input = dialogflow.types.TextInput(text=our_query,
    language_code=DIALOGFLOW_LANGUAGE_CODE)
query = dialogflow.types.QueryInput(text=our_input)
It now tries to communicate with Dialogflow and will use the InvalidArgument module we imported in the first lines of the program to send us messages if it fails:
# try or raise exceptions
try:
    response = session_client.detect_intent(session=session,
                                            query_input=query)
except InvalidArgument:
    raise
If no exception is thrown, then Dialogflow will send the information we request back:
print("Our text:", response.query_result.query_text)
print("Dialogflow's response:",
      response.query_result.fulfillment_text)
print("Dialogflow's intent:",
      response.query_result.intent.display_name)
The output should be the following:
Our text: Hi
Dialogflow's response: Hi! How are you doing?
Dialogflow's intent: Default Welcome Intent
Dialogflow's response might vary since the default welcome intent (side menu | Intents | Default Welcome Intent) response contains several random possibilities:
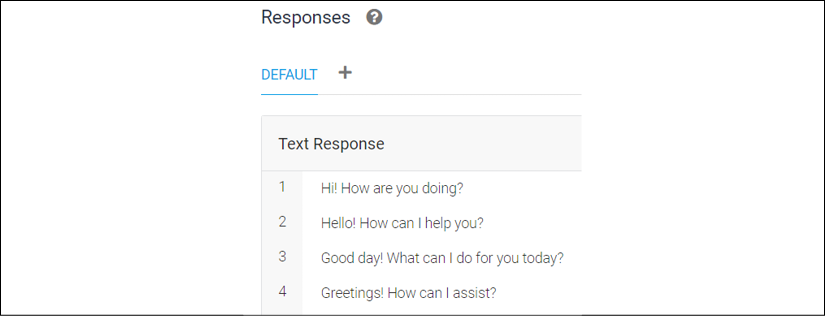
Figure 7.14: Text responses
If you run your Python client program several times, you will see that the answers change as well.
The same goes for our query. The default welcome intent contains several possible inputs we can send to our query:
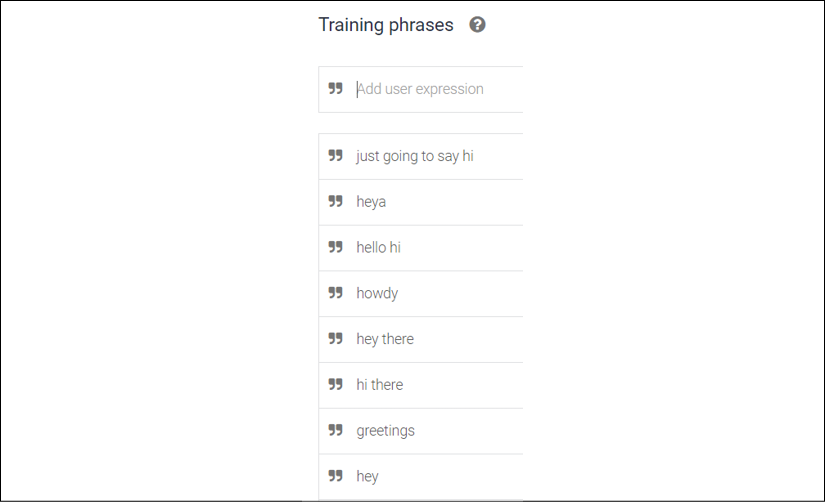
Figure 7.15: Training phrases
There are more training phrases than the ones displayed in the preceding figure. Before going to the next section, try different training phrases using the our_input variable.
Enhancing the Google Dialogflow Python client
In this section, we will enhance our program to prepare it for the XAI dialog we will build using the functions we wrote in the previous sections.
For this section, use python_client_02.py.
The goal of this section is to transform the query and response dialog of python_client_01.py into a function that can be called by various XAI requests a user might make.
Creating a dialog function
The import and credential code at the beginning of the program remains unchanged. We will simply create a function that will receive our our_query variable and return the response:
def dialog(our_query):
    # session variables
    session_client = dialogflow.SessionsClient()
    session = session_client.session_path(DIALOGFLOW_PROJECT_ID,
                                          SESSION_ID)
    # Our query
    our_input = dialogflow.types.TextInput(text=our_query,
        language_code=DIALOGFLOW_LANGUAGE_CODE)
    query = dialogflow.types.QueryInput(text=our_input)
    # try or raise exceptions
    try:
        response = session_client.detect_intent(session=session,
                                                query_input=query)
    except InvalidArgument:
        raise
    return response.query_result.fulfillment_text
We now will add the call to the function and print the response:
our_query = "Hi" # our query
print(our_query)
vresponse = dialog(our_query)
print(vresponse)
The output should be one of the responses of our intent. In one case, one possible dialog is as follows:
Hi
Good day! What can I do for you today?
There is more code, but let's stay focused on the method of creating a chatbot XAI with whatever framework you choose to use in the present or future.
We are now ready to implement an XAI dialog.
The constraints of an XAI implementation on Dialogflow
In some cases, a company will not agree to have its data published to a cloud server at all for security reasons. The company might want to separate out each function of a software solution. Many scenarios are possible. The following organizational setup represents one of those possibilities:
- A data server in one secure private location
- A service server in another location, handling algorithms, processing data, and making calculations
- A user interface server with the outside world, meaning various locations of subsidiaries within the same corporation
In this section, we will respect the philosophy of the security policy of some corporations with the following components:
- Google Dialogflow will contain a general set of intents (training phrases and responses) explaining AI. Dialogflow will not contain sensitive information.
- Google Colaboratory will simulate the use of a local server. In real life, the server might be in a private data center, not a public cloud server. Our Google Colaboratory virtual machine will play the role of a private server.
- Our program,
XAI_Chatbot.ipynb, will simulate the use of private information on our private server but will communicate with Google Dialogflow for XAI.
The Python client will manage our XAI functionality on our private server.
Let's create an intent in Dialogflow that will provide general explanations on a machine learning algorithm.
Creating an intent in Dialogflow
An intent contains training phrases (inputs) and responses (outputs). To create an intent, click on Intents in the agent's menu, as shown in the following screenshot:

Figure 7.16: Intents in the menu
When the intent page appears, click on CREATE INTENT:

Figure 7.17: Create intent
An intent page will appear. We now need to fill in some key fields for this intent to work.
Enter explain MDP as the intent name and then click on the SAVE button:

Figure 7.18: Intent name
Your intent has been created, but it is empty.
We will now create a training phrase – the possible phrases a user can write or say.
The training phrases of the intent
The training phrases are the input phrases we expect a user to enter.
To add a training phrase or training phrases, click on ADD TRAINING PHRASES:
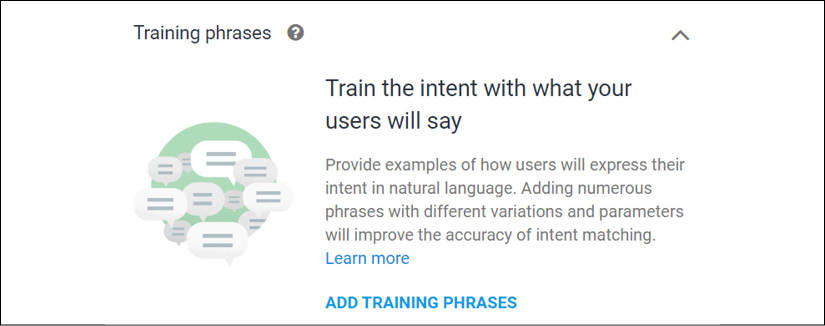
Figure 7.19: Training phrases
Add a few variations of a user phrase expressing that the user would like to understand the MDP algorithm. You must think of the various ways you might ask the same question or express something with a sentence:
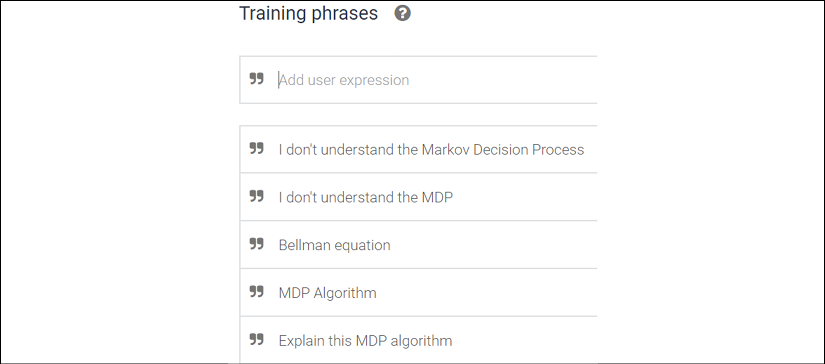
Figure 7.20: Training phrases entered
You have provided some possible user phrases. You must now think of some possible answers that will satisfy the user.
The response of an intent
The response section of an intent is a critical part of your dialog. If the response means nothing, the user might just abandon the conversation with no explanation.
That being said, let's provide a response. Scroll down to the response section and add a response and save it, as follows:
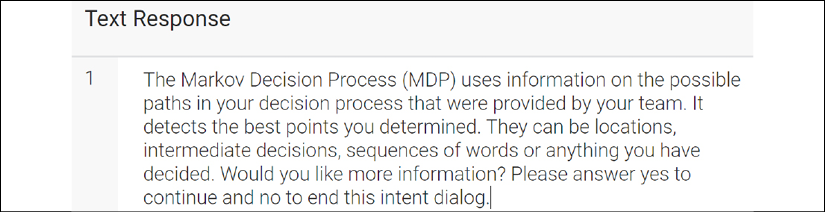
Figure 7.21: Response
As you can see, the user needs to answer yes or no. This way, you limit the user's choice of answers to your question. Otherwise, you will have to think of all of the possible inputs the user can enter. You have closed the door to an open dialog, which can lead to confusion.
The user will now answer the question. We need to follow this answer up. It's called a follow-up.
Defining a follow-up intent for an intent
Following up an intent means that we have not left it. Dialogflow will remember the previous training phrase and response. Dialogflow thus knows how to manage the context of a conversation. If not, there would be no way to know what question the user asked.
To add a follow-up intent, click on the Intents menu again and you will see the intent named explain MDP that we just created:

Figure 7.22: Follow-up intent
If you hover over this intent, the follow-up option will appear:

Figure 7.23: Creating a follow-up intent
Click on Add follow-up intent. A drop-down list will appear showing our yes and no options:

Figure 7.24: Follow-up options
We will click on yes. It will create an intent remembering the original intent it is related to:

Figure 7.25: The name of the follow-up intent
As you can see, the yes answer will be related to the explain MDP intent.
Remember, if a user sends yes to Dialogflow without using a follow-up intent, it could trigger any of the intents that start with a yes training phrase! We don't want that. We want Dialogflow to remember which intent this follow-up question is related to.
This context process of remembering the previous interactions with a user is exactly like in a conversation between humans when somebody says "yes" to a specific question.
When you click on the follow-up intent, explain MDP - yes, you will see the context of the intent you just created being displayed:
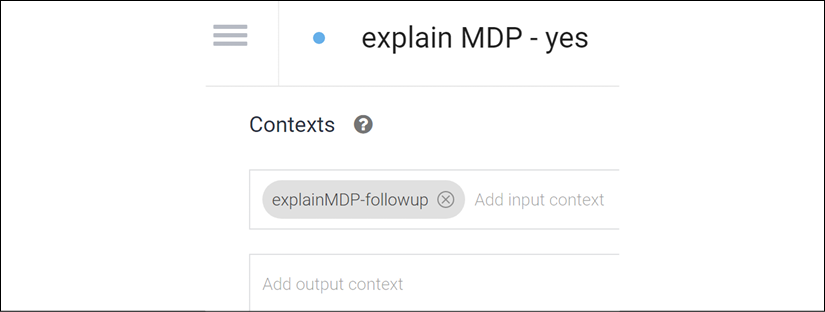
Figure 7.26: Yes follow-up dialog
Our XAI agent has just given an intuitive explanation of what an MDP is. However, the XAI agent provides a deeper explanation because the user answered yes.
First, we want to enter the training phrases section of the intent. However, Dialogflow has already done that for us, as shown in the following screenshot:
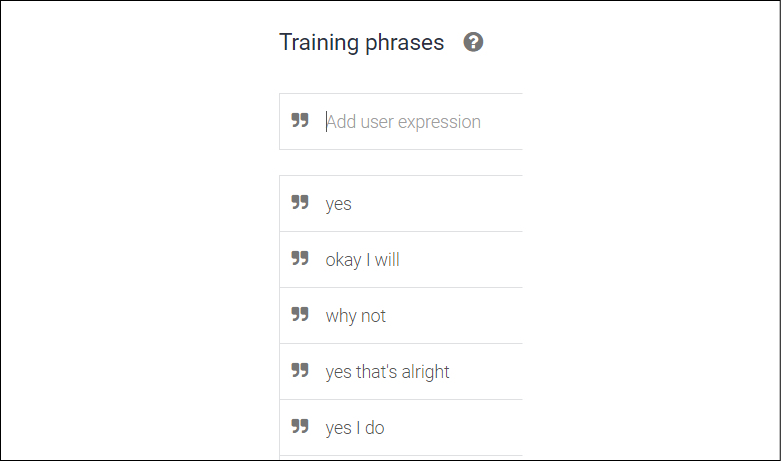
Figure 7.27: Training phrases
Note that there are more possibilities than the ones in the preceding screenshot.
Now, all we must do is to create our response. The following response is an example of how an MDP can be implemented with a chatbot:
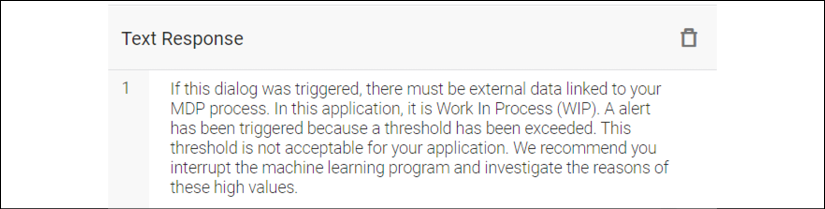
Figure 7.28: Text response
As a reminder, we can define the MDP process as a machine learning algorithm. It is a stochastic decision process framework. It will take a point A in a decision process and decide which is the best next step out of several possible decisions such as B, C, or D. The MDP might decide that C is the best next step, so the system will go from A to C.
The decision is based on a reward matrix that rewards the best decision and learns from it. This can be a machine in a factory, a person in a warehouse, a distribution location, or any other element in a decision process.
The response contains vital information for the user. For example, suppose the application and MDP were designed to manage a threshold. Suppose the user manages hundreds of developers. A team of six developers, for example, is writing code in a sequence, sharing their tasks. Once a development task is over, the program goes through another phase.
The threshold of these six developers is 8 × 6 = 48 hours.
In this development team, the number of hours remaining to finish their work is the work in progress (WIP).
If the WIP is very low, then the developers will be sitting around waiting for work to come their way. If six developers are at work for 8 hours a day, and they only have 1 hour of work to do, they are far from the threshold. 6 hours of work to do out of 48 hours isn't much. If they are well managed, they have a backlog of long-term work or other tasks they can code.
However, if the same six workers have a total of 90 hours of work to do, then their WIP has been exceeded and an alert level has been reached. The user must find what went wrong. Maybe the problem is due to the machine learning algorithm's parameters. Maybe there are more developers required. Maybe the developers did not use the right method.
In any case, the user would like to stop the algorithm instead of waiting until it's finished. For this session, the dialog will stop now to let the user interact with the program.
Just below the response, for this session, we will set this response as the last interaction with the user:

Figure 7.29: Setting the intent as the end of the conversation
The dialog is ready on the cloud side. We will now go back to the Python client to improve it.
The XAI Python client
Suppose we built a reinforcement program, the MDP application, and delivered it to a customer. The MDP program would receive an encoded reward matrix and be trained to find optimal scheduling sequences for teams producing any product or service. The output would then be decoded for further use.
In this section, we will be interacting with the output of an MDP program using our Python client and the Dialogflow agent we created online. The output produces sequences of tasks that move from one developer or group of developers to another in a development unit of production.
Open XAI_Chatbot.ipynb. The program starts with the code we previously wrote to activate the Python client for Dialogflow. Dialogflow is installed. The content of python_client_02.py is inserted. Then the MDP code was inserted into this notebook, without any user interaction elements. In this section, we are focusing on interactions with the output, not the training process.
We can sum up the first part of XAI_Chatbot.ipynb as follows:
- The installation of Dialogflow
- The Dialogflow session code taken from
python_client_02.py(python_client_03.pyis a maintenance program to see whether the API works) - The MDP code.
Before inserting interactions into our Python client, we must upload our private key to Google Colaboratory.
First, make sure Dialogflow is installed. The first cell contains the following:
!pip install dialogflow
Then comment this pip instruction.
The following cell will display the present working directory:
!pwd
In this case, the directory is /content.
Click on the file manager button on the left and upload private_key.json from your local machine:

Figure 7.30: File manager
Once it's uploaded, make sure it's in the content directory or the directory displayed with the following command:
!pwd
We are now ready to insert interactions into the MDP program.
Inserting interactions in the MDP
The second part of XAI_Chatbot.ipynb starts with the following title:
Improving the program by introducing a decision-making process
We will have a generic decoder array named conceptcode. In our example, conceptcode will contain letters from A to F. Each letter will represent a developer or group of developers. We will not go into the detail of the specific organization of this company. We will limit ourselves to observing sequences of work being passed from one team to another.
At the same time, the WIP is fed into the algorithm through an array named WIP. WIP contains six elements set to 0 at the beginning of the process. Each element represents the WIP of the corresponding group of developers in conceptcode.
For example, WIP = [80, 0, 0, 0, 0, 0] means that team A has 80 hours of WIP, that is, of work remaining to do.
Our code starts by inserting conceptcode and WIP:
"""# Improving the program by introducing a decision-making process"""
conceptcode = ["A", "B", "C", "D", "E", "F"]
WIP = [0, 0, 0, 0, 0, 0]
We now add the following:
print("Sequences")
maxv = 1000
mint = 450
maxt = 500
# sh = ql.zeros((maxv, 2))
for i in range(0, maxv):
The variables used to drive the XAI process are as follows:
maxv = 1000represents the number of scheduling sequences generated by a scheduling process derived from the MDP we described in the Defining a follow-up intent for an intent section of this chaptermint = 450represents the lower value of the threshold window; it is the sum of all the remaining work for a given team in each sequencemaxt = 500represents the higher value of the threshold window; it is the sum of all the remaining work for a given team in each sequence
The lower and higher values of the threshold represent the threshold's interval, its window. The threshold is not a precise value but rather a fuzzy window of values that trigger a WIP overload alert.
The program generates random values for the WIP array:
    for w in range(0, 6):
      WIP[w] = random.randint(0, 100)
    print(WIP)
    print("
")
We are simulating the real-time load of the developers in each sequence of tasks in the production unit, for example.
When the sum of the WIP of a team in a sequence enters the threshold window, the alert is triggered, and a dialog is initiated between the user and the AI program. The user requires explanations on the algorithm and the decision rules agreed upon when the algorithm was designed:
    if (np.sum(WIP) > mint and np.sum(WIP) < maxt):
      print(mint, maxt)
      print("Alert!", np.sum(WIP))
      print("Mention MDP or Bellman in your comment, please")
      while our_query != "no" or our_query != "bye":
        our_query = input("Enter your comment or question:")
        if our_query == "no" or our_query == "bye":
          break;
        # print(our_query)
        vresponse = dialog(our_query)
        print(vresponse)
      decision = input("Do you want to continue(enter yes) or stop(enter no) to work with your department before letting the program make a decision:")
      if(decision=="no"):
        break
If the user decides to let the AI program continue, the system might constrain the threshold window:
      mint = 460
      maxt = 470
The origin of each scheduling sequence is random to simulate the status of the production teams at a given time:
    nextc = -1
    nextci = -1
    origin = ql.random.randint(0, 6)
    print(" ")
    print(conceptcode[int(origin)])

    for se in range(0, 6):
        if (se == 0):
            po = origin
        if (se > 0):
            po = nextci
        for ci in range(0, 6):
            maxc = Q[po, ci]
            maxp = Qp[po, ci]
            if (maxc >= nextc):
                nextc = maxc
                nextp = maxp
                nextci = ci
                conceptprob[int(nextci)]=nextp
        if (nextci == po):
            break;
        print(conceptcode[int(nextci)])
print("
")
conceptcode ensures that the results are decoded for the user. Let's see what a dialog could be.
Interacting with Dialogflow with the Python client
In the previous section, a dialog was triggered by an alert. We will now analyze the output.
In the following example, one production unit, C, was in a scheduling sequence for a given task. However, the WIP values of the other production units related to the project C is working on were considered and displayed under C:
C
[23, 72, 75, 74, 45, 77]
In the following example, two production units, D-C, were in a scheduling sequence for a given task. However, the WIP values of the other production units related to the project that D-C were working on were considered and displayed under D-C:
D
C
[94, 90, 8, 39, 35, 31]
In the following example, three production units, E-D-C, were in a scheduling sequence for a given task. However, the WIP values of the other production units related to the project E-D-C were working on were considered and displayed under E-D-C:
E
D
C
[99, 81, 98, 2, 89, 100]
In this case, the total WIP of the project these developers are working on entered the alert threshold. The threshold values are displayed. The user now activates the dialog intents we created in Dialogflow. The Python client program also contains a dialog:
450 500
Alert! 469
Mention MDP or Bellman in your comment, please
Enter your comment or question: what is Bellman
The Markov Decision Process (MDP) uses information on the possible paths in your decision process that were provided by your team. It detects the best points you determined. They can be locations, intermediate decisions, sequences of words, or anything you have decided. Would you like more information? Please answer yes to continue and no to end this intent dialog.
Enter your comment or question: yes
If this dialog was triggered, there must be external data linked to your MDP process. In this application, it is Work In Progress (WIP). An alert has been triggered because a threshold has been exceeded. This threshold is not acceptable for your application. We recommend you interrupt the machine learning program and investigate the reasons for these high values.
Enter your comment or question: no
Do you want to continue (enter yes) or stop (enter no) to work with your department before letting the program make a decision: no
The user, the manager of the production team, has obtained an explanation about the program and interacted with it before waiting until the end of a complete MDP scheduling session. Introducing a user to an automatic AI process has the following double effect:
- Explaining the AI
- Creating a strong relationship with an AI algorithm by converting it into a white box automatic process.
We have described a text dialog between a Python client and Dialogflow. The inputs and outputs were in written form. This toy example that simulates possible dialogs shows the many ideas and ways you can implement solutions in real work scenarios.
We will now explore the CUI functionality of our agent in Google Dialogflow.
A CUI XAI dialog using Google Dialogflow
A CUI can be designed in four different ways:
- Voice input and voice response
- Voice input and text response
- Text input and voice response
- Text input and text response
We have already seen how to test a chatbot in Dialogflow's test console.
Let's implement a text or voice input and a text response on a website.
Dialogflow integration for a website
In this section, we will explore two scenarios for a website:
- Voice input and text response
- Text input and text response
First, click on Integrations in your agent's menu:

Figure 7.31: Dialogflow integration
You will see several integration modules. Click on Web Demo:

Figure 7.32: Web integration
Web Demo is not activated. We must first activate it as shown in the following screenshot:

Figure 7.33: Web Demo activated
Once you have activated Web Demo, a pop-up window will display a link that you can copy and paste in your browser to access a ready-to-use web page with the agent on it:
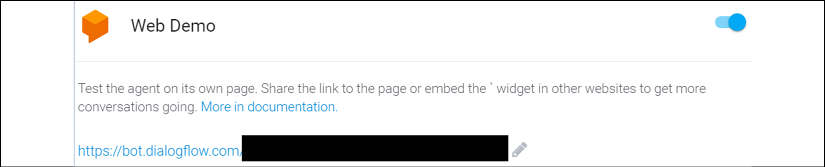
Figure 7.34: Web URL
You can also copy the following script into a web page of your choice:
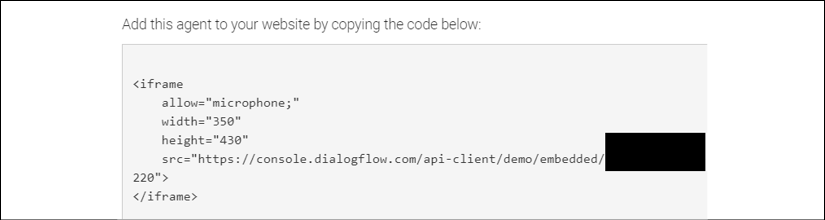
Figure 7.35: Adding an agent to a website
If you use the link and not the embedding code, you will reach your agent, as shown in the following screenshot:

Figure 7.36: Dialog interface
You can share and email the link or embed the agent as you wish. We will now test the CUI functionality of our agent.
Be sure to authorize your microphone for this site.
In the Ask something... section of the page, click on the microphone icon:

Figure 7.37: Asking something
Say hello, for example.
Your chatbot will answer with the following text:
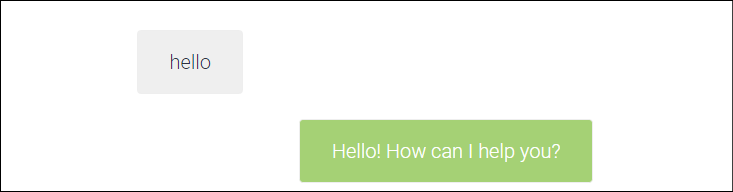
Figure 7.38: Chatbot dialog
The agent might answer with other responses. If you type hello, you will also obtain a text response.
You can create an agent manager that will contain links to multiple agents.
A Jupyter Notebook XAI agent manager
We might have to create multiple XAI agents for different aspects of an AI project. In that case, we can add an agent manager. Go to the last cell of XAI_Chatbot.ipynb.
Once it's uploaded, drag and drop it into the content directory or the directory displayed by the following command:
!pwd
In the last cell of the notebook, there are two options.
The first option is to consult:
[ML Explanation Consult](https://console.dialogflow.com/api-client/demo/embedded/[YOUR AGENT HERE])
The second option is to consult and share:
[ML Explanation Consult and Share](https://bot.dialogflow.com/https://console.dialogflow.com/api-client/demo/embedded/[YOUR AGENT HERE])
You can create an XAI chatbot menu for several agents, depending on the AI theme you wish to activate. You can change the titles, add comments, and add links. You can also create HTML pages to manage your agents.
We will now see how to explore the CUI of our agent further with Google Assistant.
Google Assistant
Google Assistant will take your agent to every smartphone on the planet that has Google Assistant installed on it. You can even deploy your agent on Google Assistant and then access it from Google Home, for example. Consult the documentation on Dialogflow to go from testing to production.
But first, you can use Google Assistant to test your agent's CUI capability.
Once you have chosen your agent on Dialogflow, click on Google Assistant at the top right of the page:
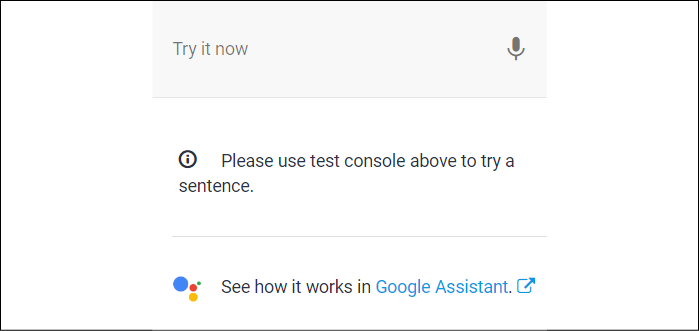
Figure 7.39: Accessing Google Assistant
Dialogflow will first update your actions:

Figure 7.40: Updating actions
There are many functions, but let's focus on testing the CUI:

Figure 7.41: CUI with Google Assistant
Make sure to authorize access to your device's microphone for this page.
For the first question, say hello talk to my test app, and you will receive both audio and text answers:

Figure 7.42: CUI dialog
Then type hello, and you will again receive both audio and text responses:

Figure 7.43: CUI dialog
You have just tested the four scenarios of a CUI dialog:
- Voice input and voice response
- Voice input and text response
- Text input and voice response
- Text input and text response
We have now implemented an XAI Python client for Dialogflow and explored how to use a CUI to obtain information from our XAI agent. You can explore Dialogflow further through Google's documentation and design complex integrations. For example, instead of using a Python client to access Python code, you can communicate with a server through Dialogflow as well.
You can add hundreds of intents to your agent, create new agents, and add new XAI Python Dialogflow clients to improve the relationship between humans and machines.
Summary
In this chapter, we built a Python client that can interact with Google Dialogflow. Our XAI chatbot can manage alert functions in the output of a machine learning algorithm.
Before implementing our chatbot, the trained machine learning algorithm would produce outputs. The user would have to wait until the ML program was finished and then activate an interactive interface.
An XAI interface, though interesting, might come too late in a decision-making process. Hundreds of automatic decisions may have been made before the user could intervene. Even if the XAI interface provides excellent explanations, bad decisions may have been made. These bad decisions must thus be analyzed, the parameters modified, and the program run again. If the errors were not damaging, then the problem can be solved with some additional configuration. But if the errors were critical, then an XAI interaction before the machine learning program ends is very productive.
Our XAI chatbot addressed two problems: explaining AI and interrupting an AI program in real time to interact with its decision-making process.
To reach our goals, we installed the Python client program on a local machine. We also installed it on Google Colaboratory in a Jupyter Notebook. We created a Dialogflow agent and activated the Google APIs and services. A private key in a JSON file was downloaded and used to establish a session between the Python client and Dialogflow.
We also built a CUI chatbot functionality for our XAI agent and explored how to deploy it on Google Assistant. Personal assistants will progressively replace keyboard interactions in many cases as smart objects become increasingly part of our everyday lives.
In the next chapter, Local Interpretable Model-Agnostic Explanations (LIME), we will explore new ways to interpret a model's predictions using only its input and output data.
Questions
- It is possible to create a dialog with Python and Dialogflow. (True|False)
- You can customize your XAI dialog with a Python client. (True|False)
- You do not need to set anything up in Dialogflow if you use a Python client. (True|False)
- Intents are optional in Dialogflow. (True|False)
- A training phrase is a response in a dialog. (True|False)
- Context is a way of enhancing an XAI dialog. (True|False)
- A follow-up question is a way of managing the context of a dialog. (True|False)
- Small talk improves the emotional behavior of a dialog. (True|False)
- Small talk can be directly set up in Dialogflow. (True|False)
Further reading
- For more on installing the Python client library for Dialogflow, see the following two links:
- For more on the Dialogflow API, visit https://dialogflow-python-client-v2.readthedocs.io/en/latest/gapic/v2/api.html.
- For more on creating chatbots with Google Dialogflow, consider the book Artificial Intelligence By Example, Second Edition, by Denis Rothman, Packt, 2020.
- The documentation for Dialogflow can be found at https://cloud.google.com/dialogflow/docs?hl=en