Chapter 17. Cursors and Asynctasks: Staying in the Background

In most apps, you’ll need your app to update its data.
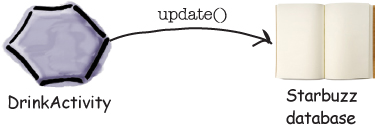
So far you’ve seen how to create apps that read data from a SQLite database. But what if you want to update the app’s data? In this chapter you’ll see how to get your app to respond to user input and update values in the database. You’ll also find out how to refresh the data that’s displayed once it’s been updated. Finally, you’ll see how writing efficient multithreaded code with AsyncTasks will keep your app speedy.
We want our Starbuzz app to update database data
In Chapter 16, you learned how to change your app to read its data from a SQLite database. You saw how to read an individual record (a drink from the Starbuzz data) and display that record’s data in an activity. You also learned how to populate a list view with database data (in this case drink names) using a cursor adapter.
In both of these scenarios, you only needed to read data from the database. But what if you want users to be able to update the data?
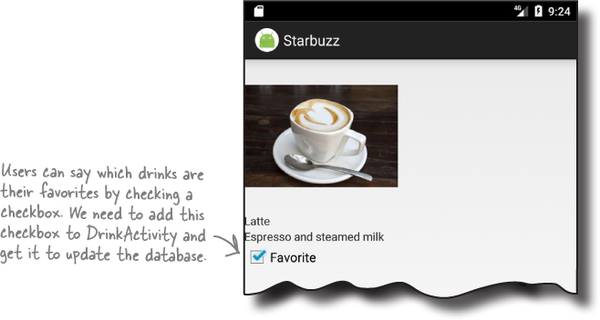
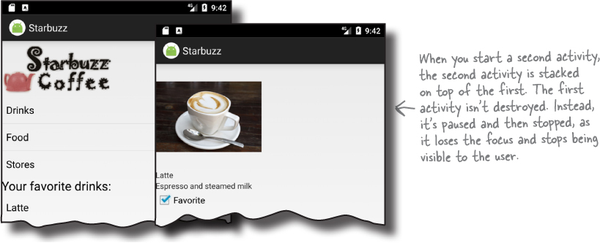
We’re going to change the Starbuzz app so that users can record which drinks are their favorites. We’ll do this by adding a checkbox to DrinkActivity; if it’s checked, it means the current drink is one of the user’s favorites:
We’ll also add a new list view to TopLevelActivity, which contains the user’s favorite drinks:

We’ll update DrinkActivity first
In Chapter 15, we added a FAVORITE column to the DRINK table in the Starbuzz database. We’ll use this column to let users indicate whether a particular drink is one of their favorites. We’ll display its value in the new checkbox we’re going to add to DrinkActivity, and when the user clicks on the checkbox, we’ll update the FAVORITE column with the new value.
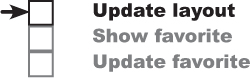
Here are the steps we’ll go through to update DrinkActivity:
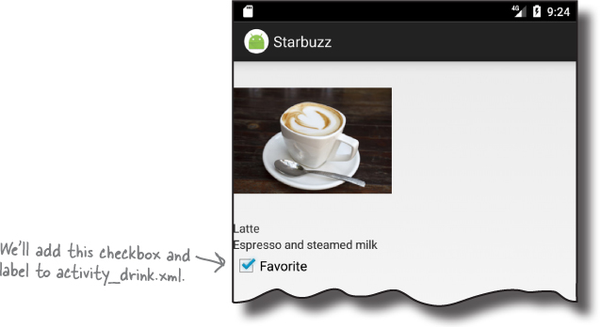
Update DrinkActivity’s layout to add a checkbox and text label.
Display the value of the FAVORITE column in the checkbox.
To do this, we’ll need to retrieve the value of the FAVORITE column from the Starbuzz database.
Update the FAVORITE column when the checkbox is clicked.
We’ll update the FAVORITE column with the value of the checkbox so that the data in the database stays up to date.
Let’s get started.
Do this!
We’re going to update the Starbuzz app in this chapter, so open your Starbuzz project in Android Studio.
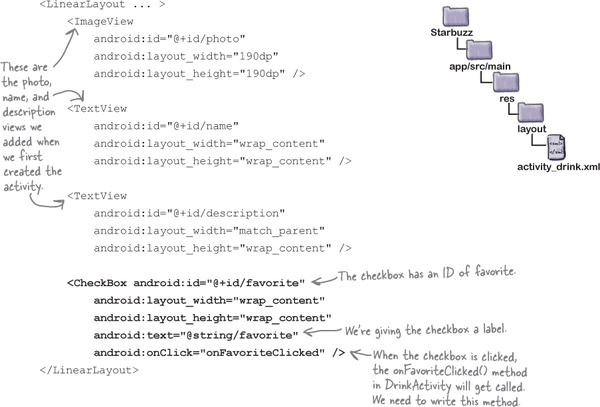
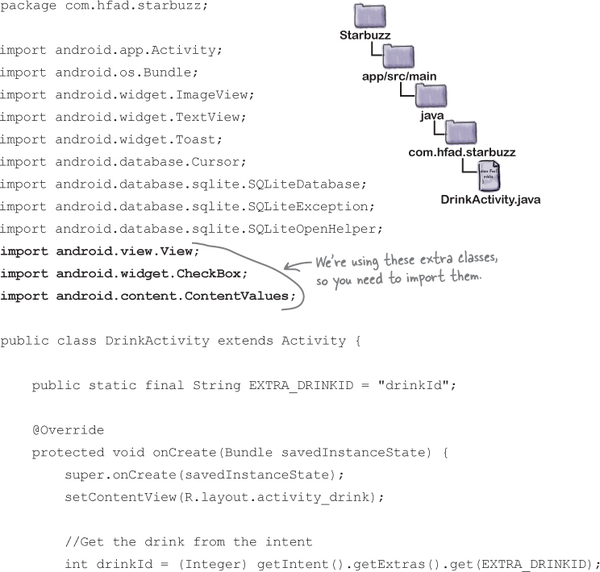
Add a checkbox to DrinkActivity’s layout
We’ll start by adding a new checkbox to DrinkActivity’s layout to indicate whether the current drink is one of the user’s favorites. We’re using a checkbox, as it’s an easy way to display true/false values.
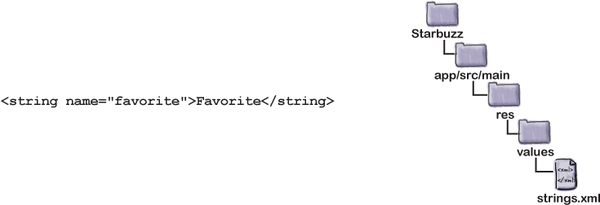
First, add a String resource called "favorite" to strings.xml (we’ll use this as a label for the checkbox):
Then add the checkbox to activity_drink.xml. We’ll give the checkbox an ID of favorite so that we can refer to it in our activity code. We’ll also set its android:onClick attribute to "onFavoriteClicked" so that it calls the onFavoriteClicked() method in DrinkActivity when the user clicks on the checkbox. Here’s the layout code; update your code to reflect our changes (they’re in bold):
Next we’ll change the DrinkActivity code to get the checkbox to reflect the value of the FAVORITE column from the database.
Display the value of the FAVORITE column

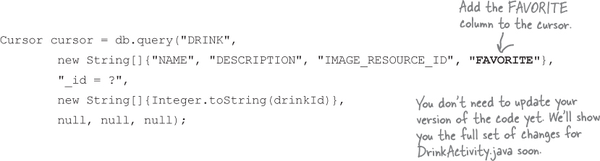
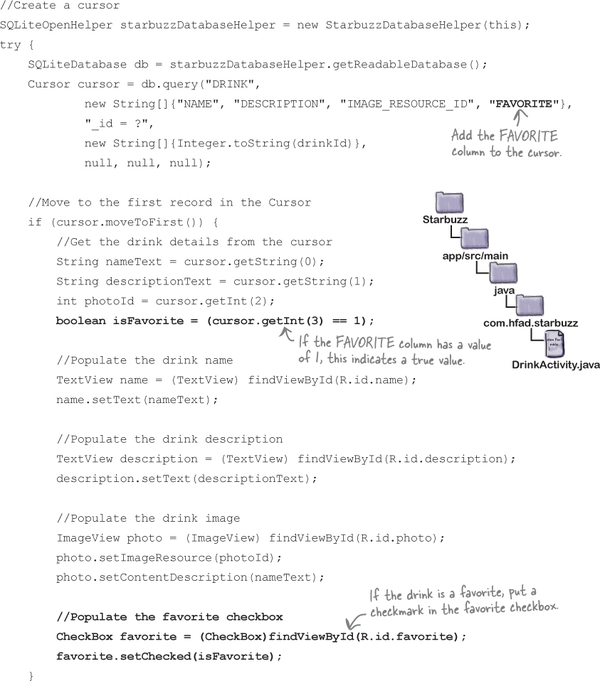
In order to update the checkbox, we first need to retrieve the value of the FAVORITE column from the database. We can do this by updating the cursor we’re using in DrinkActivity’s onCreate() method to read drink values from the database.
Here’s the cursor we’re currently using to return data for the drink the user has selected:
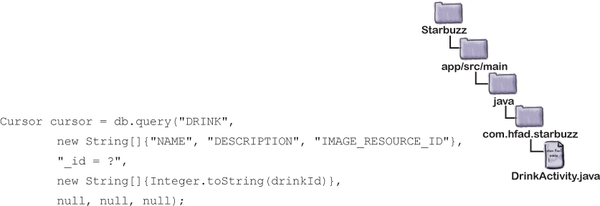
To include the FAVORITE column in the data that’s returned, we simply add it to the array of column names returned by the cursor:
Once we have the value of the FAVORITE column, we can update the favorite checkbox accordingly. To get this value, we first navigate to the first (and only) record in the cursor using:
cursor.moveToFirst();
We can then get the value of the column for the current drink. The FAVORITE column contains numeric values, where 0 is false and 1 is true. We want the favorite checkbox to be ticked if the value is 1 (true), and unticked if the value is 0 (false), so we’ll use the following code to update the checkbox:

That’s all the code we need to reflect the value of the FAVORITE column in the favorite checkbox. Next, we need to get the checkbox to respond to clicks so that it updates the database when its value changes.
Respond to clicks to update the database

When we added the favorite checkbox to activity_drink.xml, we set its android:onClick attribute to onFavoriteClicked(). This means that whenever the user clicks on the checkbox, the onFavoriteClicked() method in the activity will get called. We’ll use this method to update the database with the current value of the checkbox. If the user checks or unchecks the checkbox, the onFavoriteClicked() method will save the user’s change to the database.
In Chapter 15, you saw how to use SQLiteDatabase methods to change the data held in a SQLite database: the insert() method to insert data, the delete() method to delete data, and the update() method to update existing records.
You can use these methods to change data from within your activity. As an example, you could use the insert() method to add new drink records to the DRINK table, or the delete() method to delete them. In our case, we want to update the DRINK table’s FAVORITE column with the value of the checkbox using the update() method.
As a reminder, the update() method looks like this:

where table is the name of the table you want to update, and values is a ContentValues object containing name/value pairs of the columns you want to update and the values you want to set them to. The conditionClause and conditionArguments parameters lets you specify which records you want to update.
You already know everything you need to get DrinkActivity to update the FAVORITE column for the current drink when the checkbox is clicked, so have a go at the following exercise.
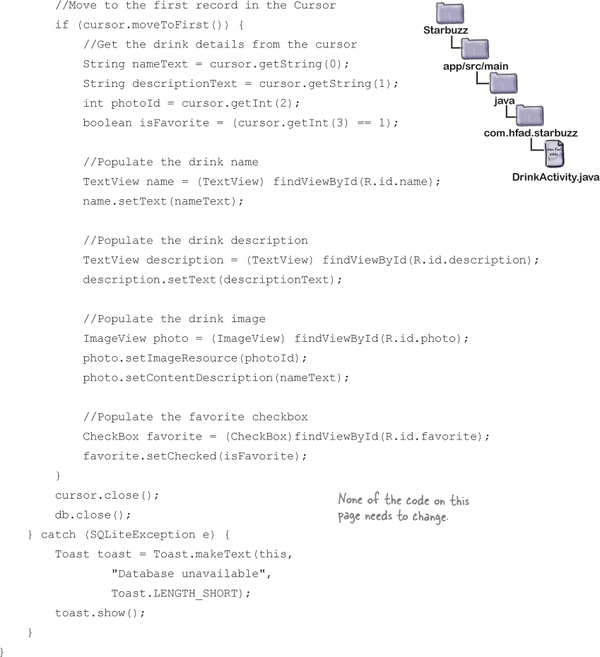
The full DrinkActivity.java code
We’ve now done everything we need to change DrinkActivity so that it reflects the contents of the FAVORITE column in the favorite checkbox. It then updates the value of the column in the database if the user changes the value of the checkbox.
Here’s the full code for DrinkActivity.java, so update your version of the code so that it reflects ours (our changes are in bold):
The code continues on the next page.
DrinkActivity.java (continued)

The code continues on the next page.
DrinkActivity.java (continued)


Let’s check what happens when we run the app.
Test drive the app

When we run the app and navigate to a drink, the new favorite checkbox is displayed (unchecked):

When we click on the checkbox, a checkmark appears to indicate that the drink is one of our favorites:
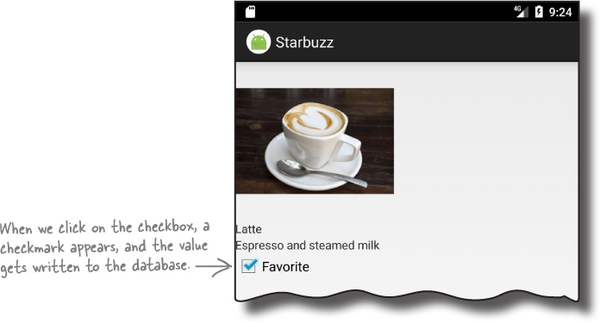
When we close the app and navigate back to the drink, the checkmark remains. The value of the checkbox has been written to the database.
That’s everything we need to display the value of the FAVORITE column from the database, and update the database with any changes to it.
Display favorites in TopLevelActivity
The next thing we need to do is display the user’s favorite drinks in TopLevelActivity. Here are the steps we’ll go through to do this:
Add a list view and text view to TopLevelActivity’s layout.
Populate the list view and get it to respond to clicks.
We’ll create a new cursor that retrieves the user’s favorite drinks from the database, and attach it to the list view using a cursor adapter. We’ll then create an
onItemClickListenerso that we can getTopLevelActivityto startDrinkActivitywhen the user clicks on one of the drinks.Refresh the list view data when we choose a new favorite drink.
If we choose a new favorite drink in
DrinkActivity, we want it to be displayed inTopLevelActivity’s list view when we navigate back to it.
Applying all of these changes will enable us to display the user’s favorite drinks in TopLevelActivity.

We’ll go through these steps over the next few pages.
Display the favorite drinks in activity_top_level.xml
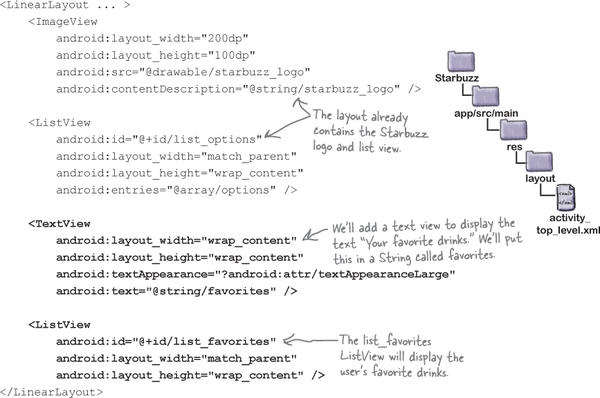
As we said on the previous page, we’re going to add a list view to activity_top_level.xml, which we’ll use to display a list of the user’s favorite drinks. We’ll also add a text view to display a heading for the list.
First, add the following String resource to strings.xml (we’ll use this for the text view’s text):
Next, we’ll add the new text view and list view to the layout. Here’s our code for activity_top_level.xml; update your version of the code to match our changes:
Those are all the changes we need to make to activity_top_level.xml. Next, we’ll update TopLevelActivity.java.
Refactor TopLevelActivity.java

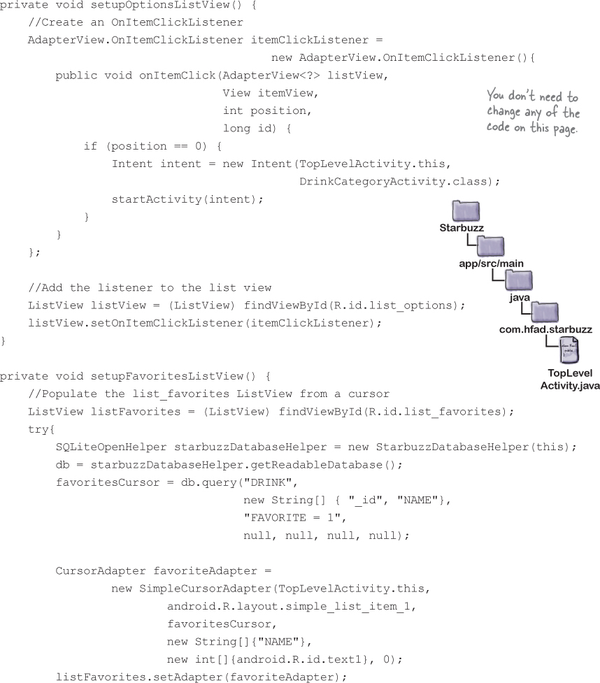
Before we write any code for our new list view, we’re going to refactor our existing TopLevelActivity code. This will make the code a lot easier to read later on. We’ll move the code relating to the options list view into a new method called setupOptionsListView(). We’ll then call this method from the onCreate() method.
Here’s our code for TopLevelActivity.java (update your version of the code to reflect our changes).
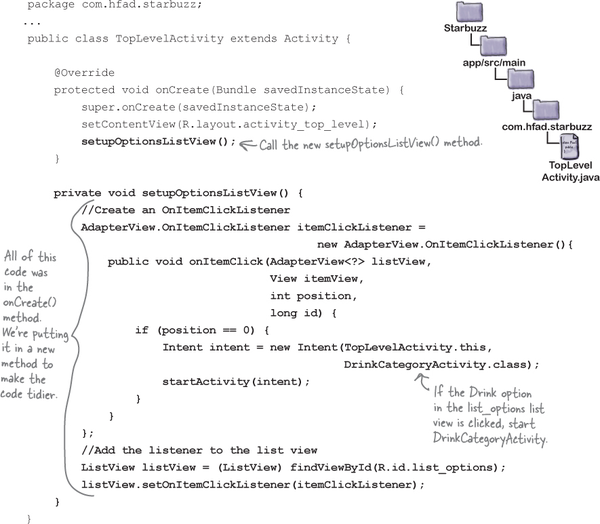
What changes are needed for TopLevelActivity.java

We need to display the user’s favorite drinks in the list_favorites list view we added to the layout, and get it to respond to clicks. To do this, we need to do the following:
Populate the list_favorites list view using a cursor.
The cursor will return all drinks where the FAVORITE column has been set to
1—all drinks that the user has flagged as being a favorite. Just as we did in our code forDrinkCategoryActivity, we can connect the cursor to the list view using a cursor adapter.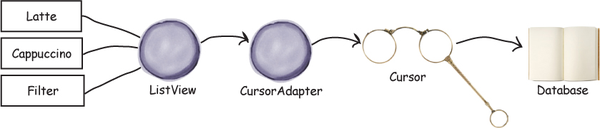
Create an onItemClickListener so that the list_favorites list view can respond to clicks.
If the user clicks on one of their favorite drinks, we can create an intent that starts
DrinkActivity, passing it the ID of the drink that was clicked. This will show the user details of the drink they’ve just chosen.
You’ve already seen all the code that’s needed to do this. In fact, it’s almost identical to the code we wrote in earlier chapters to control the list of drinks in DrinkCategoryActivity. The only difference is that this time, we only want to display drinks with a value of 1 in the FAVORITE column.
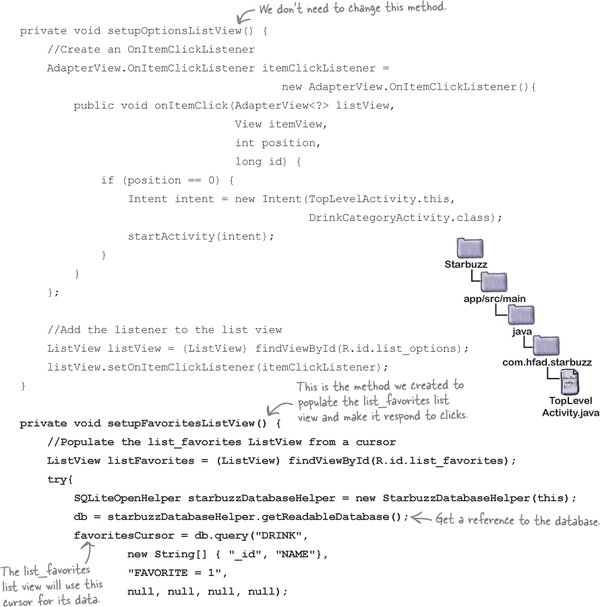
We’ve decided to put the code that controls a list view in a new method called setupFavoritesListView(). We’ll show you this method on the next page before adding it to TopLevelActivity.java.
 Ready Bake Code
The setupFavoritesListView() method populates the list_favorites list view with the names of the user’s favorite drinks. Make sure you understand the code below before turning the page.

The new TopLevelActivity.java code

We’ve updated TopLevelActivity to populate the list_favorites list view and make it respond to clicks. Update your version of TopLevelActivity.java to match ours (there’s a lot of new code, so go through it carefully and take your time):

The code continues on the next page.
The TopLevelActivity.java code (continued)

The code continues on the next page.
The TopLevelActivity.java code (continued)


The above code populates the list_favorites list view with the user’s favorite drinks. When the user clicks on one of these drinks, an intent starts DrinkActivity and passes it the ID of the drink. Let’s take the app for a test drive and see what happens.
Test drive the app

When you run the app, the new text view and list_favorites list view are displayed in TopLevelActivity. If you’ve marked a drink as being a favorite, it appears in the list view.
If you click on that drink, DrinkActivity starts and details of the drink are displayed.

But there’s a problem. If you select a new drink as being a favorite, when you go back to TopLevelActivity the list_favorites list view doesn’t include the new drink. The new drink is only included in the list view if you rotate the device.

Why do you think the new drink we chose as a favorite doesn’t appear in the list view until we rotate the device? Give this some thought before turning the page.
Cursors don’t automatically refresh

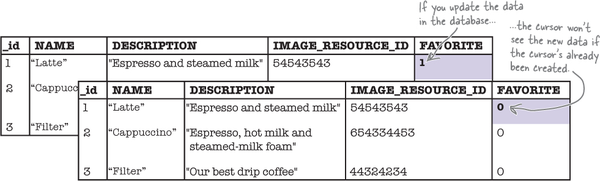
If the user chooses a new favorite drink by navigating through the app to DrinkActivity, the new favorite drink isn’t automatically displayed in the list_favorites list view in TopLevelActivity. This is because cursors retrieve data when the cursor gets created.
In our case, the cursor is created in the activity onCreate() method, so it gets its data when the activity is created. When the user navigates through the other activities, TopLevelActivity is stopped. It’s not destroyed and recreated, so neither is the cursor.
Cursors don’t automatically keep track of whether the underlying data in the database has changed. So if the underlying data changes after the cursor’s been created, the cursor doesn’t get updated: it still contains the original records, and none of the changes. That means that if the user marks a new drink as being a favorite after the cursor is created, the cursor will be out of date.
So how do we get around this?
Change the cursor with changeCursor()

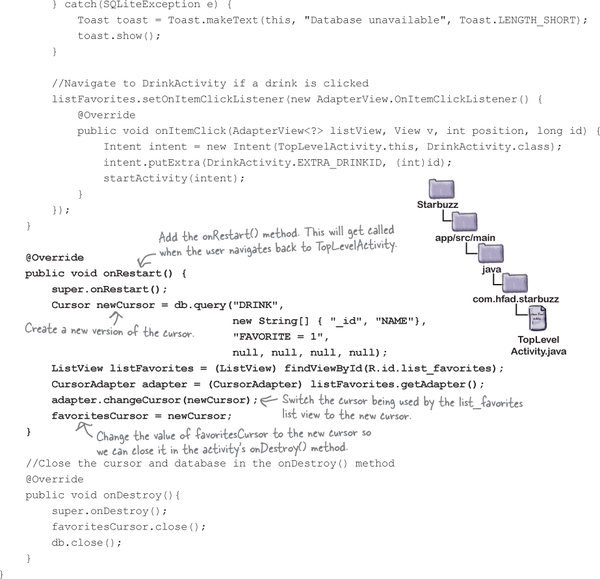
The solution is to change the underlying cursor used by the list_favorites list view to an updated version. To do this, you define a new version of the cursor, get a reference to the list view’s cursor adapter, and then call the cursor adapter’s changeCursor() method to change the cursor. Here are the details:
1. Define the cursor
You define the cursor in exactly the same way as you did before. In our case, we want the query to return the user’s favorite drinks, so we use:

2. Get a reference to the cursor adapter
You get a reference to the list view’s cursor adapter by calling the list view’s getAdapter() method. This method returns an object of type Adapter. As our list view is using a cursor adapter, we can cast the adapter to a CursorAdapter:

3. Change the cursor using changeCursor()
You change the cursor used by the cursor adapter by calling its changeCursor() method. This method takes one parameter, the new cursor:

The changeCursor() method replaces the cursor adapter’s current cursor with the new one. It then closes the old cursor, so you don’t need to do this yourself.
We’re going to change the cursor used by the list_favorites list view in TopLevelActivity’s onRestart() method. This means that the data in the list view will get refreshed when the user returns to TopLevelActivity. Any new favorite drinks the user has chosen will be displayed, and any drinks that are no longer flagged as favorites will be removed from the list.
We’ll show you the full code for TopLevelActivity.java over the next few pages.
The revised TopLevelActivity.java code

Here’s the full TopLevelActivity.java code; update your code to reflect our changes (in bold).
The code continues on the next page.
The TopLevelActivity.java code (continued)
The code continues on the next page.
The TopLevelActivity.java code (continued)

Let’s see what happens when we run the app now.
Test drive the app

When we run the app, our favorite drinks are displayed in TopLevelActivity as before. When we click on one of the drinks, its details are displayed in DrinkActivity. If we uncheck the favorite checkbox for that drink and return to TopLevelActivity, the data in the list_favorites list view is refreshed and the drink is no longer displayed.

Databases are powerful, but they can be slow.
That means that even though our app works, we need to keep an eye on performance...
Databases can make your app go in sloooow-moooo....
Think about what your app has to do when it opens a database. It first needs to go searching for the database file. If the database file isn’t there, it needs to create a blank database. Then it needs to run all of the SQL commands to create tables inside the database and any initial data it needs. Finally, it needs to fire off some queries to get the data out of there.
That all takes time. For a tiny database like the one used in the Starbuzz app, it’s not a lot of time. But as a database gets bigger and bigger, that time will increase and increase. Before you know it, your app will lose its mojo and will be slower than YouTube on Thanksgiving.
There’s not a lot you can do about the speed of creating and reading from a database, but you can prevent it from slowing down your interface.
Life is better when threads work together
The big problem with accessing a slow database is that can make your app feel unresponsive. To understand why, you need to think about how threads work in Android. Since Lollipop, there are three kinds of threads you need to think about:
The main event thread
This is the real workhorse in Android. It listens for intents, it receives touch messages from the screen, and it calls all of the methods inside your activities.
The render thread
You don’t normally interact with this thread, but it reads a list of requests for screen updates and then calls the device’s low-level graphics hardware to repaint the screen and make your app look pretty.
Any other threads that you create
If you’re not careful, your app will do almost all of its work on the main event thread because this thread runs your event methods. If you just drop your database code into the onCreate() method (as we did in the Starbuzz app), then the main event thread will be busy talking to the database, instead of rushing off to look for any events from the screen or other apps. If your database code takes a long time, users will feel like they’re being ignored or wonder if the app has crashed.
So the trick is to move your database code off the main event thread and run it in a custom thread in the background. We’ll go through how you do this using the DrinkActivity code we wrote earlier in the chapter. As a reminder, the code updates the FAVORITE column in the Starbuzz database when the user clicks on the favorite checkbox, and displays a message if the database is unavailable.
What code goes on which thread?
When you use databases in your app, it’s a good idea to run database code in a background thread, and update views with the database data in the main event thread. We’re going to work through the onFavoritesClicked() method in the DrinkActivity code so that you can see how to approach this sort of problem.
Here’s the code for the method (we’ve split it into sections, which we’ll describe below):

Code that needs to be run before the database code
The first few lines of code get the value of the
favoritecheckbox, and put it in thedrinkValues ContentValuesobject. This code must be run before the database code.Database code that needs to be run on a background thread
This updates the DRINK table.
Code that needs to be run after the database code
If the database is unavailable, we want to display a message to the user. This must run on the main event thread.
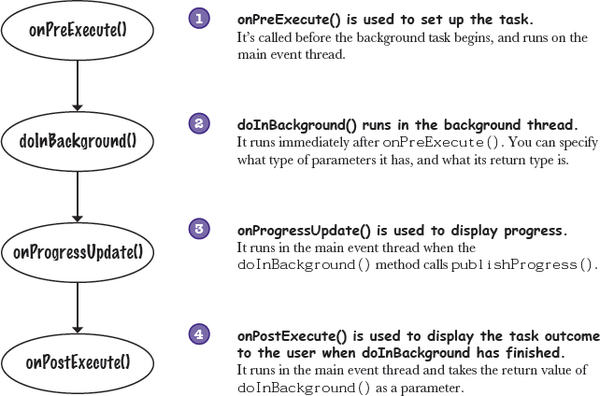
We’re going to implement the code using an AsyncTask. What’s that, you ask?
AsyncTask performs asynchronous tasks
An AsyncTask lets you perform operations in the background. When they’ve finished running, it then allows you to update views in the main event thread. If the task is repetitive, you can even use it to publish the progress of the task while it’s running.
You create an AsyncTask by extending the AsyncTask class, and implementing its doInBackground() method. The code in this method runs in a background thread, so it’s the perfect place for you to put database code. The AsyncTask class also has an onPreExecute() method that runs before doInBackground(), and an onPostExecute() method that runs afterward. There’s an onProgressUpdate() method if you need to publish task progress.
Here’s what an AsyncTask looks like:

AsyncTask is defined by three generic parameters: Params, Progress, and Results. Params is the type of object used to pass any task parameters to the doInBackground() method, Progress is the type of object used to indicate task progress, and Result is the type of the task result. You can set any of these to Void if you’re not going to use them.
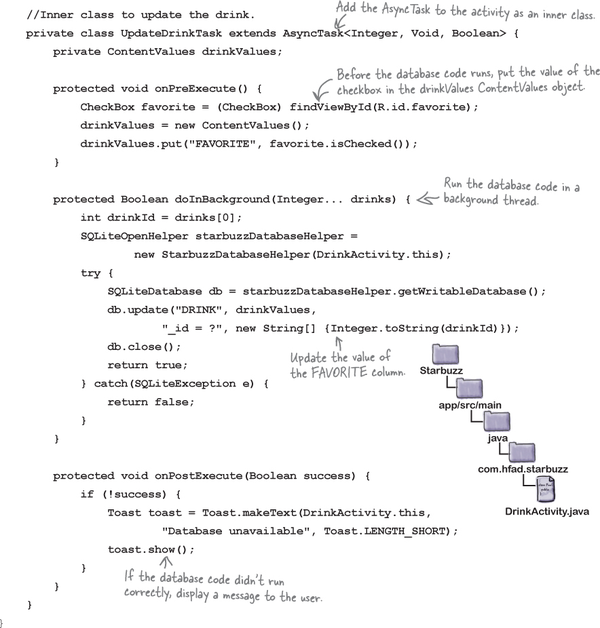
We’ll go through this over the next few pages by creating a new AsyncTask called UpdateDrinkTask we can use to update drinks in the background. Later on, we’ll add this to our DrinkActivity code as an inner class.
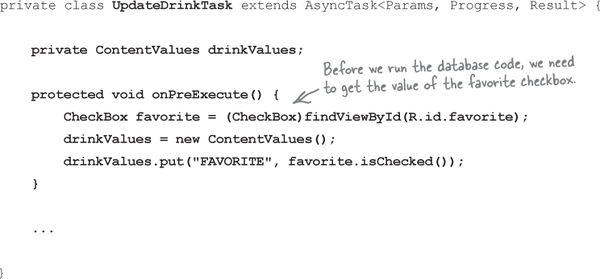
The onPreExecute() method
We’ll start with the onPreExecute() method. This gets called before the background task begins, and it’s used to set up the task. It’s called on the main event thread, so it has access to views in the user interface. The onPreExecute() method takes no parameters, and has a void return type.

In our case, we’re going to use the onPreExecute() method to get the value of the favorite checkbox, and put it in the drinkValues ContentValues object. This is because we need access to the checkbox view in order to do this, and it must be done before any of our database code can be run. We’re using a separate attribute outside the method for the drinkValues ContentValues object so that other methods in the class can access the ContentValues object (we’ll look at these methods over the next few pages).
Here’s the code:
Next, we’ll look at the doInBackground() method.
The doInBackground() method
The doInBackground() method runs in the background immediately after onPreExecute(). You define what type of parameters the task should receive, and what the return type should be.

We’re going to use the doInBackground() method for our database code so that it runs in a background thread. We’ll pass it the ID of the drink we need to update; because the drink ID is an int value, we need to specify that the doInBackground() method receives Integer objects. We’ll use a Boolean return value so we can tell whether the code ran successfully:

Next, we’ll look at the onProgressUpdate() method.
The onProgressUpdate() method
The onProgressUpdate() method is called on the main event thread, so it has access to views in the user interface. You can use this method to display progress to the user by updating views on the screen. You define what type of parameters the method should have.

The onProgressUpdate() method runs if a call to publishProgress() is made by the doInBackground() method like this:

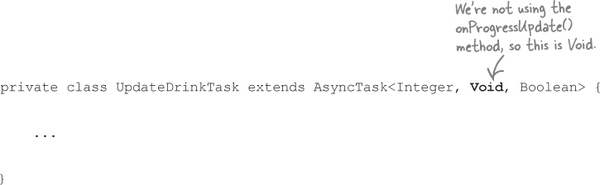
In our app, we’re not publishing the progress of our task, so we don’t need to implement this method. We’ll indicate that we’re not using any objects for task progress by changing the signature of UpdateDrinkTask:
Finally, we’ll look at the onPostExecute() method.
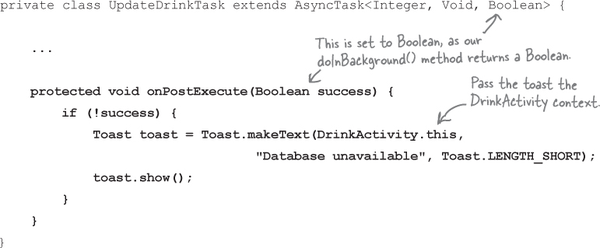
The onPostExecute() method
The onPostExecute() method is called after the background task has finished. It’s called on the main event thread, so it has access to views in the user interface. You can use this method to present the results of the task to the user. The onPostExecute() method gets passed the results of the doInBackground() method, so it must take parameters that match the doInBackground() return type.

We’re going to use the onPostExecute() method to check whether the database code in the doInBackground() method ran successfully. If it didn’t, we’ll display a message to the user. We’re doing this in the onPostExecute() method, as this method can update the user interface; the doInBackground() method runs in a background thread, so it can’t update views.
Here’s the code:
Now that we’ve written the code for our AsyncTask methods, let’s revisit the AsyncTask class parameters.
The AsyncTask class parameters
When we first introduced the AsyncTask class, we said it was defined by three generic parameters: Params, Progress, and Results. You specify what these are by looking at the type of parameters used by your doInBackground(), onProgressUpdate(), and onPostExecute() methods. Params is the type of the doInBackground() parameters, Progress is the type of the onProgressUpdate() parameters, and Result is the type of the onPostExecute() parameters:
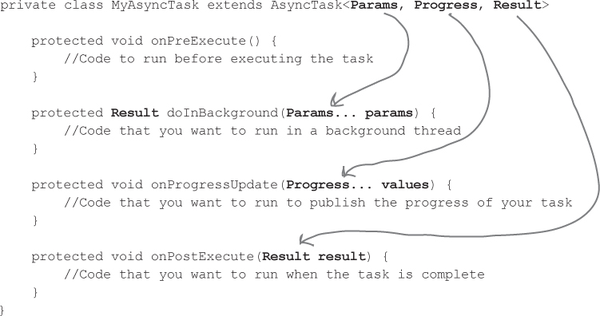
In our example, doInBackground() takes Integer parameters, onPostExecute() takes a Boolean parameter, and we’re not using the onProgressUpdate() method. This means that in our example, Params is Integer, Progress is Void, and Result is Boolean:

We’ll show you the full UpdateDrinkTask class on the next page.
The full UpdateDrinkTask class
Here’s the full code for the UpdateDrinkTask class. It needs to be added to DrinkActivity as an inner class, but we suggest you wait to do that until we show you how to execute it and show you the full DrinkActivity.java code listing.

Execute the AsyncTask...
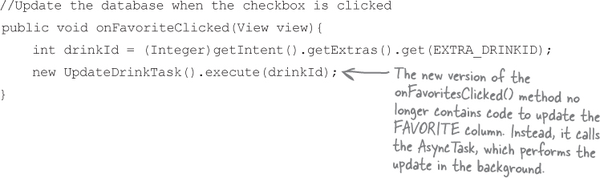
You run the AsyncTask by calling the AsyncTask execute() method and passing it any parameters required by the doInBackground() method. As an example, we want to pass the drink the user chose to our AsyncTask’s doInBackground() method, so we call it using:

The type of parameter you pass with the execute() method must match the type of parameter expected by the AsyncTask doInBackground() method. We’re passing an integer value (the drink ID), which matches the type of parameter expected by our doInBackground() method:
protected Boolean doInBackground(Integer... drinks) {
    ...
}
... in DrinkActivity’s onFavoritesClicked() method
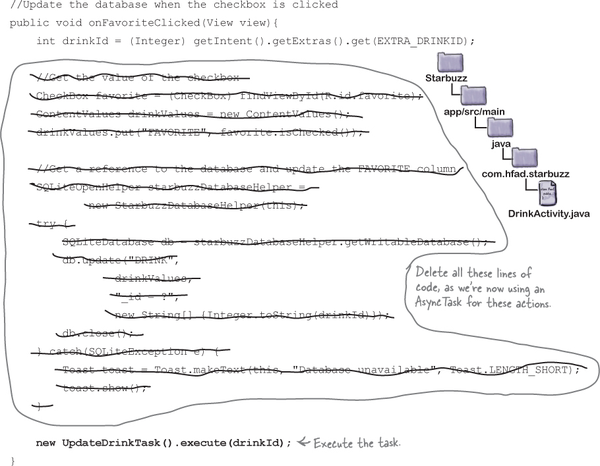
Our UpdateDrinkTask class (the AsyncTask we created) needs to update the FAVORITE column in the Starbuzz database whenever the favorite checkbox in DrinkActivity is clicked. We therefore need to execute it in DrinkActivity’s onFavoritesClicked() method. Here’s what the new version of the method looks like:
We’ll show you the new DrinkActivity.java code over the next few pages.
The full DrinkActivity.java code
Here’s the complete code for DrinkActivity.java; update your version of the code to reflect our changes:
The code continues on the next page.
The full DrinkActivity.java code (continued)
The code continues on the next page.
The full DrinkActivity.java code (continued)
The code continues on the next page.
The full DrinkActivity.java code (continued)
That’s everything you need in order to create an AsyncTask. Let’s check what happens when we run the app.
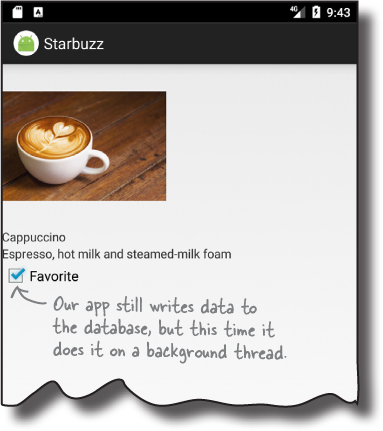
Test drive the app
When we run the app and navigate to a drink, we can indicate that the drink is a favorite drink by checking the “favorite” checkbox. Clicking on the checkbox still updates the FAVORITE column in the database with its value, but this time the code is running on a background thread.
In an ideal world, all of your database code should run in the background. We’re not going to change our other Starbuzz activities to do this, but why not make this change yourself?
Chapter 17 Your Android Toolbox

You’ve got Chapter 17 under your belt and now you’ve added writing to SQLite databases to your toolbox.
Note
You can download the full code for the chapter from https://tinyurl.com/HeadFirstAndroid.
A summary of the AsyncTask steps