WHEN IT COMES TO TYPEFACES, we are spoilt for choice. But with so many fonts just a mouse click away, it’s easy to be overwhelmed rather than empowered by all that choice. We’ve probably all felt intimidated at one time or another by the length of our font menus. if you’re like me, you’ve probably frittered away the best part of a day experimenting with this or that enticingly named font, only to find yourself unsatisfied with the results.
Complicating matters is the fact that our typefaces may be sending messages without our knowing it. Typefaces can be loaded—often through no fault of their own—with symbolism or meaning. For example, Times New Roman or Helvetica/Arial might scream “generic” because we are so used to seeing them as the “default” font; Fette Fraktur, because of its adoption by the National Socialists, might connote Nazism. Other fonts, once fashionable, may be trapped in a historical period—great if you want to evoke that era, but a potential faux pas if not. Who, in the early twenty-first century, hasn’t been overexposed to Comic Sans? Certain fonts may have been co-opted by a ubiquitous advertising campaign and can’t help but evoke that product; others may have suddenly become fashionable, only to suddenly change—like an overplayed song on the radio—from flavor of the month to minor irritation. What’s more there’s a growing number of type geeks out there who relish the opportunity to point out the historical inappropriateness of using an English sans serif from the 1930s for a book about a Russian art movement of the 1920s.
Tip: Type Specimen Book
The only way to efficiently evaluate typefaces is by using a type specimen book. Don’t be tempted to forgo this essential reference in favor of pulling down typefaces from the font menu to see how they look; this is a surefire way to waste time. Several such books are available, including The Type Specimen Book (John Wiley & Sons), and Font Bureau Type Specimens (www.fontbureau.com). Alternatively, you can browse typefaces in the Adobe Type Library at http://store.adobe.com/type/.
Maybe I exaggerate. But only a little. The thing is, there’s no way to predict how readers will react to our type choices, and, the bolder those choices, the more likely we are to upset someone. So, it’s a good idea to arm yourself with at least a basic knowledge of typographic history, a solid understanding of the fonts you use most often, and an awareness of the connotations that certain typefaces carry.
My personal type aesthetic is a minimalist one, though I wonder if this is just laziness: If less is more, then maybe I can get away with knowing fewer typefaces. Perhaps more is more, but the reality is that it’s better to know and understand a few typefaces well than to have a font list a mile long and only a passing acquaintance with the fonts that are on it.
Choosing a typeface is about enhancing the meaning of the text you are working with. It’s also about meeting the expectations and matching the tastes of your client. In a perfect world, we’d all read and thoroughly digest the text documents we are given to work with as raw materials. Depending on the length of your documents, that may or may not be possible, but you should at least have an understanding of the intended message.

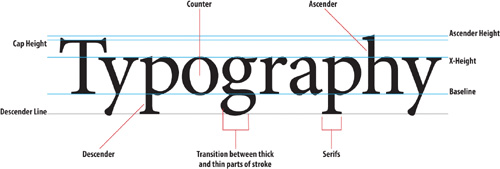
To talk meaningfully about type we need to share a common vocabulary. Below is a simple diagram deconstructing letter shapes into their constituent parts.
There is no single recognized standard for classifying typefaces; rather there are several overlapping standards. For our purposes I’m going to use a simplified version of Adobe’s type classification, showing three examples of each category.
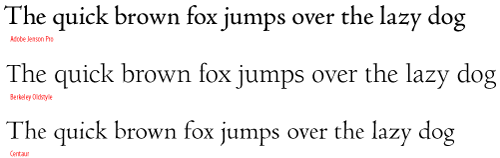
Named after the first Roman typefaces that appeared in Venice around 1470, Venetian typefaces were initially designed to imitate the handwriting of Italian Renaissance scholars. Distinguishing features:
Sloping bar on the lowercase e
Angle of stress that approximates that of a broad-nibbed pen held at an angle to the page
Little contrast between thick and thin strokes
Examples: Adobe Jenson, Berkeley Oldstyle, Centaur
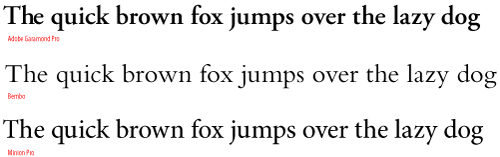
Garalde typefaces include some of the most popular roman styles in use today. Distinguishing features:
Horizontal bar on the lowercase e
A slightly greater contrast between thick and thin strokes than Venetian types
Axis curves that are inclined to the left
Bracketed serifs
Examples: Adobe Garamond, Bembo, Minion
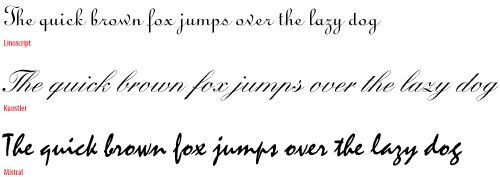
Script typefaces mimic handwriting by joining letters with connecting lines. For this reason, scripts require extra attention to the kerning of their letters. Also, you never want to set a script typeface in all caps.
Examples: Linoscript, Kunstler Script, Mistral
Representing a move away from letter shapes based on handwriting, transitional types were the first typefaces to be drawn as shapes in their own right. They represent a transition between Garalde and Modern (Didone) typefaces, and contain aspects of both. Distinguishing features:
A vertical, or near vertical axis
Pronounced contrast between hairlines and main strokes
Serifs are thin, flat and bracketed
Examples: Baskerville, Perpetua, Stone Serif
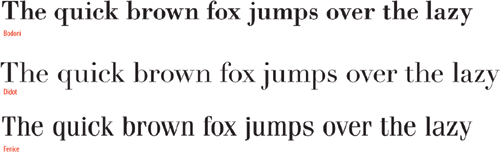
Named after Firmin Didot and Giambattista Bodoni, Didone typefaces were a response to improvements in late 18th Century paper production, composition, printing and binding, which made it possible to develop typefaces with strong vertical emphasis and fine hairlines. Distinguishing features:
Strong contrast between thick and thin strokes
Vertical axis
Mechanical appearance—constructed rather than drawn
Fine, unbracketed, serifs
Examples: Bodoni, Didot, Fenice
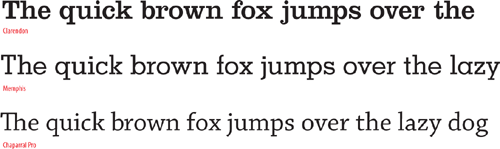
With the Industrial Revolution came the increased use of posters, billboards, and other forms of advertising, and the need for bolder, more in-your-face typefaces. Slab serif typefaces were originally called “Egyptians,” reflecting the public’s enthusiasm for the archeological discoveries of the time. Distinguishing features:
Heavy, squared-off serifs
Relatively consistent stroke weight
Sturdy
Examples: Clarendon, Memphis, Rockwell
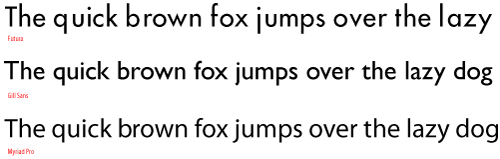
The first sans serif typeface was issued in 1816, but it wasn’t until the 1920s, with the influence of the Bauhaus and de Stijl art movements, that sans serifs became popular. Within the broad category of sans serif, there are four sub categories: Grotesque, Neo-Grotesque, Geometric, and Humanist.
Examples: Futura, Gill Sans, Myriad Pro

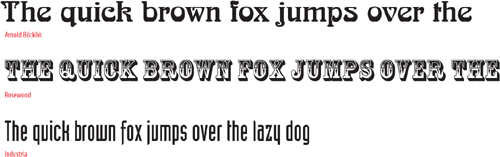
The following classes of type all play a supporting role:
While typefaces in this group incorporate elements from many styles, they are most effective when used in large sizes for display purposes, such as headlines and titles.
Examples: Arnold Böcklin, Rosewood Standard, Industria
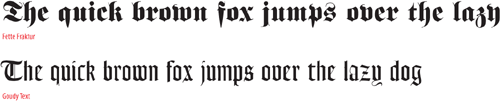
These typefaces are sometimes referred to as Old English or Gothic. They were used for text in Germany until World War II, but are now primarily used as display type.
Examples: Fette Fraktur, Goudy Text
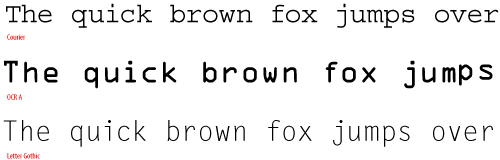
All of the characters in a monospaced typeface have the same width. Most typefaces have proportionally spaced characters, but monospaced characters may be required when setting text on forms, financial statements and other documents where exact spacing is required.
Examples: Courier, OCR-A Std, Letter Gothic
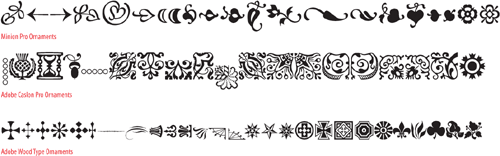
Ornamental typefaces contain decorative ornaments or symbols and can be used to embellish or decorate documents. Some OpenType fonts include ornaments as part of their extended character set.
Examples: Adobe Wood Type Ornaments, Minion Pro Ornaments, Adobe Caslon Ornaments
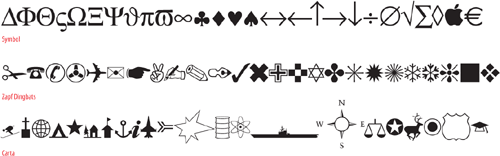
Symbol or picture typefaces fulfill a number of nontext functions: musical notation, map making, mathematics, crossword, and puzzle publishing.
Examples: ITC Zapf Dingbats, Symbol, Carta.
Move to start or end of story: Cmd+Home or End (Ctrl+Home or End)
Select start or end of story: Shift+Cmd+Home or End (Shift+Ctrl+Home or End)
Select one word: Double-click word
Select one line: Triple-click line (depending on Text Preferences setting)
Select one paragraph: Quadruple click
Select whole story: Cmd+A (Ctrl+A)
Select to the beginning of the line: Cmd+Shift+Up Arrow (Ctrl+Shift+Up Arrow)
Select to the end of the line: Cmd+Shift+Down Arrow (Ctrl+Shift+Down Arrow)
Move to the beginning of the line: Cmd+Up Arrow (Ctrl+Up Arrow)
Move to the end of the line: Cmd+Down Arrow (Ctrl+Down Arrow)
Access the Control Palette: Cmd+6 (Ctrl+6)
Toggle between Character/Paragraph Formatting Controls in the Control Palette (if the Type tool is selected): Cmd+Option+7 (Ctrl+Alt+7)
Double click a text frame with the Selection Tool to switch to the Type Tool. You can toggle back to the Selection Tool from the Type Tool (or any tool) by holding down Cmd (Ctrl).

Tip
Work with your Hidden Characters visible. This is a good way to troubleshoot potential composition problems because you can see any forced line breaks, tabs, and multiple spaces that may have crept into your text. You can toggle this view option on and off by choosing Type > Show Hidden Characters or by pressing Cmd+Option+i (Ctrl+Alt+i).
This section looks at the basic options available in the Character Formatting Controls on the Control Palette or on the Character Palette.
Because InDesign is a type snob (in a good way), it won’t allow you to make “faux” type styles. There’s no I or B icon you can click to make your text italic or bold. Instead you need to choose the real italic or real bold weights of that font from the Type Style pull down. Alternatively, the shortcuts: Cmd+Shift+I (Ctrl+Shift+I) or Cmd+Shift+B (Ctrl+Shift+B) will select the real italic or bold weights for you—so long as you have the real italic or bold weight of the font installed.
Italic types—so named because they evolved in Italy (in early 16th Century Venice)—are designed to complement their roman siblings. They are distinct fonts in their own right and not just slanted versions of the roman. Italics are typically used to clarify a word, differentiating it from the rest of the text. Italics are commonly used for the titles of films, book, magazines, or for foreign phrases or terms, and often to indicate emphasis.
Tip
To quickly access the font menu on the Control palette press Cmd/Ctrl+6. From there, you can type the first few letters of the font you’re after to go directly to it, or at least close to it, on the font menu.
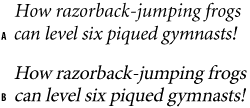
Figure 3.18. Real italics vs. slanted type. A is Minion Pro italic; B is Minion Regular slanted to 12°. Note the difference between the a, e, and f.
Italics are lighter than their roman counterparts, and their slant can make the type look hurried. Because the characters are more decorative, they can also draw too much attention to themselves. For these reasons, avoid long passages set in italics. Italics are unique but if overused that uniqueness is lost.
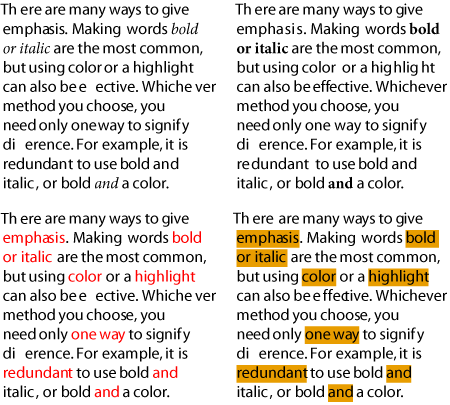
Bold weights are typically applied to headings, subheads, and running heads to establish hierarchy. In many books—this one, for example—bold is also used for referring to figures. If you are using bold weights for emphasis in body text, do so sparingly. Bold text can attract too much attention, breaking up the continuity of your text.
Small caps have the following uses:
For acronyms and abbreviations. Because small caps are smaller than full size caps—slightly larger than the x-height—they are less obtrusive and do not overwhelm the upper and lower case type as full size capitals would.
As a transition from a drop cap to the regular body text size (See Chapter 10: “First Impressions: Creating Great Opening Paragraphs”)
For abbreviations like AM and PM—with no letter spaces or periods (though it more contemporary to use lowercase: 3pm, 7pm, etc.).
The problem with Small Caps is that unless you are using an OpenType font or an Expert Set (a font of supplementary characters), you’ll end up with fake small caps. Fake small caps are regular caps that have been scaled down in size, rather than redrawn characters designed to work in proportion with the regular caps. Because all their proportions are reduced, their weight tends to look too light and spindly and their strokes will not be the same thickness when set alongside regular caps.
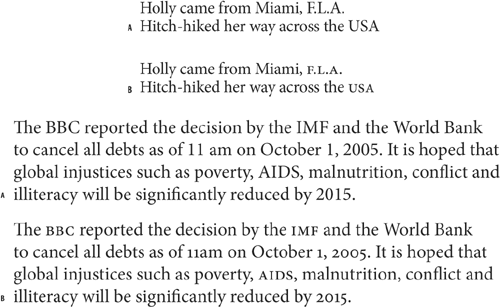
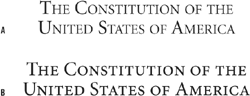
You know those people who type their emails in ALL CAPS? Annoying, aren’t they? Continuous text set in all caps is hard to read because the shapes of the words all look alike and are differentiated only by their length. We recognize words as shapes—the descenders and the ascenders of upper and lowercase text are essential to our ability to identify letters. Also, text set in all caps within body text tends to look disproportionately large when set among upper and lowercase text; hence the need for Small Caps. Just as shouting doesn’t make your message any clearer, setting text in all caps doesn’t make your message any more compelling.
None of this is to say don’t use All Caps—just use them thoughtfully. All Caps can be effective in headlines and subheads. Because there are no descenders, you should tighten the leading. Depending on the typeface, you may want to loosen the tracking for a sophisticated and understated look or tighten the tracking for a more solid, contrasty look.

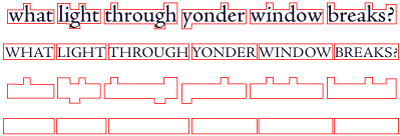
Figure 3.22. All Caps Treatments. The lack of serifs in the sans serif examples allows tighter tracking of the letters, which, in combination with the blockiness of the letter shapes, gives a more solid look, suitable in some instances but not in others. Loose tracking makes the serif versions more elegant. Context is everything.
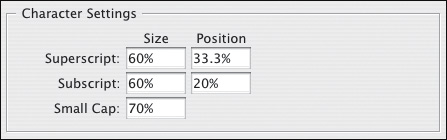
Superscript is typically used for ordinals in numbers or for footnotes. Subscript is used in chemical formulae. In Text Preferences, you can change the size of both relative to the point size of your text. You can also changetheir position relative to the baseline of the text. For best results set the Super/Subscript size to 60 percent, the Superscript position to 33 percent and the Subscript position to 0 percent.

In days of yore, when records came on vinyl and people typed on machines called typewriters, underlining was de rigueur for giving emphasis. But that was only because typewriters couldn’t do it any other way. Underlining, as every type manual will tell you, should not, in these days of typographic sophistication, be used for emphasis. The underline collides with the descenders of the word and looks downright ugly. However, underlining has become more sophisticated and is, dare I say it, perhaps making a comeback. These days you can change the weight of the underline and its distance from the baseline. Even so, underlined text—no matter how fancy the underline—is always going to be mutton dressed as lamb. That said, there are some nifty tricks you can do with underlining when applied as part of a style definition. But that’s another story—see Chapter 13, “Stylin’ with Paragraph and Character Styles.”
Tip
Really can’t resist underlining? Try adding a paper colored stroke to the underlined type. This prevents the underline from slicing through the descender shapes.
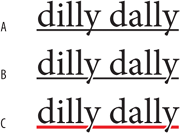
Figure 3.25. Underlining Options: Example A uses a generic underline; in example B, the type has a 0.75 pt paper-colored stroke, which keeps the underline away from the descender of the “y.” In example C, in addition to the paper-colored stroke, the color and weight of the underline have been adjusted. Choose Underline Options from the Control palette menu in the Character Formats.
You might use strikethrough to indicate which text will be deleted as a document moves through revision cycles, or once in a blue moon if you’re working on a legal document that requires you to indicate revisions. Alternatively, you might want to make a “highlight” character style—see Chapter 13, “Stylin’ with Paragraph and Character Styles.”
What can one say about the humble and oft-misunderstood baseline shift?
First, here’s what it should not be used for: Never, under any circumstances, use Baseline Shift to adjust inter-paragraph spacing—that is the function of leading and/or paragraph spacing.
Baseline shift is for fine tuning. It can be used to create effects in type, but mainly it’s used for finessing when you feel that certain characters need shifting relative to the baseline of other characters on the same line. To apply a baseline shift, use the Control Palette (nudge arrows move in one point increments) or the Options box of the Character Specifications dialog box.
Baseline shift can be used for the following:
Adjusting the position of bullets, ornaments, and inline graphics
Creating fractions, although OpenType fonts and the Make Fraction Script have made this use largely redundant
Tweaking the position of symbols like $, ®, ©, and ™
Adjusting the position of parentheses, braces, and brackets relative to the type they enclose, especially when used with All Caps. (Again, OpenType fonts make this less necessary)
Creating type effects

Get caught using these options, and the Type Police will come knocking on your door. Mess with the proportions of your typeface and you are trampling roughshod over the life’s work of some of the world’s finest artisans. OK, so maybe I’m being a bit dramatic, but faking a condensed typeface (one with a narrower horizontal scale) or an expanded typeface (one with a wider horizontal scale) will make the character shapes look spindly and the overall effect look amateurish. It’s better to choose a real condensed or real expanded typeface. It’s like the difference between My Way sung by Frank Sinatra or by some random bloke doing a karaoke version after a few too many pints. Condensed faces include Times Roman and Garamond Condensed. Expanded faces are more typically used for display instead of body type, and are more likely to be sans serif—like Helvetica Neue Expanded or Univers Extended.
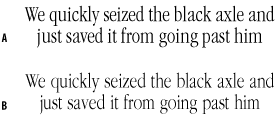
Figure 3.27. A real condensed font vs. a fake condensed font. ITC Garamond Light Condensed (A), and ITC Garamond Light (B) with horizontal scale set to 72 percent—note the lighter weight of the letters due to the scaling.
Having said all that in such a dogmatic way, I’ll now put in a disclaimer about retaining the right to contradict myself. For every rule, there will be examples of ways it can be creatively broken, and distorting type is no exception. The point I’m making is if you want to break this or any typographic “rule,” then do so consciously—and carry a big stick.
Readability refers to the ease with which we comprehend text by recognizing words and phrases as shapes. Readability is all about putting the reader first and leaving your ego behind—or at least confining it to your early drafts. Good typography is said to be “invisible”—you don’t even notice it. Instead the type is a conduit for the message of the text. This might make the typographer sound undervalued, but while your readers may not notice good typography, they will certainly recognize bad typography. As the acclaimed typographer and book designer Jan Tschichold put it: “To remain nameless and without specific appreciation, yet to have been of service to a valuable work and to the small number of visually sensitive readers—this, as a rule, is the only compensation for the long, and indeed never-ending, indenture of the typographer.[1]” Humbling stuff.
Readability studies have found that serif typefaces are better for continuous reading. Explanations for this vary. Some experts feel that serifs function like rails, guiding your eye along the line. Others suggest that we respond to serif types better because the transition of their strokes more closely resembles calligraphy. Or perhaps—and my money’s on this one—we read serif type more easily, simply because we’re more used to reading serif type. In the words of Zuzana Licko, cofounder of Émigré digital font foundry: “You read best what you read most.”
Maybe we could get used to anything, but we’ve been reading serif type for centuries and the habit is pretty much in our DNA. Sans serif typefaces are the new kids on the block relatively speaking—not invented until the early 19th Century and not in common usage until the 1920s.
Readability is less of a concern when it comes to display type, which, because it is set in short bursts rather than long passages, can afford to draw much more attention to itself.
It sounds like an overly simplistic formula, but you won’t go far wrong if you use serif faces for your body text and sans serif for your headings and subheads. Because sans serifs tend to be bolder and blockier, they are better at grabbing the reader’s attention. Also, the absence of serifs makes it possible to track sans serif headlines tighter, adding to their solidity. To make a subhead distinct from your body text, it is enough to choose a contrasting typeface; subheads do not necessarily need to be set in a larger point size.
Your choice of font is just one of several factors that work in sync to create—hopefully—readable type. Other factors include—but as they say in legalese—are not limited to:
Leading
Column measure (the ratio of type size to column width)
Alignment
Margins
Printing conditions: What kind of paper stock will the document be printed on?
Reading conditions: An enormous variable over which you, the typographer, have no control. There’s no way you can know whether your audience will be reading by candlelight, while standing on a busy commuter train, or while in the bath. Although, depending on the type of document you’re creating, you may be able to speculate. For example, if you’re designing a bus timetable, you’ll want to forgo challenging postmodern typography in favor of a straightforward, get-your-message-across approach.
Tip: Shortcuts for Sizing Type
In addition to using the Type Size control on the Control Palette, you can also size your type using keyboard shortcuts:
Cmd+Shift+>/< (Ctrl+Shift+>/<) Increase or decrease point size by the increment specified in Preferences>Units & Increments>Size/Leading.
Cmd+Shif+Option> /< (Ctrl+Shift+Alt>/<) Increase or decrease point size by five times the increment specified in Preferences>Units & Increments>Size/Leading.
With type on our page let’s look next at a critical factor in determining the readability of that type: the space between the lines, or leading.