THERE ARE TWO TYPES OF GRIDS USED IN PAGE LAYOUT: column grids and base-line grids. Column grids determine the way the page is divided vertically. Baseline grids determine how the page is divided horizontally. It is common to use both types of grids together.
Grids define where the different elements of your document are placed on the page. Essentially they are visual aids to help you quickly and consistently arrange text and graphics on a page. They come in all shapes and sizes, and there are different strategies for using them. Beneath just about every well-designed document is a grid of some sort. Novels use a simple one-column grid, but even this has to be carefully considered, because it will determine the type area of the page as well as where the folios go. Newspapers and magazines with multiple columns and a mixture of type sizes—as well as photographs and illustrations—call for a more complex grid that combines a flexible number of columns with a baseline grid.
To the average reader, a well-designed grid will be invisible; nevertheless it’s there, helping the reader to make sense of all the different elements in a document. Columns of text, headlines, photos, illustrations, captions, pull quotes, and other page elements are more easily tied-together—or unified—on the page that is based on a grid. To the designer, grids enhance creativity by imposing structure. Because they take a lot of the guesswork out of your design, grids significantly speed up workflow.
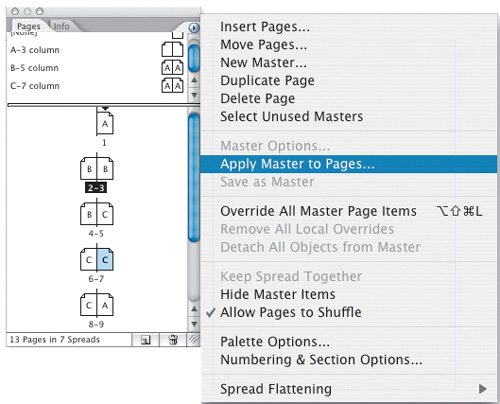
It is common to have more than one column grid. Some pages can be based on a five-column grid, others on a four-, and others on a three- column grid, etc. When working with multipage documents, it is most efficient to establish grids on Master Pages.
There’s no limit—other than common sense—to the number of Master Pages in your document.
It’s possible, though rarely necessary, to have more than one baseline grid per document because InDesign allows for individual text frames to have their own baseline grid (see below).
Grids should be flexible. Grids based on a fixed number of columns can suffer from too much symmetry if text and graphics are confined to those columns throughout. Using a 12-column grid is an easy way to introduce variety into your layouts, because you can vary between 3 and 4, 12 being divisible by both. Another common approach is the five-column grid, which allows for two text frames each filling two column widths. The remaining column can be used for white space, photos, captions, and other material. You can mix things up by changing the position of this “floating” column.


InDesign has a suite of tools that works together to help you set up and manage your grid.
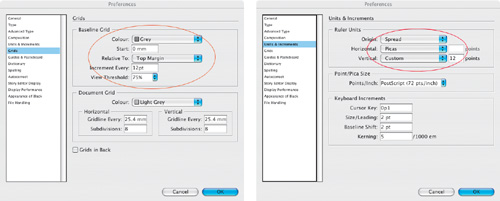
Color: Personally I like to change the color of my baseline grid so that it’s distinct from any custom guides I draw—light gray works well because it’s not too distracting.

Figure 16.4. A seven-column grid allows more flexibility by offering a narrow “floating” column for additional material and white space.
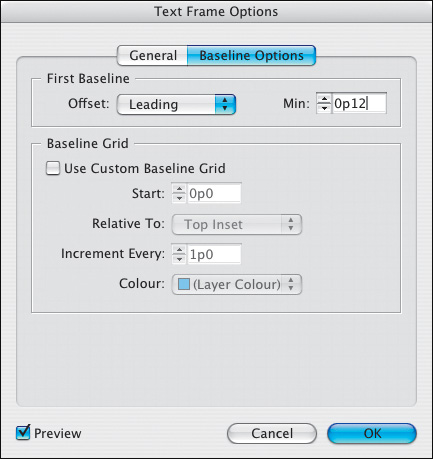
Start & Relative to: This determines where the grid starts counting off from and whether that number is relative to the top margin or the top of the page. I prefer to start at 0, relative to the top margin. Relative to Margin will show only the baseline grid within the type area rather than across the whole page.
Increment every: This should be the same as your body text leading. Note this value will appear in your chosen unit of measurement, but these numbers are unwieldy if you’re using millimeters or inches. Be sure to input this value in points.
Making your grid work will involve some rudimentary math, so it helps if you have an easy number to work with, like 12. You’ll want to use this leading value (or multiples of it) for the spacing of the elements on your page. Make sure you are not using auto leading, which, depending on your point size, may give you leading values that are fractional. For example, if your body text is 11, your auto leading will be 13.2—not a number you want to be juggling with.
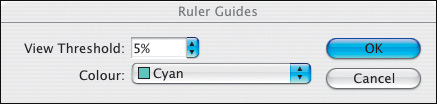
View Threshold: Determines the view size at which the baseline grid becomes visible when you have Show Baseline Grid on. To view the baseline grid, choose View > Grids & Guides > Show Baseline Grid (Cmd+Option+’/ Crtl+Alt+‘). You can selectively change the color and the view threshold of ruler guides by selecting the guides and choosing Layout > Ruler Guides.
Document Grid: Using a document grid turns your layout into graph paper. The size of each grid square is determined by the frequency of the horizontal and vertical gridlines and the number of subdivisions. If you don’t want to subdivide the grid, make the number of subdivisions 1. Unlike grids created using a baseline grid or Create Guides, a document grid covers the entire pasteboard.
Grids in Back: When checked, the baseline grid and/or document grid (but not ruler guides) will be behind all other objects.
Custom Ruler: Set your vertical ruler to Custom width and use your grid increment as the amount. This will make the ticks on your ruler correspond to the lines of your grid.
To ensure that the baselines of the last lines of type sit snugly on the bottom margin, make the height of your type area a multiple of your leading. To round up or down the height of the type area to the nearest multiple of the leading value, follow these steps:
Divide the height of your text area in points by your leading increment (it helps if you use points as the unit of measurement for your vertical ruler).
Round the number up or down to the nearest whole number.
Multiply that number by your leading increment.
This number will become the size of your type area. The amount you add or subtract should be added to the top or bottom margin.
For example, if I begin with a type area of 351.331 points and a leading increment of 11 points:
                714.331 / 11 = 65 (rounded up)
                        65 × 11 = 715
                      715 − 714.331 = 0.669
Subtract 0.669 from the bottom or top margin.
While this isn’t strictly necessary—the grid will still work without this step—it is pleasing to have everything align perfectly.
Once you’ve established a baseline grid, you can force your paragraphs to align to it by choosing All Lines. This option can be applied as part of a paragraph style definition, or can be applied locally using the Control palette.
Using a baseline grid is like setting a tempo for your document. In documents that use a variety of type and leading sizes, it’s perfectly acceptable to go against that rhythm by coming off the grid with certain elements, such as headings and subheads, as long as the next passage of body text finds the beat again, and reestablishes the rhythm.
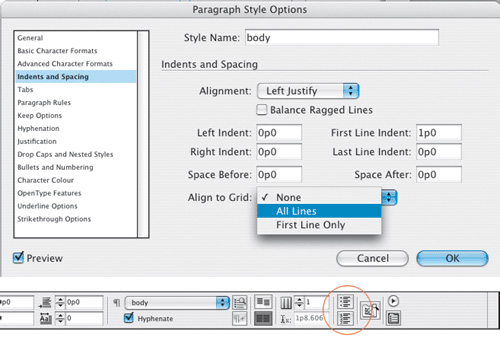
Figure 16.7. Align to Grid is usually applied as part of a paragraph style definition (top), but can also be applied locally using the Paragraph Formats level of the Control palette (bottom).
Aligning to the grid always means the next grid increment, causing leading values to be rounded up, never down. For example, if a paragraph with a specified leading value of 13 points is aligned to a 12-point grid, its leading will become 24 points.
For this reason, All Lines should be used only for body text and paragraph styles where the leading is already the same as the baseline grid increment.
Tip
When resizing graphics, the picture frame will snap to the baseline grid, making it easier to crop your picture frames to a leading increment. If you are using text wraps, set the text wrap offset to your leading increment.
If you’ve done the math right, choosing Align to Grid isn’t strictly necessary. Your type will better align to the grid through careful planning and gentle persuasion than by coercion, because the total paragraph spacing applied to all your paragraphs is a multiple of your baseline grid increment. In practice, you’ll probably find you need to add or subtract a bit of paragraph spacing here and there; this way, you, not InDesign, decide where the space is added or subtracted. The formula is simple: Total paragraph spacing (Leading + Space Before + Space After) must equal your leading increment or a multiple of your leading increment.
Let’s say you’re using a 12-point baseline grid and your body text is 10/12. The subheads are 18/18, making them 6 points off the grid. To put the subheads back on the grid, add 6 points of space before the subhead. Alternatively, you can add 4 points of space before and 2 points after.
First Line Only is useful for paragraphs such as multiline subheads or intro paragraphs that, because of their size and leading values, cannot keep to the grid. Nevertheless, you’ll want to make sure that the first lines of such paragraphs align with the body text in adjacent columns. Subsequent lines will follow the specified leading increment.
This option determines exactly where the first baseline of your type will occur in your text frame—essential if you are using a baseline grid. From the five possible choices, Leading or Fixed are your best bets. Choose Leading and enter your leading increment into the Min field. Your first baseline will sit exactly one leading increment from the top of the text frame no matter what—even if there are different size characters and/or inline graphics in that first line.
Fixed allows you to specify exactly how far from the top of the frame the first baseline should fall. This might be useful if you want the type to start at a specified distance from the top of your text frame—for example, a chapter opening page where the text begins further down the page.
Avoid the other three methods because they will vary the first baseline position if the first line contains characters of different sizes.
Note
You can change the preferences to place all guides (including ruler guides) in back, mimicking QuarkXPress default behavior. But this is pointless; to use guides, you need to see them. If they are too obtrusive, change them to a less distracting color.
When working with grids it’s crucial that Snap to Guides is turned on (View > Guides & Grid > Snap to Guides or Cmd+Shift+; / Ctrl+Shift+;) so that when you draw, move, or resize an object its edges snap to the nearest guide or baseline grid. Guides must be visible in order for snapping to occur, however, objects can snap to the document and baseline grids whether the grids are visible or not.
The Snap to Zone in Preferences determines the exact range within which an object snaps to guides. If you have both Snap to Guides and the Snap to Document Grid on, the grid takes precedence.

Figure 16.11. Using a line scale can make it easier to identify corrections when communicating remotely with a client.
Tip
To draw a custom guide from the horizontal ruler that straddles the left- and right-hand pages of the spread, hold down Cmd (Ctrl) as you draw the guide. You can also position guides precisely by selecting them. For vertical guides specify their x coordinate, for horizontal guides, specify their y coordinate.
In addition to a document-wide baseline grid, you can also use a separate baseline grid for each frame. This can be useful if you have sidebar material that flows in multiple columns and uses a different type size and leading than your body text. Theoretically every text frame can have its own baseline grid. It’s nice to know you can, but if a document has numerous baseline grids it undermines the whole purpose of a grid: a document architecture based on consistent modular units.
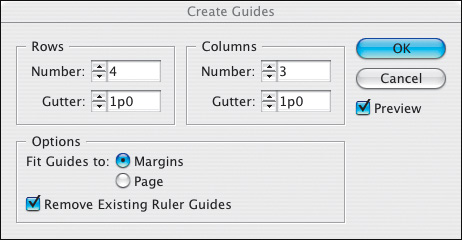
While Margins and Columns is the place to be when creating or adjusting major column divisions that affect text flow, Create Guides can be used to make custom grids of rows and columns, as an alternative to laboriously dragging out multiple ruler guides. This feature is a guide-making machine—if you want to divide up your page with guides, then Create Guides makes it a cinch, and, because it is so instantaneous, there’s lots of scope to experiment with. To prevent your document from getting cluttered with too many guides, consider putting these guides on a separate layer, which you can show and hide or lock as needed.
Tip
While InDesign won’t let you draw objects and turn them into guides the way you can in Illustrator, there’s nothing to stop you from putting “guide objects” on a particular layer, then when they have served their purpose, making that layer invisible. Alternatively, you can select the guide objects and make their Attributes “Non Printing.”