STYLES HAVE BEEN AROUND since the dawn of desktop publishing. Over the years they have evolved in their ease of use and range of capabilities. A bed-rock feature of any page layout program, styles represent humankind’s greatest advance in the field of digital page layout. Styles are to graphic designers what fire was to prehistoric people.
Using style sheets and not using styles sheets is the difference between you controlling InDesign and InDesign controlling you. Here are some reasons to use styles:
Styles ensure consistency in formatting throughout your document, making for a better-designed piece.
Styles enable you to change in seconds the entire formatting of your document, no matter how large, by changing your style definitions.
And, as I mentioned before, the best reason of all: Styles save you hours and hours of drudgery.
Despite these irrefutable facts, many designers either underutilize or avoid styles altogether. I’m frequently amazed by the number of designers—many of whom should know better—who don’t use styles, or who use them in a half-assed way. What’s up with you people? You like the grind of unnecessary repetitive work?
I’ve had designers tell me: “I don’t like to use styles, because I like to experiment with different designs,” or “I don’t want my pages to all look the same.” These are exactly the reasons you should use styles. Far from stifling creativity, styles enhance it by making experimentation quick and easy. And just because your style names may be the same or similar from one document to the next doesn’t mean the style definitions can’t be completely different.
Time spent creating style sheets is an investment that will repay you many times over throughout the lifespan of the publication. Though you should set up your Styles at the beginning of the design process, it is easy to add to your Style Sheet and edit your styles as your document evolves. There are several different approaches:
Format the paragraph the way you want it to look.
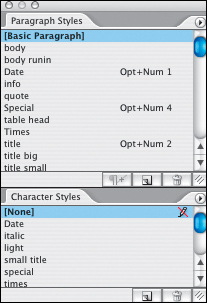
Click the Create New Style icon at the bottom of the Paragraph Styles palette: “Paragraph Style 1” will appear in your Paragraph Styles palette.
Double click “Paragraph Style 1” to type a name for your Style and (optionally) specify a shortcut keystroke. If you want to add additional formatting, click the attributes list on the left and specify the options you want to add to your style. With Preview checked, you can see your formatting changes added to the paragraph.

Tip: Style Naming Conventions
Name your styles in a logical way. Keep in mind that it’s likely you’ll need to come back to a document months or even years down the road, so you’ll want a style-naming strategy that is transparent. Alternatively, you may need to hand over your InDesign document to someone else to finish. So that you don’t spend a long time on the phone explaining why you named your styles after your favorite Radiohead songs, keep them simple.
Because InDesign lists your styles in alphanumeric order, consider putting a two digit number in front of your most commonly used styles to force them to the top of the list in the Styles palette. Putting a unique two character identifier at the beginning of your style names also makes it easier to access those styles using Quick Apply by simply pressing Cmd-Return (Ctrl-Enter) then typing the first two characters to access the style.
Styles are case-sensitive: Body Text and body text are recognized as two distinct styles, so be precise when naming your styles, or you may end up with two versions of the style and no idea which is the real one.
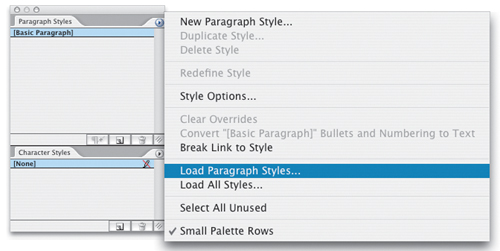
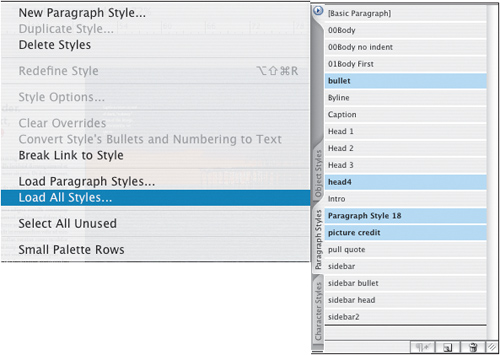
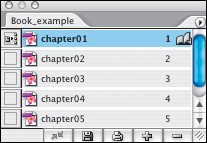
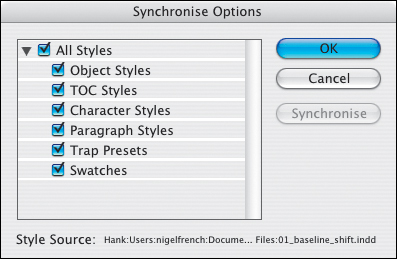
If you have an InDesign file with a style sheet already created, there’s no need to reinvent the wheel. You can load those styles from one document to another. You can even import styles from Microsoft Word and RTF documents. Choose Load All Styles (to bring in Paragraph, Character and Object styles from the source document), then navigate to it and click Open. Note, you will not be able to load styles from an InDesign CS2 document into a CS document; you can do it in the other direction.
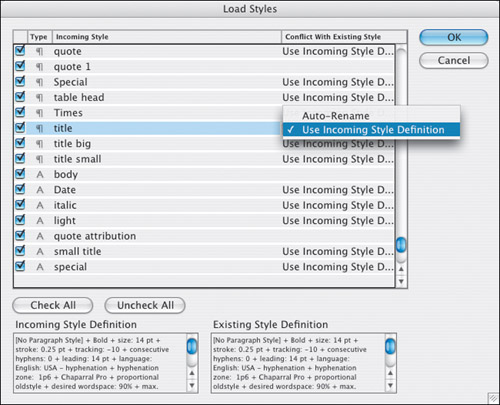
With InDesign CS2 you can import specific styles and determine how to deal with any style name conflicts: Where the style name is the same in both documents, you can choose to use the Incoming Style Definition or to rename the incoming style, which will have “copy” appended to its style name. (You can rename the style later if you wish.)
Using the Paragraph Style Options dialog box, you can create as many styles as you need without having a single character on your page. With experience, you can visualize what a style will look like without needing to see it formatted on your page, which makes setting up a Style Sheet much faster.
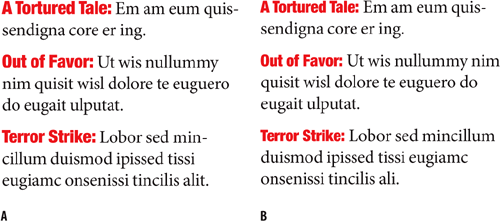
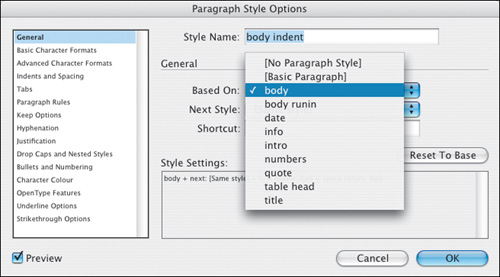
Hierarchy is a big concept in typography. Hierarchy gives your documents structure. Hierarchy is not about working for the Man—it’s about effective communication. Take a simple example: Your headings and subheadings will probably use the same font. For this reason you need to consider carefully the relationship between them. By basing one style on another, you create more than just a visual link between the styles. When you edit the base or “parent” style, the attributes that it shares with its “offspring” styles will also change. To establish this relationship between styles, choose the parent style in the Based On menu. The new style becomes the “child” style.
To apply a paragraph style, place your Type Tool cursor anywhere inside the paragraph then click on the Style name in the Paragraph Styles palette. There is no need to select the whole paragraph—unless of course you like doing things the hard way. If you want to apply a paragraph style to more than one contiguous paragraph, drag your cursor through those paragraphs. Again, you don’t need the whole paragraph selected; you just need to make contact with at least a part of each of the paragraphs.
To apply a character style, you need to first select the text. Character styles are applied to specific ranges of text, so no sloppiness allowed here.
Applying a paragraph style doesn’t remove any existing character formatting or character styles applied to that paragraph—unless you clear overrides (see below). When you apply the style, if the text has additional formatting that is not part of the style definition, a plus sign (+) appears next to the current paragraph style in the Paragraph Styles palette.
Character styles, on the other hand, replace any local formatting, and because you can’t apply two Character Styles to the same text as soon as you apply a new Character Style, the old one is removed.
Tip
Assign a keyboard shortcut to your styles and you’ll be able to apply them even faster. However, only keys on the numeric keypad (in combination with modifier keys) can be used for style shortcuts. To really speed things up, try applying your styles in the Story Editor. (I wonder why can’t you assign F-keys as shortcuts for Style names. What’s up with that?)
When you add formatting to text that already has a paragraph or character style applied, you are overriding the style definition. To put it another way: You’ve defined a paragraph style, applied it to a piece of text, and then contradicted your style definition by adding additional formatting. You can tell which text has overrides applied because when selected a plus sign (+) appears next to its style name. Maybe this local formatting is what you want, maybe not. Maybe you’ve inherited the document from someone else—someone who hasn’t used styles as effectively as you would have liked and you want to clear the overrides.
There are several ways to approach this:
To clear all local formatting, but retain any Character Styles applied to the paragraph, Option/Alt+click the style name in the Paragraph Styles palette. Alternatively, click once on the Clear Overrides button in the Control palette.
To remove just the local character formatting (retaining any local paragraph formatting), Command/Ctrl+click the Overrides button.
To remove just the local paragraph formatting (retaining the character formatting), Command+Shift+click/Ctrl+Shift+click the Clear Overrides button.
This works the same way with Character Styles.
To clear all local formatting and Character Styles: Option+Shift (Alt-Shift) +click the style name in the Paragraph Styles palette.
Tip: The Plus Sign
Curious about exactly what the + refers to? Hover the cursor over the style in the Paragraph Styles palette and a tool tip pops up with details of the local formatting.
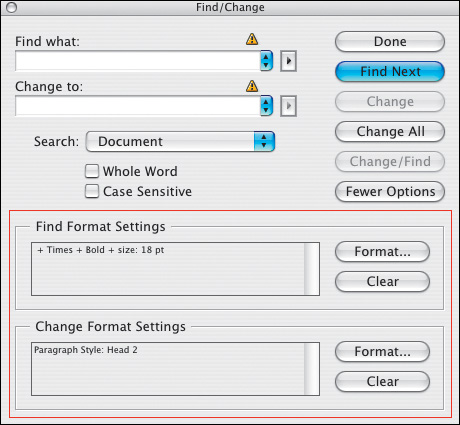
Figure 13.10. Find/Change can be used to “map” local formatting (perhaps imported with a Word or RTF file) to paragraph styles.
Tip
Using Find/Change Find/Change is a great way to find all instances of a particular style and replace it with another. You can also use Find/Change to convert local formatting into styles. For example, if you inherit a document where the “subheads” have been locally styled in a particular font, you can look for that formatting and replace it with a specific style name.
When you have a lot of styles—Paragraph, Character, and Object (see next chapter)—it can mean scrolling through long lists to get to the one you’re after. To dramatically speed up your workflow use Quick Apply, a simple new feature in InDesign CS2 that allows you to find a style quickly by typing the first few characters of its name.
Select the text or frame to which you want to apply the style, choose Cmd+Return (Ctrl+Enter), start typing the name of the style, and you’ll be taken to the closest match. You can use the Up and Down Arrow keys on the keyboard to move through the list. Simply press Return/Enter to apply the style.

The beauty of styles is that you can change their definition at any time. Changing a style definition means that all the text formatted with that style changes to match the new style definition. This has been a staple feature of all page layout programs since the Stone Age. Yet it still blows me away.
Styles allow you unprecedented flexibility in experimenting with the appearance of your document. A few simple clicks and you can totally transform the appearance of your pages. It’s a beautiful thing.
There are several ways to edit a style, but to my mind the best (and safest) is to Control+Click (Right Mouse+Click) on the style name in the appropriate Styles palette. That way, there’s no danger of inadvertently applying the style where you don’t want it.
Once you’re in the Styles Options box, make as many or as few changes as you want, click OK, and, as they say in cockney gangster movies, “Bob’s your uncle.”
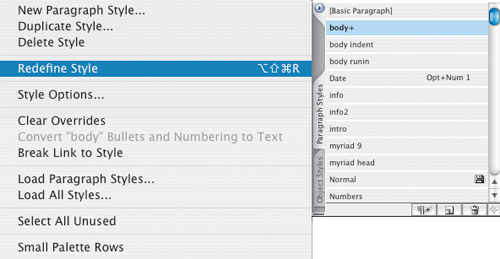
Alternatively, and just to shake things up a bit, instead of editing the style, you can modify a paragraph with local overrides, decide that’s how you’d like the style to look, then redefine the style based on the modified paragraph: With the paragraph selected choose Redefine Style from the fly-out menu of the Paragraph Styles palette.
If you create paragraph styles, character styles, or color swatches with no document open, the styles and swatches will be in every new document. Most documents have a similar structure: heads, subheads, body text, captions, sidebar text, etc. So it might be worth creating a default style sheet so you’re ready to go every time you create a new document. Just because their styles names may be the same doesn’t mean they have to look the same from one document to another. What’s important is the hierarchy of the styles.
Make sure you have no InDesign document open when you create your styles or load them from an existing InDesign document. That way they will show up in every InDesign document you create thereafter. Of course this doesn’t mean that all your documents will look the same. You have infinite choices for how you define your styles, but just about all documents will have such features as headlines, subheads, body text, captions, etc. What you make them look like is entirely up to you.
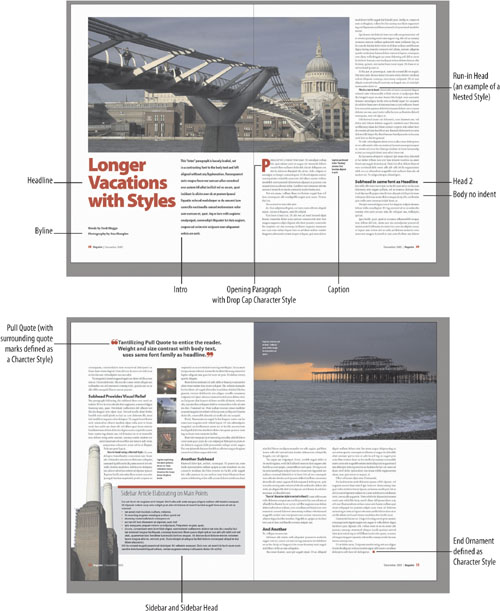
This type of style sheet would be appropriate for a magazine or newspaper publication. These are just the basic styles; typically there would be styles defined for all standard type elements.
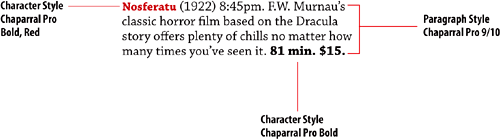
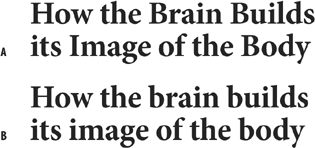
Heads will likely be in the bold or even black weight. Depending on the typeface, they may be negatively tracked and tightly leaded—contributing to a dark type color. The purpose of the Head1 headline is to make the reader want more. Typically such headlines do this by posing a question or telling part—the best part—of the story.
A secondary level head or subhead will be in the same typeface as the first-level head, its size reduced to indicate a lower level on the hierarchy and space added before (and possibly after) to separate it from the preceding text. The secondary level head will help the reader navigate the body text and break it up into chunks to provide visual relief.
A third level of heading could be a run-in head, one in which the heading is part of the same paragraph as the body text that follows. The run-in head would need to be a Character Style, which could be nested in the paragraph style definition.
This will likely (though not necessarily) be a serif face in the regular or book weight at a size of 8 to 11 points. First line indents indicate the beginning of a new paragraph.
The author’s credit, typically based on body style, differentiated by bold weight and paragraph spacing above and/or below.
With so many competing demands on peoples’ time, captions may be what people read first, so a caption should provide enough information for the browsing reader to decide whether to continue reading. More than just stating the obvious, a caption should clearly establish the relationship between the image and the text.
In magazines, to create an entry point for the reader the opening paragraph, or the first lines of the opening paragraph, are often set in larger type, possibly in bold type, possibly in a contrasting font. Often this intro paragraph will be set over a wider measure than the body text. Sometimes the byline will be incorporated into this first paragraph.
A pull quote is an excerpt “pulled” from the text and used as a graphic element. Pull quotes are intended to catch and hold the reader’s interest. They should be thought-provoking and succinct. Pull quotes also add visual interest to a layout, especially when you have few photographs or illustrations to work with.
The pull quote is display text. It should offer a strong visual contrast to your body text and be positioned to catch the eye of a potential reader who’s skimming or flipping pages.
The pull quote should be positioned on or before the page where the excerpted text appears. Long sentences should be edited into tight, provocative pull quote versions. They can be set off with rules, be reversed, set in a contrasting color, or combined with decorative quotations marks. If you put your pull quote in quotation marks, make sure you are not distorting the meaning of the text. See the next chapter for information on formatting pull quotes using Object Styles and Chapter 17: “Text Wraps” for information on how to anchor a pull quote to a specific portion of text.
Tip: Getting Rid of Unwanted Styles
When you import Word text or Styles from other InDesign documents, you’ll likely end up with several unwanted styles in your styles palettes. Leaving these around is apt to create confusion—either for you or for anyone else who may work on the document. You can get rid of them on a case-by-case basis, but the quickest way to zap them all at once is to choose Select All Unused in the Styles palette menu, and then click the Trash button. It gives you that same satisfying feeling you get after clearing out your closets.
An article that, as the name suggests, typically runs by the side of the main article, though it can mean any supplementary article. It is graphically separate from the main text but contextually linked to it.
The heading of a sidebar article.
Tip: Printing Out a Style Sheet from Word
InDesign offers no facility for printing out the specifications of your Style Sheet, but you can do this using Microsoft Word. In InDesign, create as many blank paragraphs as you have styles. Assign each of your styles to one of these blank paragraphs. Choose File > Export and choose RTF as the file format. Open the text file in Word and choose File > Print. In the Print dialog box, choose Styles from the Print What pop-up menu.
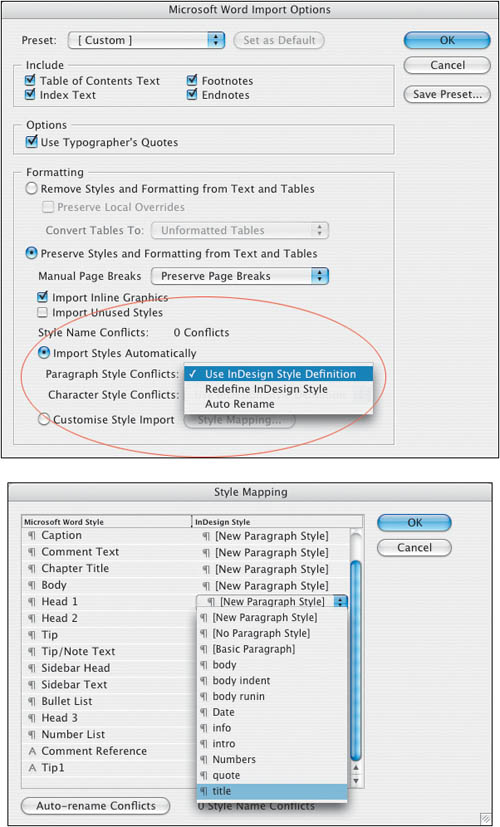
When you place a Word document, checking Show Import Options allows you to determine how to handle any Style name conflicts. You can use the InDesign Style Definition (the default) or you can choose to redefine the InDesign Style with the incoming Word definition. For more control, choose Custom Style Import to map specific Word styles to specific InDesign styles.
If you already have a style with the same name as the Word style, the style is not imported. Text in the Word document takes on the formatting of the InDesign style with the same name.
A nice workflow feature is the ability to save a preset—a big time-saver if you import Word files that always use the same style names.
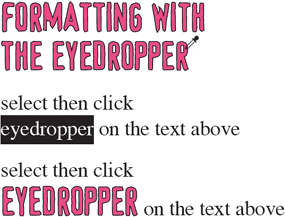
Need to quickly apply the formats of one paragraph to another but don’t want to create a style? You can use the eyedropper to sample the character and paragraph formats from one piece of text and apply them to a selected range of text. Simply select the text you want to copy the formats to, then choose the Eyedropper tool and click on the text you want to copy the formats from. This also works with object formats. Note, there is no relationship between the two pieces of text beyond the visual. They are not thereafter controlled by the same style sheet.