
WE LIVE IN A WORLD OF LISTS: the Top Ten this, the 100 greatest that, 12-step programs, 50 ways to leave your lover, etc. Tabs and tables are invaluable tools when it comes to working with anything list-like—from a simple bullet list to a complex financial table. In this chapter we’ll look first at tabs and some of their common uses, and then take a look at InDesign’s robust and versatile table formatting features.
Tabs are for positioning a piece of text in a specified place on the line. They are used to create bullet or numbered lists, reply forms, or for aligning numbers on a decimal point. Tabs can also be used to separate columns of information into a table-like layout. However, these days it’s usually easier to use an InDesign table to do this.
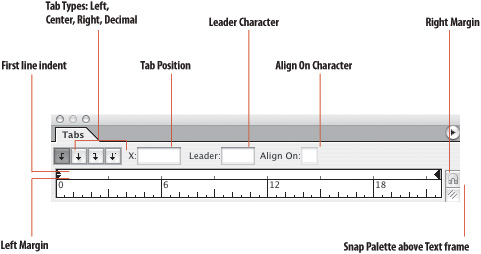
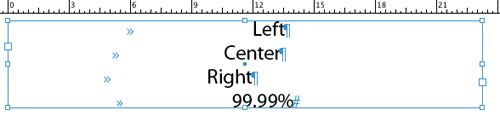
Tabs come in several flavors: left, center, right, and decimal or special-character tabs.
Place your pointer where you want to add horizontal space and press the Tab key.
Choose Type > Tabs. With your Type cursor in the text frame, click the magnet symbol at the bottom right of the Tab Ruler to snap the Tab Ruler above the text frame.
On the Tab Ruler, choose the type of tab you want and click a location on the ruler to position the tab.
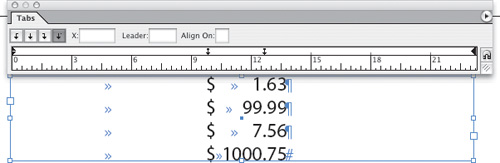
A decimal tab aligns characters on a decimal or another character you specify: Select a decimal tab on the Tab ruler, then, in the Align On box, type the character you want to align on—typically a decimal point, but you can use anything.
Tab leaders are used on menus, price lists, and contents pages. Their purpose is to guide the eye from one piece of text to the next. There are other solutions, arguably preferable, that don’t introduce gaping holes between the item and its page number or price, but so long as the distance between the text and the number isn’t too wide, this can be a good solution.
If you’ve ever tried to create a form with the underscore character, you’ve doubtless found it’s impossible to have the lines perfectly aligned at the right column edge, giving you an ugly, stepped effect. This is because, unlike with typewriters, proportional-spaced fonts are not of a fixed width. With different characters on each line, the likelihood of your underscores ending at the same position is remote. The solution, or one of them, is to use a right tab with an underscore as the leader character.
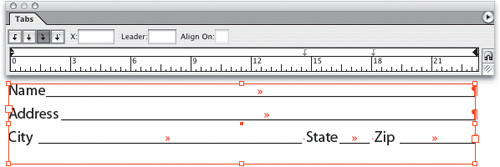
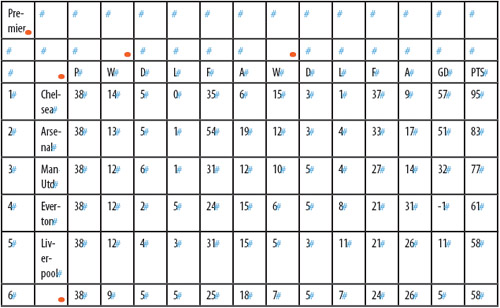
When you have numbered lists that mix one-, two-, and possibly three-digit numbers you’ll need two tabs, combining the right alignment of the numbers and the left alignment of the text.

Figure 12.6. A numbered list before formatting (example A) and the same text using a right and a left tab (example B). Note that the periods after the numbers are redundant and have been removed. Using the Control palette or the PageMaker Toolbar to convert the text to a numbered list adds numbers before each paragraph, but does not add tabs or formatting. The numbers are static—that is, they do not update should you change the order of the text.
A right-aligned tab allows you to align all subsequent text to the right edge of the text frame. You won’t find it in the Tabs palette, but under the Insert Special Character menu. Alternatively you can press Shift-Tab in the text. To use a Right Indent Tab with a tab leader (CS2 only), set a tab stop anywhere in the paragraph and apply a leader character to it. When you press Shift-Tab the leader character will appear.

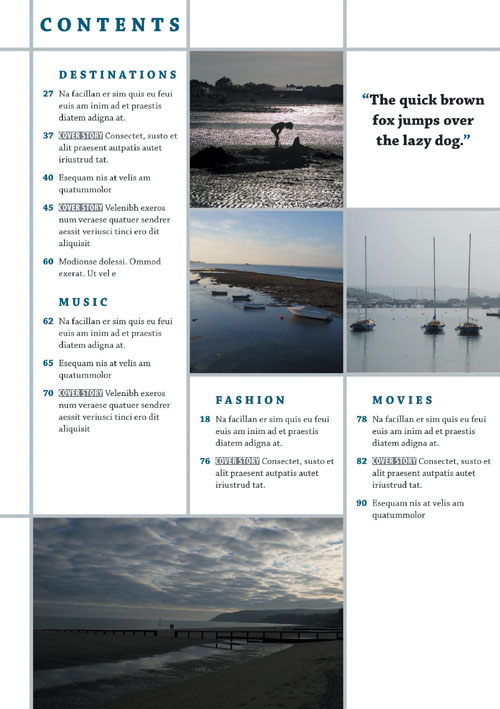
Working with tables in InDesign is so much more than just making financial spreadsheets readable, although if that’s what you need to accomplish InDesign is more than up to the task. Tables can be used in all sorts of creative ways beyond the obvious: crossword puzzles, reply coupons, television listings, calendars, and forms of all kinds. Just because you use a table to design all or part of your document doesn’t mean that document has to look like a table. In fact, tables are useful when you have content that needs to be updated yet remain in the same location on the page. The rows, columns, and cells that make up the structure of your table can be visible as such, or they can merely serve as an underlying grid to your design. Tables used to be a thorn in the side of the graphic designer, but InDesign offers such powerful and intuitive table formatting features that this is no longer the case.
Tables are always contained in a text frame and move with the flow of the text. To align the table within the text frame, insert the Type tool to the right or left of the table and click the appropriate alignment option on the Paragraph formats section of the Control Palette.
A table is edited with the Type tool. Formatting text within a table is the same as formatting text in a text frame. Paragraph and Character Styles, as well as local formatting, can be applied to the text.

Working with tables, you can add or delete rows and columns, cut or copy and paste selected cells, change the column and row height, split or merge cells, add header and footer rows, and much more.
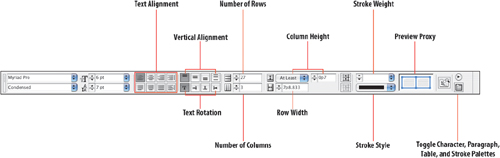
When you create a table, it fills the width of your column. The default height of a row is determined by the leading of your text at the insertion point, but this can be easily changed.
There are three approaches to creating a table: from scratch, converting existing text to a table, or importing a table from Microsoft Word or Excel.
Each table cell is like a text frame. You type or paste text, or place text into a table cell just as you would do with a text frame. You can also paste or place (File > Place) graphics into table cells.
Note
If you add a graphic that is larger than the cell, the cell height expands to accommodate the graphic, but the cell width remains fixed, causing the graphic to extend beyond the right side of the cell. If the row is set to a fixed height, a graphic that is taller than the row height causes the cell to be overset.
If you are going to convert text to a table, it pays to set up the text properly with tabs separating the columns and paragraph returns separating the rows. Once your tabs and carriage returns are in the right place, select your text and choose Table > Convert Text to Table.
It’s rare that you’d want to, but you can also make this conversion in reverse by inserting your Type Tool in a table and choosing Table > Convert Table to Text.
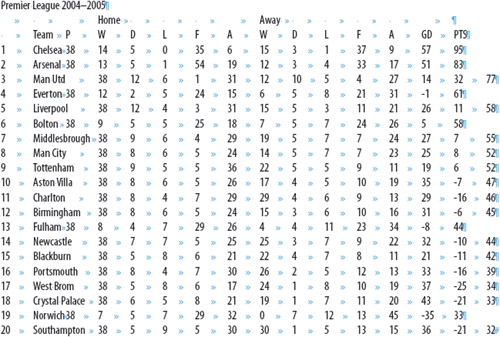

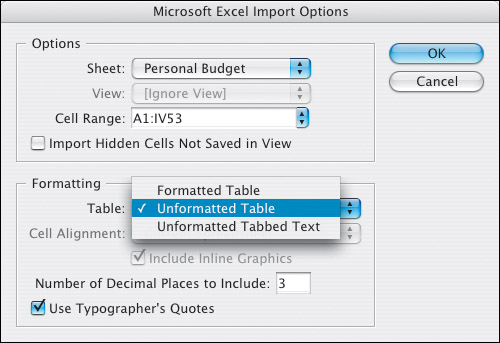
There’s no point in reinventing the wheel: If you already have a table in a Microsoft Excel spreadsheet or in Microsoft Word, choose File > Place to import it into InDesign, either retaining the formatting (probably not a good idea) or stripping out the formatting—the information will appear as tabbed text—and then using InDesign’s Table tools to prettify it.
Selecting a whole table allows you to change the formatting of all the table’s cells. To do so, move your pointer to the upper left corner of the table—it becomes a southeast pointing arrow—and click. Alternatively, with your pointer inside the table, choose Table > Select > Table (Cmd+Option+A/Ctrl+Alt+A).
Large tables can be a pain, but, thankfully, if the table is taller than the text frame in which it resides, you can thread the frame with another frame—in the same way as you would thread a regular text frame—to continue the table.
Keep Options determines how many rows should remain together. You can also specify where a row breaks, such as at the top of a column or frame.
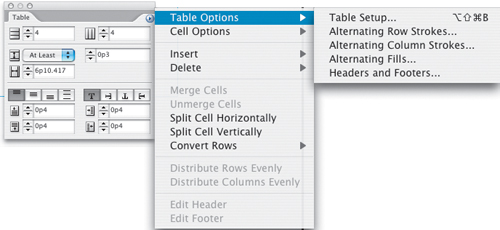
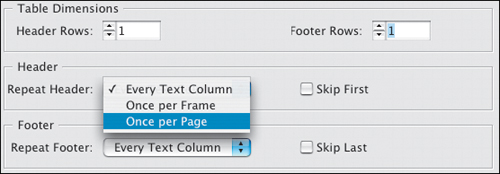
If you want a header or footer row to repeat information in the new frame, choose Table > Headers and Footers.
If you didn’t set up a header or footer row first time around, you can easily convert an existing row to a header or footer row by choosing Table > Convert Rows > To Header or To Footer.
In the Table Options dialog box, you can change the stroke of the table border and add alternating strokes and fills to columns and rows.
To enhance the readability of a complicated table with a wide measure, use alternating strokes and/or fills to help the eye to track along the table rows. Depending on the nature of your data, you may want to experiment with Alternating Patterns. You can apply your fills or strokes to every other row, every second row, every third row, or, using the First and Next menus, come up with a Custom Row pattern. The same is true with columns.
Note
Unless you choose Preserve Local Formatting, any formatting previously applied to individual table cells will be overridden by the row and column formatting.

Figure 12.16. Preserve Local Formatting. Note that the Fill Color and Tint are shown as blank when this option is checked.
Confusingly, row strokes are set on even when Alternating Pattern is set to None. To turn off row strokes, columns strokes, and the table border at the same time, select the whole table and then target the Stroke swatch on the Swatches palette or at the bottom of the Tool Palette, and then choose None.
To turn off just row strokes, choose Every Other Row as the Alternating Pattern, and then choose None as the color for the First and the Next row. If you want row strokes on, but want to change their weight and/or color, make sure you change both the First and the Next row. Likewise when working with column strokes: They are on even though Alternating Pattern is set to None. To change their stroke weight, choose a different alternating pattern and change the options for the First and the Next column stroke weights.
Tip:Tables and Text Wraps
Text wraps do not work in tables without first jumping through a few hoops. Let’s say you have a graphic and some text that you want to wrap around that graphic and you want to insert both items into a single table cell. Create your text frame and graphic outside the table, and then group them together (Cmd+G/Ctrl+G). Select the group, and copy and paste into the table cell—the relationship between the type and graphic is preserved.

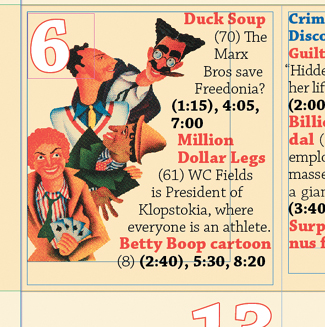
Figure 12.19. Tables and Text Wraps. This section of a film calendar shows a grouped text frame and graphic with text wrap pasted into a single table cell.
To select a column or columns, move the pointer to the top edge of the table, and your pointer becomes an arrow shape. Click to select the entire column. To select a row, move your pointer to the left edge of the table and click to select the row. Alternatively, you can click inside a table and choose Table > Select > Column or Row.
To specifically select Header, Body, or Footer rows, click inside the table and choose Table > Select > Header Rows, Body Rows, or Footer Rows.
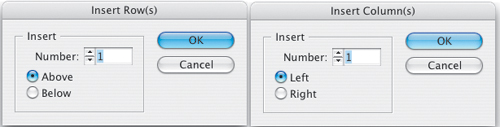
You can insert rows and columns using the menu options, or, if you want to be flash, on the fly by dragging while holding down Option (Alt) as you drag a row or column border. In addition, you can also create a new row by pressing Tab when the insertion point is in the last cell of the table.
To delete all or selected parts of your table, choose Table > Delete > Row, Column, or Table.
To delete cell contents without deleting cells, select the cells containing the text you want to delete and press Backspace or Delete.
To resize rows and columns, drag the row or column border to change the row height or column width. To keep the table at the same size, hold Shift while you drag. This affects only two rows (or two columns) at once—one row or column gets bigger while the other gets smaller. To resize all the rows and columns proportionally, hold Shift while dragging the bottom table edge or the right table edge respectively.
To resize the whole table, position the pointer over the lower right corner of the table so that the pointer becomes an arrow, and then drag to increase or decrease the table size. To maintain the table’s height and width proportions, hold Shift. Note, this doesn’t work if your table spans more than one frame.
Choosing At Least specifies a minimum row height that will grow as you add text or increase the point size of the text you already have. If you copy or Place a graphic into the table cell, the row height will grow to accommodate the graphic. But the column width will not. With an overset graphic you can either choose to Clip Contents to Cell to crop the graphic to the table cell width or adjust the column width to fit the graphic.
Tip
Choosing Exactly from the Control palette or Table palette sets a fixed row height. Fixed row heights don’t grow when you add text, and a small red dot will appear in the lower right corner of the cell if it is overset. With an overset cell you have two options: Make the content smaller or the table cell bigger.
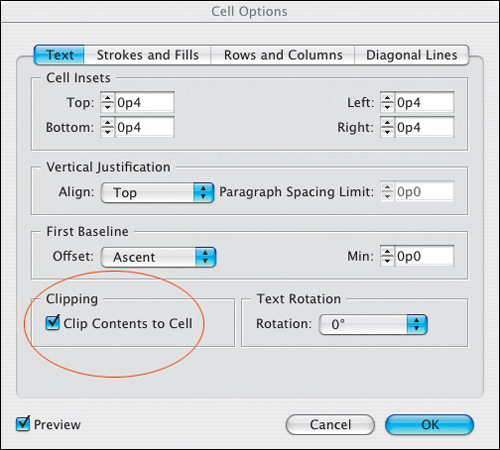
The building blocks of a table are cells, and each cell in your table is like an individual text frame. Using Cell Options, you can determine the Cell Inset Spacing, the Vertical Alignment, Row Strokes, Column Strokes, the First Baseline Options, and Diagonal Lines. Table text can be formatted in exactly the same way as text in a text frame, and paragraph and character styles are equally beneficial—see s 13 and 14. The only restriction on the formatting of tables is that text can be rotated only in increments of 90°, 180°, or 270°. (If you really must have text rotated at any other angle, format the text in its own frame, then cut and paste the text frame as an inline frame into a cell.)
Note
Selecting the Cell and the text within the cell are two distinct things. To select the cell, drag from the top left of the cell. Alternatively, because it’s all too easy to inadvertently resize the rows and columns when trying to select individual table cells, especially if your table is complex, put your Type cursor in the cells and choose Table > Select > Cell (Cmd+/ [Ctrl+/]).
You can merge two or more cells in the same row or column into a single cell. You can also split cells horizontally or vertically.
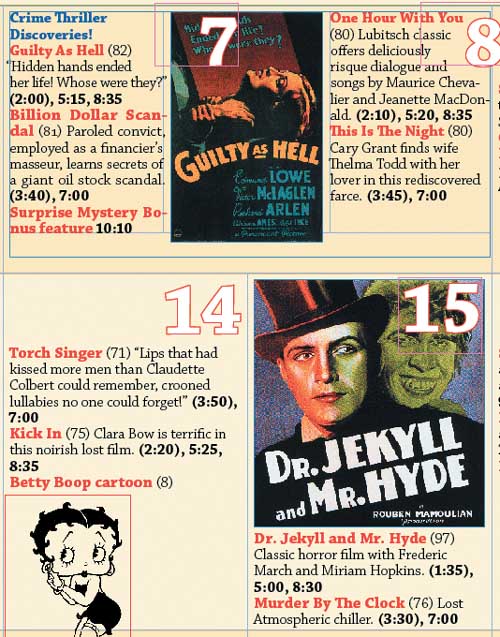
Figure 12.25. Tables Within Tables. This section of a film calendar shows a three-column single-row table that has been pasted into a merged cell above the two columns in the second row. A similar effect may have been possible by Splitting Cells vertically (not the same as Unmerging, which will restore the cells to their premerged state), but does not allow the same degree of independence when adjusting the column widths of the individual rows.
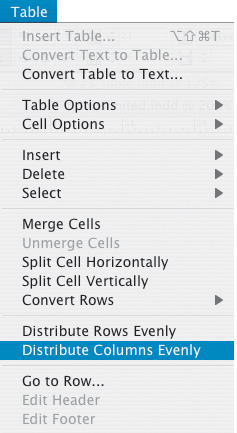
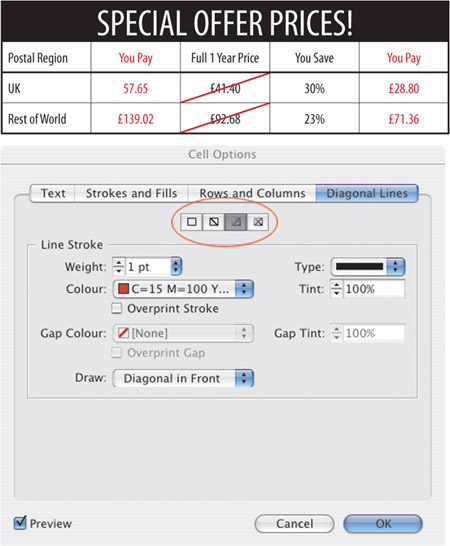
Choose Table > Cell Options > Diagonal Lines. From the Draw menu, you can specify Diagonal in Front or Content in Front to position the diagonal line in front of or behind the cell contents.
For Line Stroke, specify desired weight, type, color, and gap settings; specify a Tint percentage and Overprint options, and then click OK.
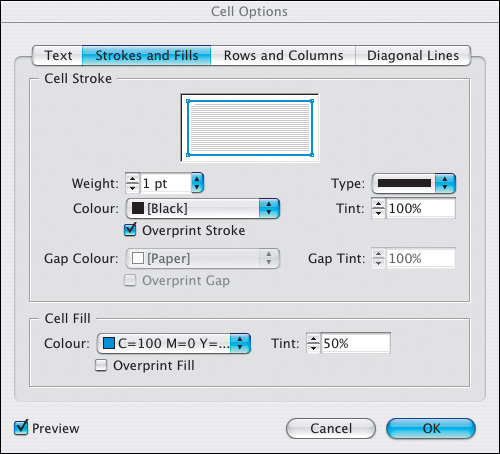
Just like a regular text or picture frame, each table cell has fill and stroke properties. Choose the cell (Cmd+/[Ctrl+/]), or drag your pointer across a range of cells to select multiples, and use the Fill and Stroke boxes on the bottom of the Tool palette to change the properties of a cell. To modify specific sides of the cell border, determine which stroke line(s) you are affecting with the Preview Proxy at the bottom of the Stroke palette. Selected lines appear in blue; deselected lines in gray. To deselect all lines, triple click the Preview Proxy. Alternatively, you can use the Cell Options dialog box, which has all these options in one place.
Tables are extremely versatile and can be used for much more than just “tables.” For example, putting a screen behind a single paragraph is a common request that is easy in Word, but has long proved problematic for the more heavyweight layout applications. Until now, that is. With InDesign the solution is simple.
Like all tables, the single cell table will move with the flow of text. What’s more, the table cell—and it’s shading—will expand and contract as necessary if you edit the paragraph.
Tip: Shading a Paragraph
If you want to put a screened background behind a specific paragraph, a table is an elegant solution. Select the text in the paragraph—but not the final hidden carriage-return character—and choose Table > Convert Text To Table to make a one-cell table. You can then stroke and/or fill the table as you wish and—because it’s a table—it will grow as you add type and move as part of the text flow. You control the paragraph spacing between the table and the paragraphs above and below using Table Options >Table Setup.
See how you can let InDesign take the strain with its super array of Styles. Veterans of page layout programs will find paragraph and character styles as they would expect, but in addition, InDesign offers such delights as nested styles, sequential styles, and object styles—features that can make formatting even the longest, most complicated documents a joy.