THIS CHAPTER LOOKS AT SOME STRAIGHTFORWARD TECHNIQUES that are the icing on the delicious three-tiered cake of Paragraph, Character, and Object Styles. The reasons for taking advantage of these features are the same reasons for using Styles in the first place: consistency, ease of editing, and the enormous amount of time saved. These techniques are quickly learned and will pay you back thousands of times over for the time you invest learning them.
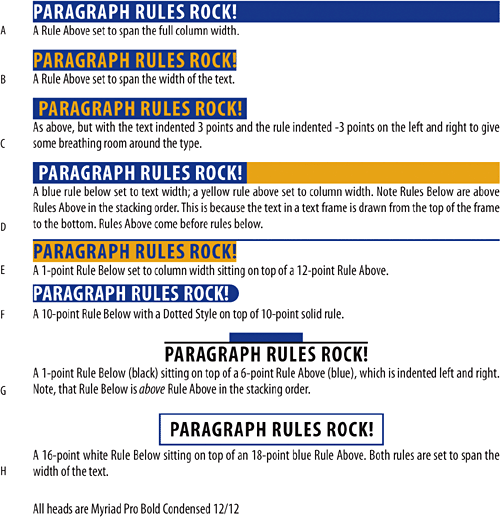
If you’ve ever drawn a rule above a line of text, only to have the text reflow and leave the rule in the dust, you’ll find Paragraph Rules an invaluable feature. With Paragraph Rules you can add a rule above and/or below the text and have that rule move with the paragraph when the text is edited. No more chasing after the text to reposition those lines.
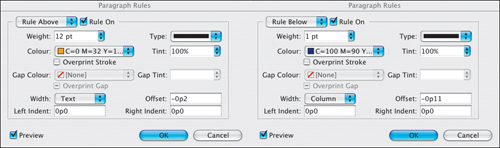
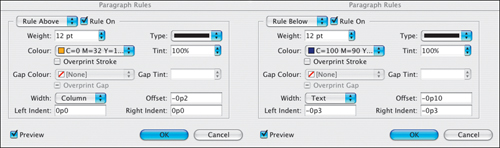
Rules Above starts at the baseline and extends up. Using a positive offset shifts the line up relative to the baseline; a negative offset shifts the line down relative to the baseline.
Note
The amount of offset added to paragraph rules does not alter the paragraph spacing of the paragraph.
Rules Below starts at the baseline and extends down. Using a positive offset shifts the line down relative to the baseline; a negative offset shifts the line up relative to the baseline.
The techniques below involve shifting the rules relative to the baseline of the type, sometimes so much so that the terms above and below become meaningless.


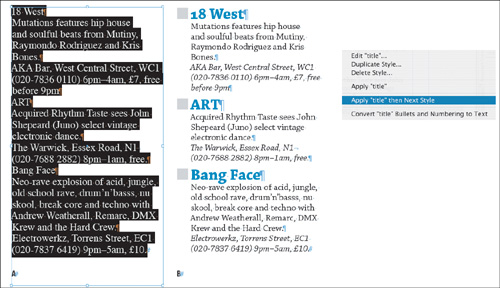
It used to be that the Next Style option was pretty underwhelming. All it did was determine what style the next paragraph would take on when you pressed Return (Enter) for the next line. Unless you keyed your text directly into InDesign, this was not particularly useful. Well, Next Style still does this, but in InDesign CS2, it does a whole lot more besides. You can now use Next Style to apply a style, which in turn applies the specified Next Style to the next paragraph. If that next paragraph has a Next Style option, the next style will be applied to the third paragraph, and so on, creating a cascade of automatic style formatting! In any document where the text styling follows a consistent pattern—which is a big percentage of documents—this can save hours of donkeywork. Imagine, for example, an event listing where the date style is followed by the title style, which in turn is followed by the description style. Define date’s Next Style as title, and define title’s Next Style as description. Then select the date style. In the Paragraph Styles palette, Ctrl+click (right-click) the parent style, and then choose Apply (Style Name) then Next Style. Voila! Three paragraphs in one.
Nested Styles will rock your world. If you’re like me—essentially lazy, but love gadgets and stuff that makes life easier—then Nested Styles is for you. Nested Styles allows you to apply Paragraph Styles and Character Styles at the same time. This is profound, so let me reiterate: Nested Styles allows you to apply a Paragraph Style with a Character Style (or styles) applied to specific range or ranges of a paragraph. All with a single mouse click! Nested Styles can eliminate hours of repetitive drudgery, freeing you up to be more creative.
It was the Best of times, it was the worst of times, it was the age of wisdom, it was the age of foolishness, it was the epoch of belief, it was the epoch of incredulity, it was the season of Light, it was the season of Darkness, it was the spring of hope, it was the winter of despair, we had everything before us, we had nothing before us, we were all going direct to Heaven, we were all going direct the other way—in short, the period was so far like the present period, that some of its noisiest authorities insisted on its being received, for good or for evil, in the superlative degree of comparison only.

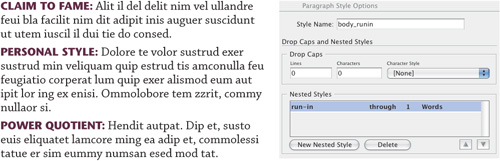
To create a Nested Style, you need to add a Character Style—or styles—to a Paragraph Style definition.
Ctrl+click (right mouse click) on the Paragraph Style you want to edit.
Click Drop Caps and Nested Styles.
Click New Nested Style and choose from the list of available Character Styles.
Specify how to “turn off” the Character Style. Depending on the nature of the Nested Style either choose a specified number of words or characters, or choose a condition from the drop down menu. You can also type a specific character such as a colon (:) into this field.
Choosing Through includes the character that ends the Nested Style, while choosing Up To formats only those characters that precede the designated character.
If you have more than one Nested Style you can use the up button or down button to change the order of the styles in the list, determining the order in which the formatting is applied. The formatting defined by the second style begins where the formatting of the first style concludes.
Figure 14.11. Apply Nested Styles from the beginning of the paragraph forward. The Nested Style will be “on” until the specified number of the chosen delimiter—for example 4 Words, 1 sentence, 1 en space—is found in the text. You can also type a specific character such as a colon (:) into this field.

Tip
Use a keyboard shortcut to insert the End Nested Style Here character. Create your own custom keyboard shortcut to quickly place this character in your text. I use Ctrl+Cmd+Option+X (on a Mac).
All well and good, but what if there’s nothing consistent about your paragraphs that you can use to turn off the Nested Style? Enter the End Nested Style Here character. The End Nested Style Here character is an invisible character you can insert into your text to turn off character styling at that specific point.
Here are some practical applications of Nested Styles:
Run-ins are usually third-level subheads that have the heading on the same line as the body text that follows. The heading is distinguished from the body text with a contrasting font. The key with run-in heads—and for all Nested Styles—is some identifiably consistent element. This might be separating the subhead from the body text with a colon or an en space.
Tip: Using Multiple Delimiters
What if there just isn’t anything that you can designate as a consistent delimiter? Well, it’s possible to accommodate just about any kind of variation by entering multiple characters in the delimiter field of a Nested Style. If you enter all the possible characters that could end a sentence—.?!—InDesign will use the first one it encounters to turn off the Nested Style.
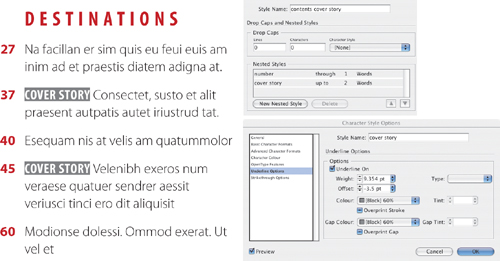
A common style of a contents page uses the page number as a run-in head. Additional run-in elements can include identifying tags like “Cover Story” or “Feature Article.” In the example shown, this tag is reversed out of a gray bar. As we saw with Paragraph Rules, it’s easy to create reverse heads that move with the flow of the text. However, in this example the “rule” is applied to only a portion of the paragraph and therefore needs to be defined as a Character Style. To make this possible, use Underline Styles.
In this example, Nested Styles can be combined with Sequential Styles. The review section follows a consistent format: Artist and Album Title as the first paragraph, Record Label and Star Rating as the second, and the review itself as the third paragraph. Paragraphs 1 and 2 contain Nested Styles (with an en space delimiter) and a Next Style specified. Select the three paragraphs and Ctrl+Click (Right Click) on the Artist Paragraph Style. From the context menu, choose Apply Artist then Next Style.

Part of the natural evolution of global formatting, Object Styles takes the concept of Paragraph and Characters styles and applies it to text and graphic frames as well as to lines and pen paths. Within one style name, you can save such attributes as fill color, stroke weight, stroke color, the number of columns in the frame, drop shadow, etc. You can also incorporate into the Object Style definition the Paragraph Style that should be applied to the text inside the frame. By using the Next Style option it is possible to apply paragraph styles sequentially to more than one paragraph.You get to control which settings the Object Style affects by including or excluding a category in the style definition.
Just like Paragraph and Character styles, you can base one Object Style on another, creating a parent-and-child relationship so that when you change the base or parent style, the “child” style changes as well.
Tip
When you create a Style Sheet you may not be the only person who uses it. Or you may find yourself returning to Style Sheets that you created weeks, months, even years before. So that you and the other members of your team don’t get confused by Nested Styles, adopt a naming convention that is transparent. For example, append “_nested” after the style name.
Each document begins its life with a [Basic Text Frame] and a [Basic Graphics Frame] Object Style. By default these styles are applied respectively to any text or graphic frames you create. Just as with the [Basic Paragraph] style you can edit these [Basic] styles, but you can’t delete them. If you want to change these default styles for a text frame, choose Default Text Frame Style or Default Graphics Frame Style from the Object Styles palette fly-out menu, and then select from your available Object Styles.
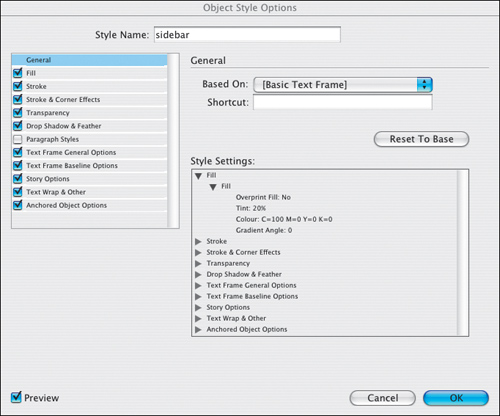
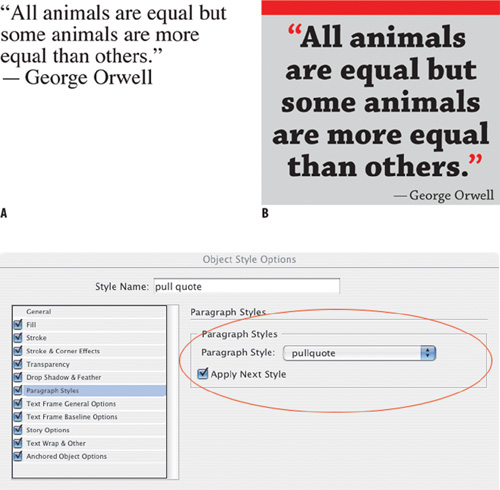
Figure 14.17. Making a “Pull Quote” Object Style. Having set up an object style for the pull quote it takes only a single click to transform A into B. The quote paragraph is a nested style with a paragraph rule above. Its Next Style is defined as the attribution line. The Object Style definition includes the Paragraph Style with the Next Style option checked.