
Controlling Kinect status changes is one of the key factors and essential for development. Initially in Chapter 3, Starting to Build Kinect Applications, we have discussed the Status property of the KinectSensor class and how we handle it using the StatusChanged event handler in the Dealing with Kinect Status section.
To quickly recall how you can handle the status change, first of all you have to first register for the StatusChanged event as shown below.
KinectSensor.KinectSensors.StatusChanged += KinectSensors_StatusChanged;
The StatusChanged event is attached to the KinectSensor class and raised when the KinectSensor.Status property of a Kinect sensor in the collection changes.
Finally, whenever there is an event change the event handler is called by sending the StatusChangedEventArgs argument. This event's argument holds the KinectStatus property and the reference of KinectSensor for the Kinect device, by which this event has been raised. Refer to the following code block:
  void KinectSensors_StatusChanged(object sender, StatusChangedEventArgs e)
        {
            KinectSensor sensorStatus = e.Sensor;
 //handle the status here
        }
As shown in the preceding code block, the sensorStatus property holds the reference of Kinect, which has the changed status. Now we will see how we can extend to the Multiple Kinect Viewer application with status change in the next section.
In the very first step we will make the KinectInfo class to implement the INotifyPropertyChange interface, as we need to update the status as and when the status changes. These changes are highlighted in the following code block:
public class KinectInfo : INotifyPropertyChanged
    {
        public string deviceCount { get; set; }
        public string DeviceID { get; set; }
        private string status;
    public string Status
        {
            get
            {
                return this.status;
            }
            set
            {
                this.status = value;
                this.OnPropertyChange("Status");
            }
        }
        public string ConnectionID { get; set; }

        public event PropertyChangedEventHandler PropertyChanged;

        public void OnPropertyChange(string propertyName)
        {
            if (this.PropertyChanged != null)
            {
                this.PropertyChanged.Invoke(this, new PropertyChangedEventArgs(propertyName));
            }
        }
    }
With this change in the code, the Status property of KinectInfo class should automatically reflect to the UI whenever there is a status change.
The StatusChanged event will only fire if the event handler is attached with the KinectSensor class. To do so, attach the event handler on the MainWindow() method as shown in the following code block:
public MainWindow()
        {
            InitializeComponent();
            Loaded += new RoutedEventHandler(MainWindow_Loaded);
            KinectSensor.KinectSensors.StatusChanged += new EventHandler<StatusChangedEventArgs>(KinectSensors_StatusChanged);
            this.ViewModel = new MainWindowModelView();
            this.DataContext = this.ViewModel;
        }
When there is a change in the sensor status, the
StatusChanged event will fire with the StatusChangedEventArgs argument, which contains the reference of the sensor that causes the status change. In the following code block, we are matching the ConnectionID value of the device from the list of sensor elements with the ConnectionID value of the sensor that raised the
StatusChanged event:
void KinectSensors_StatusChanged(object sender, StatusChangedEventArgs e)
        {
            KinectInfo kinfo = this.kinectSensorInfo.FirstOrDefault(item => item.ConnectionID.Equals(e.Sensor.DeviceConnectionId));
            if (kinfo != null)
            {
                kinfo.Status = e.Status.ToString();
            }
        }
If the ID gets matched, we are just updating the Status value of the particular element from the list. As we have already implemented the PropertyChanged attribute, the data will bind automatically with the UI.
Run the Multiple Kinect Viewer application again. First you will find that both the devices have Connected status as shown in the left part of the screenshot. Then try to unplug one of the sensors, thereby disconnecting it from the system. You will find the status is getting updated automatically. Refer to the right part of the screenshot, where the NotPowered status is shown for the Device 2:

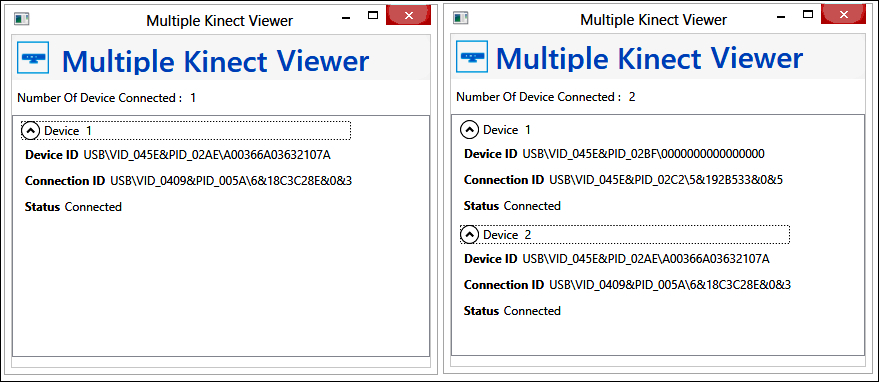
With the help of the StatusChanged event, you can also identify the device automatically when they are connected to the system. Just consider the scenario where you have one device connected when you run the Multiple Kinect Viewer application; you will find the list item showing only one device connected.
Now, if you plugged in another device, the list won't reflect the information of a newly-added device as our system knows there is a new device connected, but our application is still not aware about it. In such scenarios we can make use of the StatusChanged event itself to identify when the sensor is getting connected, because the StatusChanged event can recognize the new devices when it's connected. So, if the event is registered, the application invokes the event handler for a status change for a new connected device as well. To recognize and update the collection of devices in our application, we have to add a few extra lines of code in the StatusChanged event handler as shown in the following code block:
KinectInfo kinfo = this.kinectSensorInfo.FirstOrDefault(item => item.ConnectionID.Equals(e.Sensor.DeviceConnectionId));
            if (kinfo != null)
            {
                kinfo.Status = e.Status.ToString();
            }
            else
            {
                kinectSensorInfo.Add(new KinectInfo { deviceCount = string.Format("Device  {0}", numberofDevice++), DeviceID = e.Sensor.UniqueKinectId, ConnectionID = e.Sensor.DeviceConnectionId, Status = e.Sensor.Status.ToString() });
            }
The changes we made here reflect that if the device ConnectionID value does not match, then the device is not in the list and the item needs to be added to the list. That's all.
Run the application with one sensor plugged in as seen in the left part of the following screenshot. Then plug in the other sensor; you will get the list updated with two sensors as shown in the right part of the following screenshot:
We have developed one KinectStatusNotifier component as part of the Building KinectStatusNotifier exercise in Chapter 3, Starting to Build Kinect Applications, which is not self-executable; it generates a KinectStatusNotifier.dll assembly, which can be used with a Kinect-based application. We have also integrated the same with the Kinect Info Box application in the Using KinectStatusNotifier section. If you follow the same steps with the Multiple Kinect Viewer application, you will be able to see a system tray notification with a status change as shown in the following screenshot:
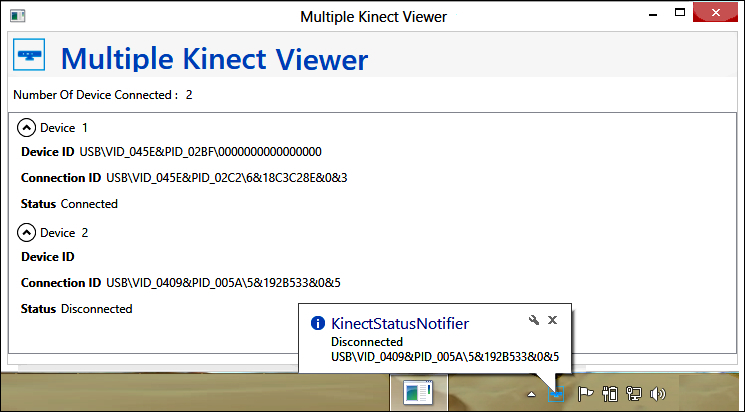
Well, using KinectStatusNotifier, you can customize the notification messages and display other information as well on status change. As shown in the following screenshot, you can see that we are able to identify which device status is getting changed and the status as well as the Device ID:

To achieve this, you just need to disable the Auto Notification feature from the Status Notifier by using the following code:
this.notifier.AutoNotification = false;
By doing this, the KinectStatusNotifier will stop showing automatic notifications in our system and the control is transferred to the user. In the next step, in sensor status change, read the information from KinectInfo Collection, and invoke the notification message as shown in the following code block:
    if (kinfo != null)
        {
          kinfo.Status = e.Status.ToString();
          this.notifier.NotifierTitle = kinfo.deviceCount;
          this.notifier.NotifierMessage = string.Format("Sensor Status :{0}
Device Id: {1}", kinfo.Status, kinfo.DeviceID);
          this.notifier.NotifyStatus();
        }
As you can see from the preceding code, we are assigning the NotifierTitle property with the deviceCount property and assigning the
NotifierMessage property with Status as well as DeviceId. Then, we are calling the NotifyStaus() message explicitly to notify us in the system tray.
Until now, we have discussed how we can configure, connect, and check the status of multiple Kinects. Now let's have a look at how we can use two Kinect sensors and capture the depth and color stream data.
If your sensors are connected properly and you are able to access individual Kinects, capturing data from multiple sensor is fairly easy. You are already familiar with capturing color and depth data stream from a sensor, so rather than going into a step-by-step discussion, just look at the following steps for capturing data:
- Identify the individual Kinect sensors.
- Attach the event handler to the individual Kinect sensors.
- Handle the events for the attached event handler.
- Check the sensor status and control the start and stop based on your requirement.
Using these steps you can a build an application that can capture different data streams from the Kinect sensor as shown in the following screenshot:
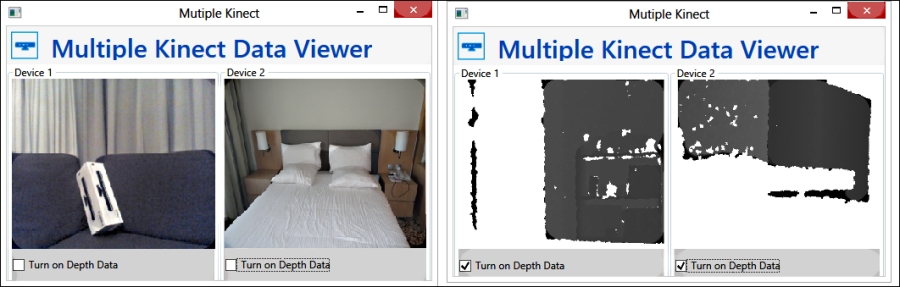
Both these images show that the color and depth data are being captured from multiple Kinects.
Note
The overall implementation will be the same as we did for individual Kinect sensors, except identifying and attaching an event handler for a particular sensor. You can enable the color, depth, as well as the skeleton stream for multiple Kinects. Skeleton processing requires heavy CPU processing, so make sure your CPU has enough power to process skeleton data for both the sensors.
This application is available for download from the book resource location.