
Algorithmic gesture recognition is built on top of basic gesture recognition, hence the understanding of basic gesture recognition is essential for going ahead with the algorithmic approach. The algorithmic approach uses a set of predefined conditions and parameters to detect and validate a gesture against each of them. With the algorithmic approach, we basically validate a gesture as it is being performed, by ensuring the start points, constraints, parameters, and the end points are always valid.
You can consider the gestures to be measured by an algorithmic approach when gestures need to be validated against multiple conditions, multiple joints are involved, and where you need to measure the multiple states of gesture. If your application needs all the conditions to be validated and measured based on time or frames, you should go ahead with the algorithmic approach. So, before you go ahead and start implementing, first consider the different boundary conditions, entry and exit criteria for the gestures, and validation states. In general, most of the applications follow the algorithm for regular gesture implementation. Following are a few example gestures which can be considered as algorithmic:
- Hand moving in the same direction
- A swipe to the right or the left
- Zooming in and out
- Waving hands
From the gesture types mentioned, you can understand how the approach could be different from basic gesture detection. The algorithmic approach not only recognizes the gestures, but it also tracks if the gesture is performed correctly or not. Though they are very closely related to each other, we can even say that all the basic approaches are nothing but a smaller set of algorithmic approaches, whereas the algorithmic gestures are more advanced and are calculated with various conditions and parameters.
To summarize, choose the algorithmic approach when the application needs to play around a series of joints. This involves a number of calculations for each and every frame with start criteria, validation of different states, and end criteria.
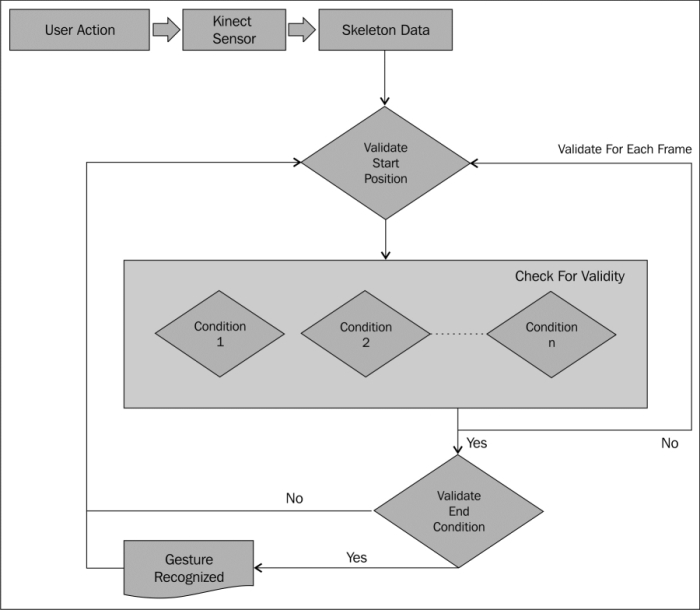
To help you understand, lets articulate the components that are required for algorithmic gesture recognition in a list:
- Start
- Condition
- Validation
- Finish
To start with any gesture, there will always be an initial position—we call it the "start" position. This is the entry point for any gesture and has to be validated before validating other positions. Once the start position is validated and the gesture is being performed by the end user, every single frame has to be validated under the predefined "condition" for the particular gesture types. If any of these conditions fail to satisfy during the complete execution cycle, we can stop the gesture tracking and wait for it to start again. Finally, there should be a condition that triggers the end of the gesture and "validates" the final position, which indicates that gesture recognition is "finished".
For example, consider you need to perform a SwipeToLeft gesture using your right hand. The following images show us the steps for the same, where the user is facing the Kinect sensor:

To validate this gesture, you need to perform the following steps very closely:
- Before starting, the left hand joint should be below the left elbow and the spine joint. Also, the right hand joint should be below the right shoulder joint and above the right elbow joint.
- The user should move the hand from right to left while maintaining the right hand and left hand joint positions.
- This condition needs to be validated for a couple of predefined frames, and should result in success every time it checks if the hand is moving to the left.
- After a specific number of frames when the gesture reaches to validate the last condition, it will check if the distance between the right hand joint and the left shoulder has reduced from the starting point.
By considering the preceding points for every skeleton frame, we can determine if a SwipeToLeft gesture has been detected or not. The validation should be performed for each and every frame, and you can add a time or frame number to validate.
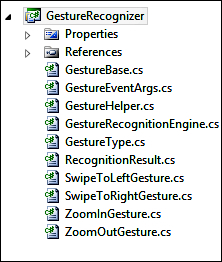
In this section we will learn how to implement the gesture recognition engine by following the earlier approaches. We will be extending the GestureRecognizer class library developed earlier. Overall project structures for the new GestureRecognizer class library are given in the following screenshot:
Note
In the earlier implementations we passed the GestureType enumeration to the gesture recognizer engine to inform it what we need to detect. In this implementation we rather pass the types, the gesture recognizer will return the type of gesture that has been detected. This is because we will have multiple GestureType enumerations in these scenarios.
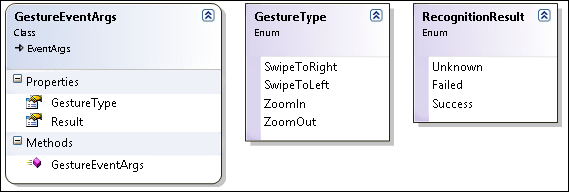
Open the GestureType.cs file from the Solution Explorer and define the following types of gestures.
public enum GestureType
    {
        SwipeToRight,
        SwipeToLeft,
        ZoomIn,
        ZoomOut
}Using Events, the recognition engines can notify the subscriber of events that occur. We have already used the RecognitionResult class for the gesture recognition engine, which would result in either Success, Failed, or Unknown. The
EventArgs class is the base class for encapsulating any data that can be passed with an event. The following code block defines the GestureEventArgs class that will hold the RecognitionResult class as well the GestureType property, as an argument:
public class GestureEventArgs : EventArgs
    {
     public RecognitionResult Result { get ; internal set; }
     public GestureType GestureType { get; internal set; }

     public GestureEventArgs(RecognitionResult result, GestureType type)
        {
            this.Result = result;
            this.GestureType = type;
        }
    }
When a gesture is recognized, the recognition engine will raise an event with GestureEventArgs, which will hold the RecognitionResult class as well as the GestureType property.
We can add a new class named GestureHelper.cs. The GestureHelper.cs class works as a utility class that contains reusable methods. At this time, we have placed the
GetJointDistance() method as a public static method, which has been called to calculate the distance between joints in several places for gesture recognition. Earlier, we had this method inside the GestureRecognitionEngine class; you have to just move the same method inside the GestureHelper.cs class.
Now we will create a GestureBase class that will contain the basic structure for all the gestures. All the gesture classes will implement the GestureBase class to validate the gestures. The GestureBase class is shown in the following code block:
    public abstract class GestureBase
    {
        public GestureBase(GestureType type)
        {
            this.CurrentFrameCount = 0;
            this.GestureType = type;
        }

        public bool IsRecognitionStarted { get; set; }

        private int CurrentFrameCount { get; set; }

        public GestureType GestureType { get; set; }

        protected virtual int MaximumNumberOfFrameToProcess { get { return 15; } }

        public long GestureTimeStamp { get; set; }

        protected abstract bool ValidateGestureStartCondition(Skeleton skeleton);

        protected abstract bool ValidateGestureEndCondition(Skeleton skeleton);


        protected abstract bool ValidateBaseCondition(Skeleton skeleton);

        protected abstract bool IsGestureValid(Skeleton skeleton);
        public virtual bool CheckForGesture(Skeleton skeleton)
        {
            if (this.IsRecognitionStarted == false)
            {
                if (this.ValidateGestureStartCondition(skeleton))
                {
                    this.IsRecognitionStarted = true;
                    this.CurrentFrameCount = 0;
                }
            }
            else
            {
                if (this.CurrentFrameCount == this.MaximumNumberOfFrameToProcess)
                {
                    this.IsRecognitionStarted = false;
                    if (ValidateBaseCondition(skeleton) && ValidateGestureEndCondition(skeleton))
                    {
                        return true;
                    }
                }

                this.CurrentFrameCount++;
                if (!IsGestureValid(skeleton) && !ValidateBaseCondition(skeleton))
                {
                    this.IsRecognitionStarted = false;
                }
            }

            return false;
        }

    }
The constructor of the GestureBase class accepts the GestureType property as the parameter and sets it into the class-level public property named GestureType. The abstract base class we just saw has a CheckForGesture() method that accepts the skeleton data and returns a Boolean value to indicate if the gesture was recognized or not.
First, the
ValidateGestureStartCondition() method is called to check if the gesture satisfies the start condition. Once the start condition is validated, it will set IsRecognitionStarted to true and set the CurrentFrameCount count to 0. By setting IsRecognitionStarted to true, it indicates that the start position is validated and gesture recognition is in progress. If any further condition fails to recognize the gesture, IsRecognitionStarted will be set to false so that recognition will again start validating the start position.
Once the start position is validated, for all other congestive frames it will call the ValidateBaseCondition() and IsGestureValid() methods until the frame count reaches the number specified as MaximumNumberOfFrameToProcess. The default value of MaximumNumberOfFrameToProcess is set to 15, which means the recognition will validate the stability of the gesture for 15 frames. The IsGestureValid() method will validate if the user is still performing the action and moving to the right.
The ValidateBaseCondition() method will verify if the user is performing the action in the right way. For example, for the SwipeToLeftGesture class, the IsGestureValid() method will verify if the hand is moving from the right-to-left direction and the distance between the right hand joint and the left shoulder is decreasing. Whereas, the
ValidateBaseCondition() method will check if the right hand position is between the shoulder and the spine joint.
Finally, it will validate the final condition by calling the ValidateGestureEndCondition() method; also, it will validate the base condition by calling the ValidateBaseCondition() method. If the
ValidateGestureEndCondition() method returns a true value, this means the current gesture satisfies all the predefined conditions and the CheckForGesture() method will return true. At any time, if the condition fails, the CheckForGesture() method will return false and will reset the gesture by initializing the values.
Once the base gesture class is ready, we can implement any types of gesture that are valid under the given circumstance and can be implemented. For example, here we will follow the example of implementing SwipeToLeftGesture using the right hand.
The following code block is a concrete implementation of the GestureBase class for a SwipeToLeftGesture class:
    public class SwipeToLeftGesture : GestureBase
    {
        public SwipeToLeftGesture() : base(GestureType.SwipeToLeft) { }
        private SkeletonPoint validatePosition;
        private SkeletonPoint startingPostion;
        private float shoulderDiff;
        protected override bool ValidateGestureStartCondition(Skeleton skeleton)
        {
        // return true if start condition is valid else return false

        }
        protected override bool IsGestureValid(Skeleton skeletonData)
        {
        // return true if current position of gesture is still valid else return false
        }

        protected override bool ValidateGestureEndCondition(Skeleton skeleton)
        {
        // return true if end condition is valid else return false
        }

        protected override bool ValidateBaseCondition(Skeleton skeleton)
        {
        // return true if base condition is valid else return false
        {
    }
The SwipeToLeftGesture class we just saw inherits from the GestureBase class and implements all the abstract methods defined in the base class for gesture recognition. The very first thing you notice is the constructor of the SwipeToLeftGesture class, where we have set the GestureType property to SwipeToLeft. This will let our base class know that the current recognition is set for SwipeToLeft.
Note
We haven't given the code block for each and every condition for the validating methods. The conditions for every method will be very logical, as we discussed in the Understanding algorithmic approach section. You can get the complete workable solution downloaded from the book's resource location.
Similar to the SwipeToLeftGesture class, we will have three other classes, namely SwipeToRight, ZoomIn, and ZoomOut, and all of them are inherited from the GestureBase base class and implement all the methods, as shown in the following diagram:

So far we have defined the GestureType, RecognitionResult, GestureEventArgs, and GestureHelper classes, and finally we have implemented different gesture classes derived from the GestureBase base class.
Now we need to inject the created gesture class's information to GestureRecognitionEngine so that GestureRecognitionEngine takes input from the application and instantiates the process of recognition.
Within the RecognitionEngine class (RecognitionEngine.cs), first remove all the existing code that we have written during the basic gesture recognition and just keep the namespaces.
Add the following class-level member in the class:
   int SkipFramesAfterGestureIsDetected = 0;
   public event EventHandler<GestureEventArgs> GestureRecognized;
   public GestureType GestureType { get; set; }

   public Skeleton Skeleton { get; set; }
Then, create a List class of the GestureBase class and name it gestureCollection to hold lists of different gesture classes:
private List< GestureBase > gestureCollection = null;
Add a new method, InitilizeGesture(), to add all the gestures into gestureCollection one by one as shown in the following code block:
private void InitilizeGesture()
        {
            this.gestureCollection = new List<GestureBase>();
            this.gestureCollection.Add(new ZoomInGesture());
            this.gestureCollection.Add(new ZoomOutGesture());
            this.gestureCollection.Add(new SwipeToRightGesture());
            this.gestureCollection.Add(new SwipeToLeftGesture());
        }
The initialization of all the gestures needs to be done when the application instantiates the GestureRecognitionEngine class. This can be done by calling the
InitilizeGesture() method from the constructor of the GestureRecognitionEngine class, as shown in following code block:
public GestureRecognitionEngine()
        {
            this.InitilizeGesture();
        }
So, when the GestureRecognitionEngine class instantiates, the recognition engine will create a list of specified gestures and store them into gestureCollection.
The StartRecognize() method serves the following two purposes:
- Skips some specified frames after gesture detection
- Invokes the
CheckForGesture()method for individual gestures
The StartRecognize() method is defined as follows:
public void StartRecognize()
        {
            if (this.IsGestureDetected)
            {
            while (this.SkipFramesAfterGestureIsDetected <= 30)
                {
                    this.SkipFramesAfterGestureIsDetected++;
                }
                this.RestGesture();
                return;
            }

            foreach (var item in this.gestureCollection)
            {
                if (item.CheckForGesture(this.Skeleton))
                {
                    if (this.GestureRecognized != null)
                    {
                        this.GestureRecognized(this, new GestureEventArgs(RecognitionResult.Success, item.GestureType));
                        this.IsGestureDetected = true;
                    }

                }
            }
        }
This method first checks if any gesture is recognized using the IsGestureDetected property. If the value of IsGestureDetected is true, the method will wait for 30 frames to skip and then will reset the initialization of gestureCollection. This is done to avoid the overlapping of gestures. The next part of the method, which is highlighted, iterates through gestureCollection and calls the CheckForGesture() method by passing the Skeleton data as the argument. Once the gesture is recognized, the CheckForGesture() method returns a true, and in the next statement the GestureRecognized event will be raised with RecognitionResult set as successful and the GestureType property as a GestureType of the current element of gestureCollection.
The following is the code block for resetting the gestures:
private void RestGesture()
        {
            this.gestureCollection = null;
            this.InitilizeGesture();
            this.SkipFramesAfterGestureIsDetected = 0;
            this.IsGestureDetected = false;
        }
This block of code just reinitializes gestureCollection and resets the class member to the initial state.
We are done with the implementation of GestureRecognitionEngine, and now it's time to plug it into our applications. The use of GestureRecognitionEngine is similar to that which we used for basic gesture recognition. The only different here is that we have a collection of gestures and instead of passing GestureType to the GestureRecognitionEngine when a gesture is recognized, the recognition engine returns back the recognized gesture type with the GestureEventArgs argument. The following steps show how to use the recognizer in any Kinect application where you want to use this gesture recognizer:
- Add
GestureRecognizer.dllas a reference assembly application from the Add References dialog window. - Add the following namespace in the application:
using GestureRecognizer;
- Define a new class-level variable for the
GestureRecognitionEngineclass, as shown:GestureRecognitionEngine recognitionEngine;
- Add the following code snippet to instantiate the
GestureRecognitionEngineclass and register the event:recognitionEngine = new GestureRecognitionEngine(); recognitionEngine.GestureRecognized += new EventHandler<GestureEventArgs>(recognitionEngine_GestureRecognized);
The lines of code we just saw are clear enough; we created an instance of the
GestureRecognitionEngineclass and registered theGestureRecognizedevent handler. The definition for therecognitionEngine_GestureRecognized()event handler is as follows:void recognitionEngine_GestureRecognized(object sender, GestureEventArgs e) { MessageBox.Show(e.GestureType.ToString()); }Here we are just showing the types of the recognized gestures using a message box. For the actual implementation, you can call for specific actions depending on the types of gestures it recognizes.
- As the final step, add the following highlighted lines of code at the end of the
SkeletonFrameReadyevent handler. This will pass the skeleton data for every frame torecognitionEngineand then call theStartRecognize()method to verify if the gesture condition is satisfied or not. The code block is as follows:void sensor_SkeletonFrameReady(object sender, SkeletonFrameReadyEventArgs e) { using (SkeletonFrame skeletonFrame = e.OpenSkeletonFrame()) { . . . // getting skeleton code goes here if (firstSkeleton == null) { return; } recognitionEngine.Skeleton = firstSkeleton; recognitionEngine.StartRecognize(); } }
If you run the application, and perform the necessary actions that recognize these gestures, your application will show a message box with the type of the recognized gesture.
The following screenshot shows a Gesture Detector application. One side of the application will show us the skeleton with all the tracked joints, and on the other side, it will show us the recognized gestures from the user's actions:
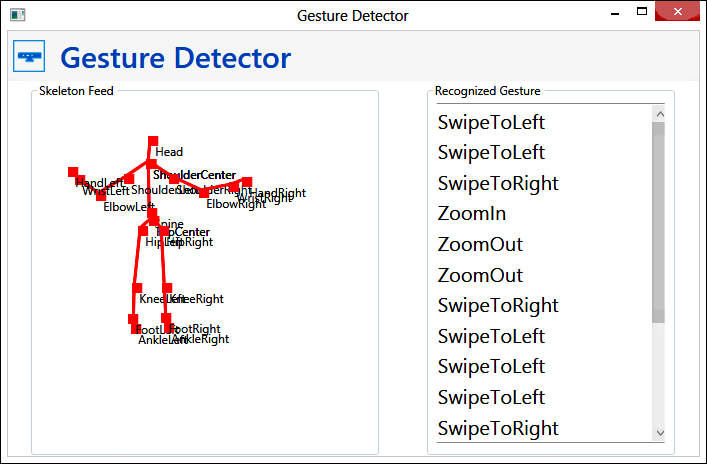
The working solution of the gesture detector is a sample project available in the GestureDetector folder of the resource location for this book. This application leverages the algorithmic gesture recognition engine we just built, and can detect four types of specified gestures. You will also be able to view the skeleton joints within this application.
To take another granular look into the algorithmic gesture recognition approach, and to simplify the implementation, we can further break down the complete condition block into multiple smaller modules, and call it them "phases". Each phase of a gesture will have its own result set or conditions that measure the success or failure of the phase. The result of the phases will be dependent on each other, which means recognition will move to the next phase if the previous phase result was passed. It could also happen that all the conditions in a phase are not satisfied. This does not always mean that the phase has failed, it could be that the user is "on hold" or "in progress" on that particular position for sometime. We can mark the state of the phase as pause and wait for the next action for a few frames. These phases can communicate with one another using Inter Phase Communication, to share the information, result, and data with each other. The next screenshot shows how we can divide the complete Gesture Recognition Phase into multiple phases and validate the gestures against each phase:
