
The fundamental approach of gesture recognition is to play around with the skeleton's joint points and apply basic logic to perform some action. Basic gesture detection depends on some pre-defined set of conditions, known as the result set. If the performed action is matched with the result set, we can say that the user has performed a certain gesture, otherwise not.
In this section, we will learn a few approaches to recognize the basic gestures and will build an application that leverages the basic gesture recognition approach.
Gesture detection depends on the tracked joints of the human skeleton because we define the condition of gestures based on the joints. Before jumping into further details, let's have a quick look at the representation of skeleton joints.
Each skeleton joint is measured in a three-dimensional (X,Y,Z) plane. The X and Y coordinates specify the location of the joint in the plane, and the player facing the Kinect sensor is in the Z direction.

When a joint is represented with X, Y, and Z coordinates in a three-dimensional plane, the X and Y coordinates actually indicate the joint location in the plane, and Z indicates how far the joint is from the sensor. If the joints move from the right-hand side to the left-hand side or vice versa, the X axis of the joint will change. Similarly, for moving joints in the upwards or downwards direction, the value of the Y axis will change. Changes in the Z axis will reflect if the joints move forward or backwards from the sensor.
Calculations for the basic gestures can be done by either of the following:
- Calculating the distance between different joints
- Comparing the joints' positions and the deviation between the joints' positions
Skeleton data representation is three dimensional; however, before looking into the 3D coordinate plane, let's first consider the points in a 2D coordinate plane with only X and Y axis and see how to calculate the distance between two points.
In general mathematics, to calculate the distance between two points, we need to make use of the Pythagorean Theorem. The theorem states that:
For a right-angled triangle, the square of the hypotenuse is equal to the sum of the squares of the other two sides.
Refer to the following diagram, which shows how the Pythagorean theorem can be applied to calculate the distance between two joints:
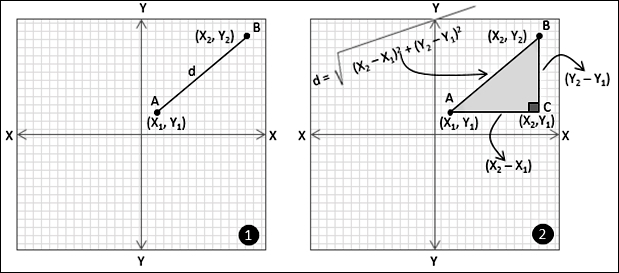
Consider that you have a point A (X1,Y1) and a point B (X2,Y2) in a two-dimensional coordinate plane. You want to calculate the distance (let's call it "d") between point A and point B (refer to the image marked as 1). To calculate the distance using the Pythagorean theorem, we have to first draw a parallel line to the X axis from point A and another line from point B, which is parallel to the Y axis. Consider both the lines meeting at point C (X2,Y1). As we know, the X and Y axes are perpendicular to each other; the triangle formed by the points A, B, and C is a right-angled one (refer to the image marked as 2).
Now, the value of "d", the distance between points A and B, will be the hypotenuse of the right-angled triangle that was formed by the points A, B, and C. The distance between A and B, now can be calculated using following formula:
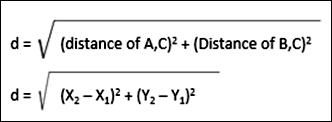
The Pythagorean theorem works well for three dimensional planes as well, and the distance between points (X1,Y1,Z1) and (X2,Y2,Z2) can be calculated by the following formula:
To articulate the discussion on joint distance calculation and put it in the form of code, you can write a method like the following:
private float GetJointDistance(Joint firstJoint, Joint secondJoint)
        {
            float distanceX = firstJoint.Position.X - secondJoint.Position.X;
            float distanceY = firstJoint.Position.Y - secondJoint.Position.Y;
            float distanceZ = firstJoint.Position.Z - secondJoint.Position.Z;
            return (float)Math.Sqrt(Math.Pow(distanceX, 2) + Math.Pow(distanceY, 2) + Math.Pow(distanceZ, 2));
        }
The GetJointDistance() method accepts two joints as arguments; it measures the distance from the joints for every axis in the coordinate system and finally returns the distance between the joints.
For example, if you want to calculate the distance between the HandLeft
and HandRight joints, the GetJointDistance() method can be invoked as follows:
  Joint handRight = skeleton.Joints[JointType.HandRight];
  Joint handLeft = skeleton.Joints[JointType.HandLeft];
  if (handRight.TrackingState == JointTrackingState.Tracked && handLeft.TrackingState == JointTrackingState.Tracked)
  {
  this.GetJointDistance(handRight, handLeft);
  }
The reason behind checking the TrackingState property of joints before calling the
GetJointDistance() method is to just make sure the joints are tracked and have valid positions for calculating the distance.
Note
It may be possible that Kinect is unable to see the joints and thus TrackingState will not be tracked. However it may also be possible that Kinect can infer the position. Thus you can also use the code based on TrackingState == JointTrackingState.Inferred and calculate the distance with one of the joints as tracked and the other as inferred.
Let's try to build a simple gesture application by calculating the distance between joints and see how it works.
In this section we will build a clapping-hands application. The application will play a clapping sound whenever the joints of the right and the left hand are very close to each other.
You can start building this application by creating a new WPF project in Visual Studio. Name the project Clapping Hands.
This application needs both the depth and skeleton streams to be enabled and captured. Once you are done with creating the project, you have to perform the following tasks:
- Identify and initialize the Kinect sensor
- Capture the depth stream data from the sensor and display the depth data to the application screen. (You can use color stream or IR data to display on the screen as well; for this application we will be using the depth data)
- Capture the skeleton stream data and detect the first tracked skeleton
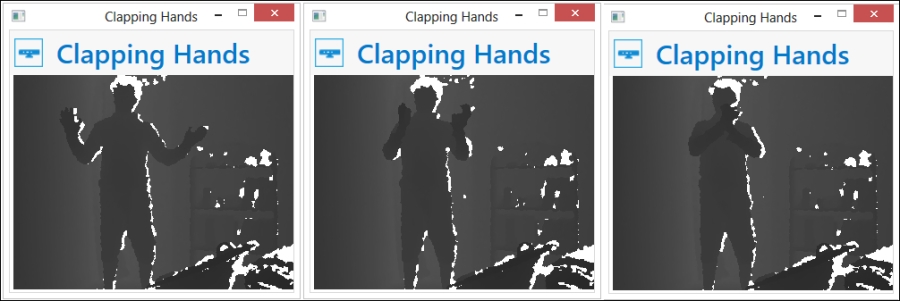
By now, you are very familiar with all of the previously mentioned tasks, and can implement it very quickly. Once you are finished with the implementation of these tasks and run the Clapping Hands application, if you stand in front of the Kinect sensor, you should be able to view the depth stream data in your application as shown in next image:
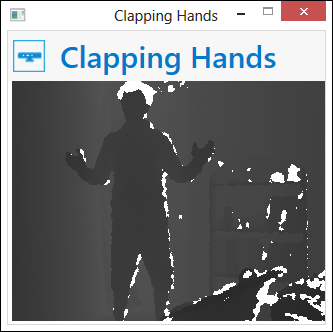
Once a skeleton is tracked we can start measuring the distance between the joints. For the time being, leave this application in this state, and let's focus on how to implement the gesture recognizer engine for our application.
The core of a gesture-enabled application is the gesture recognizer. The gesture recognizer will have a Gesture Recognition Engine that will accept the user data, validate the data against predefined conditions, and execute the action depending on the gesture.
First we will create a new Class Library project in Visual Studio and give the library a name, GestureRecognizer. The default template of the Class Library project gives us an empty Class1.cs class to start with. Right-click on Class1.cs and select Delete so that we can start everything from scratch. We can now right-click on the project file in the Solution Explorer window and select Add New Item. We will be adding four class files into our project as shown in the following screenshot:
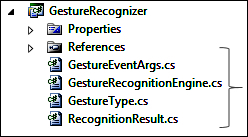
Once done, add the Microsoft.Kinect.dll assembly as a reference from the Add Project Reference option of the project context menu. All the added classes have their own responsibilities, and together all of them will build the gesture recognizer. We will start with the GestureType.cs file.
For any gesture, we need a type to specify what kind of gesture it is. We used the GestureType.cs files to define an enumeration for the type of the gesture that is indicated by the GestureType enumeration. The definition looks like the following:
public enum GestureType
    {
        HandsClapping
}Along with the type of gestures, every gesture action needs a result, which we can use to notify the user or help us to take further actions. The RecognitionResult enumeration defines the following result status for a basic gesture recognition:
public enum RecognitionResult
    {
        Unknown,
        Failed,
        Success
}Using an event, a class can notify its client when something happens. We have defined RecognitionResult for gestures that could be either Success, Failed, or Unknown. Whenever a particular status of the gesture is identified, it's the responsibility of recognition engine to notify back to the application and the end user. The EventArgs class is a base for encapsulating any data that can be passed with the event. We have defined the GestureEventArgs class, which will hold the RecognitionResult event as an argument. This is shown in the following code block:
public class GestureEventArgs : EventArgs
    {
     public RecognitionResult Result { get ; internal set; }
        public GestureEventArgs(RecognitionResult result)
        {
            this.Result = result;
        }
    }
When a gesture is recognized or failed, the recognition engine will raise an event with GestureEventArgs, which will hold the result in it. You can surely customize it if you want to pass any additional information, message, and so on.
So far, we have defined the following entities:
- Types of gestures in the
GestureTypeenumeration - Result of the recognition in the
RecognitionResultenumeration GestureEventArgs; it holds the arguments for gesture related events
The final and most important part of building the Gesture Recognizer is to wrap up the above components into the GestureRecognitionEngine class and let the recognition engine know the source of the data and what to recognize.
In the GestureRecognitionEngine class we will be handling skeleton joints information, you have to refer to the Kinect assembly namespace in this class file. GestureRecognitionEngine will have a default constructor with two public properties for defining GestureType and assigning skeleton data from the application. This class will also have an event handler for handling the action when the gesture is recognized with GestureEventArgs. The class will look as follows:
  public class GestureRecognitionEngine
    {
        public GestureRecognitionEngine()
        {
        }
        public event EventHandler<GestureEventArgs> GestureRecognized;
        public event EventHandler<GestureEventArgs> GestureNotRecognized;

        public GestureType GestureType { get; set; }
        public Skeleton Skeleton { get; set; }
   }
Add a new method called StartRecognize(), which will be invoked by the recognizer to start recognizing the gesture. The method checks for the GestureType property and calls the corresponding method to match the gesture. As shown in the following code block, the MatchHandClappingGesture() method is called to match the clapping gesture.
  public void StartRecognize()
        {
            switch (this.GestureType)
            {
                case GestureType.HandsClapping:
                    this.MatchHandClappingGesture(this.Skeleton);
                    break;
                default:
                    break;
            }
        }
The
MatchHandClappingGesture() method implements the logic or conditions for the clapping gesture. It accepts the skeleton and then calculates the distance between two hand joints as follows:
float previousDistance = 0.0f;

private void MatchHandClappingGesture(Skeleton skeleton)
        {
        if (skeleton == null)
        {
                return;
        }

        if (skeleton.Joints[JointType.HandRight].TrackingState == JointTrackingState.Tracked && skeleton.Joints[JointType.HandLeft].TrackingState == JointTrackingState.Tracked)
            {
                float currentDistance = GetJointDistance(skeleton.Joints[JointType.HandRight], skeleton.Joints[JointType.HandLeft]);
                if (currentDistance < 0.1f && previousDistance > 0.1f)
                {
                    if (this.GestureRecognized != null)
                    {
                        this.GestureRecognized(this, new GestureEventArgs(RecognitionResult.Success));
                    }
                }

                previousDistance = currentDistance;
            }
            }
The method first validates the skeleton data for the null reference and then returns the control to the application if the skeleton data is null. Then it will check if both the HandRight and HandLeft joints are being tracked. If they are being tracked, it will calculate the distance by calling the GetJointDistance method. We have already walked through the piece of code for the GetJointDistance() method, and we will use the same code block in this class as well. The currentDistance variable holds the distance between the joints. Once the distance is calculated, we are checking the value with a predefined value (0.1, which means the joints are very close to each other).
We have used another variable called previousDistance, which keeps track of previously calculated distance between joints. This allows the program to only play the sound when the hands are very close to each other and not all the time. Also, the starting value given to previousDistance will ensure that even if your hands are together at the starting position, it won't be recognized.
Once the overall condition is satisfied, the RecognitionEngine class raises the GestureRecognized event handler with RecognitionResult.Success. As we did for GestureRecognized, you can put some condition where the gesture recognition can fail, and raise the GestureNotRecognized event handler.
If we put everything in the form of a class diagram, the overall
GestureRecognitionEngine class will look like the following:

Now you should be able to build the class library. This will produce the GestureRecognizer.dll assembly. Our next job will be using the GestureRecognizer.dll assembly in our previously built ClappingHands application.
Resume work with the ClappingHands application from the position we left it at. The GestureRecognizer library project generates an assembly GestureRecognizer.dll that can be used with any Kinect-based application for gesture recognition. Let's integrate this with our ClappingHands application and see how it works.
This can be done simply by performing the following steps:
- Add the
GestureRecognizer.dllassembly as a reference assembly to theClappingHandsapplication, from the Add References window. - Add the following namespace in the application:
using GestureRecognizer;
- Define a new class level variable for the
GestureRecognitionEngineclass, as follows:GestureRecognitionEngine recognitionEngine;
- In the
MainWindow_Loadevent handler, add the following line just after where you have enabled the skeleton and depth streams:recognitionEngine = new GestureRecognitionEngine(); recognitionEngine.GestureType = GestureType.HandsClapping; recognitionEngine.GestureRecognized += new EventHandler<GestureEventArgs>(recognitionEngine_GestureRecognized);
These lines of code are clear enough; we created an instance of the
GestureRecognitionEngineclass and then set theGestureTypeproperty and registered theGestureRecognizedevent handler. The definition for therecognitionEngine_GestureRecognizedmethod looks like the following:void recognitionEngine_GestureRecognized(object sender, GestureEventArgs e) { kinectSoundPlayer.Play(); }kinectSoundPlayeris an object of theSoundPlayerclass with a specified sound location for the clapping sound.You can download the
Clap.wavsound files from the book resource location. - As a final step, add the following highlighted lines at the end of
SkeletonFrameReadyevent handler. This will pass the skeleton data for every frame torecognitionEngineand then call theStartRecognize()method to verify if the gesture condition is satisfied or not.void sensor_SkeletonFrameReady(object sender, SkeletonFrameReadyEventArgs e) { using (SkeletonFrame skeletonFrame = e.OpenSkeletonFrame()) { . . . if (firstSkeleton == null) { return; } recognitionEngine.Skeleton = firstSkeleton; recognitionEngine.StartRecognize(); } }
That's all. Run your ClappingHands application in Visual Studio and then stand in front of the Kinect sensor and perform the gesture we generally make for clapping! You will be able to hear a clapping sound from the application. The following image shows the three different poses for the clapping gesture; when the user's action is similar to pose three, where both the hand joints are very close, the application will play the sound.
The working solution of the ClappingHands application is a sample project available in the ClapingHands directory of the resource location of this book.
In this exercise we have just measured the distance between joint points. We haven't consider the points where the joints are positioned. So, if you clap by putting your hands above your head or below your hips, the application will still play the clapping sound. When we think about making it more precise by identifying a clapping gesture only when the hands are in between the shoulder and hip joint, or not beyond the left or right shoulders, the algorithmic gestures come into play as we need to handle more complex logic than the current one.
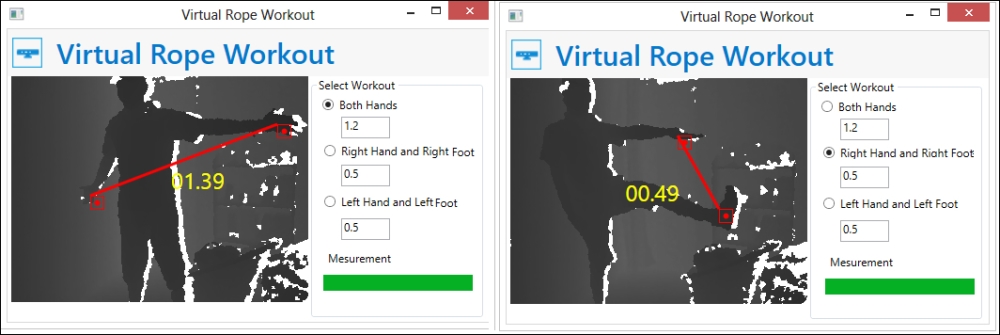
Another simple but interesting solution you can build based on basic gesture recognition is a virtual rope workout application. Choose the joints for your exercise and see how much you can stretch them or how close you can bring them. You can also set a threshold value between two joints and try to reach your targeted distance.
The working solution of a virtual rope workout is available in the VirtualRopeWorkout directory of the resource location of this book as a sample project. Sample measurements of the exercises are shown in the following screenshot. You can choose from the options for your exercise type and try to reach the target you have specified, as shown:
Calculating the distance between joints and performing the actions based on the value of the distance are examples of basic gestures to start with developing and understand how gestures work.
Note
Understanding the positions of joints and calculating the distance are very important for gesture-enabled application development. This is true not only for the basic approaches, but also for algorithmic or other approaches. Overall, the understanding of basic gesture recognition will give you a base for further understanding and implementation of gesture-enabled applications.
Distance calculation will help you measure the distance between joints, but it does not say in which direction the joints are moving or where they are positioned. For example, the distance between the head and the right hand joint can be calculated in different directions, but it does not mean the hand is above the head or below it.
For this kind of calculation, we need to compare with the point-to-point data in the three-dimensional plan. We can come to some conclusions about joint movement and positions based on the change in the direction and values of coordinates. Let's have a look at how we can recognize the gesture of the hands raised up.
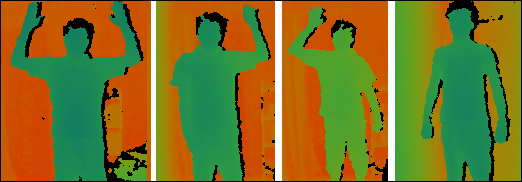
There are several different types of gesture that can be identified for this scenario. They are as follows:
- Both hands are raised above the head
- Only the right hand is raised above the head
- Only the left hand is raised above the head
- Neither hand is raised above the head
The poses mentioned are shown in the following picture, where the user is facing the Kinect sensor:
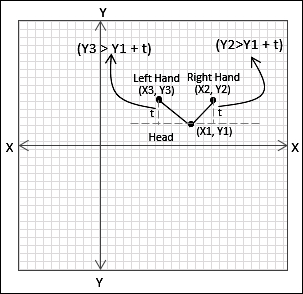
Overall, this gesture recognition involves three different joints; namely, the head, right hand, and left hand. We cannot recognize these gestures by just calculating distances between these three joints; rather, we need to measure the joint positions with respect to the coordinate plane.
So, let's consider that you want to detect if both the hands are raised above the head. Movement of the hands in either the upwards or the downwards direction will be based on the y axis of the coordinate plane. First of all, consider the y axis of the head joint position as the reference point for the other two hand joint positions, let's call them target points. Then you need to compare the values of both the targeted joints' y axis movement with respect to the reference points. Once the targeted value crosses the reference point, you can say that the gesture is identified. Additionally, you can use a threshold value with reference points to make sure that the targeted joints are crossing as expected.
The following code block shows how we can check the gesture of both hands raised above the head:
float threshold = 0.3f;
if (skeleton.Joints[JointType.HandRight].Position.Y > skeleton.Joints[JointType.Head].Position.Y + threshold
                && skeleton.Joints[JointType.HandLeft].Position.Y > skeleton.Joints[JointType.Head].Position.Y + threshold)
            {
                if (this.GestureRecognized != null)
                {
                    this.GestureRecognized(this, new GestureEventArgs(RecognitionResult.Success));
                }
            }
In the code block we just saw, the first part of the condition checks if the right hand is above the head joint and the second part of the head joint checks if the left hand is above the head. When both are true at the same time, the gesture recognition engine raises a GestureRecognzied event.
Gesture recognition based on a calculation between or among joints is a pattern that is implemented using calculation. Yes, overall implementation of gestures is based on similar patterns where you have to use your own logic based on the gesture definitions. Finally, match those patterns based on the joints' information. The following diagram illustrates the overall steps for identifying basic gestures:
