
So far we have built the basic KinectCam application, which can feed and display the color stream from the sensor. Our next job is to extend it by leveraging the features of Kinect for Windows SDK.
In this section, you will start with displaying frame numbers, displaying and calculating the frame rates, followed by changing image formats, and finally you will learn how to apply color effects by manipulating the color pixels.
The Kinect sensor sends the data as an individual frame, and every frame has a number just to identify the frame. This number is incremented with every single frame when you are using the event model to retrieve the image. Whereas for the polling model, with the OpenNextFrame() method it returns the frame numbers of that particular image frame. FrameNumber is a read-only property of the ImageFrame class and can be accessed as follows:
int frameNumber=imageFrame.FrameNumber;
To make it generic, in our KinectCam application we will write a method called GetCurrentFrameNumber(), which accepts the image frame and returns the frame number:
private int GetCurrentFrameNumber(ColorImageFrame imageFrame)
{
  return imageFrame.FrameNumber;
}
Now the frame number has to be updated from each and every frame, and we process single frames inside the ColorFrameReady event handler. Hence the final task you need to do would be to call the GetCurrentFrameNumber() method from the ColorFrameReady event handler and assign the value to the FrameNumber property of the view, which will update the UI automatically:
this.viewModel.FrameNumber = this.GetCurrentFrameNumber(imageFrame);
You have seen that while enabling the color stream we provide the specific color format using the ColorImageFormat enumeration. The ImageStream class has an overloaded method for Enable (). If you want to initialize the color stream with a different image format, use the overloaded method that accepts ColorImageFormat.
Let's have a look at how we can use this in our KinectCam application and change the format.
The very first things we need to do are that we need to bind the available image formats in a dropdown using binding. The dropdown will contain the list of image formats whereas the label control is just used for showing a message. The following is the XAML snippet for the combobox:
<ComboBox Name="ColorImageFormatSelection" ItemsSource="{Binding ColorImageFormats}" SelectionChanged="ComboBox_SelectionChanged" />In the next step, you need to bind the available color image formats. You can bind them as a string value with the list controls and then use them as a value converter when enabling the stream, but here we have done so using the property ColorImageFormats which returns ObservableCollection of ColorImageFormat as assigned, similar to ItemsSource of ComboBox.
private ObservableCollection<ColorImageFormat> colorImageFormatvalue;

public ObservableCollection<ColorImageFormat> ColorImageFormats
{
  get
  {
    colorImageFormatvalue = new ObservableCollection<ColorImageFormat>();
    foreach (ColorImageFormat colorImageFormat in Enum.GetValues(typeof(ColorImageFormat)))
    {
      colorImageFormatvalue.Add(colorImageFormat);
    }
    return colorImageFormatvalue;
  }
}
At this point, if you run the application and select the Video Format dropdown, you should able to see all the image formats populated in the dropdown:

Now you have the list of color image formats, and you want to see them in action when you are changing the selections from the combobox. ChangeColorImageFormat looks like the following, which you can call when the ColorImageFormatSelection selection is changed.
private void ChangeColorImageFormat()
{
  if (this.sensor.IsRunning)
  {
    this.viewModel.CurrentImageFormat = (ColorImageFormat)this.ColorImageFormatSelection.SelectedItem;
    this.sensor.ColorStream.Enable(this.viewModel.CurrentImageFormat == ColorImageFormat.Undefined ? ColorImageFormat.RgbResolution640x480Fps30 : this.viewModel.CurrentImageFormat);
  }
}
Yes, this is very straightforward; just enable the color stream with the selected value from the list control. In the case of an undefined image format we have used RgbResolution640x480Fps30.
Note
For the Bayer image format, you have to write your own conversion logic that will convert Raw Bayer color to RGB color. To convert an image from a Bayer filter format to an RGB format, we need to interpolate the two missing color values in each pixel. The interpolation algorithm for deriving the two missing color channels at each pixel is called demosaicing. There are several standard interpolation algorithms, such as nearest neighbor, bilinear interpolation, bicubic, spline, and lanczos that can be used for this conversion. The KinectCam application does not handle this conversion.
To know more about the Bayer color filter and the different conversion algorithms for converting Bayer color to RGB, you can refer to the URLs http://en.wikipedia.org/wiki/Demosaicing and http://en.wikipedia.org/wiki/Bayer_filter.
Frame rate is the number of frames produced per second and is denoted as fps. In terms of the Kinect sensor image stream, the frame rate is the number of image frames coming from the sensor per second. Frame rates depend on the resolution and type of the color format you are using.
There is no direct API to read the frame rate of the current image stream. But you must have noticed that the ColorImageFormat value has the frame rate mentioned within it. For example, when you are providing the color image frame format as ColorImageFormat.RgbResolution640x480Fps30, the color stream will have a frame rate of 30 fps at maximum. But the frame number may vary due to the compression and decompression on the image stream channel. The following code snippet shows how you can keep track of the frame rate every time:
private int TotalFrames { get; set; }
private DateTime lastTime = DateTime.MaxValue;
private int LastFrames { get; set; }
int currentFrameRate = 0;

private int GetCurrentFrameRate()
{

  ++this.TotalFrames;
  DateTime currentTime = DateTime.Now;
  var timeSpan = currentTime.Subtract(this.lastTime);
  if (this.lastTime == DateTime.MaxValue || timeSpan >= TimeSpan.FromSeconds(1))
  {
    currentFrameRate = (int)Math.Round((this.TotalFrames - this.LastFrames) / timeSpan.TotalSeconds);
    this.LastFrames = this.TotalFrames;
    this.lastTime = currentTime;
  }
  return currentFrameRate;
}
Just as with the frame number, we have to invoke this method during frame processing itself so that our counts keep updated with every frame if there is any change. Call the GetCurrentFrameRate() method from the ColorFrameReady event handler and assign the value to the FrameRate property:
this.viewModel.FrameRate = this.GetCurrentFrameRate();
To test the frame rate follow these steps:
- Run the KinectCam application; at this point of time you can't view the frame rates as this is not possible from Settings.
- Check the Display Frame Rate checkbox from Settings. This will start to display the frame rate in the application.
- Change Video Format from the drop-down box to see the changed frame rates.
KinectCam not only allows you to display captured video, but also captures a particular image frame and saves it as an image in your hard drive. Images can be saved on a drive as follows:
private void SaveImage()
{
  using (FileStream fileStream = new FileStream(string.Format("{0}.Jpg",  Guid.NewGuid().ToString()), System.IO.FileMode.Create))
  {
    BitmapSource imageSource = (BitmapSource)VideoControl.Source;
    JpegBitmapEncoder jpegEncoder = new JpegBitmapEncoder();
    jpegEncoder.Frames.Add(BitmapFrame.Create(imageSource));
    jpegEncoder.Save(fileStream);
    fileStream.Close();
  }
}
In the previous code block, we are first taking the reference of imageSource from the source of our UI image control, named VideoControl, and then saving the image by converting the image source to a .jpeg image using JpegBitmapEncoder:
The following highlighted code block calls the SaveImage() method. You can call this method with some specific events, such as on the KinectCam application where we have called it by clicking on the Save button.
if (this.sensor.IsRunning && this.sensor.ColorStream.IsEnabled)
{
  this.SaveImage()
}
Run the application, and capture a few images by clicking on the Save button. Then click on the Captured Images expander to see the images that have been captured by the application:

You can enable the automatic image save from the KinectCam settings. Saving images periodically is also an easy task. You just need to call the SaveImage () method on a Tick event of DispatcherTimer. You can achieve the automatic image save by performing the following steps:
- Define the
DispatcherTimerobject, which you can find under theSystem.Windows.Threadingnamespace:private DispatcherTimer timer = new DispatcherTimer();
- Write the start method, as shown in the following snippet, with an interval of 10 seconds and attach the
Tickevent handler:public void StartTimer() { this.timer.Interval = new TimeSpan(0, 0, 10); this.timer.Start(); this.timer.Tick += this.Timer_Tick; } - On the
Tickevent handler, call theSaveImage()method. That's it.public void Timer_Tick(object sender, object e) { if (this.sensor.IsRunning && this.sensor.ColorStream.IsEnabled) { this.SaveImage(); } }The timespan defined for the timer is 10 seconds. So
Timer_Tickwill be invoked every 10 seconds and capture the image frame. - The only thing you need do next is call the
StartTimer()method on the checked event of the Auto Frame Capture checkbox.
In the previous section, we saved the images by taking the reference of the image source from the source property of an image control where the image frames are already processed. Consider a situation where you want to save the images directly from the image frame. The call to the
SaveImage() method would look like:
using (ColorImageFrame imageFrame = e.OpenColorImageFrame())
{
  if (imageFrame != null)
  {
    …
    this.SaveImage(imageFrame);
    …
}
Here the image frame is the current image frame captured by the sensor. Though it looks quite simple and similar to how we performed saving earlier, the problem will start when you try to access the image frame from the SaveImage() method. It will throw an ObjectDisposedException exception, because the frame you are trying to access on the imageFrame object has already been disposed of or might have changed.
To handle this type of situation with the image frames, you can write a wrapper class that implements the IDisposable interface, as follows:
internal class ColorImageWrapper :IDisposable
{
  public ColorImageWrapper(ColorImageFrame frame)
  {
    this.ImageFrame = frame;
    this.NeedDispose = true;
  }

  internal ColorImageFrame ImageFrame { get; set; }

  internal bool NeedDispose { get; set; }

  public void Dispose()
  {
    if (this.ImageFrame != null && this.NeedDispose)
    this.ImageFrame.Dispose();
    this.NeedDispose = false;
  }
}
Once you have the ColorImageWrapper class, you can define an ImageFrame property of the type ColorImageWrapper within your application:
private ColorImageWrapper imageFramevalue;
ColorImageWrapper ImageFrame
{
  get
  {
    return this.imageFramevalue;
  }
  set
  {
    if (this.imageFramevalue != null &&
this.imageFramevalue.NeedDispose)
      this.imageFramevalue.Dispose();
      this.imageFramevalue = value;
  }
}
Now within the ColorFrameReady handler, take the reference of the current image frame within the ImageFrame property:
ColorImageFrame imageFrame = e.OpenColorImageFrame();
{
  if (imageFrame != null)
  {
    …
    this.ImageFrame = new ColorImageWrapper(imageFrame);
    …
}
Finally, click on the Save button and pass imageFrame to the SaveImage() method, as follows:
using (this.ImageFrame)
{
  ColorImageFrame imageFrame = this.ImageFrame.ImageFrame;
  this.SaveImage(imageFrame);
}
With this approach, you can save the current image frame directly to an image. This is very useful when you are not displaying the captured stream in the UI and want to save the frames directly or from the event handler.
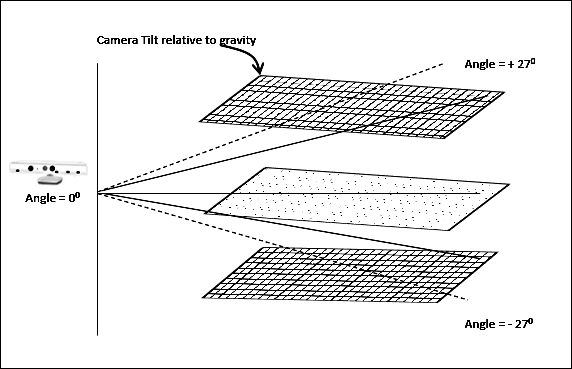
The Kinect sensor has a motor in the basement. This is used to change the camera and the sensor's angles to get the correct position of players within the room. The sensor motor can be tilted vertically up to 27 degrees, which means that the Kinect sensor's angles can be shifted upwards or downwards by 27 degrees:
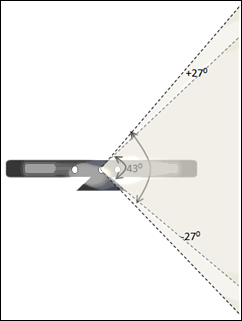
The default elevation angle is 0 degrees, which indicates that the sensor is pointing to a perpendicular gravity. So when the Kinect sensor is on the default angle, it considers a perpendicular gravity as the base. Changing the sensor angle involves just changing the base of the gravity with respect to the previous base, because the base depends on the gravity and not on the sensor base.
The Kinect sensor can be tilted upwards or downwards by up to 27 degrees in a vertical position; these values are fixed. The Kinect SDK has two read-only properties MaxElevationAngle and MinElevationAngle, which return the maximum and minimum elevation angle for the Kinect sensor. The values of these two properties are simply defined with +27 and -27 in the class library.
The sensor angle can be adjusted using the ElevationAngle property. You can change the angle of the Kinect camera within the range of the
ElevationAngle property. The specified value is in degrees and must be between the MaxElevationAngle and MinElevationAngle properties. The following code snippet shows how you can change the sensor elevation angle:
//Sets the sensor angle.
private void SetSensorAngle(int angleValue)
{
  if(angleValue > sensor.MinElevationAngle || angleValue < sensor.MaxElevationAngle)
  {
    this.sensor.ElevationAngle = angleValue;
  }
}
In the KinectCam application, we are controlling the sensor angle by a slider control, where the slider max and min values are defined as +27 and -27; we are changing a value of five on every tick of the slider.
<Slider TickPlacement="BottomRight" IsSnapToTickEnabled="True"
Minimum="-27" Maximum="27" SmallChange="5" LargeChange="5" ValueChanged="Slider_ValueChanged"  />
Call the SetSensorAngle() method on the Slider_ValueChanged event handler:
this.SetSensorAngle(Int32.Parse(e.NewValue.ToString()));
One of the most important things to keep in mind while doing any implementation with the elevation angle is to use the Kinect motor tilt operation only when it's absolutely required. Changing the sensor angle frequently will result in an error code.
Tip
You can handle the changes in the sensor elevation angle in an asynchronous mode such that it does not freeze the actual UI to deliver the updates as to which sensor movement is happening. You are free to use the BeginInvoke pattern in the Dispatcher thread to make sure the UI thread affinity is maintained, yet calling the code asynchronously.
Each RGB pixel of the Kinect color image frame is an array of size four. The first three values represent the values of blue, green, and red, whereas the fourth value is the alpha value for that pixel:

The previous diagram is the representation of each pixel within an image frame. The maximum value of each color is 255 and the minimum is 0. The following screenshot shows the color values for blue, green, and red along with the alpha values from an image frame:

We could use values from the array to set or change the color value. Pixel manipulation has to be done while we are processing the images inside the ColorFrameReady event handler, as this has to be taken care of for all the pixels.
While processing color pixels, applying red, green, and blue effects is the easiest. You can easily iterate through the array and set the value. The following code block refers to how you can apply only red color effects on an image stream by just not setting 0 for green and blue:
for (int i = 0; i < this.pixelData.Length; i += imageFrame.BytesPerPixel)
{
  this.pixelData[i] = 0; //Blue
  this.pixelData[i + 1] = 0; //Green
}
As every pixel is represented by an array of length four, which is nothing but imageFrame.BitsPerPixel (32 bpp), we are increasing the loop with the same number. Similar to changing the red value, you can set the values for green and blue; you can even give a combination of these three values to apply some more color effects on the images.
You can apply the effects from the Effects drop-down box of the KinectCam settings, which holds the Red, Green, and Blue values. Changing these values will result in the application of the effect. If you don't want any effects, set it to None, which is set by default:

Similar to RGB effects, you can apply grayscale effects on an image stream. To apply the grayscale, you need to apply the same values for all the bytes of the array for a single pixel, and the value should be the maximum byte of that pixel returned by the sensor. The following code snippet shows how to apply grayscale effects on the incoming image stream:
for (int i = 0; i < this.pixelData.Length; i += imageFrame.BytesPerPixel)
{
  var data = Math.Max(Math.Max(this.pixelData[i], this.pixelData[i + 1]), this.pixelData[i + 2]);
  this.pixelData[i] = data;
  this.pixelData[i + 1] = data;
  this.pixelData[i + 2] = data;
}Another interesting effect that you can try, which even KinectCam does, is inverting the color values. The following code refers to how you can invert color pixel values:
for (int i = 0; i < this.pixelData.Length; i += imageFrame.BytesPerPixel)
{
  this.pixelData[i] = (byte)~this.pixelData[i];
  this.pixelData[i + 1] = (byte)~this.pixelData[i + 1];
  this.pixelData[i + 2] = (byte)~this.pixelData[i + 2];
}In the KinectCam application, ViewModel holds the two properties IsInvertColorEffectsEnabled and IsGrayScaleEnabled, and the value of these two properties is set from the UI checkboxes. When the value of these properties is true, the respective processing on the image frame is performed.
Note
Similar to RGB, grayscale, and color inverting, you can apply different additional effects on the image stream by just playing around with the pixel data. The only thing you should keep in mind while processing with a color pixel is the application performance. This is because the loop for changing the color pixel will run for each and every byte of each image frame.