
The Kinect sensor returns the raw depth data, where each pixel contains a value that represents the distance between the sensor and the object. In the previous chapter we explored depth image processing techniques, how depth sensors work, how we can measure the distances, and how each pixel value represents the player information. The depth data gives us unlimited possibilities to play around with Kinect. To build an interactive application and enable a rich user experience, we need to gain control over the application using our body motion. When we talk about how to build an application that interacts with human body motion, first of all we need to capture the information about the users standing in front of the Kinect, and from then on the skeleton tracking comes into the picture.
The complete skeleton-tracking feature is built on the depth data processing, internal machine learning, and color vision algorithms. Using skeleton tracking, the Kinect sensor can track the human body with various joint points. Using the Kinect for Windows SDK, you can track up to six players and up to 20 joints for each skeleton. Only two users can be tracked in detail, which means the sensor can return all the twenty tracked joint points information; whereas, for reset users, it just gives the overall position. This is because it would require a lot of processing to track joint information for all the six users.
In this chapter we will start with the fundamentals of skeleton tracking, events, and the skeleton object model. We will learn how to work with skeleton joints and bones. Detailed information on each of the topics listed below will be provided. We will also develop a few applications that harness these features. In the end, we will have an integrated solution that showcases different features of skeleton tracking:
- How skeleton tracking works
- Skeleton tracking with Kinect for Windows SDK
- Start tracking joints, and looking inside skeleton stream helpers
- Building an intrusion-detection camera
- Learn how to track a skeleton in seated mode
- Choosing a skeleton for your application
- A deep look inside skeleton joints and bones hierarchy
- Providing live feedback to users based on their positions
- Making the skeleton movement softer
- Advanced Skeleton Viewer – a tool for viewing skeleton data
- Debugging skeleton applications
The Kinect sensor returns raw depth data from which we can easily identify the pixels that represent the players. Skeleton tracking is not just about tracking the joints by reading the player information; rather, it tracks the complete body movement. Real-time human pose recognition is difficult and challenging because of the different body poses (consider; a single body part can move in thousands of different directions and ways), sizes (sizes of humans vary), dresses (dresses could differ from user to user), heights (human height could be tall, short, medium), and so on.
To overcome such problems and to track different joints irrespective of body pose, Kinect uses a rendering pipeline where it matches the incoming data (raw depth data from sensor) with sample trained data. The human pose recognition algorithm used several base character models that varied with different heights, sizes, clothes, and several other factors. The machine learned data is collected from the base characters with different types of poses, hair types, and clothing, and in different rotations and views. The machine learned data is labeled with individual body parts and matched with the incoming depth data to identify which part of the body it belongs to. The rendering pipeline processes the data in several steps to track human body parts from depth data.
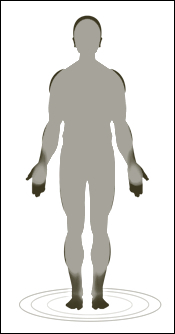
The Kinect sensor can identify the pixel range of a player from the depth data. In the initial steps of the rendering pipeline process, the sensor identifies the human body object, which is nothing but raw depth data that is similar to another object captured by the sensor. In the absence of any other logic, the sensor will not know if this is a human body or something else. The following image shows what a human body looks like when it is represented with depth data; the sensor recognizes it as a big object:
To start recognizing a human body, the sensors start matching each individual pixel of incoming depth data with the data the machine has learned. This match is done within the sensor with very high speed of processing. The data each individual machine has learned is labeled and has some associated values to match with incoming data. This complete matching is based on the probability that the incoming data matches with the data the machine has learned.
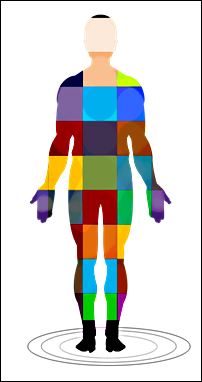
The immediate next step in pose recognition is to label the body parts by creating segments. This segment creation is done by matching similar probable data. Kinect uses a trained tree structure (known as a decision tree) to match the data for a specific type of human body. This tree is known as a Decision Forrest .
All the nodes in this tree are different model character data labeled with body part names. Eventually, every single pixel data passes through this tree to match with body parts. The complete process of matching data is run over and over. Whenever there is matched data, the sensor starts marking them and starts creating body segments , as shown in the following image:
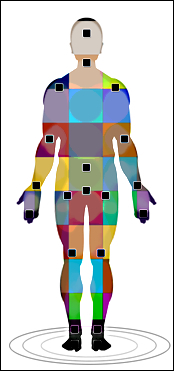
Once the different body parts are identified, the sensor positions the joint points with the highest probable matched data. With identified joint points and the movement of those joints, the sensor can track the movement of the complete body. The following image shows the tracked joints of different body segments:
The joint positions are measured by three coordinates (X, Y, and Z), where X and Y define the position of the joint and Z represents the distance from the sensor. To get the proper coordinates, the sensor calculates the three views of the same image: front view, left view, and top view, by which the sensor defines the 3D body proposal. The three views are shown in the following screenshot:

The following are steps you need to remember:
- Depth data is processed in the rendering pipeline process and matches with decision forrest labeled data and generates the inferred body segments.
- Once all parts are identified based on the labeled data, the sensor identifies the body joints.
- The sensor then calculates the 3D view from the top, front, and the left of the proposed joints.
- Then the sensor starts tracking the human skeleton and body movement based on the proposed joint points and the 3D view.
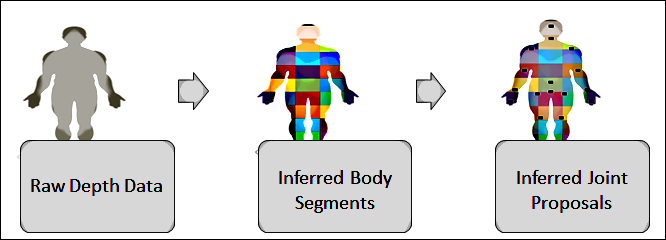
The following image shows the overall process flow that creates joint points from raw depth data:
Note
To get an insight on how skeleton tracking works, please refer to the following URL: http://research.microsoft.com/apps/pubs/default.aspx?id=145347