
In this section you are going to learn how to record and play raw audio data streams from the Kinect microphone array. You will also learn how you can leverage the Kinect SDK Audio API's capability to process the captured audio stream data and apply noise suppression and echo cancellation.
The very first thing you need to do is create and set up the project by adding the required assemblies that are required for accessing the sensor. Perform the following steps to set up a blank project for your KinectSoundRecorder application:
- Start a new instance of Visual Studio.
- Create a new project by navigating to File | New Project.
- You will see the New Project dialog box. Choose Visual C# as your development language, select WPF Application Template, and type the name as
KinectSoundRecorder. - From the Solution Explorer, right-click on the References folder and select Add References.
- Include a reference of the
Microsoft.Kinectassembly.
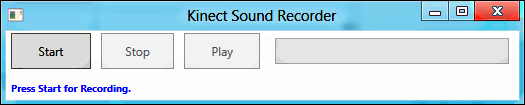
Open the MainWindow.Xaml file from Solution Explorer. The basic UI using XAML, as shown in the next screenshot, contains three button controls to start, stop, and play the recorded sound. We have placed a progress bar control just to display the amount of time the recording has been going on; the progress bar will also indicate how much time is remaining while playing. We have placed one additional label control, which will display the status message of the current operation. To play the captured audio, we have also used a WPF media element control.
<Button x:Name="buttonStart" IsEnabled="{Binding CanStartRecording}" Content="Start" Click="buttonStart_Click" />
<Button x:Name="buttonStop" IsEnabled="{Binding CanStopRecording}" Content="Stop" Click="buttonStop_Click" />
<Button x:Name="buttonPlay" IsEnabled="{Binding CanPlayback}" Content="Play" Click="buttonPlay_Click" />
<ProgressBar x:Name="audioProgress" Maximum="10" Minimum="0" />
<Label VerticalAlignment="Center" Foreground="Blue" x:Name="labelStatusMessage" Content="Status Message" />
<MediaElement Name="kinectaudioPlayer" />
Use the previous XAML snippet within WPF Grid container and specify the Grid. Row and Grid.Column properties to generate the UI as shown in the following screenshot:

Add a new class named MainWindowViewModel.cs, which implements the INotifyPropertyChanged interface and has the properties, listed in the following screenshot, that call the
OnNotifyPropertyChanged() method if there is any value change:

The MainWindowViewModel class also has a set of methods to enable and disable the UI buttons during start, stop, and playback of the recorded audio. For example, when we click on the Start button, it invokes the StartRecording() method, which sets the CanStartRecording and CanPlayback properties to false.
public void StartRecording()
{
    this.CanStartRecording = false;
    this.CanStopRecording = true;
    this.CanPlayback = false;
}
If you have noticed the XAML UI, we did the binding of all the controls with the MainWindowViewModel class properties. Now the property change will automatically take care of updating the UI controls. But, before the binding comes into action, you need to set the data context:
public MainWindowViewModel ViewModel { get; set; }
public MainWindow()
{
    InitializeComponent();
    Loaded += new RoutedEventHandler(MainWindow_Loaded);
    this.ViewModel = new MainWindowViewModel();
    this.DataContext = this.ViewModel;
}
We are done with the handling of controls for start, stop, and play. Now the remaining part is capturing and playing the audio.
Recording is a very simple and straightforward process and can be done by performing the following steps:
- Create a buffer for recording the audio.
- Read the Kinect audio stream into the buffer.
- Write the buffer data into the file system.
The main recording is done by the RecordAudio() method, which can record an audio from the Kinect source for 10 seconds at 16 KHz.
public void RecordAudio()
{
    int recordingLength = (int)10 * 2 * 16000;
    byte[] buffer = new byte[1024];

    using (FileStream fileStream = new FileStream("d:\kinectAudio.wav", FileMode.Create))
{
        WriteWavHeader(fileStream, recordingLength);

        using (Stream audioStream = this.sensor.AudioSource.Start())
        {
            int count, totalCount = 0;
            while ((count = audioStream.Read(buffer, 0, buffer.Length)) > 0 && totalCount < recordingLength)
            {
                fileStream.Write(buffer, 0, count);
                totalCount += count;
            }
        }
    }
}
Note
Before writing the data into a WAV file, note that the WAV file requires a special header format. You can find out the details for the header format from the following URL:
http://msdn.microsoft.com/en-us/library/windows/desktop/ee419050%28v=vs.85%29.aspx
We have implemented the same in the WriteWavHeader() method.
The next step for the sound recorder implementation is starting the recording. We have already created the view model that takes care of all the UI-related binding. So once we call the StartRecording() method, the recorder screen will disable the Stop and Play buttons in the UI unless the recording is finished. We have used a dispatcher timer over here just to show a timer progress during your recording. This progress will indicate the recording time as well as the time remaining while playing the audio. The line highlighted in the following code block is where we call the record audio from our helper class:
this.ViewModel.StartRecording();
this.PlugDispatcher();
var audioThread = new Thread(new ThreadStart(RecordAudio));
audioThread.SetApartmentState(ApartmentState.MTA);
audioThread.Start();WPF requires single-threaded apartment
(STA) to run an application, hence we have used an MTA thread to start recording the audio. This will be totally independent of the UI. This thread will invoke the RecordAudio() method, which will eventually start recording sound from the Kinect audio source for 10 seconds.
Once the recording is done, the Play button will be enabled automatically. In the UI, we have used the WPF media element to play the sound. The following highlighted code shows how we have loaded the recorded audio source into the media element and played the audio:
If (!string.IsNullOrEmpty("d:\kinectAudio.wav") && File.Exists("d:\kinectAudio.wav"))
{
    this.PlugDispatcher();
    kinectaudioPlayer.Source = new Uri("d:\kinectAudio.wav", UriKind.RelativeOrAbsolute);
    kinectaudioPlayer.LoadedBehavior = MediaState.Play;
    kinectaudioPlayer.UnloadedBehavior = MediaState.Close;
    labelStatusMessage.Content = "Playing in Progress";
    playinginProgress = true;
}Now you are done with the development of the sound recorder and have gone through the major area of implementation. Let's have a look at the behavior once you run the application.
To run the application, press F5 or select Start Debugging from the Debug menu. The following screen will appear:
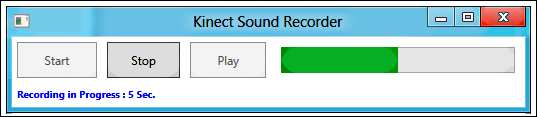
Click on Start to start recording. The progress bar will indicate the time remaining for the recording to complete.
Once the recording is done, the Play button will be enabled automatically. Then click on Play to play the recorded audio from the Kinect sensor.
