Character Reference Images
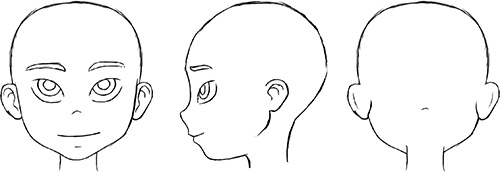
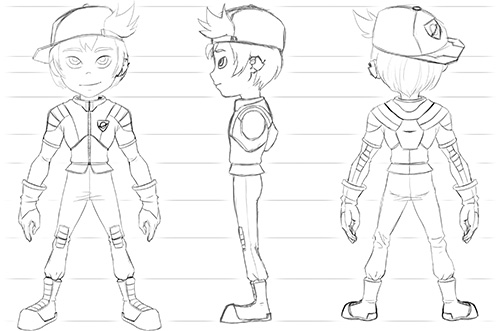
Ok, so you’ve designed your character. If you’re experienced, you probably can start modeling right away. If not and regardless of your expertise, you’ll want to create some references to use in the 3D modeling program, so that you have at least a general idea of the character’s size or basic shapes, which will make the modeling process much faster. These images will stay in the background of the 3D View while you model, so you can model on top of them to make the shapes fit those references. The reference images should represent the character in a neutral pose, as that is what you’ll need to model the character. Cool poses will come later.
For our example, you’ll need six different reference images that you can place in the 3D Views. You’ll put these in the background and place your model on top of them.
![]() Head, front view
Head, front view
![]() Head, back view
Head, back view
![]() Head, side view
Head, side view
![]() Body, front view
Body, front view
![]() Body, back view
Body, back view
![]() Body, side view
Body, side view
These reference images will help you make sure your 3D model fits your original design. Design elements tend to change during the 2D to 3D conversion, as 2D and 3D are completely different worlds, but by using references, you’ll get something in 3D that’s closer and more proportional to the 2D design you created.
For the head views, hair isn’t needed for now; because you’ll be modeling the head shape at this stage, the hair will be added on top of that shape later (see Figure 5.9).
For the body views shown in Figure 5.10, you can see the side view doesn’t have arms; this is intentional, as you don’t want the arms to be in the way just yet. Later, you can model them from the front and back images. In the side view, there would not be much relevant information about them, and they would be covering the body of the character, which is just what you want to have visible in the side view.
Notice the horizontal lines in the sketch. These must always be aligned so the character’s features are in the same position in all of the views; then later on, you won’t have trouble placing the characters in 3D. It’s expected that your images won’t be perfect; after all, they’re hand drawings and there is always some level of error, but the better aligned they are, the easier it will be when you get to modeling. Otherwise, you’ll have to do a lot of guess work when modeling your character because the reference images are not aligned and you may even have to reinvent some areas while you model.
Note
Feel free to play with these designs and change them to something that looks better to you or has a different style that you like more than this one. This may serve as a good starting point if you’ve never done character design and need some initial guidance. This should give you a base to start with and a method to follow, but you don’t have to stick to it. Character design is a creative process, so be sure to try new things all the time!


