Blocking the Face’s Basic Shape
In this section, you’ll start by blocking the face. Blocking is what we call the first stages of creating a model, animation, painting, or any other artistic endeavor. It is the stage in which you define, quickly and roughly, how something will look; you’re not paying a lot of attention to detail, but just defining the base. In this case, for example, the blocking consists of creating the very basic shape and geometry of the face to which we’ll add definition in later steps.
Blocking is very useful because it’s the part of the process in which making substantial changes is easier and faster, so during this stage you can experiment with different modeling ideas.
Remember that keeping your scene organized is important, so now that you’ll start creating a lot of new objects, it’s a good choice to name them intuitively.
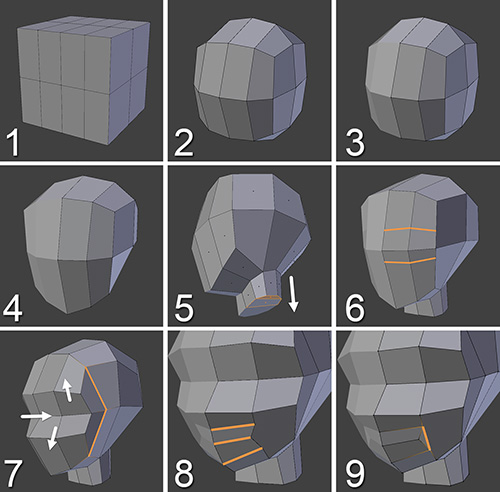
In Figure 7.8, you’ll see the first steps for modeling the face, which we’ll use to create the basic shape. Explanations of each step immediately follow the figure.
1. Create a cube, go to Edit Mode, and divide the cube as shown in the first image: three vertical divisions for the front of the face, one horizontal division through the front and sides of the face, and one vertical division for the sides of the face. These edge loops will help you set the basic shape of the face in the first stages. The reason for three vertical lines in the front is that you’ll need additional details for the mouth and the eyes. You can perform these divisions using Loop Cut and Slide (Ctrl + R).
2. Select all vertices with A and use the Smooth Vertices tool from the Tools Region or from the Vertices menu (Ctrl + V). Once smoothing is applied, increase its iterations in the Operator panel. The idea is to get a more spherical shape. Now, scale the whole shape to make it approximately fit the size of the head in the reference images.
3. From the front view, select the vertices of the left section of the mesh (negative X) and delete them, so you’re left with only one-half of the face model. Now, add a Mirror modifier and the default settings should be enough to make the mirroring work. Just activate the Clipping option in the modifier so the vertices in the middle are prevented from jumping to the opposite half of the mirror center. At this point, you can work on half of the face and those changes will automatically be reflected on the other side.
4. Using Proportional Editing (press O to enable/disable it), adjust the shape of the geometry to fit the reference images of the head. The eyes should be placed on the horizontal line in the front. At the bottom of the head, the faces in the back will be the base for the neck.
5. Select the faces in that area and extrude them to create the neck. To form the neck, adjust the vertices so they look round. At this stage, you’ll be defining the basic shape, so avoid cubic shapes; otherwise, as you start adding details, those cubic shapes will be more noticeable and it will be more difficult to arrange them properly at that later stage.
6. With the Knife tool (K), make a couple of cuts in the front as highlighted in the corresponding image in Figure 7.8.
7. From the previous step, you’re left with three edge loops. Move them accordingly to fit Jim’s face: the top one will define the eyebrows, the middle one will determine the center of the eyes, and the bottom one will establish the nose and cheeks. After that, using the Knife tool again, make the cuts highlighted in the image to end up with a round face loop that surrounds the face.
8. Perform three cuts in the mouth area and move them as needed. The middle one will establish the mouth, the bottom one can help define the chin, and the top one will mark the area of the mouth near the nose.
9. Join the side vertices of the edges above and below the mouth to form a triangle in the corner of the mouth.

