Setting Up the Reference Planes
Before you start modeling, you need to load into your scene the character designs you created in Chapter 5 as “background images” to use as a reference while modeling. This will definitely help a lot to define the right proportions of our character, Jim.
Some people prefer to load references in planes that they can see when they rotate the camera around the scene. You can do this by adding planes in the views you need to show and then adding the images to those planes as a texture. This can be a little tricky (especially before you learn to use materials in later chapters) but Blender actually offers two easy ways to use reference images.
![]() Open the folder in which you have your images and drag them into the 3D View. Once they’re loaded into the scene, you may need to adjust them a little. You can go to the Background Images menu in the 3D View Properties Region to make any necessary adjustments.
Open the folder in which you have your images and drag them into the 3D View. Once they’re loaded into the scene, you may need to adjust them a little. You can go to the Background Images menu in the 3D View Properties Region to make any necessary adjustments.
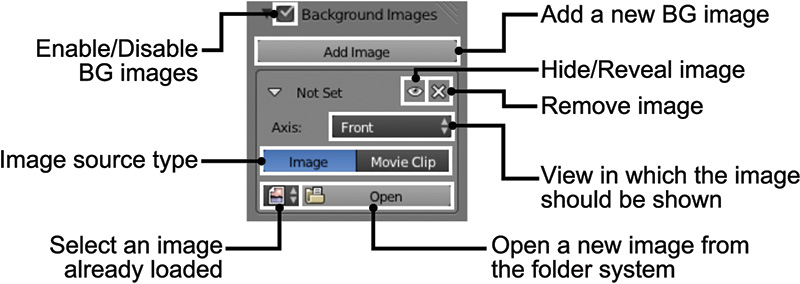
![]() Go to the 3D View Properties Region and scroll to the Background Images panel and turn that feature on to load your images (see Figure 7.2).
Go to the 3D View Properties Region and scroll to the Background Images panel and turn that feature on to load your images (see Figure 7.2).
From the Background Images panel, you can load an image and decide in which view it will be visible. After you load your image, you’ll be able to adjust its position, size, and opacity.
Note
These Background Images are only visible when you’re using a predefined orthographic view (for example, Front, Right, Back, Top); they won’t work if you’re in a Perspective View or in a random orthographic point of view. If you have a NumPad, press 5 to switch between Perspective and Orthographic views; otherwise, you can switch views from the View menu on the 3D View header.
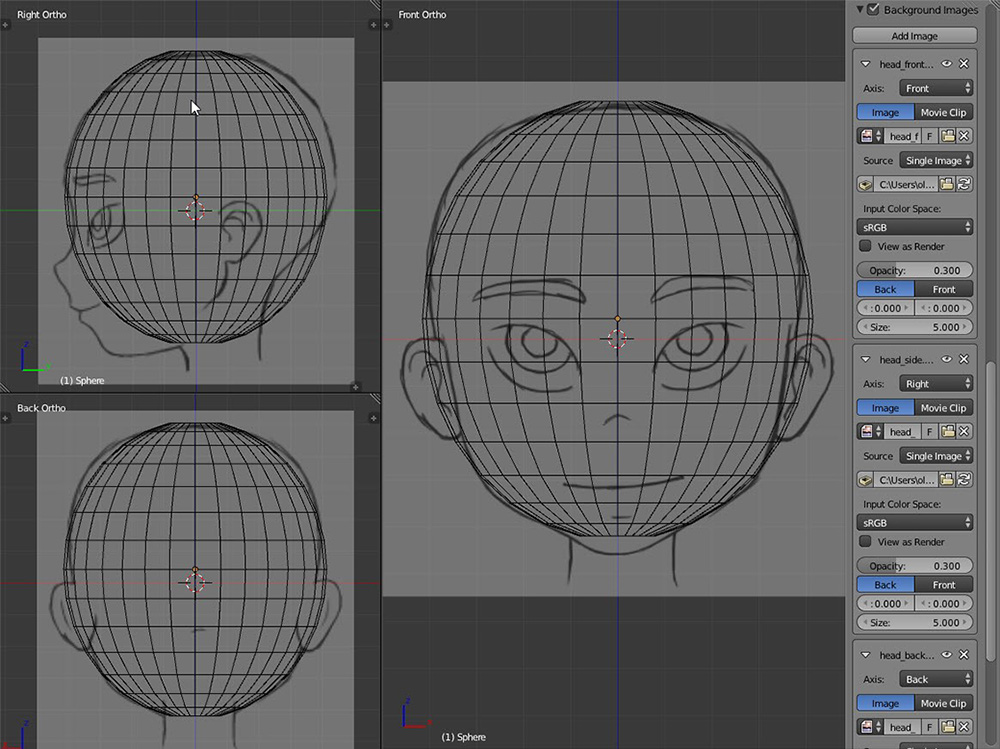
Load the reference images for the front, side, and back of the head into their corresponding views, so you can see them in the background while you’re building Jim’s head (see Figure 7.3).
Caution
It’s very important that the reference images are properly aligned. In this case, they all have the same height and the front and back images are centered. In some cases, however, the images can have different sizes or margins, so you may need to adjust the scale and position from the Background Images menu in the 3D View Properties Region. To help you with those adjustments, you can use a very simple mesh that allows you to compare the size and position of the images with those of the 3D model. In Figure 7.3, you can see that a sphere was used to make sure that Jim’s head references were properly aligned. Also, remember that the drawings are not physically accurate, so you’ll have to leave some space for modifications to the images, as it’s very difficult to make the 3D model fit the 2D images perfectly.


