Defining the Face’s Shapes
After the blocking stage, in which we’ve already created the face’s basic shape, we’ll now go ahead and add some definition to the geometry.
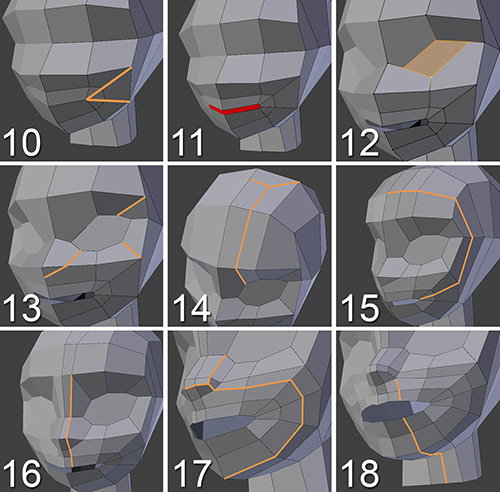
Figure 7.9 shows the next steps of the face’s modeling process, with step-by-step explanations.
Tip
When you’re adjusting your mesh to the reference images, it’s better to overestimate the shapes’ sizes and make them a little bigger. The reason is that as you add more and more details, some of those vertices will be divided and this will cause the shapes to shrink. This can also happen when applying a Subdivision Surface modifier: when you smooth shapes, they’ll shrink.
10. Using the Knife tool, cut the triangle generated in the mouth’s corner in step 9 above and create two new edge loops to connect the mouth with the cheek and the jaw. Now, the loop around the mouth is completely composed of quads (four-sided faces).
11. Select the mouth’s edge, bevel it just a little, and delete the new geometry so you can make the mouth’s opening and the area surrounding it with circular loops formed of quads.
12. Select the vertex in the middle of the eye and bevel it (you can use the Bevel Vertices tool: Shift + Ctrl + B). Then, move the resulting vertices to make a shape similar to the eye in your reference images.
13. Perform several cuts around the eye with the Knife tool, as highlighted in the corresponding image. This will give you more vertices to define the eye’s shape, as well as some additional cuts to start defining the nose’s geometry.
14. There was a side of the eye that was not cut in step 13. Cut it now but keep the cut going to the top of the head and convert the two edge loops into one as shown in the image. You only need the loop in the front of the head, so this way you can end the loop where it’s no longer needed.
15. Using Ctrl + R, add a new loop from the mouth corner all around the face and adjust its shape and the surrounding vertices.
Tip
When you add a new loop to an organic shape with the Loop Cut and Slide tool (Ctrl + R), you can take advantage of the Smooth option in the Operator panel to make the new loop less rigid and flat between the two existing loops. Also, when you have an area with quite a few vertices, you can select all of them and use the Smooth Vertices tool to smooth them.
16. Cut a line from the eyebrow to the mouth and define the nose a little more.
17. Make a new cut from the eye down to the nose, and join it with a new loop around the mouth area. Adjust the shapes and you’ll now have the geometry necessary to create the nostrils.
18. Create some new edges from the bottom of the neck to the nose and then to the mouth, and also a new vertical loop at the chin. Move things around a little to adapt the new vertices to the reference images and you’re ready to add some more details and create the lips.

