Modeling the Basic Shapes for the Torso and Arms
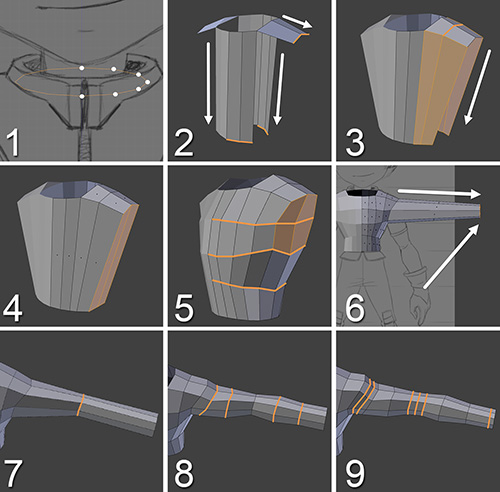
Let’s start blocking the shapes for Jim’s torso and arms. In Figure 7.15, you’ll see the first steps in the process for creating them. Because the face was modeled using box modeling, you’ll have a chance to see how poly to poly works at this stage, even though it will be combined with box modeling.
1. Create a circle with 12 vertices, delete the left half, add a Mirror modifier to it (similar to what you did when you started working on the face) and place it in the base of the neck area. Enabling the Clipping option of the Mirror modifier will help with the central vertices of the torso.
2. Perform three extrusions (E), each one using two edges of the circle (two edges at the front, two at the back and two at the side). The two frontal edges will define the front of the torso, the two side edges will draw the trapezoids that go to the shoulders, and the two edges in the back will extend to the hips and define the back.
3. Use the Loop Cut and Slide (Ctrl + R) tool to divide the trapezoid, then select the front and back outer edges and extrude them down. Now, select the four vertices that have an empty space between them and press F to create a face in that space (do the same with the empty spaces in the front and the back).
4. Select the side middle vertex of the shoulder, extrude it down to the hips, and then select the vertices and use F to fill them with faces. At this point, you have the envelope of the torso.
5. Make three horizontal loop cuts through the torso and adjust the shapes to the reference images. Keep an eye on the highlighted faces: you should be giving them the shape from which the arm will be extruded.
6. Select the faces highlighted in step 5 and extrude them horizontally to create the whole arm down to the wrist.
Tip
Even if you extrude it completely horizontally (on the X-axis), take the reference’s arm as a guide. Imagine where the wrist would be if the arm were extended in a T pose. Later, you’ll pose it better, but right now it’s easier to work with it aligned to one axis (X, in this case). Also, the shape of the wrist will be a little irregular, so after the extrusion you can scale its vertices to 0 on the Y-axis, and from the front view it will now look flat.
7. Cut a new loop in the middle of the arm and adjust it a little to define the elbow. From the top view, move the loop back just a bit as if the arm were slightly flexed. This will help achieve the arm’s shape. Keep in mind that you should rarely have the arms extended at 90 degrees, as that would look unnatural.
8. To continue defining the arm’s shape, add some new loops with Ctrl + R in the biceps and forearm areas. Each time you add a loop, move the vertices around a little: if you add a lot of loops and try to modify the shape later, it will be more difficult.
Tip
There are a lot of ways to model things like arms or legs. One good way is to extrude (in the case of an arm) from the shoulder to the wrist, then cut the elbow, then divide the biceps and forearm, and keep dividing until you’re happy with the result. This way, first you’ll have the general shape of the arm, then you’ll define the main articulation and it will have two divisions, then four, then eight. For me, it’s easier to model this way, and better for developing details little by little than just extruding the shape piece by piece.
9. Add more loops in the articulation areas such as the shoulders and the elbow; it’s important that you have enough geometry in those areas so they can deform correctly later on. You should also add another loop near the wrist to define the shape better when it’s subdivided. As with the face, this is a good time to add a Subdivision Surface modifier and start checking on how the subdivided model will look.

