Editor Types
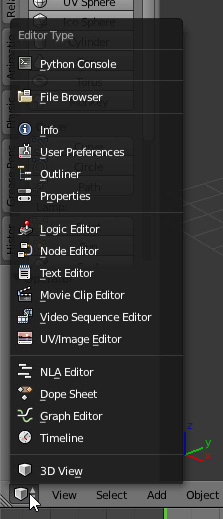
Now that you know how to use areas to shape your workspace, you need to see what types of editors you can show in those areas. You can select the Editor Type for an area by clicking the icon to the left of the editor’s name (see Figure 2.7).
![]() Python Console is a built-in console that allows you to interact with Blender using its Python API; this editor is mainly for developers.
Python Console is a built-in console that allows you to interact with Blender using its Python API; this editor is mainly for developers.
![]() File Browser allows you to navigate through your system’s folders where, for example, you can look for images. Keep in mind you can drag images to other editors, such as dragging an image to the 3D View to use it as a background reference. File Browser is also useful when you’re editing video and frequently need to access the video files and load them into the timeline.
File Browser allows you to navigate through your system’s folders where, for example, you can look for images. Keep in mind you can drag images to other editors, such as dragging an image to the 3D View to use it as a background reference. File Browser is also useful when you’re editing video and frequently need to access the video files and load them into the timeline.
![]() Info is the main menu found by default at the top-left corner of the interface. Also, if you drag down this area, you’ll be able to see a Python Console that shows you logs and error messages.
Info is the main menu found by default at the top-left corner of the interface. Also, if you drag down this area, you’ll be able to see a Python Console that shows you logs and error messages.
![]() User Preferences is a window with different tabs that allow you to customize Blender keyboard shortcuts, change the interface’s colors and theme, adjust performance settings, and manage add-ons.
User Preferences is a window with different tabs that allow you to customize Blender keyboard shortcuts, change the interface’s colors and theme, adjust performance settings, and manage add-ons.
![]() Outliner is a tree graph of every element in the scene and is very useful when you’re looking for objects or navigating through all of the elements of a scene. You can select specific objects or groups in complex scenes.
Outliner is a tree graph of every element in the scene and is very useful when you’re looking for objects or navigating through all of the elements of a scene. You can select specific objects or groups in complex scenes.
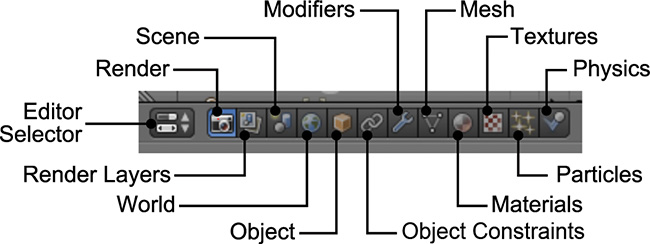
![]() Properties is one of the most important editors in Blender. It has different tabs for different groups of options you can access (depending on your selection, tabs may vary as they are context sensitive). This is where you set up your render size and performance, add modifiers, set the object parameters, add materials, control particle systems, and indicate which measuring units you want for your scene (see Figure 2.8). Another interesting fact to mention here is that these tabs are organized from most general to most specific: Render > Render Layers > Scene > World > Object > Object Constraints > Modifiers > Object Data > Materials.
Properties is one of the most important editors in Blender. It has different tabs for different groups of options you can access (depending on your selection, tabs may vary as they are context sensitive). This is where you set up your render size and performance, add modifiers, set the object parameters, add materials, control particle systems, and indicate which measuring units you want for your scene (see Figure 2.8). Another interesting fact to mention here is that these tabs are organized from most general to most specific: Render > Render Layers > Scene > World > Object > Object Constraints > Modifiers > Object Data > Materials.
![]() Logic Editor provides an interface to define behaviors and functions that control the objects in a scene; it is used to creative interactive games inside Blender.
Logic Editor provides an interface to define behaviors and functions that control the objects in a scene; it is used to creative interactive games inside Blender.
![]() Node Editor lets you create node trees for final image compositing, textures, and materials.
Node Editor lets you create node trees for final image compositing, textures, and materials.
![]() Text Editor is used for scripting (you can even run Python scripts from it) or for adding some text notes to the scene (especially useful if you work with a team and want to add information about how to use the scene).
Text Editor is used for scripting (you can even run Python scripts from it) or for adding some text notes to the scene (especially useful if you work with a team and want to add information about how to use the scene).
![]() Movie Clip Editor is used to load video footage, analyze it, and use it for camera or motion tracking. You can also create and animate masks that you can then use in the compositor, and you can stabilize shaky footage.
Movie Clip Editor is used to load video footage, analyze it, and use it for camera or motion tracking. You can also create and animate masks that you can then use in the compositor, and you can stabilize shaky footage.
![]() Video Sequence Editor is used for editing video inside Blender.
Video Sequence Editor is used for editing video inside Blender.
![]() UV/Image Editor is used for loading images as a reference or to paint over them. It’s also where you manipulate UVs and unwrap objects. You can use it to see the compositing result preview. Renders are also displayed in this editor.
UV/Image Editor is used for loading images as a reference or to paint over them. It’s also where you manipulate UVs and unwrap objects. You can use it to see the compositing result preview. Renders are also displayed in this editor.
![]() NLA Editor is similar to the Video Sequence Editor, but it works with animations. In it, you can load different animations for an object or armature and mix them together using strips, and you can even add transitions.
NLA Editor is similar to the Video Sequence Editor, but it works with animations. In it, you can load different animations for an object or armature and mix them together using strips, and you can even add transitions.
![]() Dope Sheet is a place to display objects in the scene and their keyframes (a keyframe is the state of an element in a given frame of the animation; see Chapter 12 for more information about using keyframes), making it very easy to adjust the timing of your animations. It can be used as an “advanced” timeline.
Dope Sheet is a place to display objects in the scene and their keyframes (a keyframe is the state of an element in a given frame of the animation; see Chapter 12 for more information about using keyframes), making it very easy to adjust the timing of your animations. It can be used as an “advanced” timeline.
Tip
In other animation software, you can access the basic timing control of keyframes from the timeline. In Blender, you can replace the basic timeline for a Dope Sheet to customize areas and activate the Summary and Selected Only options to display the keyframes Summary at the top of all the keyframes of the selected objects. This way, you’ll have a timeline that allows you to control an animation’s timing.
![]() Graph Editor is similar to the Dope Sheet, but it also shows animation curves, which you can use to control how interpolations between keyframes work and to fine tune your animations.
Graph Editor is similar to the Dope Sheet, but it also shows animation curves, which you can use to control how interpolations between keyframes work and to fine tune your animations.
![]() Timeline is a window that shows the time in the scene and lets you play the animation and select the frame in which you want to work. You can also add markers to easily designate important parts of the sequence and to set the start and end frames of the animation.
Timeline is a window that shows the time in the scene and lets you play the animation and select the frame in which you want to work. You can also add markers to easily designate important parts of the sequence and to set the start and end frames of the animation.
![]() 3D View is where you control the 3D world by modeling, animating, and adding objects to a scene.
3D View is where you control the 3D world by modeling, animating, and adding objects to a scene.
Tip
In Blender, you can even zoom in and out inside menus. Hover your cursor over a menu, press Ctrl + MMB, and drag up and down to make menu items bigger or smaller.


