
Tableau connects to data stored in a wide variety of files and databases. This includes flat files, such as Excel documents, spatial files, and text files; relational databases, such as SQL Server and Oracle; cloud-based data sources, such as Google Analytics and Amazon Redshift; and OLAP data sources, such as Microsoft Analysis Services. With very few exceptions, the process of analysis and creating visualizations will be the same, no matter what data source you use.
We'll cover details of connecting to different types of data sources in Chapter 2, Working with Data in Tableau. And we'll cover data spanning a wide variety of industries in other chapters. For now, we'll connect to a text file, specifically, a comma-separated values file (.csv). The data is a variation of the sample that ships with Tableau: Superstore, a fictional retail chain that sells various products to customers across the United States. Please use the supplied data file instead of the Tableau sample data, as the variations will lead to differences in visualizations.
The Chapter 1 workbooks, included with the code files bundle, already have connections to the file, but for this example, we'll walk through the steps of creating a connection in a new workbook:
- Open Tableau. You should see the home screen with a list of connection options on the left and, if applicable, thumbnail previews of recently edited workbooks in the center, along with sample workbooks at the bottom.
- Under Connect and To a File, click Text File.
- In the Open dialogue box, navigate to the Learning TableauChapter 01 directory and select the Superstore.csv file.
- You will now see the data connection screen, which allows you to visually create connections to data sources. We'll examine the features of this screen in detail in the Connecting to data section of Chapter 2, Working with Data in Tableau. For now, Tableau has already added and given a preview of the file for the connection:
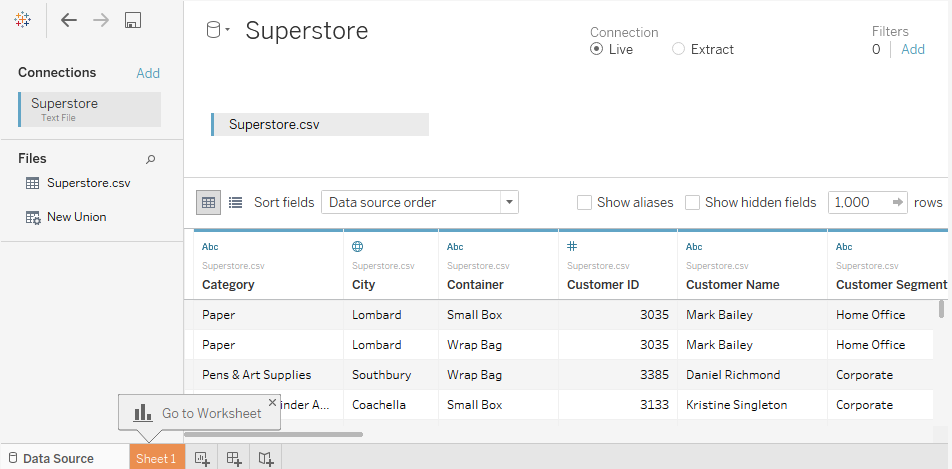
For this connection, no other configuration is required, so simply click on the Sheet 1 tab at the bottom to start visualizing the data! You should now see the main work area within Tableau, which looks like this:

We'll refer to elements of the interface throughout the book using specific terminology, so take a moment to familiarize yourself with the terms used for various components numbered in the preceding screenshot:
- The Menu contains various menu items for performing a wide range of functions.
- The Toolbar allows for common functions such as undo, redo, save, add a data source, and so on.
- The Side Bar contains tabs for Data and Analytics. When the Data tab is active, we'll refer to the side bar as the data pane. When the Analytics tab is active, we'll refer to the side bar as the analytics pane. We'll go into detail later in this chapter, but for now, note that the data pane shows the data source at the top and contains a list of fields from the data source below, divided into Dimensions and Measures.
- Various shelves such as Columns, Rows, Pages, and Filters serve as areas to drag and drop fields from the data pane. The Marks card contains additional shelves such as Color, Size, Text, Detail, and Tooltip. Tableau will visualize data based on the fields you drop on to the shelves.
- The canvas or view is where Tableau will draw the data visualization. You may also drop fields directly on to the view. You'll find the seamless title at the top of the canvas. By default, it will display the name of the sheet, but it can be edited or even hidden.
- Show Me is a feature that allows you to quickly iterate through various types of visualizations based on data fields of interest. We'll look at Show Me toward the end of the chapter.
- The tabs at the bottom of the window give you options for editing the data source, as well as navigating between and adding any number of sheets, dashboards, or stories. Many times, any tab (whether it is a sheet, a dashboard, or a story) is referred to generically as a sheet.
- A sheet is a single data visualization, such as a bar chart or a line graph. Since Sheet is also a generic term for any tab, we'll often refer to a sheet as a view because it is a single view of the data.
- A dashboard is a presentation of any number of related views and other elements (such as text or images) arranged together as a cohesive whole to communicate a message to an audience. Dashboards are often designed to be interactive.
- A story is a collection of dashboards or single views arranged to communicate a narrative from the data. Stories may also be interactive.
- As you work, the status bar will display important information and details about the view, selections, and the user.
- Various controls allow you to navigate between sheets, dashboards, and stories, as well as view the tabs with Show Filmstrip or switch to a sheet sorter showing an interactive thumbnail of all sheets in the workbook. Now that you have connected to the data in the text file, we'll explore some examples that lay the foundation for data visualization and then move on to building some foundational visualization types. To prepare for this, please do the following:
- From the menu, select File | Exit.
- When prompted to save changes, select No.
- From the learning TableauChapter 01 directory, open the file Chapter 01 Starter.twbx. This file contains a connection to the Superstore data file and is designed to help you walk through the examples in this chapter.
With a connection to the data, you are ready to start visualizing and analyzing the data. As you begin to do so, you will take on the role of an analyst at the retail chain. You'll ask questions of the data, build visualizations to answer those questions, and ultimately design a dashboard to share the results. Let's start by laying some foundations for understanding how Tableau visualizes data.