
4 Global Elements of Logic
FOR LONG-TIME LOGIC USERS, the system of global and local menus used in Logic has become second nature. Logic Pro X has changed this paradigm significantly, so if you’re upgrading from a previous version of Logic, you may be searching a bunch of new and different menus in locations you would not expect to find commands you’ve used for years. Some commands have been moved from local menus to global menus; indeed, there are numerous new and different global menus. Some menus seem to have disappeared entirely. Don’t worry; those commands can still be accessed, just in new or renamed menus. Reading this chapter will be essential to working with Logic Pro X not just for users who are new to Logic, but also for long-time users, who might normally skip this chapter.
Many of Logic’s commands and options make sense only within the specific window where the command or feature is used. For example, having a function to select notes wouldn’t make sense in the Mixer, and having a way to adjust the stereo field of an audio track isn’t useful in the Score editor. That’s why many commands and tools in Logic reside in local menus—menus specific to the window or area of the main window you are using. This allows Logic to put many more commands at your fingertips than if it were limited only to the menus in the OS X menu bar. Many of these commands are also available in right-click menus within each specific area.
There are some functions that apply to more than one window, affect the entire song, or affect the whole application. These elements of Logic can be considered global. However, there has been a shift of focus in Logic Pro X to the main window. Many functions that previously resided only in local menus in the former Arrange window (current main window) now exist in both local and global menus. Before covering the more specific elements of Logic Pro X, I’ll use this chapter to give you one more broad view of the kinds of options and features available to you in Logic.
What Do You Know?: Logic Pro X’s organizational change from previous iterations has made organizing this book more challenging. Believe it or not, determining where to put this chapter in the book and what to include in it were actually two of my tougher decisions. The change in content and structure among many global and local menus is significant. For intermediate and advanced music software users, it’s not that intimidating—you’re familiar with the concepts of global menus, local menus, using tools from a Tool menu, and so on. Intermediate and advanced Logic users may already understand what most of the features, functions, and concepts are all about. Experienced Logic Pro X users simply have to become familiar with the new paradigm. For a beginner or someone migrating from GarageBand, on the other hand, reading about these menus—some having specific functions in the main window while having no purpose in other windows—and later learning how to create and manipulate data in global tracks might seem overwhelming.
In the end, I decided that because the global tracks and some of the global menus play a part in almost every section after this one, those items needed to be covered here. Because some local commands have been moved to global menus, those will be covered in detail when we get to those specific areas of focus later in the book. For example, it would be hard to discuss the Record Button Options command in the global Record menu without dealing with the Transport controls as a whole; the Transport controls have a dedicated chapter. Conversely, because the marker track functions across your whole project, it is truly global and it is covered in this chapter. As these features are mentioned, I’ll list the sections that cover the issues more in depth so you can find answers to any questions you might be left with. Hopefully, for those of you who are a bit perplexed, after you’ve read a little further, you can come back to this chapter and everything will be clearer.
The Global Menus
You’ve already looked at and used commands from both global and local menus. The following chapters explore all of the local menus throughout the various editors, windows, and tabs in Logic in depth. Detailed information on many functions of the global menus will be offered later on in the appropriate chapters. This chapter offers a brief description of each global menu and its contents. When menu commands have default key commands, these will also be listed with the menu command.
The Logic Pro X Menu
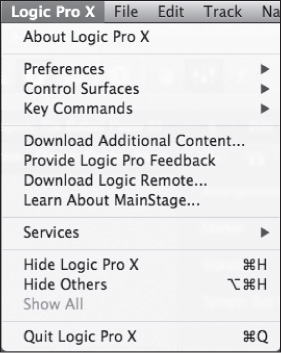
The Logic Pro X menu, shown in Figure 4.1, contains commands and options that affect the entire application.
Figure 4.1 The Logic Pro X menu.
© Apple Inc.
It contains the following commands and submenus:
![]() About Logic Pro X: Obsessed with trying to figure out whose name is on the platinum album on the Logic Pro X splash screen? You can get another look at the splash screen by selecting this command. To close the splash screen, simply click anywhere inside it.
About Logic Pro X: Obsessed with trying to figure out whose name is on the platinum album on the Logic Pro X splash screen? You can get another look at the splash screen by selecting this command. To close the splash screen, simply click anywhere inside it.
![]() Preferences: The Preferences submenu, detailed in the next section, “The Preferences Submenu,” offers shortcuts to the main tabs in the Preferences window. The preferences themselves are described throughout this book, where appropriate.
Preferences: The Preferences submenu, detailed in the next section, “The Preferences Submenu,” offers shortcuts to the main tabs in the Preferences window. The preferences themselves are described throughout this book, where appropriate.
![]() Control Surfaces: This submenu, explained in the section “The Control Surfaces Submenu,” contains options for configuring and using MIDI control surfaces with Logic.
Control Surfaces: This submenu, explained in the section “The Control Surfaces Submenu,” contains options for configuring and using MIDI control surfaces with Logic.
![]() Key Commands: The Key Commands submenu lets you change your default keyboard language and gives you access to the Logic 9 key commands (for those of you who are used to them) via the Key Commands > Presets command. It also offers the command to open the Key Commands window. Chapter 3, “The Logic Project,” discussed the Key Commands window. The key command for this is Option+K.
Key Commands: The Key Commands submenu lets you change your default keyboard language and gives you access to the Logic 9 key commands (for those of you who are used to them) via the Key Commands > Presets command. It also offers the command to open the Key Commands window. Chapter 3, “The Logic Project,” discussed the Key Commands window. The key command for this is Option+K.
![]() Download Additional Content: Logic Pro X has tens of gigabytes of additional content—Apple Loops, samples, Drummer kits, impulse responses, and so forth—which you can download from Apple using this command. If you have the storage space for all of this content, it is well worth the effort to download it.
Download Additional Content: Logic Pro X has tens of gigabytes of additional content—Apple Loops, samples, Drummer kits, impulse responses, and so forth—which you can download from Apple using this command. If you have the storage space for all of this content, it is well worth the effort to download it.
![]() Provide Logic Pro Feedback: Selecting this command will open your Web browser and take you to a page on the Apple website where you can submit feedback to Apple about Logic Pro. I can’t stress how important it is for you to use this feature to submit new ideas and report any bugs you may encounter.
Provide Logic Pro Feedback: Selecting this command will open your Web browser and take you to a page on the Apple website where you can submit feedback to Apple about Logic Pro. I can’t stress how important it is for you to use this feature to submit new ideas and report any bugs you may encounter.
NOTE: There are bugs in nearly every program that won’t crash the program but may affect your workflow. Because they don’t show up in crash logs, the only way a developer can fix these bugs is from user feedback, detailing what the bug is and how to reproduce it. Believe me when I say that developers appreciate this kind of user feedback. No one tries to write bugs into their software, and Apple does listen to your feedback, be it about wish-list features or any bugs. Many of the features you will learn about in this book are a direct result of user feedback.
![]() Download Logic Remote: Those of you with an iPad 2 or greater running iOS 6.0 or greater can download the Logic Remote app, which offers a fairly full complement of touch-based controls for things like the Mixer and Logic’s software instruments. Highly recommended.
Download Logic Remote: Those of you with an iPad 2 or greater running iOS 6.0 or greater can download the Logic Remote app, which offers a fairly full complement of touch-based controls for things like the Mixer and Logic’s software instruments. Highly recommended.
![]() Learn About MainStage: Selecting this command opens your Web browser to a page detailing Apple’s live performance spin-off of Logic, MainStage. MainStage offers all the included Logic effects and software instruments in a purpose-built application for use on stage. Its flexibility is amazing, and its $30 price makes it truly a bargain.
Learn About MainStage: Selecting this command opens your Web browser to a page detailing Apple’s live performance spin-off of Logic, MainStage. MainStage offers all the included Logic effects and software instruments in a purpose-built application for use on stage. Its flexibility is amazing, and its $30 price makes it truly a bargain.
![]() Services: This is a standard Mac OS X submenu included by the system in every Mac OS X application. This submenu is of no use in Logic.
Services: This is a standard Mac OS X submenu included by the system in every Mac OS X application. This submenu is of no use in Logic.
![]() Hide Logic Pro X: This command will remove all the Logic Pro windows from your screen until you select the application in the Finder or the Dock. The key command for this is Command+H.
Hide Logic Pro X: This command will remove all the Logic Pro windows from your screen until you select the application in the Finder or the Dock. The key command for this is Command+H.
![]() Hide Others: You can hide every application except Logic Pro with this command. The key command for this is Option+Command+H.
Hide Others: You can hide every application except Logic Pro with this command. The key command for this is Option+Command+H.
![]() Show All: You can reveal all applications, including those that are hidden, with this command.
Show All: You can reveal all applications, including those that are hidden, with this command.
![]() Quit Logic Pro X: Use this command to quit Logic Pro. The key command for this is Command+Q.
Quit Logic Pro X: Use this command to quit Logic Pro. The key command for this is Command+Q.
The Preferences Submenu
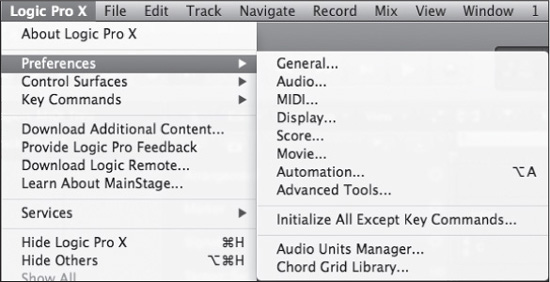
The Preferences submenu, shown in Figure 4.2, gives you access to the individual tabs of the Preferences window and other global preference-related elements of Logic Pro. Preferences govern the application as a whole, and therefore apply to any project open within the application.
Figure 4.2 The Preferences submenu. Selecting any of these options will open the Preferences window to that particular tab.
© Apple Inc.
The commands in the Preferences submenu are as follows:
![]() General, Audio, MIDI, Display, Score, Movie, Automation, and Advanced Tools: Each of these opens the Preferences window to the specific tab you have selected. Each tab has a number of sub-tabs to which you can navigate from there. The different tabs are explained in the chapter appropriate for each particular set of preferences. The Advanced Tools option is covered further in the next section.
General, Audio, MIDI, Display, Score, Movie, Automation, and Advanced Tools: Each of these opens the Preferences window to the specific tab you have selected. Each tab has a number of sub-tabs to which you can navigate from there. The different tabs are explained in the chapter appropriate for each particular set of preferences. The Advanced Tools option is covered further in the next section.
![]() Initialize All Except Key Commands: You can reset every preference except your key commands by selecting this command.
Initialize All Except Key Commands: You can reset every preference except your key commands by selecting this command.
![]() Audio Units Manager: You can launch the Audio Units Manager with this command. The Audio Units Manager allows you to turn on and off individual Audio Unit plug-ins within Logic, as well as scan them for compatibility. Chapter 11, “Mixing in Logic,” details the functions of the Audio Units Manager.
Audio Units Manager: You can launch the Audio Units Manager with this command. The Audio Units Manager allows you to turn on and off individual Audio Unit plug-ins within Logic, as well as scan them for compatibility. Chapter 11, “Mixing in Logic,” details the functions of the Audio Units Manager.
![]() Chord Grid Library: Selecting this command opens the Chord Grid Library, which contains more than 4,000 different guitar chords displayed in tablature for use in the Score editor. You can also use the Chord Grid Library to create your own guitar chord tablature for use in the Score editor. The Chord Grid Library is covered in detail in Chapter 8, “Working with MIDI.”
Chord Grid Library: Selecting this command opens the Chord Grid Library, which contains more than 4,000 different guitar chords displayed in tablature for use in the Score editor. You can also use the Chord Grid Library to create your own guitar chord tablature for use in the Score editor. The Chord Grid Library is covered in detail in Chapter 8, “Working with MIDI.”
THE ADVANCED TOOLS PREFERENCES
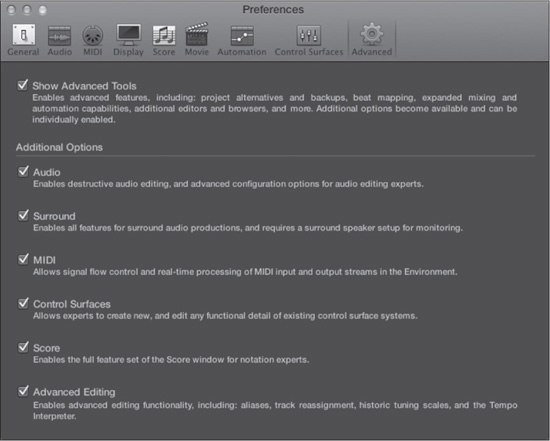
Logic Pro X is, as you are discovering, an incredibly deep and powerful application. Although this book deals with Logic Pro wide open—with all Advanced Tools available—you may want a more managed experience when you use Logic. The Advanced Preferences window, shown in Figure 4.3, which you access by choosing Advanced Tools from the Preferences submenu, gives you ample control over what tools are available to you in Logic.
Figure 4.3 The Advanced Preferences window.
© Apple Inc.
The Advanced Tools Preferences are as follows:
![]() Show Advanced Tools: This checkbox turns on or off access to all advanced tools. When it is selected, you have access to the additional options shown in Figure 4.3. If you deselect this checkbox, the additional options are no longer available, and Logic runs in a very basic mode with limited editing parameters and global tracks, among other things. If you recall, Figure 2.2 in Chapter 2, “A Quick Tour of Logic Pro,” showed how Logic looks when Show Advanced Tools is disabled—simplified, but with all the basics covered. For those of you transitioning from GarageBand who want something more like “GarageBand Pro” than the full Logic Pro experience, working with Show Advanced Tools disabled is a great option. It is also an excellent option if you are turning over control of Logic to someone with much less knowledge for a bit while working on a project. You can turn all the advanced tools on and off at any time, even while a project is open!
Show Advanced Tools: This checkbox turns on or off access to all advanced tools. When it is selected, you have access to the additional options shown in Figure 4.3. If you deselect this checkbox, the additional options are no longer available, and Logic runs in a very basic mode with limited editing parameters and global tracks, among other things. If you recall, Figure 2.2 in Chapter 2, “A Quick Tour of Logic Pro,” showed how Logic looks when Show Advanced Tools is disabled—simplified, but with all the basics covered. For those of you transitioning from GarageBand who want something more like “GarageBand Pro” than the full Logic Pro experience, working with Show Advanced Tools disabled is a great option. It is also an excellent option if you are turning over control of Logic to someone with much less knowledge for a bit while working on a project. You can turn all the advanced tools on and off at any time, even while a project is open!
![]() Audio: Selecting the Audio checkbox lets you access the Audio File editor. The Audio File editor works on audio files destructively; the original audio file is permanently altered when using the Audio File editor. You also have full access to all audio configuration options, like full control of surround inputs and outputs.
Audio: Selecting the Audio checkbox lets you access the Audio File editor. The Audio File editor works on audio files destructively; the original audio file is permanently altered when using the Audio File editor. You also have full access to all audio configuration options, like full control of surround inputs and outputs.
![]() Surround: The Surround option lets you enable or disable surround entirely.
Surround: The Surround option lets you enable or disable surround entirely.
![]() MIDI: This MIDI option gives you access to the Environment and MIDI Transform windows.
MIDI: This MIDI option gives you access to the Environment and MIDI Transform windows.
![]() Control Surfaces: This option gives you full access to all commands in the Logic Pro X > Control Surfaces submenu and all parameters in the Control Surfaces Setup window.
Control Surfaces: This option gives you full access to all commands in the Logic Pro X > Control Surfaces submenu and all parameters in the Control Surfaces Setup window.
![]() Score: This option gives you access to all the features in the Score editor.
Score: This option gives you access to all the features in the Score editor.
![]() Advanced Editing: This option gives you access to advanced editing features like track reassignment (covered in Chapter 3) and the Tempo Interpreter, which is covered in Chapter 13, “Advanced Tempo Operations.”
Advanced Editing: This option gives you access to advanced editing features like track reassignment (covered in Chapter 3) and the Tempo Interpreter, which is covered in Chapter 13, “Advanced Tempo Operations.”
The Control Surfaces Submenu
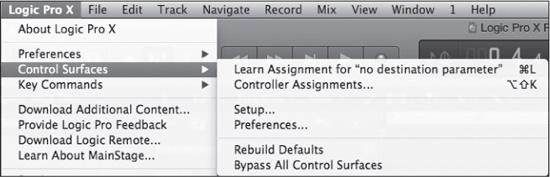
The Control Surfaces submenu, shown in Figure 4.4, offers commands relating to the use and configuration of MIDI devices to be used as control surfaces for Logic.
Figure 4.4 The Control Surfaces submenu of the Logic Pro X menu.
© Apple Inc.
The commands in this submenu include the following:
![]() Learn Assignment For: This command launches the Controller Assignments window for the selected option or command. This was discussed in Chapter 3. The key command for this is Command+L.
Learn Assignment For: This command launches the Controller Assignments window for the selected option or command. This was discussed in Chapter 3. The key command for this is Command+L.
![]() Controller Assignments: You can launch the Controller Assignments window without previously selecting an option or command here. The Controller Assignments window was discussed in Chapter 3. The key command for this is Option+Shift+K.
Controller Assignments: You can launch the Controller Assignments window without previously selecting an option or command here. The Controller Assignments window was discussed in Chapter 3. The key command for this is Option+Shift+K.
![]() Setup: This launches the Control Surface Setup window. This window was discussed in Chapter 3.
Setup: This launches the Control Surface Setup window. This window was discussed in Chapter 3.
![]() Preferences: You can set a number of preferences for how your control surface interacts with Logic here.
Preferences: You can set a number of preferences for how your control surface interacts with Logic here.
![]() Rebuild Defaults: This will reset the preferences for your control surface.
Rebuild Defaults: This will reset the preferences for your control surface.
![]() Bypass All Control Surfaces: When selected, this option disables your control surface.
Bypass All Control Surfaces: When selected, this option disables your control surface.
The File Menu
Not surprisingly, the File menu, shown in Figure 4.5, contains options and commands that involve files. Most commands here will get files either into or out of Logic. If not otherwise noted, most of these commands will be explored in more detail in Chapter 12, “Working with and Sharing Files.”
The following list describes the entries in the File menu:
![]() New: This command opens a completely empty Logic project. In a break with Apple’s own system-wide key-command conventions, the key command for New is Shift+Command+N.
New: This command opens a completely empty Logic project. In a break with Apple’s own system-wide key-command conventions, the key command for New is Shift+Command+N.

© Apple Inc.
![]() New from Template: This command opens the New window, which was covered in Chapter 3. The key command for this is Command+N.
New from Template: This command opens the New window, which was covered in Chapter 3. The key command for this is Command+N.
![]() Open: The Open command opens a song or project created by Logic (any version or platform of Logic from Logic 5 to Logic X). It can also open all the other file types Logic supports—GarageBand, MIDI, AAF, and XML (Final Cut Pro). The key command for this is Command+O.
Open: The Open command opens a song or project created by Logic (any version or platform of Logic from Logic 5 to Logic X). It can also open all the other file types Logic supports—GarageBand, MIDI, AAF, and XML (Final Cut Pro). The key command for this is Command+O.
![]() Open Recent: The Open Recent submenu contains a list of your recently opened projects. If the list gets too long, you can use the Clear Menu option in the Open Recent submenu to clear the Open Recent list.
Open Recent: The Open Recent submenu contains a list of your recently opened projects. If the list gets too long, you can use the Clear Menu option in the Open Recent submenu to clear the Open Recent list.
![]() Close: This command closes the upper-most open window. If only one window is open, it prompts a Save dialog box, allowing you to close the current project. It will not close a floating window, but you can use it to close a plug-in window if the plug-in window has been selected. The key command for this is Command+W.
Close: This command closes the upper-most open window. If only one window is open, it prompts a Save dialog box, allowing you to close the current project. It will not close a floating window, but you can use it to close a plug-in window if the plug-in window has been selected. The key command for this is Command+W.
![]() Close Project: This command closes the current project. The key command for this is Option+Command+W.
Close Project: This command closes the current project. The key command for this is Option+Command+W.
![]() Save: This will save the current project. The key command for this is Command+S. The first time you save your project, the Save command functions like the Save As command.
Save: This will save the current project. The key command for this is Command+S. The first time you save your project, the Save command functions like the Save As command.
![]() Save As: This command brings up a Save dialog box for you to name and save your project. The key command for this is Shift+Command+S.
Save As: This command brings up a Save dialog box for you to name and save your project. The key command for this is Shift+Command+S.
![]() Save a Copy As: This command brings up a Save dialog box for you to save a copy of your project.
Save a Copy As: This command brings up a Save dialog box for you to save a copy of your project.
![]() Save as Template: This command saves the current project as a template.
Save as Template: This command saves the current project as a template.
![]() Revert To: If you aren’t happy with the current state of your project, Revert To will reload the last saved version of your project. Obviously, this only works if you’ve previously saved your project!
Revert To: If you aren’t happy with the current state of your project, Revert To will reload the last saved version of your project. Obviously, this only works if you’ve previously saved your project!
![]() Alternatives: The Alternatives submenu offers ways of saving and accessing different versions of a project—for example, different mixes, different arrangements, or different instrumentations—contained within the project.
Alternatives: The Alternatives submenu offers ways of saving and accessing different versions of a project—for example, different mixes, different arrangements, or different instrumentations—contained within the project.
![]() Project Management: The Project Management submenu offers you a few options for managing Logic projects:
Project Management: The Project Management submenu offers you a few options for managing Logic projects:
![]() Clean Up: You can use this command to find and display unused project files, enabling you to selectively delete them.
Clean Up: You can use this command to find and display unused project files, enabling you to selectively delete them.
![]() Consolidate: You can take a Logic song that does not have its dependent files in the proper project folder structure and consolidate it into the correct structure with this command.
Consolidate: You can take a Logic song that does not have its dependent files in the proper project folder structure and consolidate it into the correct structure with this command.
![]() Rename: This allows you to rename a project.
Rename: This allows you to rename a project.
![]() Show in Finder: This command opens a Finder window to the location of your Logic project within your file structure.
Show in Finder: This command opens a Finder window to the location of your Logic project within your file structure.
![]() Project Settings: The Project Settings submenu, described in further detail in the next section, allows you to open the Project Settings window to a specific tab. Project settings are specific to the particular project in which you are working.
Project Settings: The Project Settings submenu, described in further detail in the next section, allows you to open the Project Settings window to a specific tab. Project settings are specific to the particular project in which you are working.
TIP: If you have a preferred, standard set of project settings, save them as a part of your template. You can then alter them on a per-project basis as needed.
![]() Page Setup: This command opens the Page Setup window for your printer driver.
Page Setup: This command opens the Page Setup window for your printer driver.
![]() Print: This prints the contents of the selected window. This is useful if you want to print musical notation from the Score editor, for example. The key command for this is Command+P.
Print: This prints the contents of the selected window. This is useful if you want to print musical notation from the Score editor, for example. The key command for this is Command+P.
![]() Movie: The Movie submenu offers a few options for working with movie files, including the Open Movie command. While the movie track is discussed briefly at the end of this chapter, you’ll find much more information on using movies in Logic in Chapter 14, “Working with Video.”
Movie: The Movie submenu offers a few options for working with movie files, including the Open Movie command. While the movie track is discussed briefly at the end of this chapter, you’ll find much more information on using movies in Logic in Chapter 14, “Working with Video.”
![]() Import: The Import submenu gives you options for importing any supported file type into Logic.
Import: The Import submenu gives you options for importing any supported file type into Logic.
![]() Export: In the Export submenu, you can export your Logic project into any of the aforementioned formats that Logic supports except GarageBand. You can also export a single region, track, or all of your tracks into individual files. The various Export options are discussed in Chapter 7, “Working with Audio and Apple Loops,” and Chapter 12, “Working with and Sharing Files.”
Export: In the Export submenu, you can export your Logic project into any of the aforementioned formats that Logic supports except GarageBand. You can also export a single region, track, or all of your tracks into individual files. The various Export options are discussed in Chapter 7, “Working with Audio and Apple Loops,” and Chapter 12, “Working with and Sharing Files.”
![]() Bounce: The Bounce submenu gives you options for bouncing all or part of your project to audio files. The File > Bounce > Project or Section command is discussed in Chapter 11, “Mixing in Logic.” The other Bounce submenu commands are covered in Chapter 6, “The Logic Pro Main Window.”
Bounce: The Bounce submenu gives you options for bouncing all or part of your project to audio files. The File > Bounce > Project or Section command is discussed in Chapter 11, “Mixing in Logic.” The other Bounce submenu commands are covered in Chapter 6, “The Logic Pro Main Window.”
The Project Settings Submenu
When you set Logic’s preferences, those settings apply to the entire application, regardless of the project. Project settings, on the other hand, apply only to the current project. The Project Settings submenu is shown in Figure 4.6.
Figure 4.6 The Project Settings submenu.
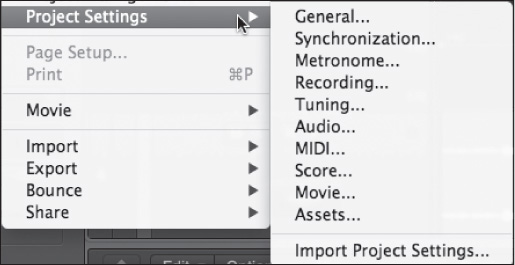
© Apple Inc.
![]() General: The General command opens the General tab in the Project Settings window. This tab offers one option: the Project Type checkbox. This lets you choose between using a musical grid in the Tracks area and editors—bars and beats in the ruler—and a time-based ruler. When Use Musical Grid is enabled, tempo information will be embedded in your audio files. If you are recording music with Logic, you will generally want to enable the Use Musical Grid checkbox.
General: The General command opens the General tab in the Project Settings window. This tab offers one option: the Project Type checkbox. This lets you choose between using a musical grid in the Tracks area and editors—bars and beats in the ruler—and a time-based ruler. When Use Musical Grid is enabled, tempo information will be embedded in your audio files. If you are recording music with Logic, you will generally want to enable the Use Musical Grid checkbox.
![]() Synchronization: You can open the Project Settings Synchronization tab here. Some synchronization settings are discussed in Chapter 13.
Synchronization: You can open the Project Settings Synchronization tab here. Some synchronization settings are discussed in Chapter 13.
![]() Metronome: You can open the Project Settings Metronome tab here. These settings are described in Chapter 5, “Transport Controls and Recording.”
Metronome: You can open the Project Settings Metronome tab here. These settings are described in Chapter 5, “Transport Controls and Recording.”
![]() Recording: You can open the Project Settings Recording tab here. These settings are described in Chapter 5.
Recording: You can open the Project Settings Recording tab here. These settings are described in Chapter 5.
![]() Tuning: You can open the Project Settings Tuning tab here. In addition to a global master tuning option for software instruments used in your project, you can also use and create alternate tuning systems via the tuning settings.
Tuning: You can open the Project Settings Tuning tab here. In addition to a global master tuning option for software instruments used in your project, you can also use and create alternate tuning systems via the tuning settings.
![]() Audio: You can open the Project Settings Audio tab here. These settings are described in Chapter 6.
Audio: You can open the Project Settings Audio tab here. These settings are described in Chapter 6.
![]() MIDI: You can open the Project Settings MIDI tab here. These settings are described in Chapter 6.
MIDI: You can open the Project Settings MIDI tab here. These settings are described in Chapter 6.
![]() Score: You can open the Project Settings Score tab here. These settings are described in Chapter 8.
Score: You can open the Project Settings Score tab here. These settings are described in Chapter 8.
![]() Movie: You can open the Project Settings Movie tab here. These settings are described in Chapter 14.
Movie: You can open the Project Settings Movie tab here. These settings are described in Chapter 14.
![]() Assets: You can open the Project Settings Assets tab here. These settings are described in Chapter 12.
Assets: You can open the Project Settings Assets tab here. These settings are described in Chapter 12.
![]() Import Project Settings: This command allows you to import the project settings of another Logic project. Selecting this command brings up a File dialog box, where you can choose the project from which you want to import settings. You may choose to import any or all of the following: screensets, transform sets, lane sets, score instrument sets, score styles, and/or score settings.
Import Project Settings: This command allows you to import the project settings of another Logic project. Selecting this command brings up a File dialog box, where you can choose the project from which you want to import settings. You may choose to import any or all of the following: screensets, transform sets, lane sets, score instrument sets, score styles, and/or score settings.
The Edit Menu
The Edit menu, shown in Figure 4.7, includes a standard set of global editing, moving, selection, and undo commands.

© Apple Inc.
The commands in the Edit menu are as follows:
![]() Undo: If you are not happy with your most recent action, Undo will revert Logic to the condition before that action. Not all actions can be undone. If you try to undo an action that cannot be undone, the command will be grayed out and will read “Can’t Undo.” The key command for Undo is Command+Z.
Undo: If you are not happy with your most recent action, Undo will revert Logic to the condition before that action. Not all actions can be undone. If you try to undo an action that cannot be undone, the command will be grayed out and will read “Can’t Undo.” The key command for Undo is Command+Z.
![]() Redo: If you have undone an action and you want to bring it back, you can use the Redo command. Not all actions can be redone. If you try to redo an action that cannot be redone, the command will be grayed out and will read “Can’t Redo.” The key command for this is Shift+Command+Z.
Redo: If you have undone an action and you want to bring it back, you can use the Redo command. Not all actions can be redone. If you try to redo an action that cannot be redone, the command will be grayed out and will read “Can’t Redo.” The key command for this is Shift+Command+Z.
![]() Undo History: Logic has multiple levels of undo. Each action gets stored in the Undo History window. At any time, you can go back and undo as many actions as you’d like. The Undo History window is explored in more detail in Chapter 6. The key command for this is Option+Command+Z.
Undo History: Logic has multiple levels of undo. Each action gets stored in the Undo History window. At any time, you can go back and undo as many actions as you’d like. The Undo History window is explored in more detail in Chapter 6. The key command for this is Option+Command+Z.
![]() Delete Undo History: Use this command to empty the Undo History window and start over with a brand-new list of actions.
Delete Undo History: Use this command to empty the Undo History window and start over with a brand-new list of actions.
![]() Cut: This command removes the selected data from its current location and adds it to the Clipboard. The key command for this is Command+X.
Cut: This command removes the selected data from its current location and adds it to the Clipboard. The key command for this is Command+X.
![]() Copy: This command adds the currently selected data to the Clipboard without removing it from its current location. The key command for this is Command+C.
Copy: This command adds the currently selected data to the Clipboard without removing it from its current location. The key command for this is Command+C.
![]() Paste: This command pastes the data in the Clipboard at the current playhead location. Note that this works only for compatible data. For example, if an audio file is in the Clipboard, you can’t paste it into the Score editor. You can, however, paste it into the Audio window, Sample editor, or main window, as these windows can contain audio data. The key command for this is Command+V.
Paste: This command pastes the data in the Clipboard at the current playhead location. Note that this works only for compatible data. For example, if an audio file is in the Clipboard, you can’t paste it into the Score editor. You can, however, paste it into the Audio window, Sample editor, or main window, as these windows can contain audio data. The key command for this is Command+V.
![]() Delete: This command will delete the selected data without adding it to the Clipboard.
Delete: This command will delete the selected data without adding it to the Clipboard.
![]() Select All: This command will select all of the data in the current window. The key command for this is Command+A.
Select All: This command will select all of the data in the current window. The key command for this is Command+A.
![]() Start Dictation: The Start Dictation command lets you speak into your computer’s microphone. Your computer will send that audio to Apple’s servers for analysis, then return it to your computer as text.
Start Dictation: The Start Dictation command lets you speak into your computer’s microphone. Your computer will send that audio to Apple’s servers for analysis, then return it to your computer as text.
![]() Special Characters: The Special Characters command gives you access to a host of non-standard characters.
Special Characters: The Special Characters command gives you access to a host of non-standard characters.
NOTE: There may be more commands available in the main Edit menu. This depends on the currently selected window or on what area is in focus in the main window.
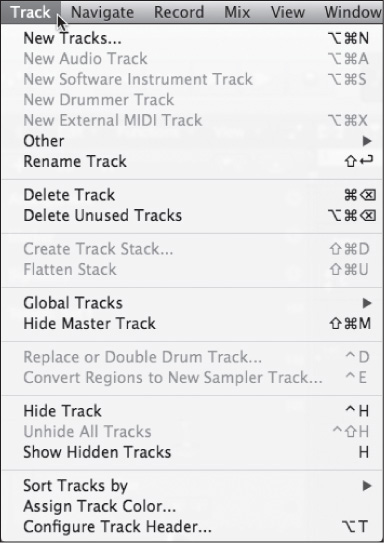
The Track Menu
The Track menu, shown in Figure 4.8, contains a number of commands for creating and working with tracks. You’re already familiar with some of these commands from setting up your template. Many of the others will be covered in Chapter 6. The Global Tracks submenu options are covered in detail in the “Global Tracks” section later in this chapter.
© Apple Inc.
The Navigate Menu
The Navigate menu offers a number of commands for navigating your project. Many of the Navigate menu commands are covered elsewhere in this book. The commands that deal with markers in the Navigate menu and its Go To submenu are covered in the section “The Marker Track” later in this chapter.
The Record Menu
The Record menu offers a number of recording options, which are covered in Chapter 5.
The Mix Menu
The Mix menu offers a number of automation- and mix-related commands, which are covered as needed throughout this book.
The View Menu
The View menu offers a number of main window view options. It is covered in Chapter 6.
The Window Menu
The Window menu, shown in Figure 4.9, contains commands related to opening and manipulating windows.
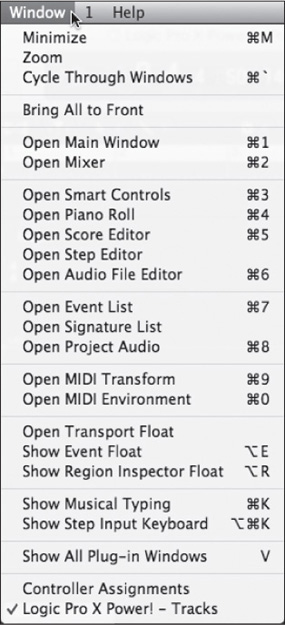
© Apple Inc.
The Window menu contains the following commands:
![]() Minimize: This command minimizes the currently selected window to the Dock. The key command for this is Command+M.
Minimize: This command minimizes the currently selected window to the Dock. The key command for this is Command+M.
![]() Zoom: You can instantly resize a window to fill the entire screen using this command.
Zoom: You can instantly resize a window to fill the entire screen using this command.
![]() Cycle Through Windows: You can switch from the current window to the next unselected window using this command. The key command for this is Command+`.
Cycle Through Windows: You can switch from the current window to the next unselected window using this command. The key command for this is Command+`.
![]() Bring All to Front: Selecting this command brings all Logic windows to the front of any other open windows.
Bring All to Front: Selecting this command brings all Logic windows to the front of any other open windows.
![]() Open Main Window: This command launches the main window. The main window is the focus of Chapter 6. The key command for this is Command+1.
Open Main Window: This command launches the main window. The main window is the focus of Chapter 6. The key command for this is Command+1.
![]() Open Mixer: This command launches a Mixer window. The Mixer is discussed in Chapter 11. The key command for this is Command+2.
Open Mixer: This command launches a Mixer window. The Mixer is discussed in Chapter 11. The key command for this is Command+2.
![]() Open Smart Controls: This command opens Smart Controls for the selected track at the bottom of the main window. Smart Controls are covered in Chapter 6. The key command for this is Command+3.
Open Smart Controls: This command opens Smart Controls for the selected track at the bottom of the main window. Smart Controls are covered in Chapter 6. The key command for this is Command+3.
![]() Open Piano Roll: This command launches the Piano Roll editor. The Piano Roll editor is discussed in Chapter 8. The key command for this is Command+4.
Open Piano Roll: This command launches the Piano Roll editor. The Piano Roll editor is discussed in Chapter 8. The key command for this is Command+4.
![]() Open Score Editor: This command launches the Score editor. The Score editor is discussed in Chapter 8. The key command for this is Command+5.
Open Score Editor: This command launches the Score editor. The Score editor is discussed in Chapter 8. The key command for this is Command+5.
![]() Open Step Editor: This command launches the Step editor, formerly called the Hyper editor. The Step editor is discussed in Chapter 8.
Open Step Editor: This command launches the Step editor, formerly called the Hyper editor. The Step editor is discussed in Chapter 8.
![]() Open Audio File Editor: This command opens the Audio File editor, formerly known as the Sample editor. The Audio File editor is explored in Chapter 7. The key command for this is Command+6.
Open Audio File Editor: This command opens the Audio File editor, formerly known as the Sample editor. The Audio File editor is explored in Chapter 7. The key command for this is Command+6.
![]() Open Event List: This command launches the Event list. The Event list is discussed in Chapter 8. The key command for this is Command+7.
Open Event List: This command launches the Event list. The Event list is discussed in Chapter 8. The key command for this is Command+7.
![]() Open Signature List: This command launches the Signature list. This window is used for entering time-signature and key-change information. This window is explored in “The Signature Track” section later in this chapter.
Open Signature List: This command launches the Signature list. This window is used for entering time-signature and key-change information. This window is explored in “The Signature Track” section later in this chapter.
![]() Open Project Audio: This command opens the Project Audio window, formerly called the Audio bin. The Project Audio window is explored in Chapter 7. The key command for this is Command+8.
Open Project Audio: This command opens the Project Audio window, formerly called the Audio bin. The Project Audio window is explored in Chapter 7. The key command for this is Command+8.
![]() Open MIDI Transform: This command launches a Transform window. The Transform window is discussed in Chapter 8. The key command for this is Command+9.
Open MIDI Transform: This command launches a Transform window. The Transform window is discussed in Chapter 8. The key command for this is Command+9.
![]() Open MIDI Environment: This command launches an Environment window. The key command for this is Command+8.
Open MIDI Environment: This command launches an Environment window. The key command for this is Command+8.
![]() Open Transport Float: This command launches a Transport window. The Transport window is discussed in Chapter 5.
Open Transport Float: This command launches a Transport window. The Transport window is discussed in Chapter 5.
![]() Show Event Float: If you want a one-entry Event list in a floating window to always show you the currently selected data, you can launch one with this command. The key command for this is Option+E.
Show Event Float: If you want a one-entry Event list in a floating window to always show you the currently selected data, you can launch one with this command. The key command for this is Option+E.
![]() Show Region Inspector Float: Selecting this command opens a floating Region Inspector, which will display the playback parameters for the selected region. The floating Region Inspector is an exact duplicate of the Region Inspector in the Inspector pane, which is covered in Chapter 6. The key command for this is Option+R.
Show Region Inspector Float: Selecting this command opens a floating Region Inspector, which will display the playback parameters for the selected region. The floating Region Inspector is an exact duplicate of the Region Inspector in the Inspector pane, which is covered in Chapter 6. The key command for this is Option+R.
![]() Show Musical Typing: This command opens the unfortunately named Musical Typing window, formerly the much hipper Caps Lock Keyboard window. Musical Typing lets you use your computer keyboard for realtime performance, albeit in a much more limited fashion than you can achieve with a MIDI controller. Still, it’s very handy in a pinch! The key command for this is Command+K.
Show Musical Typing: This command opens the unfortunately named Musical Typing window, formerly the much hipper Caps Lock Keyboard window. Musical Typing lets you use your computer keyboard for realtime performance, albeit in a much more limited fashion than you can achieve with a MIDI controller. Still, it’s very handy in a pinch! The key command for this is Command+K.
![]() Show Step Input Keyboard: This command opens the Step Input Keyboard window, which can be used to input MIDI note information into the Event list and Score and Piano Roll editors. The key command for this is Option+Command+K.
Show Step Input Keyboard: This command opens the Step Input Keyboard window, which can be used to input MIDI note information into the Event list and Score and Piano Roll editors. The key command for this is Option+Command+K.
![]() Show All Plug-in Windows: This command lets you show any plug-in windows you have open. It also lets you close all open plug-in windows. The key command for this is V.
Show All Plug-in Windows: This command lets you show any plug-in windows you have open. It also lets you close all open plug-in windows. The key command for this is V.
![]() Controller Assignments: This command opens the Controller Assignments window, covered in Chapter 3.
Controller Assignments: This command opens the Controller Assignments window, covered in Chapter 3.
![]() List of open windows: At the bottom of the Window menu is a list of all the windows currently open in Logic. In Figure 4.9, for example, the open window is the Tracks window, or the main window from the Logic X Power! Project. If you have several windows open in Logic, they all will be listed here, and you can select one of those windows to bring that window to the front.
List of open windows: At the bottom of the Window menu is a list of all the windows currently open in Logic. In Figure 4.9, for example, the open window is the Tracks window, or the main window from the Logic X Power! Project. If you have several windows open in Logic, they all will be listed here, and you can select one of those windows to bring that window to the front.
The Screenset Menu
This menu includes commands relating to screensets. This menu was explored in Chapter 3.
The Help Menu
The Help menu is the standard Mac OS X Help menu with some great added features. In addition to the Help menu’s Search field, the Help menu gives you direct access to all your Logic Pro manuals on the Internet. The Help menu also contains a number of other useful Logic Web links.
Global Tracks
Global tracks are unique tracks that contain information that pertains to the entire Logic project, such as the project’s tempo, key signature, time signature, arrangement, song markers, thumbnails of video for which you are composing audio, and so on. Global tracks can be displayed in the main window and in the Piano Roll, Score, and Step editors. There are seven types of global tracks:
![]() Arrangement track: The arrangement track contains arrangement markers that can be used not only to name sections of your project, but to actually arrange them and the regions within them quickly and easily.
Arrangement track: The arrangement track contains arrangement markers that can be used not only to name sections of your project, but to actually arrange them and the regions within them quickly and easily.
![]() Marker track: This track contains song markers, or position holders you can use to label and separate sections of your project.
Marker track: This track contains song markers, or position holders you can use to label and separate sections of your project.
![]() Movie track: This track contains thumbnail frames of QuickTime movie in sync with Logic.
Movie track: This track contains thumbnail frames of QuickTime movie in sync with Logic.
![]() Signature track: This track contains all your time signatures and key signatures for your project.
Signature track: This track contains all your time signatures and key signatures for your project.
![]() Transposition track: This track shows any global transposition events—in other words, any chord changes or note transpositions that would result in all MIDI regions and Apple Loops being transposed from their original pitch.
Transposition track: This track shows any global transposition events—in other words, any chord changes or note transpositions that would result in all MIDI regions and Apple Loops being transposed from their original pitch.
![]() Tempo track: This track contains the tempo and tempo changes for your project.
Tempo track: This track contains the tempo and tempo changes for your project.
![]() Beat mapping track: This powerful addition to Logic allows you to use any audio or MIDI region with strong rhythmic accents to create a beat map that Logic will use to adjust the musical timeline.
Beat mapping track: This powerful addition to Logic allows you to use any audio or MIDI region with strong rhythmic accents to create a beat map that Logic will use to adjust the musical timeline.
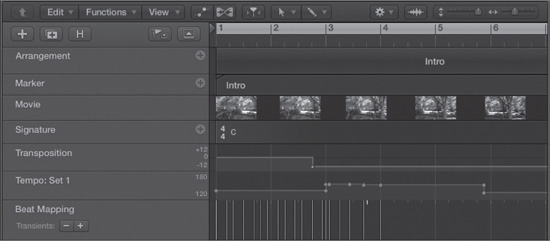
Figure 4.10 shows all the global tracks open in the Tracks area.
Figure 4.10 The seven global tracks displayed in the Tracks area.
© Apple Inc.
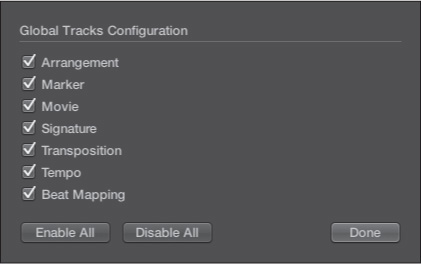
As you can see in Figure 4.10, even in a more minimized state, global tracks can eat up your screen real estate quickly! Don’t worry—you don’t need to view them all at the same time. They can be easily shown or hidden using the G key command or the Hide/Show Global Tracks button (the right-most button at the top of the Track list in Figure 4.10), and they can be resized. The Track > Global Tracks submenu includes the Configure Global Tracks command. You can also right-click any global track header and select this command from the shortcut menu or press Option+G key. This will bring up a sliding window allowing you to choose to show only those global tracks that you want to see (see Figure 4.11). There are also key commands to toggle each global track on or off, commands for this in the Track > Global Tracks submenu, and hide/show individual global tracks options in the global tracks right-click shortcut menu. Using the Global Tracks Configuration window, you can, for example, choose to view only the marker and movie tracks, or you might choose to show the tempo track in the main window but not in the Score editor.
Figure 4.11 The Global Tracks Configuration sliding window lets you select which global tracks you would like to show.
© Apple Inc.
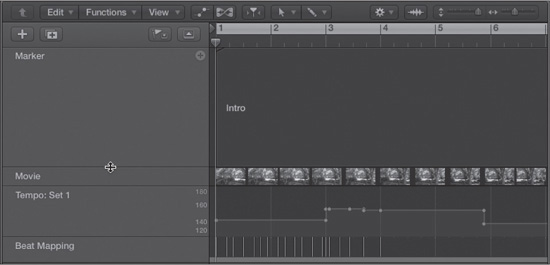
If you want to rearrange your displayed global tracks, you can do this by grabbing a global track in the Track list and dragging it to its new location. Also, when you move the cursor to the bottom border of a global track, it turns into a resize cursor, and you can drag that track to resize it. Figure 4.12 gives an example of these global track features.
Figure 4.12 Here, only four of the seven global tracks are showing. The marker track has been resized to its maximum size via the resize cursor (shown). The movie and beat mapping tracks have been resized to their smallest setting. Finally, the tempo track is expanded to a medium setting.
© Apple Inc.
Common Features of Global Tracks
The movie and beat mapping tracks are unique in their functions and features, but the other five global tracks share a number of common features. The data on these global tracks consists of global events. These global events are different types of data depending on the specific global track, but they can be created, moved, copied, and deleted similarly. The next sections explain how.
Creating a Global Event
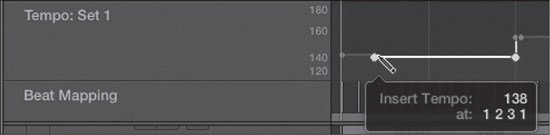
To create a global event on a global track, simply click with the Pencil tool at the desired position in the track. As the mouse button is down, a help tag with the exact position (and value, if applicable to that global track) will be displayed below the cursor. Figure 4.13 illustrates creating a global event in the tempo track.
Figure 4.13 Inserting global events in the tempo track. Just click in the track with the Pencil tool to create the event. The help tag below the Pencil tool displays information about your action, including position information.
© Apple Inc.
If you have not changed the default tool to the Pencil tool, you can access the Pencil tool with the Command key by assigning the secondary Tool menu to the Pencil tool.
You can also access the Tool menu by pressing T. If you have set the Right Mouse Button preference in the Logic Pro > Preferences > Global > Editing tab to Opens Tool Menu or Opens Tool and Shortcut Menu, you can use your right mouse button to access the Tool menu and select the Pencil tool.
NOTE: If the concepts of tools and Tool menus aren’t familiar to you, you might want to skip to Chapter 6, which, in the context of the main window tools, discusses the Tool menu and the Pencil tool in detail.
The arrangement, marker, and signature tracks offer one other method of creating new global events. Clicking the plus (+) button at the right side of those global track headers creates a new global event for that track at the current playhead position. Signature track events created this way are automatically rounded to the nearest bar.
Selecting and Moving Global Events
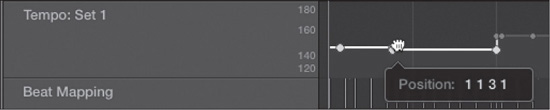
You can select global events using the common selection methods you are familiar with from other applications. Click on an event with the mouse pointer to select it. To select multiple global events, Shift-click on the events you want to select. If you want to make a “rubber band” (sometimes called a lasso) selection, you can click and drag the cursor over a group of events, although this method does not work on the beat-mapping, signature, and marker tracks. If you click the track header of the global track in the Track list, you will select all the events on that track.
Once selected, you can move and/or change global events simply by dragging them. When the mouse button is down, a help tag with the exact position (and value, if applicable to that global track) of your global event will be displayed below the cursor. Figure 4.14 shows a global event on the tempo track being moved.
Copying and Deleting Global Events
You can copy and delete global events using the standard Macintosh methods for copying and deleting information.
Figure 4.14 A global event on the tempo track has been selected and is being moved to the right.
© Apple Inc.
To copy data using the mouse, Option-drag any selected data. You can also use the Edit menu and keyboard commands for Cut and Paste or Copy and Paste.
To delete data using the mouse, click on the data with the Eraser tool from that window’s Tool menu. You can also use the Delete or Backspace key on your keyboard. Finally, you can use the Delete command in the Edit menu.
The Arrangement Track
The arrangement track is a very welcome addition to Logic Pro X. The arrangement track lets you experiment with and create new arrangements of your project on the fly. Want to hear what a double-chorus would sound like before the bridge? Think that perhaps you want to delete that last verse? Previously, this kind of stuff would involve copying and pasting entire sections, moving entire sections, and/or deleting entire sections by selecting all the regions in those sections and manipulating them and the playhead to move all your regions where you wanted them. With the arrangement track, all of this is done quickly and easily—once you create your arrangement markers. The arrangement track also influences the Drummer track, covered in Chapter 6. Figure 4.15 shows the arrangement track over a project in the main window.
Figure 4.15 The arrangement track lets you change the arrangement of your project quickly and easily.
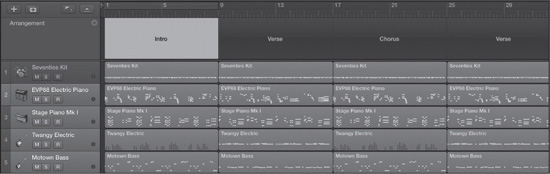
© Apple Inc.
Creating Arrangement Global Events
You can create arrangement markers by using the methods described earlier in the section “Creating a Global Event.” Use the plus sign in the arrangement track header to create a new arrangement marker. By default, arrangement markers made using this method are eight bars long when using the musical grid. They are also named by default, starting with “Intro,” “Verse,” “Chorus,” “Bridge,” and “Outro” as you create more arrangement markers. Don’t worry, you can rename them, as you’ll discover in the next section. If you create an arrangement marker using the Pencil tool, it will begin wherever you click with the Pencil tool. If you click the Pencil tool on an area in the arrangement track that already has an arrangement marker, the new marker will be placed where you click the Pencil tool and the previous marker will be automatically resized to end at that point. By default, arrangement markers created using the Pencil tool are four bars long and are named “marker” with a number describing its order among the other markers. Figure 4.16 shows a marker created with the Pencil tool. It is named marker 3 because it is the third marker in the arrangement track. Note that the Verse marker from Figure 4.15 has been automatically resized to accommodate the new marker.
Figure 4.16 Marker 3, created with the Pencil tool, is numbered per its position among the markers in the arrangement track.
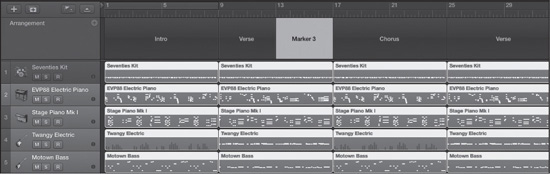
© Apple Inc.
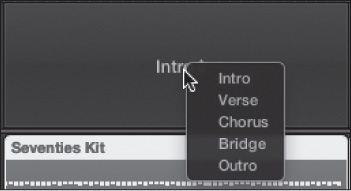
Renaming Arrangement Markers
Given the automatic marker naming in the arrangement track, it’s likely you will want to rename some or all of your arrangement markers almost immediately. Renaming arrangement markers is incredibly easy. If you’re fine with the basic Intro, Verse, Chorus, Bridge, and Outro names for your arrangement, but you simply want to rename a marker to one of those options, click on the name of the marker you wish to change. A menu opens giving you access to each of these options, as shown in Figure 4.17.
Figure 4.17 To change the name of a marker to one of the basic names provided in Logic, click on the name of the marker you wish to change and select another option from this menu.
© Apple Inc.
This method works for arrangement markers created using either the plus button or the Pencil tool. To change the name of any arrangement marker to some other, more specific name, double-click somewhere in the marker outside the marker name area. A text input window opens where you can name the marker anything you choose. Enter the name, press Return, and your marker is renamed.
Copying, Resizing, Moving, and Deleting Arrangement Markers
The processes for copying, resizing, moving, and deleting couldn’t be easier:
![]() To copy an arrangement marker to a new location, Option-drag the selected marker to its new location. Your original marker stays in its original location, and a copy of that marker and all the regions within that marker are placed in the new location.
To copy an arrangement marker to a new location, Option-drag the selected marker to its new location. Your original marker stays in its original location, and a copy of that marker and all the regions within that marker are placed in the new location.
![]() To resize a marker, simply move the cursor to the right or left edge of the marker you wish to resize. A resize cursor will appear. Click and drag the edge of the marker to resize the marker to the desired length.
To resize a marker, simply move the cursor to the right or left edge of the marker you wish to resize. A resize cursor will appear. Click and drag the edge of the marker to resize the marker to the desired length.
![]() To move an arrangement marker, drag the marker to its new location; the marker and all the regions within it are moved accordingly.
To move an arrangement marker, drag the marker to its new location; the marker and all the regions within it are moved accordingly.
![]() Deleting an arrangement marker is a little more involved. When you press the Delete key the first time, all the regions within the marker are deleted but the marker remains. Pressing Delete again removes the marker. If you delete an arrangement marker between two other markers, the markers to the right are moved to the left with their dependent regions, closing the gap in your project. If you delete the first arrangement marker in your project, all other markers and their dependent regions are shifted to the left, with the new first marker placed at the beginning of your project. You can delete multiple arrangement markers by Shift-clicking the markers you want to delete. Again, pressing Delete once removes the regions within the selected markers, and pressing Delete again removes the actual markers, with all gaps among remaining markers automatically eliminated.
Deleting an arrangement marker is a little more involved. When you press the Delete key the first time, all the regions within the marker are deleted but the marker remains. Pressing Delete again removes the marker. If you delete an arrangement marker between two other markers, the markers to the right are moved to the left with their dependent regions, closing the gap in your project. If you delete the first arrangement marker in your project, all other markers and their dependent regions are shifted to the left, with the new first marker placed at the beginning of your project. You can delete multiple arrangement markers by Shift-clicking the markers you want to delete. Again, pressing Delete once removes the regions within the selected markers, and pressing Delete again removes the actual markers, with all gaps among remaining markers automatically eliminated.
Remember, if you accidentally perform any of these operations on an arrangement marker, the Undo command, Command+Z, will undo the action.
The Marker Track
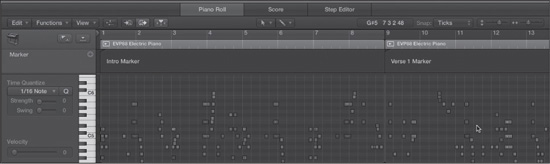
The marker track displays project markers. While this may sound like it’s identical to the arrangement track, their functions are quite different. Arrangement track markers can help you easily change a song’s arrangement. Marker track markers, on the other hand, are very useful placeholders for locations or sections of your project. They can appear as short placeholders with a line of text in the marker track or as much longer messages in their own Marker Text window. The background and text of the markers can be colored if you wish. Figure 4.18 shows the Piano Roll editor with the marker track displayed.
Figure 4.18 This Piano Roll editor has a marker track displaying song markers at the top of the editor.
© Apple Inc.
The marker track has its own hide/show button—it’s the button with the flag in it next to the Hide/Show Global Tracks button. If you click the Hide/Show Marker Track button, the marker track will be shown, and any other currently displayed global tracks will be hidden. Clicking the button again hides the marker track, and all other global tracks remain hidden.
Markers are an invaluable aid in organizing and navigating your project. They are very easy to create and use, as you will soon see. They are even embedded in any audio files you bounce or export from Logic, allowing you to use them across multiple projects.
The Marker List
In addition to being visible in the marker track, Logic stores the locations of all of a song’s markers in a specialized Event list called the Marker list, available in the List Editors area of the main window or as its own window. The Marker list displays all the markers currently in your project. It allows you to edit the positions of markers, create markers, and perform some additional functions as well. You can bring up the Marker list window by choosing Navigate > Open Marker List or by click-dragging the Marker tab in the List Editors area. To display the Marker list in the main window, open the List Editors area in the main window by clicking the List Editors button or pressing D and then clicking the Marker tab. Figure 4.19 shows a Marker list window.
Figure 4.19 In the Marker list, you can add markers, edit their position and length, and more.
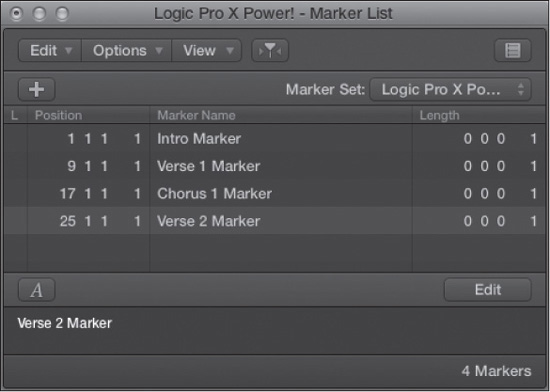
© Apple Inc.
The Marker list serves as a single location to quickly view all your markers. If you like to navigate or edit markers from a list, the Marker list serves that purpose, too. If you make regular use of markers, a Marker list window can be an invaluable addition to your screensets.
The Marker list incorporates some unique buttons and menus, which you will now explore.
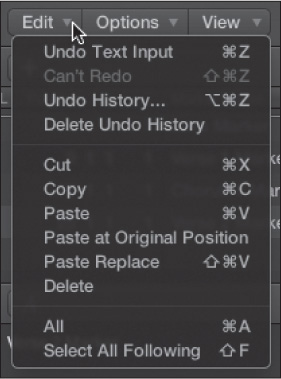
THE EDIT MENU
The Marker list Edit menu, shown in Figure 4.20, features many of the same functions as the global Edit menu. Refer to the section on the global Edit menu for information on these functions.
Figure 4.20 The Marker list Edit menu.
© Apple Inc.
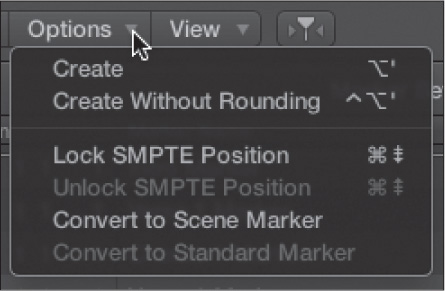
THE OPTIONS MENU
The Options menu contains commands for creating and altering markers. Figure 4.21 shows the Marker list Options menu.
Figure 4.21 The Marker list Options menu.
© Apple Inc.
The Marker list Options menu commands are as follows:
![]() Create: The Create command creates a new marker at the bar nearest to the current playhead position. The key command for this is Option+’ (apostrophe).
Create: The Create command creates a new marker at the bar nearest to the current playhead position. The key command for this is Option+’ (apostrophe).
![]() Create Without Rounding: The Create Without Rounding command creates a new marker at the current playhead position. The key command for this is Control+Option+’ (apostrophe).
Create Without Rounding: The Create Without Rounding command creates a new marker at the current playhead position. The key command for this is Control+Option+’ (apostrophe).
![]() Lock SMPTE Position: This command locks your marker to its current SMPTE position. The key command for this is Command+Page Down.
Lock SMPTE Position: This command locks your marker to its current SMPTE position. The key command for this is Command+Page Down.
![]() Unlock SMPTE Position: If you have a marker locked to a SMPTE position, you can unlock it using this command. This is particularly applicable to video markers, which are covered in more detail in the section “The Movie Track” later in this chapter and in Chapter 14. The key command for this is Command+Page Up.
Unlock SMPTE Position: If you have a marker locked to a SMPTE position, you can unlock it using this command. This is particularly applicable to video markers, which are covered in more detail in the section “The Movie Track” later in this chapter and in Chapter 14. The key command for this is Command+Page Up.
![]() Convert to Scene Marker: This command converts a standard marker into a movie scene marker.
Convert to Scene Marker: This command converts a standard marker into a movie scene marker.
![]() Convert to Standard Marker: This command converts a movie scene marker into a standard marker.
Convert to Standard Marker: This command converts a movie scene marker into a standard marker.
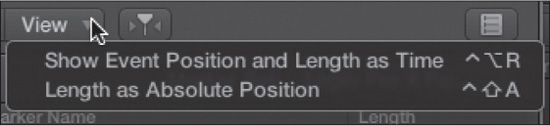
THE VIEW MENU
The View menu contains a couple of options to change the display of information in the Marker list. Figure 4.22 shows the Marker list View menu.
Figure 4.22 The Marker list View menu.
© Apple Inc.
The Marker list View menu options are as follows:
![]() Show Event Position and Length as Time: This command changes the Position and Length columns in the Marker list from displaying information in bars to SMPTE. This is very useful when working with movie scene markers. The key command for this is Control+Option+R. If you are not using the musical grid in a project, the Marker list will use time by default.
Show Event Position and Length as Time: This command changes the Position and Length columns in the Marker list from displaying information in bars to SMPTE. This is very useful when working with movie scene markers. The key command for this is Control+Option+R. If you are not using the musical grid in a project, the Marker list will use time by default.
![]() Length as Absolute Position: This command changes the Length column from displaying the relative length of the marker to the actual bar position of the end of the marker. The key command for this is Control+Shift+A.
Length as Absolute Position: This command changes the Length column from displaying the relative length of the marker to the actual bar position of the end of the marker. The key command for this is Control+Shift+A.
THE MARKER SET MENU
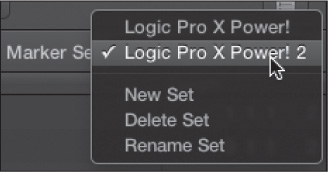
The Marker Set menu, shown in Figure 4.23, lets you manage multiple sets of markers. As you learn to work with markers and begin using them to navigate your projects, you’ll see the advantage of, for example, having one set of markers ready for navigating vocal overdubs while another set is ready for the lead guitar track. The Marker Set menu makes managing sets of markers simple.
Figure 4.23 The Marker Set menu lets you manage and access multiple sets of markers.
© Apple Inc.
The menu commands are self-explanatory:
![]() Create a new marker set (an empty Marker list) with the New Set command.
Create a new marker set (an empty Marker list) with the New Set command.
![]() To switch marker sets, choose the desired set at the top of the Marker Set menu.
To switch marker sets, choose the desired set at the top of the Marker Set menu.
![]() Delete the selected set with the Delete Set command.
Delete the selected set with the Delete Set command.
![]() Rename the selected set with the Rename Set command.
Rename the selected set with the Rename Set command.
It’s that simple! You can also access this menu by clicking on the Marker fields in the marker track header.
THE MARKER LIST BUTTONS
The Marker list has three buttons. Brief explanations of their functions follow:
![]() Catch Playhead: When lit, this button (next to the View menu) ensures the Marker list follows along the playhead.
Catch Playhead: When lit, this button (next to the View menu) ensures the Marker list follows along the playhead.
![]() Edit Marker: This button, in the upper-right corner of the Marker list, opens the Marker Text area at the bottom of the Marker list. The Marker Text area is covered later in the section “The Marker Text Area” later in this chapter.
Edit Marker: This button, in the upper-right corner of the Marker list, opens the Marker Text area at the bottom of the Marker list. The Marker Text area is covered later in the section “The Marker Text Area” later in this chapter.
![]() Create: Clicking the plus button creates a new marker at the beginning of the division nearest the current playhead position. Divisions and the Division setting in the Transport are covered in Chapter 5.
Create: Clicking the plus button creates a new marker at the beginning of the division nearest the current playhead position. Divisions and the Division setting in the Transport are covered in Chapter 5.
Marker Commands in the Navigate Menu
In addition to the commands available in the Marker list, there are also commands pertaining to the creation and use of markers in the global Navigate menu, as shown in Figure 4.24.
The Navigate menu marker commands are as follows:
![]() Go To: The Go To submenu, shown in Figure 4.25, contains the following marker commands:
Go To: The Go To submenu, shown in Figure 4.25, contains the following marker commands:
![]() Next Marker: The Next Marker command lets you navigate your project via markers. Selecting Next Marker moves the playhead to the next marker. The Go To marker key commands are particularly good ones to learn. The key command for Next Marker is Option+. (period).
Next Marker: The Next Marker command lets you navigate your project via markers. Selecting Next Marker moves the playhead to the next marker. The Go To marker key commands are particularly good ones to learn. The key command for Next Marker is Option+. (period).
![]() Previous Marker: The Previous Marker command moves the playhead to the previous marker. The key command for this is Option+, (comma).
Previous Marker: The Previous Marker command moves the playhead to the previous marker. The key command for this is Option+, (comma).
![]() Marker Number: The Marker Number command opens the Go to Marker dialog box. Simply type a marker number in the Go to Marker Number field, click OK, and the playhead will move to that marker. The key command for this is Option+/(forward slash).
Marker Number: The Marker Number command opens the Go to Marker dialog box. Simply type a marker number in the Go to Marker Number field, click OK, and the playhead will move to that marker. The key command for this is Option+/(forward slash).
Figure 4.24 The Navigate menu.

© Apple Inc.
Figure 4.25 The Go To submenu.
© Apple Inc.
![]() Create Marker: The Create Marker command creates a new marker at the bar nearest to the current playhead position. The key command for this is Option+’ (apostrophe).
Create Marker: The Create Marker command creates a new marker at the bar nearest to the current playhead position. The key command for this is Option+’ (apostrophe).
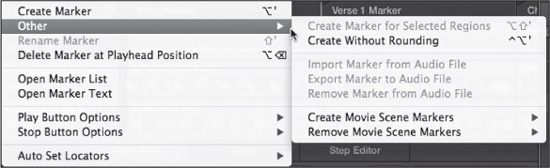
![]() Other: The Other submenu, shown in Figure 4.26, contains a number of useful marker commands:
Other: The Other submenu, shown in Figure 4.26, contains a number of useful marker commands:
Figure 4.26 The Other submenu.
© Apple Inc.
![]() Create Marker for Selected Regions: This command creates new markers at the position of each selected region. The markers also span the length of each selected region and take on the name of their respective parent region. The key command for this is Option+Shift+’ (apostrophe).
Create Marker for Selected Regions: This command creates new markers at the position of each selected region. The markers also span the length of each selected region and take on the name of their respective parent region. The key command for this is Option+Shift+’ (apostrophe).
![]() Create Without Rounding: The Create Without Rounding command creates a new marker at the current playhead position. The key command for this is Control+Option+’ (apostrophe).
Create Without Rounding: The Create Without Rounding command creates a new marker at the current playhead position. The key command for this is Control+Option+’ (apostrophe).
![]() Import Marker from Audio File: When you record or bounce an audio file in Logic, the marker information that falls within the borders of that audio file is included in the bounced file. The Import Marker from Audio File command lets you import this information into your Logic project—a handy feature if you want to share markers across multiple projects. You’ll learn more about bouncing audio in Chapter 11.
Import Marker from Audio File: When you record or bounce an audio file in Logic, the marker information that falls within the borders of that audio file is included in the bounced file. The Import Marker from Audio File command lets you import this information into your Logic project—a handy feature if you want to share markers across multiple projects. You’ll learn more about bouncing audio in Chapter 11.
![]() Export Marker to Audio File: The Export Marker to Audio File command allows you to export marker information directly into an audio region.
Export Marker to Audio File: The Export Marker to Audio File command allows you to export marker information directly into an audio region.
![]() Remove Marker from Audio File: The Remove Marker from Audio File command removes the marker information from an audio file, which is helpful if you are sharing audio across projects and want to remove marker information from the audio on a per-project basis.
Remove Marker from Audio File: The Remove Marker from Audio File command removes the marker information from an audio file, which is helpful if you are sharing audio across projects and want to remove marker information from the audio on a per-project basis.
![]() Create Movie Scene Markers: The Create Movie Scene Markers submenu offers a variety of options for creating movie scene markers. It’s covered in Chapter 14.
Create Movie Scene Markers: The Create Movie Scene Markers submenu offers a variety of options for creating movie scene markers. It’s covered in Chapter 14.
![]() Remove Movie Scene Markers: The Remove Movie Scene Markers submenu offers a variety of options for removing movie scene markers. It’s also covered in Chapter 14.
Remove Movie Scene Markers: The Remove Movie Scene Markers submenu offers a variety of options for removing movie scene markers. It’s also covered in Chapter 14.
![]() Rename Marker: The Rename Marker command lets you rename the selected marker. When you use this command, a text window opens above the marker in the marker track lane, where you can input a new name and then press Return. The key command for this is Shift+’ (apostrophe).
Rename Marker: The Rename Marker command lets you rename the selected marker. When you use this command, a text window opens above the marker in the marker track lane, where you can input a new name and then press Return. The key command for this is Shift+’ (apostrophe).
![]() Delete Marker at Playhead Position: This command deletes the marker at the current playhead position. The key command for this is Option+Delete.
Delete Marker at Playhead Position: This command deletes the marker at the current playhead position. The key command for this is Option+Delete.
![]() Open Marker List: The Open Marker List command opens a Marker list window.
Open Marker List: The Open Marker List command opens a Marker list window.
![]() Open Marker Text: The Open Marker Text command opens a Marker Text window. The Marker Text window is discussed in the section “The Marker Text Area” later in this chapter.
Open Marker Text: The Open Marker Text command opens a Marker Text window. The Marker Text window is discussed in the section “The Marker Text Area” later in this chapter.
Creating, Copying, Resizing, Moving, and Deleting Markers
As discussed, markers are global events and can be created, copied, moved, resized, and deleted in the same way as any global event on a global track. The Marker list gives you the ability to accomplish the same things in a text-based editor using standard Edit menu commands, mouse input, and keyboard input. The marker commands in the Navigate menu offer a number of other ways to work with markers. In addition to the methods discussed earlier, Logic offers a few additional ways to work with markers in your project:
![]() You can use the Create Marker, Rename Marker, and Delete Marker commands by Control-clicking when mousing over the marker lane to open a shortcut menu.
You can use the Create Marker, Rename Marker, and Delete Marker commands by Control-clicking when mousing over the marker lane to open a shortcut menu.
![]() You can drag one or more regions from the main window into the marker track. A marker will be created with the same length and position as the dragged region(s).
You can drag one or more regions from the main window into the marker track. A marker will be created with the same length and position as the dragged region(s).
![]() You can click the Marker field in the marker track header to open a menu that offers the Create Markers from Regions command.
You can click the Marker field in the marker track header to open a menu that offers the Create Markers from Regions command.
![]() Markers that you create using regions may be rounded to the closest bar line. If you want your marker to be at the exact position of the regions, even if they are not on a bar line, you can choose Navigate > Other > Create Without Rounding. The key command for this is Control+Option+’ (apostrophe).
Markers that you create using regions may be rounded to the closest bar line. If you want your marker to be at the exact position of the regions, even if they are not on a bar line, you can choose Navigate > Other > Create Without Rounding. The key command for this is Control+Option+’ (apostrophe).
![]() You can create a marker that corresponds to a cycle area if Cycle mode is on (see Chapter 5) and the marker track is shown by dragging the cycle area down into the marker track or down into the bottom third of the Bar ruler.
You can create a marker that corresponds to a cycle area if Cycle mode is on (see Chapter 5) and the marker track is shown by dragging the cycle area down into the marker track or down into the bottom third of the Bar ruler.
If you attempt to create a marker where one already exists within a quarter note in either direction, Logic will not create the new marker. If you want to assign a marker to an absolute time position regardless of the song’s tempo (this is very useful for film scoring and audio post-production for video), create a marker or select a previously created marker and use the Lock SMPTE Position command from the Tracks areas’s local Functions menu. The key command for this is Command+Page Down.
If you decide that you no longer need a marker, deleting it is very simple. You can simply select the marker in the marker track and press Delete. Alternatively, you can delete it from the Marker list. Lastly, you can move the playhead to the marker you would like to delete and choose Navigate > Delete Marker at Playhead Position.
Adding or Changing Marker Color
You can easily add or change the color of a marker on the marker track:
1. Choose View > Show Colors or press Option+C to open the Color palette.
2. Select one or more markers.
3. Click the color in the palette you wish to add to the marker(s). The color will be applied to the selected marker(s).
The Marker Text Area
The Marker Text area, shown in Figure 4.27, is found at the bottom of the Marker list. It is where you customize the look and feel of the marker you have created.
Figure 4.27 The Marker Text area contains all your options for customizing markers.
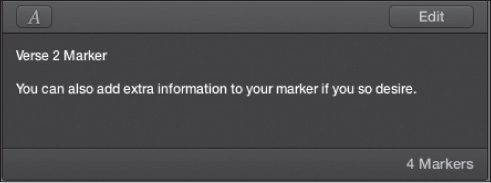
© Apple Inc.
As you can see in Figure 4.27, there are two buttons above the text-entry area. These buttons have the following functions:
![]() A: This button opens a Font window containing options for selecting a font, resizing the font, and choosing the font style and color.
A: This button opens a Font window containing options for selecting a font, resizing the font, and choosing the font style and color.
![]() Edit/Done: Click the Edit button to edit the text for the selected marker. After you click the Edit button, it toggles to a Done button. When you are finished entering the marker text, click the Done button.
Edit/Done: Click the Edit button to edit the text for the selected marker. After you click the Edit button, it toggles to a Done button. When you are finished entering the marker text, click the Done button.
You can also double-click in the Marker Text area to enter text. If you have text in the Clipboard, you can paste it into a marker, or you can copy the text here in the Marker Text area into the Clipboard to paste it elsewhere.
Keep in mind that in the main window, the marker space in the marker track may be too small to display anything more than the name and color of your marker. You can resize an expanded marker track to display all the text if desired. You’ll need to keep the Marker Text window open in your screenset to view customized marker text; the marker track itself uses only its default font.
TIP: Clearly, the markers in the global track are not designed for large amounts of text. They are perfect for a quick title and maybe a note or a lyric or two, but not much more than that. If you want your markers to contain extensive notes and information for collaborators, future reference, and so on, you would be better off to keep the Marker Text window open permanently. A great way to do this is to select Navigate > Open Marker Text. This creates the Marker Text window as a floating window, meaning it will not get lost behind other windows and will always be visible. One thing to keep in mind, however, is that with the Notes feature, there is far less need to use markers for extensive notes. You can read about the Notes feature in Chapter 6.
Using Markers
This chapter has already discussed using markers as a visual cue to organize your project or to create extensive text boxes filled with notes, lyrics, and such that will automatically follow your song. You can also use markers to move the playhead and set a cycle area.
If you Option-click on a marker in the marker track, the playhead moves to the start of the marker. If you drag a marker to the Bar ruler, it will set the locators and turn on Cycle mode for the length of that marker.
Importing Markers from Other Projects
One very cool feature in Logic is the ability to import settings from one project directly into another. While templates do a great job of giving you a customized blank slate from which to start, sometimes you’ll find that you’d really like to import things like aux routings, entire mixer configurations, and global tracks. In addition to being able to import markers from an audio file, you can import the marker track from one project into another in the All Files Browser. This is covered in detail in Chapter 12.
The Signature Track
The signature track shows any time and key signatures associated with the song. If you haven’t set any, Logic will default to a time signature of 4/4 and a key of C. If you import a GarageBand song, your initial key and time signature settings from GarageBand will be carried over. If you are not familiar with music notation or otherwise do not generally use time and key signatures in your music, you most likely will not use the signature track very often. Figure 4.28 shows a signature track open in the Score editor.
Figure 4.28 A signature track with a time and key signature change displayed in the Score editor.
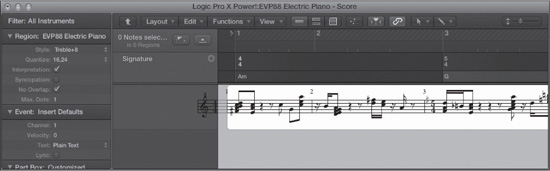
© Apple Inc.
In general, information in the signature track is more for display purposes than anything else. Any key-signature changes after the initial key signature affect the display of MIDI notes in the Score editor but don’t have any effect on playback. Similarly, even time-signature changes don’t affect playback, only the display of measures in the Score editor and the Bar ruler and the emphasis of the metronome.
The signature track does interact with the transposition track. When you create signature events and transposition events, the transposition events will automatically reflect your signature events. The reverse is not true: Transposition events you create are not reflected on the signature track. Apple Loops and transposable MIDI regions will be transposed based on the setting in the transposition track. These settings determine whether there will be any transposition relative to the current key signature shown in the signature track. If no events are available in the transposition track, the global playback key for Apple Loops and MIDI regions is determined by the very first key signature.
Creating Time- and Key-Signature Global Events
You can create time and key signatures by creating global events in the signature track as described in the “Creating a Global Event” section earlier in this chapter. If you click with the Pencil tool in the top half of the signature track, you will see the dialog box shown in Figure 4.29, for adding a time-signature event. You can also access the Time Signature dialog box by clicking the plus button in the signature track header. If you click the Pencil tool in the bottom half of the signature track, you will be shown the dialog box in Figure 4.30 to add a key-signature event.
If you collapse the signature track height to the point that the time and key signatures are merged onto the same line, you won’t be able to create signature events with the Pencil tool. Only when the signature track is expanded will both lines for time and key signatures be visible.
Time and key signatures can also be added in the Score editor. This is discussed in Chapter 8.
Figure 4.29 When you use the Pencil tool or the plus button to create a time-signature event, this dialog box lets you enter the time-signature information. When you click OK, the time signature will be added to the signature track.
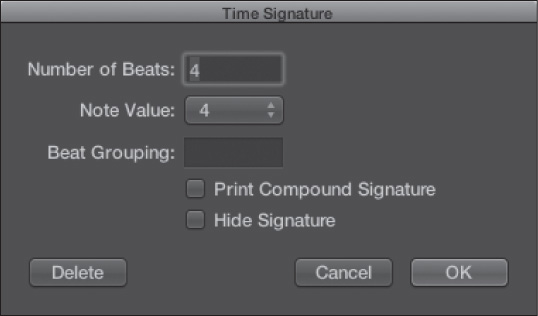
© Apple Inc.
Figure 4.30 When you use the Pencil tool to create a key-signature event, this dialog box lets you enter the key-signature information. When you click OK, the key signature will be added to the signature track.
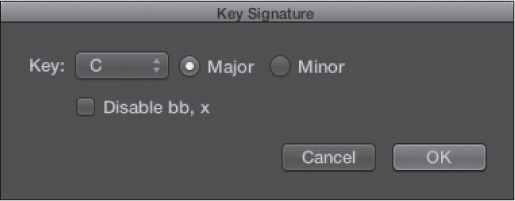
© Apple Inc.
Copying, Resizing, Moving, and Deleting Signatures
Events on the signature track can be selected, moved, deleted, and copied in the same way as other global events. If you want to edit an existing signature, double-click it, and the corresponding dialog box shown in Figures 4.29 and 4.30 will open. If you Shift-double-click anywhere in the signature track, you will open the Signature list window, shown in Figure 4.31. The Signature list is also available in the List Editors area of the main window. Time and key signatures are shown in a list-style editor, much like the Marker list. Any other score symbols, such as repeat signs, double bar lines, and so on, are also shown in this list. You can also open the Signature list in its own floating window by dragging the Signatures tab in the List Editors area.
Figure 4.31 The Signature list window shows all your time signatures and key changes in a list format.
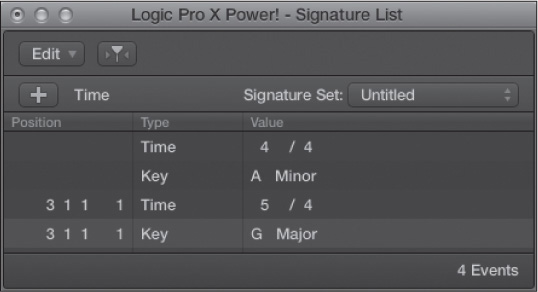
© Apple Inc.
The Edit menu in the Signature list is a typical Edit menu, full of familiar commands. You can create new signature events by clicking the plus button in the Signature list. You can select what kind of event is created when you click the plus button by clicking the text field next to the plus button (it reads “Time” in Figure 4.31). The Signature Set menu in the Signature list gives you access to signature sets, which are similar to marker sets in that you can create, rename, delete, and switch between signature sets. You can also access commands related to signature sets by clicking on the Signature field in the signature track header.
Cutting Measures in the Signature Track
If you want to cut measures in the signature track—for example, if you want to divide one 5/4 measure into a 3/4 measure and a 2/4 measure—you can select the Scissors tool from the Tool menu of the selected window and click at the desired location. If you make a cut in the middle of a bar in which there are no time-signature changes, you will create two shorter measures with the original time. You can also merge two measures into one longer measure by using the Glue tool in the signature track.
Importing Signature Tracks from Other Projects
Like marker tracks, signature tracks can be imported from one project into another in the All Files Browser. This is covered in Chapter 12.
The Transposition Track
The transposition track shows global transposition events that affect the transposition of Apple Loops and MIDI regions. In MIDI regions, the MIDI events themselves are changed, but nondestructively, meaning that the original data is not deleted. If you remove the transposition, the original data will return. Apple Loops will be pitch-shifted based on the transposition events on the transposition track. Regular audio regions and Apple Loops with no key information will not be transposed. Figure 4.32 shows the transposition track in the main window.
Figure 4.32 The transposition track in the main window.
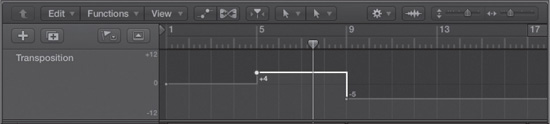
© Apple Inc.
If you do not want a MIDI region to transpose, click the No Transpose checkbox in its Region Inspector. The current key signature in the signature track determines the zero position of the transposition track. If the key signature changes during a song, the zero position of the transposition track also changes.
Editing Events in the Transposition Track
Transposition events on the transposition track take the form of nodes (round dots). These transposition events are connected with vertical and horizontal lines. The transposition event determines the global transposition value until the song position reaches the next transposition event (node) during playback.
You can create, copy, move, and delete transposition events as described in the “Common Features of Global Tracks” section earlier in this chapter. Transposition events are limited to being moved horizontally (along the timeline) or vertically (by the transposition value), not diagonally. The help tag will appear below the cursor when you drag a transposition node or the transposition line, with the exact transposition value or bar position of the current transposition event displayed, depending on the direction of the drag.
Pressing Control+Option+Command while clicking in the transposition track opens a text window, as shown in Figure 4.33. You can directly enter a transposition value in the box and press Return. This creates a transposition event of the typed value at the clicked position. The scale range for the display of transposition events is +/–12 semitones.
Figure 4.33 If you Control+Option+Command-click on the transposition track, a text window will appear. When you type a value and press Return, a transposition event will be created at that location.
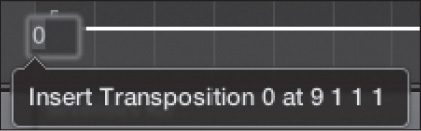
© Apple Inc.
The Tempo Track
Tempo, meaning speed or pace, is one of the most important elements in music. Tempo management can be as simple as agreeing on the tempo of a song and asking all the musicians to play in time, or as complicated as keeping track of multiple tempo changes throughout a musical movement or even continuous tempo changes. With digital audio sequencers being the nerve center for both electronic and acoustic programmed and performed tracks, it becomes vital that the sequencer keeps everything synchronized and that it gives the user the tools to fully implement whatever tempo requirements they have. The tempo track gives you a visual track for displaying, setting, and editing tempo events for your song. Figure 4.34 shows the tempo track in the main window.
Figure 4.34 The tempo track offers both a visual display and a convenient editing track for tempo changes in your song.
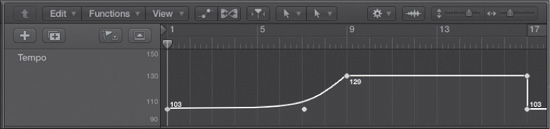
© Apple Inc.
Like the transposition track, the tempo track is made up of nodes along a line. These nodes are tempo events, and the line is the current tempo.
Inserting, Deleting, Moving, and Copying Tempo Changes
You can insert tempo changes like any other global event: by clicking in the tempo track with the Pencil tool to create a tempo change at the current position. Pressing Control+Option+Command while clicking in the tempo track opens a text window, as shown in Figure 4.35. You can directly enter a tempo value in the box and press Return. This creates a tempo change of the typed value at the clicked position.
Figure 4.35 If you Control+Option+Command-click on the tempo track, a text window will appear. When you type a value and press Return, a tempo change will be created at that location.
© Apple Inc.
You can also record tempo changes in real time, as explained in Chapter 13; they will be reflected in the tempo track.
Moving, copying, and deleting tempo changes is handled exactly the way other global events are handled. If you want to create a continuous transition between two tempi, select the node at the tip of the right angle formed by the first and second nodes and drag it inside the angle. A curve or diagonal line will form. The Tempo > Resolution menu, available by clicking on the Tempo field in the tempo track header, defines the minimum division size for tempo changes along the project timeline. Shorter divisions mean more tempo changes; longer divisions mean fewer tempo changes. You can define this differently for each node. You can also define a quantization setting for tempo nodes in the Tempo > Quantization menu in the tempo track header.
The range for the display of tempo events adjusts automatically: Dragging a tempo event beyond the current upper and lower boundaries of the tempo track results in an automatic adjustment of the range. You can manually define the maximum and minimum of the tempo scale by grabbing the maximum and minimum values in the tempo track header and dragging them vertically or by double-clicking on them and typing the desired value into the text window that appears.
Tempo Sets
Tempo sets work similarly to the marker sets discussed earlier in this chapter. You can also access, create, delete, and rename tempo sets in the Tempo > Tempo Sets menu in the tempo track header and in the Tempo list, which is covered in Chapter 13.
Importing Tempo Tracks from Other Projects
Like marker and signature tracks, tempo tracks can be imported in the All Files Browser.
Accessing Logic Pro’s Advanced Tempo Functions from the Tempo Track
Logic Pro X offers a number of more advanced tempo features, a few of which can be accessed directly from the tempo track. These are discussed in Chapter 13.
You can Shift-double-click in the tempo track to open the Tempo list, which is a list view of your project’s tempo changes. The Tempo list opens in the List Editors area of the main window.
The tempo track has a close relationship with the beat mapping track, described in a the next section. After you use the Beat Mapping function in the beat mapping track, do not make any more changes in the tempo track!
The Beat Mapping Track
The beat mapping track is perhaps one of the most unusual and powerful global tracks in Logic. It does exactly what the name implies: It maps Logic’s tempo to a beat. Suppose you recorded a fantastic audio or MIDI performance of an instrument, but the timing was a bit off the metronome click. Or maybe you recorded a live band without any metronome at all. The beat mapping track analyzes the performance and creates a musically meaningful tempo map so that the bars and measures will fall in useful places. The performance is in no way moved or altered; it is only Logic’s tempo map and Bar ruler that are adjusted to fit the performance. Beat mapping allows you to then use a metronome that will follow the tempo of your recorded performance. You can quantize other regions to the performance thanks to the beat mapping track; loops will lock to the rest of the project, and so on. Figure 4.36 shows the beat mapping track.
Figure 4.36 The beat mapping track shown in the main window.
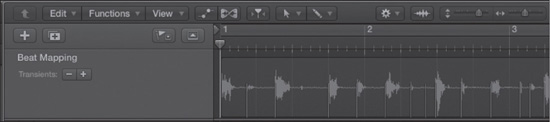
© Apple Inc.
NOTE: For new Logic users, a common mistake is to think that beat mapping is the same thing as Logic’s audio tempo manipulation features, collectively called Flex Time. In fact, beat mapping and Flex Time are the exact opposite. Beat mapping conforms Logic’s tempo map to the existing tempo of your performance. Flex Time conforms your performance to Logic’s tempo map. You’ll learn more about Flex Time in Chapter 6.
Beat-Mapping Process
The beat-mapping process basically consists of two steps:
1. You graphically link musical events (MIDI notes or audio transients, which correspond to the initial accent of rhythmically important notes) to the desired bar positions in the beat mapping track.
2. You tell the beat mapping track which measures to line up with which beat position lines. Logic will automatically insert tempo changes, causing the musical bars to correspond to the positions of the beat position lines.
As you can imagine, manually adding each and every beat position line for a song that is hundreds of bars long would require massive amounts of work! Luckily, Logic offers a number of automatic beat-mapping functions to make this process as fast and intuitive as possible.
BEAT MAPPING FROM MIDI REGIONS
Beat mapping from MIDI regions is simple:
1. Select a MIDI region for Logic to beat map. As soon as you select a MIDI region, beat position lines for each MIDI note, similar to those found in the Piano Roll editor, will appear in the beat mapping track, as shown in Figure 4.37.
Figure 4.37 The beat mapping track uses beat position bars identical to those in the selected region.
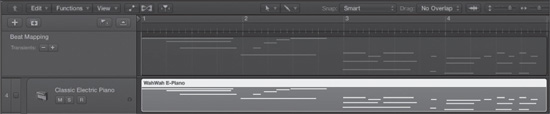
© Apple Inc.
2. Tell Logic exactly which position on the Bar ruler you want to correspond to each note. At the first position where you want to assign to a MIDI note, click and hold the mouse button. A white vertical line will appear in that location, as shown in Figure 4.38.
Figure 4.38 Click and hold the mouse at the first position on the Bar ruler where you want to assign a MIDI note.

© Apple Inc.
3. Drag the vertical line toward the beat position line to which you want to assign the selected bar position. Another line will extend from the selected bar position location to the beat position line you have selected, as shown in Figure 4.39. The help tag will reflect your action and the pointer’s exact location.
Figure 4.39 Drag the vertical line to the beat position line you want to assign to your selected bar position. A line will extend from the original vertical line to the beat position line.

© Apple Inc.
4. Release the mouse button. Logic inserts a tempo change to shift the Bar ruler so that the position you chose is linked to the note you chose, as shown in Figure 4.40.
Figure 4.40 When you release the mouse button, a tempo change is created to shift the Bar ruler to match the beat position. Notice that the entire Bar ruler has moved over. No musical events have been affected, however—only the tempo map.

© Apple Inc.
That’s the whole procedure! Simply repeat these steps for any additional Bar ruler positions you want to map to MIDI notes. If you want connect a bar position line to a position in which there is no beat position line, drag the yellow vertical line while pressing the Control key.
If you are not happy with a mapped beat, you can erase any beat allocation by double-clicking on it, clicking on it with the Eraser tool from the selected window’s Tool menu, or selecting it and pressing Delete. You can erase all your beat mapping by clicking in the Track list of the beat mapping track (except, obviously, the buttons or menus) and pressing Delete.
TIP: This example illustrated beat mapping a MIDI region on the main window. Keep in mind that the global tracks all appear in the Piano Roll, Score, and Lane editors. You might find it more convenient to beat map MIDI regions in one of these MIDI editors, where you have a much better view of the actual MIDI notes.
BEAT MAPPING FROM AUDIO REGIONS
Beat mapping from audio regions follows the same procedure as beat mapping from MIDI regions: You click on a Bar ruler position to create the vertical line, drag it to the vertical beat position line to which you wish to allocate that bar position, then release the mouse, repeating this procedure until you have completed the beat map. There is one very significant difference between beat mapping a MIDI region and an audio region, however. Whereas the notes of the selected MIDI region(s) will automatically generate beat position lines in the beat mapping track, audio regions must be analyzed first. That means Logic must search the audio region for transients, or the initial attack of strong notes. (In the waveform, these transients look like spikes in the signal.) Generally, the more rhythmic the instrument (drums, percussion, and so on), the more distinct and accurate Logic’s analysis of the transients will be.
To do this, follow these steps:
1. Select an audio region (or regions).
2. Click in the Beat Mapping field in the beat mapping track header.
3. Select Analyze Transients in the Beat Mapping menu.
Logic will analyze the region(s) for transients and generate corresponding beat position markers in the beat mapping track. You can also drag an audio region (or regions) directly onto the beat mapping track to begin the analyzing process.
The Transients buttons in the track header of the beat mapping track (see Figure 4.36) allow you to change the sensitivity to transients of the beat-mapping algorithm. You can click on these buttons to increase or decrease the sensitivity of the detection algorithm to transients. Generally, the most useful results will happen within a couple of clicks up or down from the default analysis. High Transients settings work well for regions with less distinct accents, but will detect too many peaks as transients in other files. If even a Transients setting somewhere in the middle of the range detects extraneous transients that are not musically useful, you can try a lower Transients setting. After you analyze transients, you can click through the entire Transients range to find a setting that works for your selected region.
BEATS FROM REGIONS
Selecting this option in the Beat Mapping menu creates a metronome region that you use to guide the beat mapping track as to where to generate beat position lines. For veteran Logic users, this is almost identical to using a guide region in the Reclock function. The advantage to using Beats from Regions is that the metronome region you create will often be easier for the beat mapping track to detect beats from, resulting in more accurate beat mapping. For example, you might want to beat map your song to an acoustic guitar part, but the accents may be too soft to accurately analyze. In that case, creating a metronome region with the same timing as the acoustic guitar track and using Beats from Regions will result in the beat map you want.
To use this option, follow these steps:
1. Create a MIDI track with an appropriately distinct rhythm, tapping out the exact beat to which you want Logic to beat map. If your metronome region isn’t exactly right, you can use the MIDI editors to shift notes or keep trying until you get it right.
2. When you are satisfied with the metronome region, click the Beats from Region button. You will be presented with the Set Beats by Guide Region(s) dialog box shown in Figure 4.41.
Figure 4.41 Choose the note division of your metronome region in the Set Beats by Guide Region(s) dialog box.
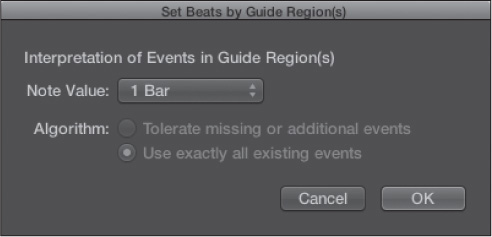
© Apple Inc.
3. Select the note division you want for your metronome region and click OK. The Bar ruler of your song will be beat mapped to the metronome region, as shown in Figure 4.42.
BEAT MAPPING TO MARKERS
You can beat map to the markers in the marker track, if that track is visible. Simply select one or more markers, and the beginning of the marker(s) will appear as beat position lines in the beat mapping track. This works with standard markers and with scene markers.
Figure 4.42 After the Beats from Regions process, your Bar ruler will be mapped to the beats of your metronome region.

© Apple Inc.
BEAT MAPPING TO SCENE MARKERS
This feature of the beat mapping track is especially useful for scoring to picture. If you are using a movie track with a loaded QuickTime movie and you have used the Create Marker Set from Scene Cuts or the Add Scene Cuts to Marker Set function on the movie track (see the section “The Movie Track” later in this chapter), the detected scene cuts will create markers, which can be used to generate beat position lines in the beat mapping track. If you want to define cut positions as the first downbeat of a bar, simply allocate the bar position to the beat position line as described in the “Beat Mapping from MIDI Regions” section earlier in this chapter.
PROTECTING MIDI EVENT POSITIONS
When you beat map an audio region, all MIDI events also move to reflect the new tempo map. However, this is not always a desirable result. For example, suppose you have a MIDI drum pattern that needs to line up correctly with a piano audio region you are beat mapping. To maintain the absolute position of all your MIDI events relative to the Bar ruler, you can select the Protect MIDI option in the beat mapping track header menu.
The Movie Track
The movie track, unlike the other global tracks, does not contain any global events. Instead, it contains thumbnail images of single frames of a QuickTime movie loaded with your song. This track is especially for users who are doing sound for picture. Figure 4.43 shows the movie track displayed in the main window.
Figure 4.43 The movie track shows thumbnails of a QuickTime movie.

© Apple Inc.
You can open a QuickTime movie by choosing the Open Movie option in the Movie menu of the movie track header, by selecting File > Movie > Open Movie, or by clicking in the movie track with the Pencil tool of the window you are in to insert a movie into the movie track at the current mouse pointer position.
You can also use the Movies tab in the Media area of the browsers in the main window to search for and preview movie files on any connected volume. You can open a movie from the Movie tab of the Media Browser by dragging the movie file directly into the Tracks area at the desired position. All of these methods open the Open Movie dialog box, shown in Figure 4.44. In this dialog box, you can choose to open the movie, extract its audio, or both.
The number of thumbnails you see depends on the current zoom level. The frames are always left aligned, with the exception of the final movie frame, which is right aligned. In other words, the left border of every frame except the final frame represents the correct song position for that frame. The final frame is right aligned to ensure that regardless of your zoom level, at least the first and last frames of a movie will be visible. No video editing operations are possible on movie thumbnail tracks.
Figure 4.44 The Open Movie dialog box.
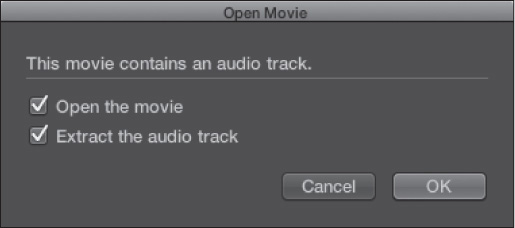
© Apple Inc.
Because the movie track doesn’t contain any global events, you can’t do any editing. You can, however, use the Create Marker Set from Scene Cuts or the Add Scene Cuts to Marker Set functions in the movie track header menu, both of which search for scene cuts in the movie. Both of these commands create movie scene markers, which are special markers locked to a specific SMPTE time and which can be deleted if the movie is removed from the song. Create Marker Set from Scene Cuts creates an entire new marker set from the detected scene cuts. Add Scene Cuts to Marker Set adds detected scene cuts to the current marker set. Finally, as described in the section “The Beat Mapping Track,” you can use the detected cut scenes from a movie track to generate beat position lines in the beat mapping track.
Now that you are familiar with some of the global options that you can access from several areas of Logic Pro X, it’s time to start exploring the individual program areas, starting with the Transport in the next chapter.