
5 Transport Controls and Recording
THE TRANSPORT CONTAINS PERHAPS THE MOST FUNDAMENTAL FUNCTIONS IN LOGIC—the controls for recording, playback, and project position. The Transport is modeled after the transport section of a tape machine, so named because pressing the buttons physically moves (transports) the magnetic tape. Of course, there’s no tape in your computer, but because the metaphor of the tape machine transport for these controls is quite intuitive, it has found its way into Logic (and, in fact, almost all modern software-based audio applications). Figure 5.1 shows the default Logic Pro X Transport.
Figure 5.1 In the Transport, you can control recording, playback, and related functions. The Transport also offers project position display and other data viewing options.
© Apple Inc.
Notice that the Transport in Logic offers many more options than a standard tape machine. This is because Logic offers far more functionality than simply recording and playing back. Logic Pro X brings some changes to the Transport, including the moving of the Transport to the control bar at the top of the main window, and multiple preset display modes for the LCD. All of the functions accessible on the Transport are directly related to playback or recording, as you’ll discover in the next sections.
The Transport Buttons
The most immediately noticeable features of the Transport are the Transport buttons themselves. These are the buttons that directly correspond to those buttons on a tape machine that “transport” the tape. When you record on a computer, no actual tape is physically moved, so Logic uses a playhead—a vertical line in the main window from the Bar ruler to the bottom of the Tracks area—to indicate the current playback location in the song. Figure 5.2 shows the default Transport buttons.
Figure 5.2 The default Transport buttons.

© Apple Inc.
If you have help tags enabled, holding the mouse pointer over these buttons will reveal the names of the buttons. Although the functions of these buttons are self-evident if you’ve previously used a tape recorder, here is specific information about how these buttons function in Logic, starting from left to right in the Transport shown in Figure 5.2.
![]() Rewind: Clicking this button moves the playhead backward. If you click and hold this button, the playhead moves backward more quickly. The key command for this is Shift+, (comma). If you short-click the button (that is, click the button very quickly), the playhead jumps back one bar. The key command for this is, (comma). If you click and hold the button and drag your mouse to the left or right, you can shuttle the playhead backward or forward. If you Command-click on the Rewind button, you will move the playhead to the previous marker. The key command for this is Option+, (comma).
Rewind: Clicking this button moves the playhead backward. If you click and hold this button, the playhead moves backward more quickly. The key command for this is Shift+, (comma). If you short-click the button (that is, click the button very quickly), the playhead jumps back one bar. The key command for this is, (comma). If you click and hold the button and drag your mouse to the left or right, you can shuttle the playhead backward or forward. If you Command-click on the Rewind button, you will move the playhead to the previous marker. The key command for this is Option+, (comma).
TIP: It might be easier to remember these Rewind commands by thinking of them as using the less than (<) key rather than the comma, as this key resembles the left-facing arrows of a Rewind button on a tape, CD, or DVD player’s transport controls.
![]() Fast Forward: This button moves the playhead forward. If you click and hold this button, the playhead moves forward more quickly. The key command for this is Shift+. (period). If you short-click the button, the playhead jumps forward one bar. The key command for this is. (period). If you click and hold the button and drag your mouse to the left or right, you can shuttle the playhead forward or backward. If you Command-click on the Fast Forward button, you will move the playhead to the next marker. The key command for this is Option+. (period).
Fast Forward: This button moves the playhead forward. If you click and hold this button, the playhead moves forward more quickly. The key command for this is Shift+. (period). If you short-click the button, the playhead jumps forward one bar. The key command for this is. (period). If you click and hold the button and drag your mouse to the left or right, you can shuttle the playhead forward or backward. If you Command-click on the Fast Forward button, you will move the playhead to the next marker. The key command for this is Option+. (period).
TIP: It might be easier to remember these Fast Forward commands by thinking of them as using the greater than (>) key rather than the period, as this key resembles the right-facing arrows of a Fast Forward button on a tape, CD, or DVD player’s transport controls.
![]() Stop: By default, clicking Stop halts playback or recording. If Logic is not playing or recording when you click Stop, the playhead will return to the first bar of the project or cycle. The key command for this is 0. The Stop button has a shortcut menu, which you can reveal by clicking and holding or right-clicking on the Stop button. The Stop shortcut menu is covered in the section “The Stop Button Shortcut Menu” later in this chapter. You can also toggle playback with the spacebar.
Stop: By default, clicking Stop halts playback or recording. If Logic is not playing or recording when you click Stop, the playhead will return to the first bar of the project or cycle. The key command for this is 0. The Stop button has a shortcut menu, which you can reveal by clicking and holding or right-clicking on the Stop button. The Stop shortcut menu is covered in the section “The Stop Button Shortcut Menu” later in this chapter. You can also toggle playback with the spacebar.
![]() Play: By default, clicking this button begins playback at the current playhead or from the left locator. If you are in Cycle mode, playback begins at the start of the cycle. The key command for this is the Enter key on the numeric keypad. You can also toggle playback with the spacebar. The Play button has a shortcut menu, which you can reveal by clicking and holding or right-clicking on the Play button. The Play shortcut menu is covered in the section “The Play Button Shortcut Menu” later in this chapter. You can also toggle playback with the spacebar.
Play: By default, clicking this button begins playback at the current playhead or from the left locator. If you are in Cycle mode, playback begins at the start of the cycle. The key command for this is the Enter key on the numeric keypad. You can also toggle playback with the spacebar. The Play button has a shortcut menu, which you can reveal by clicking and holding or right-clicking on the Play button. The Play shortcut menu is covered in the section “The Play Button Shortcut Menu” later in this chapter. You can also toggle playback with the spacebar.
![]() Record: When you click this button, it turns red, along with the LCD, and Logic begins recording. The key command for this is R. If you have designated a count-in or a pre-roll, covered later in this chapter, Logic will play the count-in or pre-roll before engaging record. Any data sent by connected MIDI controllers is recorded on the selected MIDI track in the main window. Any audio sent into one or more channels of your audio interface is recorded as audio on record-enabled audio tracks with one of those channels selected as an input. Logic creates a region in the Tracks area for each track you record. The region will span the actual length of the time you recorded, from the end of the pre-roll (if applicable) to the moment Stop was clicked. If you click and hold down the Record button or right-click on it, you can access the Recording Settings window, which is explained in the section “The Recording Settings Window” later in this chapter.
Record: When you click this button, it turns red, along with the LCD, and Logic begins recording. The key command for this is R. If you have designated a count-in or a pre-roll, covered later in this chapter, Logic will play the count-in or pre-roll before engaging record. Any data sent by connected MIDI controllers is recorded on the selected MIDI track in the main window. Any audio sent into one or more channels of your audio interface is recorded as audio on record-enabled audio tracks with one of those channels selected as an input. Logic creates a region in the Tracks area for each track you record. The region will span the actual length of the time you recorded, from the end of the pre-roll (if applicable) to the moment Stop was clicked. If you click and hold down the Record button or right-click on it, you can access the Recording Settings window, which is explained in the section “The Recording Settings Window” later in this chapter.
TIP: Remember, Logic is designed to allow users to really fly by using key commands everywhere possible. That means not only are there key commands for all the Transport buttons, but there are key commands relating to Transport functions that offer even more functionality. For example, simply clicking Play will start playback at the current playhead position or at the beginning of a cycle, but there are also key commands for Play from Beginning (to begin playback from the start of the song), Play from Previous Bar (to begin playback one bar behind the current playhead position), Play from Selection (to begin playback from the start of a selected region), and so on. You can use a key command for the Stop and Go to Left Locator command or for the Stop and Go to Last Play Position command, and there are key commands to increase or decrease the fast-forward and rewind speed. Assigning and using these and other Transport-related key commands will vastly speed up your workflow. Give them a try!
Mode Buttons
The mode buttons, located under the Transport buttons, toggle Logic’s playback and/or record mode. Figure 5.3 shows the default mode buttons.
Figure 5.3 The Solo button. Click it once to turn Solo on. Click again to turn Solo off.

© Apple Inc.
If you have help tags enabled, holding the mouse pointer over these buttons will reveal their functions. From left to right, here is a description of the first three of these buttons:
![]() Cycle: This button toggles Cycle mode on or off. Basically, in Cycle mode, playback and recording repeat within a given range defined by the left and right locator positions. You can numerically input the boundaries of the cycle in the Locator display (see the “Locators” section later in this chapter), or you can graphically set the cycle boundaries in the main window, among other methods. The Cycle button has a shortcut menu, which you can reveal by clicking and holding or right-clicking on the Cycle button. Cycle mode and the Cycle button shortcut menu are explained in more detail in Chapter 6, “The Logic Pro Main Window.”
Cycle: This button toggles Cycle mode on or off. Basically, in Cycle mode, playback and recording repeat within a given range defined by the left and right locator positions. You can numerically input the boundaries of the cycle in the Locator display (see the “Locators” section later in this chapter), or you can graphically set the cycle boundaries in the main window, among other methods. The Cycle button has a shortcut menu, which you can reveal by clicking and holding or right-clicking on the Cycle button. Cycle mode and the Cycle button shortcut menu are explained in more detail in Chapter 6, “The Logic Pro Main Window.”
![]() Replace: This button toggles Replace mode on and off. In Replace mode, any data you record onto a track will supersede previously recorded data on that track. In other words, if you record a region on a track, turn on Replace mode, and then record over that original region, the old data will be gone and the new data will be all that is left on that track. If Replace mode is off, recording over a region on a track leaves the original region intact. The old region is still present but will not play back until you move it to an empty track. If you are using Replace mode and Cycle mode simultaneously, an existing region is deleted only on the first pass. As you continue to cycle, each subsequent pass is retained.
Replace: This button toggles Replace mode on and off. In Replace mode, any data you record onto a track will supersede previously recorded data on that track. In other words, if you record a region on a track, turn on Replace mode, and then record over that original region, the old data will be gone and the new data will be all that is left on that track. If Replace mode is off, recording over a region on a track leaves the original region intact. The old region is still present but will not play back until you move it to an empty track. If you are using Replace mode and Cycle mode simultaneously, an existing region is deleted only on the first pass. As you continue to cycle, each subsequent pass is retained.
![]() Tuner: If you have an audio track selected, you can click the Tuner button, and Logic Pro’s Tuner will open, letting you tune your source instrument.
Tuner: If you have an audio track selected, you can click the Tuner button, and Logic Pro’s Tuner will open, letting you tune your source instrument.
There are three more mode buttons: Solo, Count In, and Metronome. These buttons require the additional explanation provided in the following subsections.
The Solo Button
Next to the default mode buttons is the Solo button, which appears like an S in a box, as shown in Figure 5.4. When Solo mode is active, you may play back your song while only listening to the selected regions you wish to hear.
Figure 5.4 The Solo button. Click it once to turn Solo on. Click again to turn Solo off.

© Apple Inc.
In Logic Pro, you have two ways to solo tracks or regions in the Tracks area:
![]() You can select one or more regions and click the Transport Solo button, or use the key command Control+S.
You can select one or more regions and click the Transport Solo button, or use the key command Control+S.
![]() You can click the Solo button on a track to solo the entire track.
You can click the Solo button on a track to solo the entire track.
You can also press the key command S to toggle track solo on and off. If you press Shift while the Transport Solo button is engaged, you can solo the regions on multiple tracks by clicking in their track headers, which selects all regions on all selected tracks.
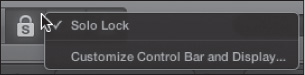
If Solo mode is active and all selected regions are being soloed, what if you want to select a region for editing or moving but you don’t want it to be soloed? Logic facilitates this by offering a Solo Lock feature. If you Option-click the Solo button, you will activate Solo Lock, which locks the Solo function to those regions already selected. You can also access the Solo Lock function by clicking and holding or right-clicking the Solo button and selecting Solo Lock from the shortcut menu that opens. Figure 5.5 shows the Solo button shortcut menu.
Figure 5.5 The Solo button shortcut menu, which contains the Solo Lock function. You can access this menu by clicking and holding or Control-clicking on the Solo button.
© Apple Inc.
With Solo Lock active, you can manipulate any other region without changing the solo selection. If you want to return to selecting only the soloed regions, you can use the key command for Reselect Solo-Locked Objects, Option+Shift+S.
When Solo is activated, the Solo button, the LCD, and the soloed regions glow yellow. When Solo Lock is activated, the button icon changes to a small padlock image with an S in it, as you can see in Figure 5.5.
The Solo function is one that spans multiple windows and has some deeper functionality, which you will explore in Chapter 6, “The Logic Pro Main Window,” and Chapter 11, “Mixing in Logic.”
The Count In and Metronome Buttons
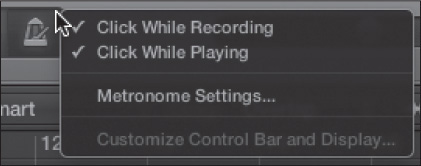
The Count In and Metronome buttons, shown in Figure 5.6, turn the count in and the metronome on and off, respectively. You can also press the key command K to toggle the metronome on and off, and Shift+K to toggle the Count In feature. The metronome emits a constant click at the current song tempo.
Figure 5.6 The Count In and Metronome buttons. These turn the pre-roll count in and the metronome on and off. Additionally, the Metronome button also gives you access to the Metronome Settings dialog box.

© Apple Inc.
If you hold the mouse button down over the Metronome button or right-click on it, Logic displays a menu (see Figure 5.7) that lets you open the Metronome Settings window.
Figure 5.7 Clicking and holding the Metronome button opens this menu.
© Apple Inc.
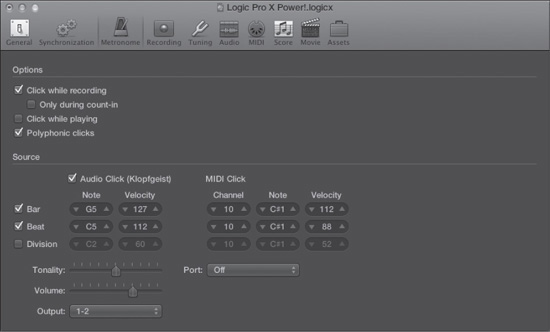
Metronome Settings
The Metronome Settings window, shown in Figure 5.8, consolidates all the various settings that affect the metronome. The MIDI settings can also be accessed from the metronome object’s Inspector in the Environment. The Recording Settings window, covered later in this chapter, offers added control of the metronome on count-in or record pre-roll.
You can access the Metronome Settings window by doing one of the following:
![]() Clicking and holding the Metronome button
Clicking and holding the Metronome button
![]() Right-clicking the Metronome button and selecting Metronome Settings from the menu that appears (refer to Figure 5.7)
Right-clicking the Metronome button and selecting Metronome Settings from the menu that appears (refer to Figure 5.7)
![]() Selecting Record > Metronome Settings
Selecting Record > Metronome Settings
![]() Selecting File > Project Settings > Metronome
Selecting File > Project Settings > Metronome
Figure 5.8 The Metronome Settings window.
© Apple Inc.
All the parameters in the lower right of the Metronome Settings window under the MIDI Click heading allow you to configure an external MIDI synthesizer to be your metronome. You can set the MIDI port of a hardware synth; determine whether you want different MIDI notes to be played on the bar, beat, or division; and set the channel, note, and velocity of each metronome note.
Most often, however, you will probably want to use Logic’s internal click as a metronome. It’s not only more convenient, but because an internal Logic software instrument generates the click, the timing is always sample-accurate, which means that the beat will always occur precisely when the master digital clock tells it to occur, not early or late. (MIDI timing has a significantly lower resolution than sample-accurate timing.) To use the internal software instrument for your metronome, select the Audio Click (Klopfgeist) checkbox at the top left of the Source area. Klopfgeist is the name of the metronome software instrument in Logic. Klopfgeist translates literally to “knocking ghost,” so when you use it, you can honestly say there is a ghost in the machine!
As with the MIDI metronome object, you can have different notes for different time divisions, and you can set the note and velocity. You also have a Tonality control, which allows you to tone-shape the sound from Klopfgeist to a limited degree, and a Volume control, which sets the volume of the software instrument. Finally, you can select the output from which Klopfgeist will sound.
The Options area of the Metronome Settings window contains checkboxes that determine when you will hear the metronome. If you select the Click While Recording checkbox, you’ll hear the click when you are recording. Selecting the Click While Playing checkbox ensures that you’ll hear the click when you’re playing. These two options can also be selected in the Metronome button menu, as shown in Figure 5.7. If you select the Only During Count-In checkbox, the click will play only during the count-in, or the measures before the recording begins.
You can set your click to be monophonic (one voice) or polyphonic (more than one voice) by selecting or deselecting the Polyphonic Clicks checkbox. If you are using Klopfgeist, this setting will have no effect.
The LCD
Between the Transport buttons and the mode buttons is the LCD, the most important source of meaningful information in the Transport. You can enter the tempo directly in the LCD, set Cycle regions, move the playhead, and perform myriad other functions within the LCD. Figure 5.9 shows the LCD.
Figure 5.9 The LCD in the Transport gives you vast amounts of feedback and control over your project.

© Apple Inc.
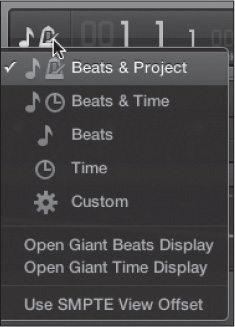
The LCD has five different display modes, accessible in the menu that opens when you click the left end of the LCD (where the musical note and metronome symbol are in Figure 5.9). Figure 5.10 shows the LCD menu.
© Apple Inc.
As you can see, in addition to the five different display modes, there are three other options in the LCD menu. The eight LCD menu options are as follows:
![]() Beats & Project: Selecting this option configures the LCD to display the current bar/beat/division/tick position, along with the project tempo, key signature, and time signature. Figure 5.11 shows this option.
Beats & Project: Selecting this option configures the LCD to display the current bar/beat/division/tick position, along with the project tempo, key signature, and time signature. Figure 5.11 shows this option.
Figure 5.11 The Beats & Project option of the LCD menu.

© Apple Inc.
![]() Beats & Time: Selecting this option configures the LCD to display the current bar/beat/division/tick position, along with the current SMPTE time position. SMPTE (short for Society of Motion Picture and Television Engineers) is the standard format used for synchronizing sound to pictures. Figure 5.12 shows this option.
Beats & Time: Selecting this option configures the LCD to display the current bar/beat/division/tick position, along with the current SMPTE time position. SMPTE (short for Society of Motion Picture and Television Engineers) is the standard format used for synchronizing sound to pictures. Figure 5.12 shows this option.
Figure 5.12 The Beats & Time option of the LCD menu.

© Apple Inc.
![]() Beats: Selecting this options configures the LCD into a large display of the current bar/beat/division/tick position. Figure 5.13 shows this option.
Beats: Selecting this options configures the LCD into a large display of the current bar/beat/division/tick position. Figure 5.13 shows this option.
Figure 5.13 The Beats option of the LCD menu.

© Apple Inc.
![]() Time: Selecting this option configures the LCD into a large display of the current SMPTE time position. Figure 5.14 shows this option.
Time: Selecting this option configures the LCD into a large display of the current SMPTE time position. Figure 5.14 shows this option.
Figure 5.14 The Time option of the LCD menu.

© Apple Inc.
![]() Custom: Selecting this option configures the LCD into a customizable display. For Logic users transitioning from older versions of Logic, this is the LCD view that offers the same functionality the Transport offered. Although all the other LCD views have their uses, the Custom view offers the most flexibility and power. The following sections deal with the options available in the Custom view. As you can see in Figure 5.15, the default Custom view offers many more features than any other LCD view.
Custom: Selecting this option configures the LCD into a customizable display. For Logic users transitioning from older versions of Logic, this is the LCD view that offers the same functionality the Transport offered. Although all the other LCD views have their uses, the Custom view offers the most flexibility and power. The following sections deal with the options available in the Custom view. As you can see in Figure 5.15, the default Custom view offers many more features than any other LCD view.
Figure 5.15 The Custom option of the LCD menu.
© Apple Inc.
NOTE: The only “problem” with the Custom view is that it can take up a lot of space in your control bar. Logic compensates for this by reducing the Transport buttons to just the essentials (Stop, Play, and Record), reducing the number of available mode buttons, and putting any displaced controls—including the list editors, Note Pad, Apple Loops, and Browser buttons—in a menu that can be accessed at the far-right end of the control bar. You’ll explore this in Chapter 6.
![]() Open Giant Beats Display: Selecting this option opens a separate, resizable window with a very large display of the current bar/beat/division/tick position. Figure 5.16 shows this display.
Open Giant Beats Display: Selecting this option opens a separate, resizable window with a very large display of the current bar/beat/division/tick position. Figure 5.16 shows this display.
![]() Open Giant Time Display: Selecting this option opens a separate, resizable window with a very large display of the current SMPTE time position. Figure 5.17 shows this display.
Open Giant Time Display: Selecting this option opens a separate, resizable window with a very large display of the current SMPTE time position. Figure 5.17 shows this display.
Figure 5.16 The Giant Beats Display option in the LCD menu opens a separate giant bar display window.

© Apple Inc.
Figure 5.17 The Giant Time Display option in the LCD menu opens a separate giant SMPTE time display window.

© Apple Inc.
![]() Use SMPTE View Offset: This option allows you to display a different SMPTE time for the start of your song rather than the true SMPTE start time that an external device is sending to Logic. For this to work, you need to check the Enable SMPTE View Offset option in the General tab of the Synchronization Settings window. To access this window, choose File > Project Settings > Synchronization. You can then choose Use SMPTE View Offset.
Use SMPTE View Offset: This option allows you to display a different SMPTE time for the start of your song rather than the true SMPTE start time that an external device is sending to Logic. For this to work, you need to check the Enable SMPTE View Offset option in the General tab of the Synchronization Settings window. To access this window, choose File > Project Settings > Synchronization. You can then choose Use SMPTE View Offset.
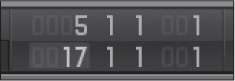
The Positions Display
To the right of the LCD menu is the Positions display, shown in Figure 5.18. This display shows you a numeric representation of where the playhead currently is in your song. The top number is shown in SMPTE time format (hours:minutes:seconds:frames/subframes), and the bottom number is in bar position format (bar/beat/division/tick). The bar position format is so named because it follows the musical notation structure of bars and beats. This is the same format shown in the main window on the Bar ruler, unless you choose to show SMPTE time format in the Bar ruler.
Figure 5.18 The Positions display, located to the right of the LCD menu.

© Apple Inc.
Positions Display Format Preferences
You have some options in how you display the two formats. If you select Logic Pro > Preferences > Display and click the General tab, you’ll see two menus that enable you to customize the display of the two formats. You can adjust the display of SMPTE time via the Display Time As menu, shown in Figure 5.19.
Figure 5.19 The Display Time As menu in the Display Preferences window’s General tab alters the way the SMPTE format appears in the Positions display.
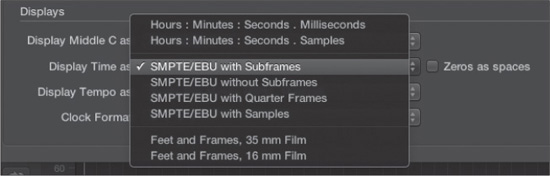
© Apple Inc.
These options change the way SMPTE appears in the Positions display. You also can opt for zeros to be displayed as spaces by selecting the Zeros as Spaces checkbox. Change the default SMPTE display only if you need a different format to synchronize your Logic song to a picture in that format.
If you open the Clock Format menu, Logic displays the various clock formats shown in Figure 5.20. These options allow the clock to take on a slightly different look. It’s worth browsing through the different options here so you can find out which one you prefer working with.
Figure 5.20 The Clock Format menu in the Display Preferences window’s General tab. These parameters allow you to change the look of the clock in the Positions display.
© Apple Inc.
Using the Positions Display to Move the Playhead
In addition to offering a numeric visual reference to the location of the playhead, the Positions display has another function. If you double-click one of the numbers, the display becomes a text box, as shown in Figure 5.21. Enter the desired numeric location here; when you press Return, the value of both numeric displays will change, and the playhead will jump to the specified location.
Figure 5.21 If you double-click on one of the numeric displays, the Positions display allows you to enter a new playhead location.

© Apple Inc.
You can also click and drag vertically on any component of either the SMPTE display or the clock display to move the playhead in those units. In other words, if you click and drag on the division area in the clock display, you can move the playhead backward and forward in divisions.
Locators
Directly to the right of the Positions display is a display window for the locators. Figure 5.22 shows the Locators display. The locators define the start and end for Cycle mode. As with the Positions display, if you double-click the numeric values, you can enter the position of each locator. Also, as in the Positions display, clicking and dragging vertically on any component of either the start or end locator allows you to alter the position of that locator.
Figure 5.22 The locators are displayed numerically to the right of the Positions display.
© Apple Inc.
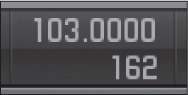
The Tempo/Project End Display
To the right of the Positions display is the Tempo/Project End display, shown in Figure 5.23. The Tempo portion, on top, displays the tempo of the current song in either beats per minute (BPM), frames per second, or quarter notes per minute.
Figure 5.23 The Tempo/Project End display.
© Apple Inc.
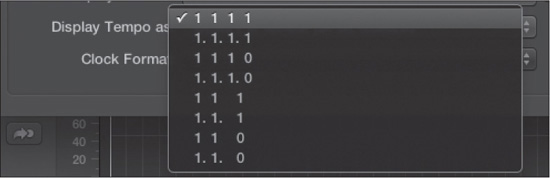
You can choose how tempo will be displayed in the Display Tempo As menu in the General tab of the Display Preferences window (see Figure 5.24), which you access by choosing Logic Pro > Preferences > Display.
Figure 5.24 The Display Tempo As menu in the General tab of the Display Preferences window.

© Apple Inc.
The first two options are BPM (beats per minute) options, while the second two are SMPTE options. Logic offers a BPM range of 5–990 BPM, with four-decimal-place precision, which should be enough tempo range for most users! You can change the tempo of the project inside the LCD in two ways:
![]() By double-clicking the tempo value to bring up a text box and then entering the new value
By double-clicking the tempo value to bring up a text box and then entering the new value
![]() By clicking on the tempo number and dragging the mouse up or down. Logic allows for more complicated tempo programming and changes using either the Tempo track in the global tracks discussed in Chapter 4, “Global Elements of Logic,” or the other tempo functions explored in Chapter 13, “Advanced Tempo Operations.”
By clicking on the tempo number and dragging the mouse up or down. Logic allows for more complicated tempo programming and changes using either the Tempo track in the global tracks discussed in Chapter 4, “Global Elements of Logic,” or the other tempo functions explored in Chapter 13, “Advanced Tempo Operations.”
The Project End display below the Tempo display shows you the final bar in the song. When the playhead reaches this measure, Logic stops playback. You can double-click in this box to open a text box in which you can change the value, or click and drag on the Project End display. The maximum project length in Logic is around 12 hours; exactly how many bars this adds up to depends on the time signature and tempo of your project.
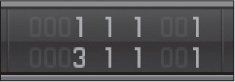
The Signature/Division Display
To the right of the Tempo/Project End display is the Signature/Division display, shown in Figure 5.25. The Signature value represents the time signature at the currently selected measure in the project. You can add as many time-signature changes as you like to your project using the signature track as described in Chapter 4, or the Score editor, which is discussed in Chapter 8, “Working with MIDI.” You can also change the Signature display value to create a signature track event at the current playhead position. If you want to remove a time-signature change, simply change the time signature back to its original value.
Figure 5.25 The Signature/Division display.
© Apple Inc.
The Division value lets you determine what note value will get the third position in the bar/beat/division/tick display. This also will affect the resolution of the Bar ruler in the main window. You can assign key commands to raise and lower this division value quickly.
The MIDI Activity Display
To the right of the Time Signature/Division display is the MIDI Activity display, shown in Figure 5.26. This display gives you visual feedback as to whether Logic is sending or receiving MIDI events. If the MIDI events being sent are a chord, Logic’s Auto Chord Recognition feature will show you the proper name for the chord rather than showing you all of the individual notes. If your MIDI devices get stuck notes (in other words, they can’t stop playing) or are otherwise unresponsive, you can click in the MIDI monitor to send a MIDI Reset command to them. If that doesn’t work, you can double-click to send a MIDI Panic Off message; basically, this sends individual note-off commands for every note on every channel.
Figure 5.26 The MIDI Activity display.

© Apple Inc.
The Load Meters
The load meters, shown in Figure 5.27, display the CPU and storage drive loads of your project in real time. Double-clicking on the load meters opens the System Performance window, which displays your project’s loads in greater graphic detail in a floating window. Figure 5.28 shows the System Performance window.
Figure 5.27 The load meters display the CPU and storage drive loads of your project.

© Apple Inc.
Figure 5.28 Double-clicking the load meters opens the System Performance window.
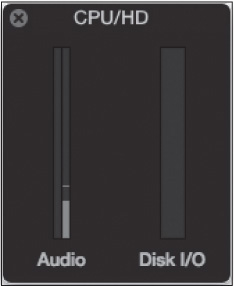
© Apple Inc.
Although Logic saves the position of every window and song setting with each project, it doesn’t save the position of the System Performance window because it seems to view that window as global to Logic, not specific to a project. In other words, if you close a project with the System Performance window open, all your project’s windows will close, but the System Performance window will remain open, ready for the next project you open. The upshot of this is if you like to display it, you’ll need to relaunch it every time you open Logic.
The Master Level Slider
To the far right of the Transport area is the Master Level slider. This slider, shown in Figure 5.29, is directly linked to the master channel strip in the Mixer, controlling the level of your entire Logic project.
Figure 5.29 The Master Level slider in the Transport.

© Apple Inc.
Customizing the Transport
If you right-click in an empty area of the Transport, the Customize Control Bar and Display menu, shown in Figure 5.30, will open. The Customize Control Bar and Display option is also accessible from any of the other shortcut menus available in the Transport.
Figure 5.30 Right-clicking in the Transport opens the Customize Control Bar and Display menu.

© Apple Inc.
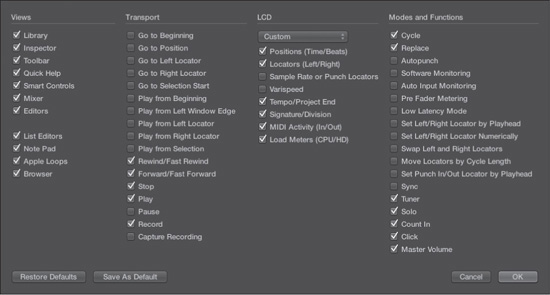
Selecting Customize Control Bar and Display causes Logic to open the Customize Control Bar and Display dialog box, shown in Figure 5.31. This dialog box allows you to customize the display of the Transport.
Three columns in the Customize Control Bar and Display dialog box are directly related to the three different areas of the Transport:
![]() Transport: The Transport column allows you to customize what Transport buttons will be displayed.
Transport: The Transport column allows you to customize what Transport buttons will be displayed.
![]() LCD: The LCD column options affect the LCD display area. The menu at the top of the LCD column gives you another means to select your display mode. Only the Custom option gives you access to a customized LCD display.
LCD: The LCD column options affect the LCD display area. The menu at the top of the LCD column gives you another means to select your display mode. Only the Custom option gives you access to a customized LCD display.
![]() Modes and Functions: The Modes and Functions column gives you access to a variety of mode area buttons.
Modes and Functions: The Modes and Functions column gives you access to a variety of mode area buttons.
NOTE: The column to the left, Views, is covered in Chapter 6.
Although there are many unique and valuable functions that you can add to the Transport via this dialog box, covering all of them here would be impossible. Rest assured, most of these functions are covered throughout this book, and anything not covered can be found in the manual. That said, there is one very important mode button, one very important display mode, and one function that adds both a button and a display option accessible in the Customize Transport dialog box, which are covered now.
The Sync Button
Selecting the Sync checkbox in the Modes and Functions column of the Customize Control Bar and Display dialog box adds a Sync button to the Transport, as shown in Figure 5.32. Clicking this button toggles on Sync mode, which allows you to slave the
Figure 5.31 The Customize Control Bar and Display dialog box allows you to create highly customized Transports, giving you access to a wide range of Transport buttons, LCD fields, and mode buttons.
© Apple Inc.
sequencer in Logic Pro to external hardware, such as tape machines, external hard disk recorders, hardware sequencers, and any other device that is capable of sending compatible timecode, as well as internal software applications that receive MIDI Clock via Core MIDI. If Logic is the slave, that means Logic is taking its tempo cues from the external hardware. If you don’t have any external hardware that generates its own tempo, or if all your external devices are slaves and Logic is the master, you will not need to use Sync mode in Logic.
Figure 5.32 The Sync button. Turn on Sync mode to slave Logic Pro to an external tempo.

© Apple Inc.
Holding down the Sync button opens a menu of synchronization options. These options allow you to select the type of sync that Logic will send, give you access to tempo editors, and so on.
The Sample Rate or Punch Locators
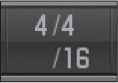
Selecting the Sample Rate or Punch Locators checkbox in the LCD column of the Customize Control Bar and Display dialog box adds the Sample Rate or Punch Locators display to the LCD display area, as shown in Figure 5.33.
Figure 5.33 The Sample Rate or Punch Locators display.
© Apple Inc.
If you do not have Autopunch mode engaged, then the Sample Rate or Punch Locators display shows the project sample rate. You can change this by clicking on the sample rate and selecting a new sample rate from the menu that opens. When you engage Autopunch mode, the display changes to show the punch locator positions, as in Figure 5.33.
The Varispeed Display and Button
Selecting the Varispeed option in the LCD column of the Customize Control Bar and Display dialog box adds the Varispeed display and Varispeed button to the Transport. Figure 5.34 shows a Transport customized to show the Varispeed display and the Varispeed button next to each other.
Figure 5.34 The Varispeed display and button.

© Apple Inc.
Varispeed is a very powerful feature, enabling you to speed up or slow down your entire project nondestructively and instantaneously. For example, you can use Varispeed to slow down the project a little bit to practice a part or speed it up to see how it feels at a faster tempo. Varispeed and the Varispeed display and button are covered in the “Using Varispeed” section later in this chapter.
Hiding the Transport
Although the Transport is a very handy tool with many important functions, there are times when you may want to hide it. Perhaps you have all your necessary Transport key commands assigned and memorized, or maybe you have a control surface that has all the necessary Transport controls configured. Possibly you’re in the middle of a large project and you find you need the extra bit of screen real estate in the main window that hiding the Transport would offer.
Hiding the Transport is not difficult; simply select View > Hide Control Bar. Alternatively, place your cursor at the bottom of the Transport or control bar and your cursor will become a Resize cursor. If you find you want the Transport at some times in a project but not at other times, or if you want certain configurations of the Transport for different purposes—tracking as opposed to mixing, for example—save your different Transport configurations in screensets!
Opening the Transport Window
Having the Transport display directly in the main window is convenient as long as you are working in the main window. However, there may be times when you are working in a screenset that doesn’t include the main window, or you may want to have multiple Transports open displaying different things, such as a conventional Transport, a Giant Beats display, and a Giant Time display. You can open separately movable, resizable, and configurable Transport windows by selecting Window > Open Transport Float from the global Window menu.
TIP: If you select the Giant Time Display or the Giant Beats Display option, you will lose all the other functions of the Transport. But never fear: Logic allows you to open as many of each kind of window as you like, so you can also open multiple Transports if you want. For example, you could open one Transport and configure it as a Giant Beats display, and then open a second, fully featured Transport.
Resizing the Transport Window
To resize a Transport window, click and hold the mouse on the lower-right corner and drag the Transport to the desired size, as shown in Figure 5.35. Note that the Transport window can only be resized horizontally.
Figure 5.35 To resize the Transport window, simply drag the lower-right corner with your mouse.
© Apple Inc.
Recording
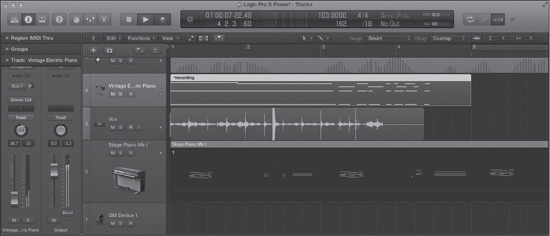
For the purposes of this book, the most basic definition of recording is capturing performances with Logic. Logic Pro offers a large number of recording modes and options. To record in Logic, you need to select a MIDI track or record-enable one or more audio and/or software instrument tracks. (This is explained further in the next chapter.) If you are recording a single audio track, the selected audio track will automatically record-enable when you click Record. To activate the normal Record mode, simply click the Record button. After the count-in, set in the Metronome Settings window, Logic begins capturing data. MIDI information and arrangement data (such as automation that you record live, tempo changes, and so on) are stored in the Logic project itself, while audio is saved onto your storage drive. All of this immediately shows up in the main window of Logic. Figure 5.36 shows a recording in progress.
Figure 5.36 Logic Pro X, recording away!
© Apple Inc.
The Record Button Shortcut Menu
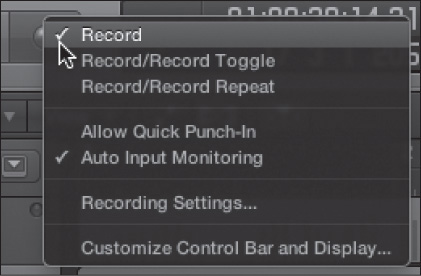
In the good (but featureless) old days, there was only one record option: You clicked the Record button, and the tape started rolling, ready to print your performance. Now, however, we are in the software age, and Logic Pro offers myriad recording and monitoring options. If you hold down the Record button or right-click it, Logic displays the menu shown in Figure 5.37.
Figure 5.37 You access this menu by clicking and holding down the Record button in the Transport.
© Apple Inc.
Here is an explanation of the menu options:
![]() Record: This starts the normal Record mode. Selecting this is the same as simply clicking the Record button. The key command is R.
Record: This starts the normal Record mode. Selecting this is the same as simply clicking the Record button. The key command is R.
![]() Record/Record Toggle: Record Toggle switches between Record and Playback modes. The key command for this is the * (asterisk) on the numeric keypad. If your keyboard doesn’t have a numeric keypad, you can reassign this command.
Record/Record Toggle: Record Toggle switches between Record and Playback modes. The key command for this is the * (asterisk) on the numeric keypad. If your keyboard doesn’t have a numeric keypad, you can reassign this command.
![]() Record/Record Repeat: This option starts recording at the previous drop or record-start point, and replaces the previous recording.
Record/Record Repeat: This option starts recording at the previous drop or record-start point, and replaces the previous recording.
![]() Allow Quick Punch-In: If you are recording audio, normally you set up a track and start recording from the beginning of the song or you set recording to begin at predetermined drop locators or with the playhead. If you turn on Allow Quick Punch-In, you can be in Play mode and simply switch into Record mode immediately. It’s a quick punch-in because you did not previously configure Logic to record at the specific location you chose. You should perform quick punch-ins sparingly because it’s pretty taxing on your computer’s resources to punch in completely cleanly without clicks or gaps. Instead, you should use the drop locators to set locator points in advance so that Logic can allocate and conserve the resources ahead of time. Also, keep in mind that even though you are quick punching in, you still need to have an audio track record-enabled to record your punch-in.
Allow Quick Punch-In: If you are recording audio, normally you set up a track and start recording from the beginning of the song or you set recording to begin at predetermined drop locators or with the playhead. If you turn on Allow Quick Punch-In, you can be in Play mode and simply switch into Record mode immediately. It’s a quick punch-in because you did not previously configure Logic to record at the specific location you chose. You should perform quick punch-ins sparingly because it’s pretty taxing on your computer’s resources to punch in completely cleanly without clicks or gaps. Instead, you should use the drop locators to set locator points in advance so that Logic can allocate and conserve the resources ahead of time. Also, keep in mind that even though you are quick punching in, you still need to have an audio track record-enabled to record your punch-in.
NOTE: The term punch-in comes from the fact that when recording to tape, to start recording on the fly, engineers would “punch in” (not literally) the recording head while the playback head was operating. With digital recording, there are no tape heads to punch, but Logic still has to switch instantly from Playback to Record mode, which in itself is quite a task.
TIP: To do true “tape-recorder style” punch-in/punch-out without stopping and starting the sequencer, use the tandem of Quick Punch-In and Record/Record Toggle.
![]() Auto Input Monitoring: This allows you to monitor in Logic what is coming in through the hardware inputs when Logic is stopped and in Record mode. When in Playback mode, Logic plays any prerecorded audio regions on the audio track that are record-enabled. You’ll almost always leave this option on unless your audio hardware has a special monitoring mode or you want to free additional resources in the host computer. As discussed in Chapter 2, “A Quick Tour of Logic Pro,” whenever you are monitoring audio through software, there is some latency.
Auto Input Monitoring: This allows you to monitor in Logic what is coming in through the hardware inputs when Logic is stopped and in Record mode. When in Playback mode, Logic plays any prerecorded audio regions on the audio track that are record-enabled. You’ll almost always leave this option on unless your audio hardware has a special monitoring mode or you want to free additional resources in the host computer. As discussed in Chapter 2, “A Quick Tour of Logic Pro,” whenever you are monitoring audio through software, there is some latency.
![]() Recording Settings: This brings up the Recording Settings window. You can also access this window by selecting File > Project Settings > Recording. The Recording Settings window is explored further in the next section.
Recording Settings: This brings up the Recording Settings window. You can also access this window by selecting File > Project Settings > Recording. The Recording Settings window is explored further in the next section.
You can also access many of these options in the global Record menu, which is covered right after the Recording Settings window.
The Recording Settings Window
The Recording Settings window, shown in Figure 5.38, presents a number of options to customize how you record with Logic. Some of these parameters are explained elsewhere in the book, and some parameters appear in other windows as well.
Figure 5.38 The Recording Settings window.

© Apple Inc.
Following are brief descriptions of some of these parameters:
![]() Count-In/Record Pre-Roll: Use these option buttons to determine how many bars or seconds Logic will rewind the playhead when you start recording.
Count-In/Record Pre-Roll: Use these option buttons to determine how many bars or seconds Logic will rewind the playhead when you start recording.
![]() Allow Tempo Change Recording: Selecting this checkbox enables you to record tempo changes.
Allow Tempo Change Recording: Selecting this checkbox enables you to record tempo changes.
![]() Auto-Colorize Takes: When you select this checkbox, Logic auto-colorizes each take in a folder when take recording. Take recording is covered later in this chapter.
Auto-Colorize Takes: When you select this checkbox, Logic auto-colorizes each take in a folder when take recording. Take recording is covered later in this chapter.
![]() Overlapping Recordings: The settings in this menu—Create Take Folders, Join with Selected Regions, Join when Cycling, Create Tracks when Cycling, and Create Tracks and Mute when Cycling—relate to MIDI recording only. The Create Take Folders setting is covered later in this chapter. The rest of these settings control how Logic records when in Cycle mode. These parameters are defined in the “Cycle Mode” section of Chapter 6.
Overlapping Recordings: The settings in this menu—Create Take Folders, Join with Selected Regions, Join when Cycling, Create Tracks when Cycling, and Create Tracks and Mute when Cycling—relate to MIDI recording only. The Create Take Folders setting is covered later in this chapter. The rest of these settings control how Logic records when in Cycle mode. These parameters are defined in the “Cycle Mode” section of Chapter 6.
![]() Auto Demix by Channel If Multitrack Recording: If this checkbox is selected and you are recording on more than one MIDI channel at a time to more than one record-enabled MIDI track at a time, Logic will automatically demix the MIDI channels to the record-enabled tracks. Each MIDI track will contain a single MIDI region with all of the information recorded from that channel.
Auto Demix by Channel If Multitrack Recording: If this checkbox is selected and you are recording on more than one MIDI channel at a time to more than one record-enabled MIDI track at a time, Logic will automatically demix the MIDI channels to the record-enabled tracks. Each MIDI track will contain a single MIDI region with all of the information recorded from that channel.
![]() MIDI Data Reduction: If this checkbox is selected, Logic thins incoming MIDI information to allow for smoother playback of complex performances of MIDI-rich projects.
MIDI Data Reduction: If this checkbox is selected, Logic thins incoming MIDI information to allow for smoother playback of complex performances of MIDI-rich projects.
![]() Folder: By default, Logic will use your project folder as the audio record path. In other words, any audio you record in a project will be automatically stored in the project folder. If you want to set a different audio record path, click the Set button to open a dialog box; there, you choose the directory in which your audio files will be saved. To revert to the project folder, click Project. The Set command may be useful for some specific projects, but in general—and more specifically for your template—the Project option is likely the best option.
Folder: By default, Logic will use your project folder as the audio record path. In other words, any audio you record in a project will be automatically stored in the project folder. If you want to set a different audio record path, click the Set button to open a dialog box; there, you choose the directory in which your audio files will be saved. To revert to the project folder, click Project. The Set command may be useful for some specific projects, but in general—and more specifically for your template—the Project option is likely the best option.
The Record Menu
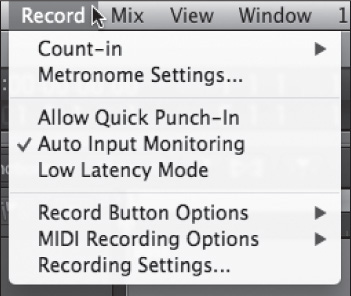
The global Record menu, shown in Figure 5.39, offers quick access to a number of different commands related to recording.
Figure 5.39 The global Record menu.
© Apple Inc.
Most of these functions are covered in depth throughout this chapter, but briefly, these commands are as follows:
![]() Count-in: This submenu let you define the length of the count-in when the Count-In button is enabled as well as the time signature of the count-in.
Count-in: This submenu let you define the length of the count-in when the Count-In button is enabled as well as the time signature of the count-in.
![]() Metronome Settings: This lets you access the Metronome Settings window, covered earlier in this chapter.
Metronome Settings: This lets you access the Metronome Settings window, covered earlier in this chapter.
![]() Allow Quick Punch-In: This allows you to perform quick punch-ins, covered in the section “The Record Button Shortcut Menu” earlier in this chapter.
Allow Quick Punch-In: This allows you to perform quick punch-ins, covered in the section “The Record Button Shortcut Menu” earlier in this chapter.
![]() Auto Input Monitoring: This enables Auto Input Monitoring, covered in the section “The Record Button Shortcut Menu” earlier in this chapter.
Auto Input Monitoring: This enables Auto Input Monitoring, covered in the section “The Record Button Shortcut Menu” earlier in this chapter.
![]() Low Latency Mode: This enables Low Latency mode, covered in the section “Low Latency Mode” later in this chapter.
Low Latency Mode: This enables Low Latency mode, covered in the section “Low Latency Mode” later in this chapter.
![]() Record Button Options: The Record Button Options submenu contains the three Record button mode options available in the Record button shortcut menu.
Record Button Options: The Record Button Options submenu contains the three Record button mode options available in the Record button shortcut menu.
![]() MIDI Recording Options: This submenu offers the same five commands found in the Overlapping Regions menu in the Recording Settings window.
MIDI Recording Options: This submenu offers the same five commands found in the Overlapping Regions menu in the Recording Settings window.
Recording Using Key Commands
Although Logic’s menus offer a large selection of recording modes and parameters, if you want to record quickly, you should assign key commands to all of the modes, functions, and options that you access regularly. In addition, some powerful recording functions are available only via key commands. For example, Record Off for All, a key command that turns off the record status of all record-enabled tracks, is available only via key command. As you are starting to see, the more key commands you assign and use while recording, the faster and more efficiently you will be using Logic.
Method Tip: How to Record in Logic: Don’t let all these recording options confuse you into thinking that basic recording of audio or MIDI in Logic is difficult. It’s not. The basic procedure couldn’t be easier:
![]() To record audio: Select one or more audio tracks in the main window. Record-enable the audio tracks and start recording (via Transport button, key command, control surface, and so on). To arm more than one audio track at a time, each track must be assigned to a different input.
To record audio: Select one or more audio tracks in the main window. Record-enable the audio tracks and start recording (via Transport button, key command, control surface, and so on). To arm more than one audio track at a time, each track must be assigned to a different input.
![]() To record MIDI: Select a MIDI track and start recording.
To record MIDI: Select a MIDI track and start recording.
![]() To record MIDI and audio at the same time: Record-enable one or more audio tracks and then record-enable an external MIDI or software instrument track. With all your audio tracks record-enabled and your MIDI track selected, start recording. The next chapter gets into more detail about record-enabling audio tracks.
To record MIDI and audio at the same time: Record-enable one or more audio tracks and then record-enable an external MIDI or software instrument track. With all your audio tracks record-enabled and your MIDI track selected, start recording. The next chapter gets into more detail about record-enabling audio tracks.
Recording, Software Monitoring, and Latency
Whenever you record audio into a computer, you will have to deal with latency. Why? Physics, I’m afraid—and as Scotty told Captain Kirk so many times, “I cannot change the laws of physics!”
Here is the simplest explanation that I can give. When recording audio onto a tape machine, the instant the Record button is clicked, the record head engages the tape, and any material streaming through the record head is printed onto the tape. There is no delay inside that tape head; the audio material instantly streams through the record head.
When you record audio into a computer, first that audio is converted into a digital signal inside your audio interface. This process requires the interface to process a number of samples before it can stream the digital audio. (See the section “The Differences Between Analog and Digital Sound” in Chapter 1 for a full explanation of digital audio, samples, and so on.) Next, the digital audio streams into your computer. In this case, the digital audio then needs to go through the Mac OS X operating system to get into Logic Pro. Core Audio, the Mac OS X audio system, also needs to hang onto a few samples’ worth of information before it can pass it onto Logic. After that, to most efficiently process the streaming audio, Logic buffers the audio and processes it in chunks. How much time this takes depends on the size of the buffer. All these samples of delay are called the recording latency, or the time lag between when a sound enters your audio interface and when it ends up in the Logic Tracks area. The exact amount of time will depend on the total number of samples divided by the sample rate at which you are recording.
Recording latency, however, is only half the story. If you want to hear what you are recording—in other words, to monitor your recording—you will have to deal with monitoring latency as well. There are basically two types of monitoring. The first, hardware monitoring, means that you monitor what you are recording before the signal passes through Logic. The second, software monitoring, means that you are monitoring your signal after it is recorded into Logic.
How Recording Latency Can Cause Recording Offset
Suppose you are using a 4/4 drum loop in which every beat is exactly on the bar. You start recording. The first beat hits at 1.1.1.0. You play the part you wish to record exactly on time. However, your recording latency is 441 samples. If Logic were to place the digital audio at the exact point in the track that it appeared in Logic, there would be a recording offset—a difference between when the source audio was recorded and when the digital audio was placed on the track—of 441 samples.
Thankfully, Logic is extremely smart regarding recording offset. All audio interfaces report how many samples they take to do their processing to Core Audio. Core Audio then adds to that number how many samples it uses to process the audio and passes that information to Logic. Logic takes that number from Core Audio, adds the setting of its own audio buffer to it, and then places that digital audio on the track at the correct spot. So using this earlier example, Logic would figure out that there was a recording latency of 441 samples and move the audio backward to 1.1.1.0 on the track, thus eliminating the recording offset. Your performance is exactly in time with the drum loop!
However, not all audio drivers report the correct recording offset to Core Audio. In this situation, Logic does the only thing it can: It places the audio where it thinks it should go based on the inaccurate numbers it has to work with. If you play back what you just recorded and it sounds off, as if your recording is consistently early or late, this may very well be the reason.
If you discover there is a recording offset, the first thing to do is to fire off an email to the manufacturer of your audio interface informing them of the problem. If you are an advanced user and have used the Logic Pro Audio File editor to count exactly how many samples of recording offset there are, be sure to send that information as well. Hopefully, this will help the manufacturer write a new Core Audio driver that reports the correct sample delay.
Fortunately, you’re not simply left at the mercy of the manufacturer. In the Audio Preferences window’s Devices tab (choose Logic Pro X > Preferences > Audio > Devices), Logic offers a Recording Delay slider (see Figure 5.40). You can use this to manually adjust Logic’s recording offset correction amount. So if, for example, you have determined that all your audio is being placed 140 samples early, you can use this slider to delay the placement of the audio by 140 samples. If you determine that the audio is being placed 140 samples late, you can use this slider to subtract 140 samples. If you’re not sure, just experiment with different amounts until you get as close to zero as you can.
Figure 5.40 The Recording Delay parameter in the Audio Preferences window’s Devices tab lets you manually adjust for recording offset.
© Apple Inc.
Hardware Monitoring Versus Software Monitoring
As mentioned, in addition to dealing with recording latency, you also have to deal with latency when listening to what you are recording. One of the ways you can deal with it is to virtually eliminate it by using hardware monitoring. That means directly listening to the source you are recording in hardware, before it hits the Logic Pro software.
This can be done in a couple of ways. Many audio interfaces offer direct monitoring or direct hardware monitoring. That means the interface sends the source audio signal both into your computer and out of one of its hardware outputs. The audio fed directly from the audio input to the audio output incurs virtually no delay at all. I say “virtually” because there may still be a small delay from digital-to-audio and audio-to-digital conversion, but this will be negligible. If your audio interface allows direct monitoring, there will be a physical switch or button on your interface or a software mixer included with your interface to set this up. Read the manual for your audio interface for more information. Suppose you do not have an interface capable of hardware monitoring. In this situation, you have two choices: Buy an external mixer and send one signal from the mixer to your audio interface and another to your speakers/headphones, or use software monitoring. There are other reasons to use software monitoring, too. If you want to monitor through Logic’s effects—for example, if you want to record your guitar using Amp Designer and Pedalboard as your guitar amp and effects—you have no choice but to use software monitoring. Also, when you monitor through hardware, you can’t be sure exactly what the signal sounded like as Logic recorded it—perhaps your mic preamp levels were too high, and so on. But when you monitor through software, you are monitoring exactly what is going through Logic, so you can stop the recording immediately to fix any problems. You can engage software monitoring via the Software Monitoring checkbox in the Devices tab of the Audio Preferences window (choose Logic Pro X > Preferences > Audio > Devices); via key command; or via the Software Monitoring button on the Transport (if you have customized your Transport to include it).
The major drawback to software monitoring is that all of the delay you incurred earlier with recording latency, you incur again. The signal goes back through Logic’s buffer, through Mac OS X, into your audio interface’s converters, and so on. That means if you use software monitoring, your monitoring latency is double your recording latency. Also, if you are using plug-ins that cause latency, software monitoring really messes with Logic’s ability to compensate for recording offset. This shortcoming of software monitoring can be addressed using Low Latency mode (see the next section), but in general, the drawbacks of software monitoring are severe enough that I highly recommend that when you record, you use hardware monitoring whenever possible.
Low Latency Mode
As explained, Logic can correct for recording offset created by your audio interface, Core Audio, and Logic’s own buffer. However, when you record through plug-ins that cause delay (plug-in delay is discussed in Chapter 11), that delay happens after Logic has internally compensated for recording offset. In other words, your recording will be placed on the track late and won’t sync up with the rest of your audio.
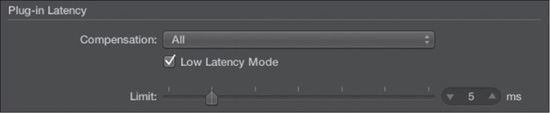
When Low Latency mode is engaged, Logic creates an alternate signal path that completely ignores plug-ins that cause more than a user-defined amount of delay. In other words, if you manually set the delay limit for 5 milliseconds (ms), and if there are plug-ins that cause more than 5 ms of delay in the signal path, turning on Low Latency mode will create an alternate signal path without those plug-ins.
This guarantees that the total plug-in delay of the entire signal flow of the selected channel, including any aux channel strips and output channel strips, stays under this user-defined maximum value.
To set the maximum plug-in delay for Low Latency mode, open the General tab of the Audio Preferences window and adjust the Limit value in the Plug-In Latency area (see Figure 5.41). To engage Low Latency mode, click the Low Latency Mode button in a custom Transport or click the Low Latency Mode checkbox in the General tab of the Audio Preferences window, also shown in Figure 5.41.
With Low Latency mode engaged, your recording will be placed far closer to its “correct” position when recording through delay-causing effects. I say “closer” because depending on your latency threshold, there may still be some amount of offset, but not enough for you to notice.
You should be aware that engaging Low Latency mode will most likely change the sound of your track, perhaps drastically, because you are bypassing plug-ins that would otherwise affect your track’s sound. For this reason, you should engage Low Latency mode only very briefly, to specifically record tracks through delay-causing plug-ins when you have software monitoring turned on. If you are not using software monitoring, you will not need Low Latency mode. Ditto if you are not recording through effects that cause delay.
Figure 5.41 Set the maximum plug-in delay limit for Low Latency mode in the General tab of the Audio Preferences window.
© Apple Inc.
Software Monitoring and I/O Buffer Size
As explained, when you record through software monitoring, your monitoring latency is double your recording latency. If this latency is too high, it will actively hinder your performers because there will be a noticeable and jarring delay between when an instrument is played or a lyric is sung and when that performance is heard. Clearly you want your total monitoring latency to be as low as possible to avoid inhibiting your performers.
The main parameter for reducing latency is the I/O Buffer Size menu, found in the Devices tab of the Audio Preferences window (choose Logic Pro X > Preferences > Audio > Devices) and shown in Figure 5.42. The lower the buffer size, the fewer samples are processed at a time, and the less latency you will experience.
Figure 5.42 The I/O Buffer Size menu lets you choose the size of the audio buffer Logic uses when streaming digital audio into and out of Logic.
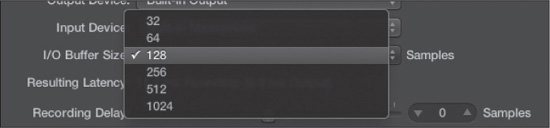
© Apple Inc.
The temptation is to use the smallest audio buffer available, which is 32 samples. Unfortunately, not all audio interfaces can operate efficiently when the number of samples is too small, which can result in crackles and pops in your recorded audio. Also, the smaller the buffer, the more CPU power is required to stream audio into and out of your Mac. Depending on how much processing power your computer has and how much processing power your Logic project is using, setting your I/O buffer size too low can result in crackles and pops in your recorded audio, or overload errors, which will stop recording.
To help you determine what monitoring mode and buffer size to use, Logic reports the total I/O latency in milliseconds beneath the I/O Buffer Size menu. The Resulting Latency area tells you the roundtrip latency as well as what your output latency is for the current buffer setting. While these things won’t tell you exactly how to use your system, they can be beneficial aids in balancing what latency you incur at different buffer settings with your monitoring needs.
Recording Takes
In the world of multitrack recording, it’s fairly common to record a particular section of a song repeatedly. Perhaps you are looking for a few different vocal recordings to work with on a chorus, or you would like to have a number of different piano solo options from which you can choose. You may even want to use multiple performances of the same section of the song to compile a single performance from the best bits of the different recordings. Recording multiple performances of the same material is known as recording takes. With Logic’s take recording, recording and managing audio and MIDI takes has been simplified and streamlined to an amazing degree.
Recording Audio Takes
Recording audio takes in Logic Pro X requires no special configuration. The ability to easily record, edit, and manage takes is the default behavior in Logic. So why bother covering recording audio takes, then? Because how Logic handles audio takes, and the things you can do with your audio takes—such as Quick Swipe Comping (covered in Chapter 6)—are likely to become integral parts of your workflow.
To record audio takes, you need to engage Cycle mode and record more than one pass in the cycle or record over at least 50 percent of an existing audio region. Logic automatically creates a take folder for that region. An audio take folder is actually a single audio file containing all your passes over a particular region. In the Tracks area, a take folder resembles a typical audio region with three very important differences: There is a disclosure triangle in the upper-left corner of the take region, to the right of that is a field featuring either a letter or a number that gives you access to the Take Folder menu, and next to the Take Folder menu is the Quick Swipe Comping button. Figure 5.43 shows a take folder in the main window.
Figure 5.43 An audio take folder in the main window.

© Apple Inc.
Opening an Audio Take Folder
Clicking the disclosure triangle in the upper-left corner of a take folder opens the take folder. You can also open a take folder by double-clicking it or by pressing Option+F. Figure 5.44 shows an open take folder.
Figure 5.44 Clicking the disclosure triangle in the upper-left corner of a take folder opens the take folder.

© Apple Inc.
You can select different takes for playback in an open take folder by clicking on the desired take. Be aware that the top level still represents the current selections in the take folder (this will become more apparent when you start Quick Swipe Comping), and the individual takes are displayed below the take folder. The last take is displayed just below the take folder, the first at the bottom. You can also select the desired take from either an open or a closed take folder by choosing it from the Take Folder menu or from the menu that appears when you right-click on a take folder. You can reorder takes by dragging a take onto the take folder. That take will then be the first take in the take folder.
The Take Folder Menu
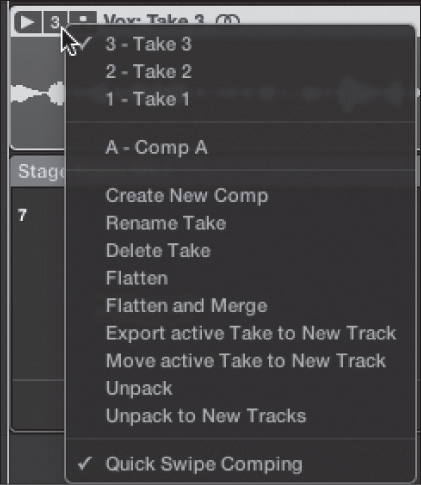
Clicking on the take number/letter field in the upper-left corner of a take folder opens the Take Folder menu, shown in Figure 5.45.
Figure 5.45 The Take Folder menu.
© Apple Inc.
The functions of the commands in the Take Folder menu are as follows:
![]() Takes and Comps list: At the top of the Take Folder menu is a list of the takes and composite takes, called comps, in the selected take folder. To switch takes or comps, simply select a different take or comp from the list.
Takes and Comps list: At the top of the Take Folder menu is a list of the takes and composite takes, called comps, in the selected take folder. To switch takes or comps, simply select a different take or comp from the list.
![]() Create New Comp: This command saves a comp you have created in a take folder and adds it to the Takes and Comps list. If you have created a comp, and the comp is selected in the Takes and Comps list, this command becomes the Duplicate Comp command, which saves the current comp and creates a duplicate of the comp. Logic’s comping features are covered in Chapter 6.
Create New Comp: This command saves a comp you have created in a take folder and adds it to the Takes and Comps list. If you have created a comp, and the comp is selected in the Takes and Comps list, this command becomes the Duplicate Comp command, which saves the current comp and creates a duplicate of the comp. Logic’s comping features are covered in Chapter 6.
![]() Rename Take/Comp: This command opens the Rename Take or Rename Comp dialog box, depending on whether you have a take or a comp selected. You can rename the selected take or comp in this dialog box. The key command for this is Shift+T.
Rename Take/Comp: This command opens the Rename Take or Rename Comp dialog box, depending on whether you have a take or a comp selected. You can rename the selected take or comp in this dialog box. The key command for this is Shift+T.
![]() Delete Take/Comp: This command deletes the selected take or comp. The key command for this is Option+Shift+Delete.
Delete Take/Comp: This command deletes the selected take or comp. The key command for this is Option+Shift+Delete.
![]() Delete All Other Comps: This command is displayed only if you have more than one comp, and you have one comp selected. The Delete All Other Comps command deletes all but the selected comp.
Delete All Other Comps: This command is displayed only if you have more than one comp, and you have one comp selected. The Delete All Other Comps command deletes all but the selected comp.
![]() Flatten: The Flatten command replaces the take folder with regions created from the comp selections you have made from your takes. The new regions are independent of each other and therefore can be moved, copied, pasted, and edited individually. The key command for this is Option+Shift+U.
Flatten: The Flatten command replaces the take folder with regions created from the comp selections you have made from your takes. The new regions are independent of each other and therefore can be moved, copied, pasted, and edited individually. The key command for this is Option+Shift+U.
![]() Flatten and Merge: The Flatten and Merge command creates a single new audio region from the comps you have made in your take folder. The new region is the same length as its parent take folder. The key command for this is Option+U.
Flatten and Merge: The Flatten and Merge command creates a single new audio region from the comps you have made in your take folder. The new region is the same length as its parent take folder. The key command for this is Option+U.
![]() Export Active Take/Comp to New Track: The Export Active Take/Comp to New Track command exports either the selected take or the current comp to a new audio track using the same channel strip as the parent track. Because the take/comp has been exported, the take/comp also remains in the take folder.
Export Active Take/Comp to New Track: The Export Active Take/Comp to New Track command exports either the selected take or the current comp to a new audio track using the same channel strip as the parent track. Because the take/comp has been exported, the take/comp also remains in the take folder.
![]() Move Active Take/Comp to New Track: The Move Active Take/Comp to New Track command moves either the selected take or the current comp to a new audio track using the same channel strip as the parent track. Because the take/comp has been moved, the take/comp no longer exists in the take folder.
Move Active Take/Comp to New Track: The Move Active Take/Comp to New Track command moves either the selected take or the current comp to a new audio track using the same channel strip as the parent track. Because the take/comp has been moved, the take/comp no longer exists in the take folder.
![]() Unpack: The Unpack command creates new tracks for each take and each comp in the selected take folder using the same channel strip as the parent track. Because all the takes and comps share the same channel strip, this command also mutes all but the currently active take or comp. The key command for this is Control+Command+U.
Unpack: The Unpack command creates new tracks for each take and each comp in the selected take folder using the same channel strip as the parent track. Because all the takes and comps share the same channel strip, this command also mutes all but the currently active take or comp. The key command for this is Control+Command+U.
![]() Unpack to New Tracks: The Unpack to New Tracks command creates new tracks for each take and comp in the selected take folder using new, unmuted channel strips for each new track, but with the settings of the parent track’s channel strip. The key command for this is Control+Shift+Command+U.
Unpack to New Tracks: The Unpack to New Tracks command creates new tracks for each take and comp in the selected take folder using new, unmuted channel strips for each new track, but with the settings of the parent track’s channel strip. The key command for this is Control+Shift+Command+U.
![]() Quick Swipe Comping: The Quick Swipe Comping option lets you toggle Quick Swipe Comping mode. When Quick Swipe Comping is engaged, you can create and edit comps. When Quick Swipe Comping is disengaged, you can’t create or edit comps, but you can access Logic’s full complement of editing features, including the new Flex Audio features. You can also toggle Quick Swipe Comping mode by clicking the Quick Swipe Comping button or by pressing Option+Q.
Quick Swipe Comping: The Quick Swipe Comping option lets you toggle Quick Swipe Comping mode. When Quick Swipe Comping is engaged, you can create and edit comps. When Quick Swipe Comping is disengaged, you can’t create or edit comps, but you can access Logic’s full complement of editing features, including the new Flex Audio features. You can also toggle Quick Swipe Comping mode by clicking the Quick Swipe Comping button or by pressing Option+Q.
Audio Take Folder Behaviors
Because recording takes and creating take folders involves recording over existing regions, there are some behaviors that are unique to recording takes and take folders. The behaviors are designed to be helpful, but because there is a wide variety of ways you can employ take recording, there are some specific guidelines you need to be aware of to understand recording takes and using take folders.
If you are working on a project alone or you are having a musician perform the same section over a few times, then using cycle recording to record a section repeatedly has obvious benefits. As mentioned earlier, cycle recording an audio track automatically creates a take folder after the second pass. What happens when you stop cycle recording? That depends on where you stop in the cycle. If you stop recording in the first bar of a cycle, Logic will automatically discard the “extra” bit that went into the next cycle and truncate the recording to the end of the previous cycle. If you stop recording after the first bar of a new cycle, Logic will automatically add the small section of the new cycle with the previous cycle. This can be handy if you don’t like what you played at the start of a cycle, and you decide you can fix it by playing into the next cycle.
If you have already created a take folder on a track and you record over the take folder, then the new region is automatically added to the existing take folder. If your new region starts before or ends after the take folder—in other words, with Cycle mode disengaged—then the take folder is lengthened to match the length of the new audio region. If the new region begins and ends inside the boundaries of the take folder, a new comp is made of the new recording and the previous take or comp.
If you record over multiple take folders in a single track lane, then the new audio file is split into separate takes at the beginning of each take folder, and the resulting takes are added to those take folders. If there were any gaps between the take folders previously, the take folders are lengthened to match their new takes.
You can also add existing audio regions to a take folder by simply dragging them to the take folder and dropping them at the desired position. If the new region is the same length as the take folder, then it is added as a take. If the new region is longer than the take folder, the take folder is lengthened to match the length of the new region. If the new region is shorter than the take folder, a new comp is created from the new region and the existing take or comp.
It is also possible to multitrack takes. For example, suppose you need the bass player and the guitarist to record a few new takes on the second verse of a song. You can record their takes at the same time, and the new regions will be added to take folders on their respective tracks, allowing you to create edits later.
Finally, you cannot record takes with Replace mode engaged, because Replace mode discards any previously recorded audio.
Can I Disengage Audio Take Recording?: Takes offer extremely powerful and intuitive organization and editing tools. I highly recommend that you learn to integrate Logic’s takes features into your workflow.
Those who started using Logic before the takes feature may be set on older ways of working. There is no preference to turn off audio take recording. However, once you have recorded audio, you can use the Unpack to New Tracks command in the Take Folder menu or press Control+Shift+Command+U to unpack your take folder to new audio tracks. If you are determined to never get used to take folders, you can unpack every take folder via key command as soon as it’s created, even on the fly.
There have been complaints that the takes feature can’t be turned off, but frankly, these complaints are unfounded. This requires a grand total of one extra key press after recording. And again, I highly recommend everyone give take recording a chance—I believe it’s worth the effort.
Recording MIDI Takes
Although there are similarities between audio take recording and MIDI take recording, there are some aspects of MIDI take recording that are different. First of all, because the default behavior in Logic is to add any new events to an existing MIDI region when recording, you actually have to tell Logic that you want to record MIDI takes. To do this, simply open the Recording Settings window by selecting File > Project Settings > Recording. In the Overlapping Recordings menu, select Create Take Folders (see Figure 5.46).
Figure 5.46 The Overlapping Recordings menu of the Recording Settings window. Selecting Create Take Folders allows you to record MIDI takes.
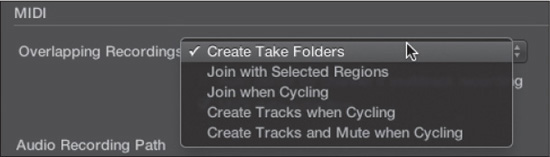
© Apple Inc.
With Create Take Folders selected, recording in Cycle mode or recording over a MIDI region creates a MIDI take folder. Figure 5.47 shows a MIDI take folder.
Figure 5.47 A MIDI take folder.

© Apple Inc.
Like audio take folders, MIDI take folders also have a disclosure triangle for opening the take folder and a number field for opening the Take Folder menu. Figure 5.48 shows the Take Folder menu.
Figure 5.48 The Take Folder menu for a MIDI take folder.
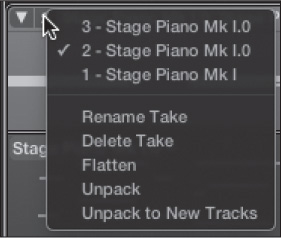
© Apple Inc.
As you can see, the functions in the Take Folder menu of a MIDI take folder are identical to some of the functions in the Take Folder menu of an audio take folder. You can reference the section “The Take Folder Menu” earlier in this chapter for an explanation of these commands. However, there is one big difference worth noting: The Flatten command replaces the take folder with the currently selected take.
MIDI Take Folder Behaviors
Recording over an existing MIDI take folder adds the new MIDI region to the MIDI take folder. If you record over multiple MIDI regions, the existing regions will be merged and will show as the first take, and the new region will show as the newest take. If you are recording to multiple MIDI tracks, the regions will be merged into take folders per track. Recording over existing MIDI take folders will merge the existing folders into first takes per track, and the new region will show as the newest take.
MIDI take folders do not offer the comping functionality of audio take folders. However, you can unpack MIDI takes, open individual takes in Logic’s powerful MIDI editors and use the editors to create your own MIDI comps by selecting and deleting sections from different MIDI takes to create the perfect performance! Logic’s MIDI editors are covered in detail in Chapter 8.
Auto-Colorizing Takes
By default, all takes assume the color of the parent region. You can also colorize individual takes using the Colors menu by selecting View > Show Colors (or pressing Option+C), selecting a color, and clicking on a take. Logic also will automatically make each take a different color when you select the Auto-Colorize Takes option in the General area of the Recording Settings window (refer to Figure 5.38). This option is particularly helpful for keeping track of which parts of a comp come from which take.
The Play Button Shortcut Menu
If you click and hold or right-click on the Play button, the Play button shortcut menu opens, giving you a variety of options for what happens when you click Play. Figure 5.49 shows the Play button shortcut menu.
Figure 5.49 The Play button shortcut menu lets you control the behavior of the Play command.
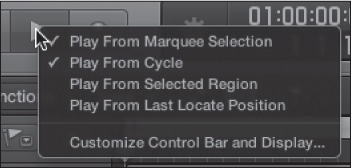
© Apple Inc.
The Play button shortcut menu options are as follows:
![]() Play from Marquee Selection: Playback will start from the beginning of your Marquee selection and end at the end of your Marquee selection. Marquee selections and the Marquee tool are covered in Chapter 6.
Play from Marquee Selection: Playback will start from the beginning of your Marquee selection and end at the end of your Marquee selection. Marquee selections and the Marquee tool are covered in Chapter 6.
![]() Play from Cycle: Playback will start from the beginning of the cycle area when Cycle mode is engaged and will continue to cycle until it is manually stopped.
Play from Cycle: Playback will start from the beginning of the cycle area when Cycle mode is engaged and will continue to cycle until it is manually stopped.
![]() Play from Selected Region: Playback will begin at the beginning of the selected region.
Play from Selected Region: Playback will begin at the beginning of the selected region.
![]() Play from Last Locate Position: Playback will begin at the last point Play was engaged. You can also accomplish this by double-clicking the Play button.
Play from Last Locate Position: Playback will begin at the last point Play was engaged. You can also accomplish this by double-clicking the Play button.
These are only some of the Play options available to you in Logic. There are more Play options available in the Key Commands window. You should check them out and maybe even assign a few you find useful to key commands.
The Stop Button Shortcut Menu
The Stop button has its own shortcut menu, which you can access by clicking and holding or right-clicking the Stop button. Figure 5.50 shows the Stop button shortcut menu.
Figure 5.50 The Stop button shortcut menu gives you options to control the Stop command’s actions.
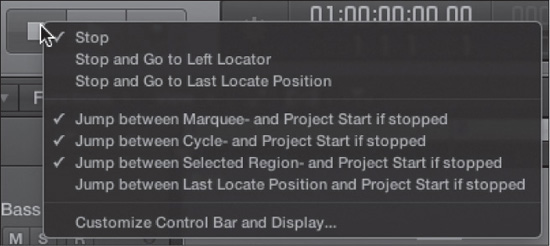
© Apple Inc.
The Stop button shortcut menu has the following options:
![]() Stop: Playback stops at the current playhead position when you click Stop.
Stop: Playback stops at the current playhead position when you click Stop.
![]() Stop and Go to Left Locator: The playhead moves to the left locator when you click Stop.
Stop and Go to Left Locator: The playhead moves to the left locator when you click Stop.
![]() Stop and Go to Last Locate Position: The playhead returns to the last locate position when you click Stop. For example, if you were playing a Marquee selection and clicked Stop with this mode engaged, the playhead would return to the beginning of the Marquee selection.
Stop and Go to Last Locate Position: The playhead returns to the last locate position when you click Stop. For example, if you were playing a Marquee selection and clicked Stop with this mode engaged, the playhead would return to the beginning of the Marquee selection.
![]() Jump Between Marquee and Project Start If Stopped: With this option selected, you can toggle the playhead position between the project start and the start of your Marquee selection by clicking Stop.
Jump Between Marquee and Project Start If Stopped: With this option selected, you can toggle the playhead position between the project start and the start of your Marquee selection by clicking Stop.
![]() Jump Between Cycle and Project Start If Stopped: With this option selected, you can toggle the playhead position between the project start and the start of your cycle area by clicking Stop.
Jump Between Cycle and Project Start If Stopped: With this option selected, you can toggle the playhead position between the project start and the start of your cycle area by clicking Stop.
![]() Jump Between Selected Region and Project Start If Stopped: With this option selected, you can toggle the playhead position between the project start and the start of your selected region by clicking Stop.
Jump Between Selected Region and Project Start If Stopped: With this option selected, you can toggle the playhead position between the project start and the start of your selected region by clicking Stop.
![]() Jump Between Last Locate Position and Project Start If Stopped: With this option selected, you can toggle the playhead position between the project start and the last locate position by clicking Stop.
Jump Between Last Locate Position and Project Start If Stopped: With this option selected, you can toggle the playhead position between the project start and the last locate position by clicking Stop.
Using Varispeed
As mentioned, Varispeed lets you alter the speed of your entire project instantly and nondestructively. You can slow down a project by up to half or speed it up to a maximum of double speed.
To use Varispeed, first customize your Transport to include the Varispeed controls. Then, to turn Varispeed on, simply click the Varispeed button. You can then adjust your project speed by clicking and dragging the Varispeed value in the Varispeed display or by double-clicking the Varispeed value and entering a value manually. If you click on the top half of the Varispeed display, where the Varispeed mode appears, a menu opens, giving you a few Varispeed options. Figure 5.51 shows the Varispeed Mode menu.
Figure 5.51 The Varispeed Mode menu.
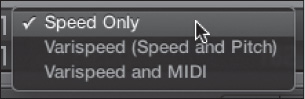
© Apple Inc.
The Varispeed Mode menu options are as follows:
![]() Speed Only: If you select this option, changing the Varispeed value only affects the speed of playback, not the pitch. This mode is best for checking how the project sounds and feels at different tempos and for practicing or recording difficult sections of a project.
Speed Only: If you select this option, changing the Varispeed value only affects the speed of playback, not the pitch. This mode is best for checking how the project sounds and feels at different tempos and for practicing or recording difficult sections of a project.
![]() Varispeed (Speed and Pitch): With this option enabled, Varispeed functions like an analog tape machine or a record player would, where speeding up or slowing down the playback also affects pitch. This mode is particularly good for working with vocal performances, enabling you to slow the speed and lower the pitch to help a singer in more difficult sections. The speed can be decreased up to half and increased up to double the original speed. Slowing the speed down by half lowers the pitch an octave, and speeding it up to double raises the pitch an octave. Obviously, the further you get from the actual pitch, the less desirable the results may be.
Varispeed (Speed and Pitch): With this option enabled, Varispeed functions like an analog tape machine or a record player would, where speeding up or slowing down the playback also affects pitch. This mode is particularly good for working with vocal performances, enabling you to slow the speed and lower the pitch to help a singer in more difficult sections. The speed can be decreased up to half and increased up to double the original speed. Slowing the speed down by half lowers the pitch an octave, and speeding it up to double raises the pitch an octave. Obviously, the further you get from the actual pitch, the less desirable the results may be.
![]() Varispeed and MIDI: The Varispeed and MIDI mode transposes any MIDI tracks (other than drum tracks) to match the pitch change your audio incurs using Varispeed. If you are using MIDI tracks and trying to alter the speed and the pitch of the project, this is the mode to use.
Varispeed and MIDI: The Varispeed and MIDI mode transposes any MIDI tracks (other than drum tracks) to match the pitch change your audio incurs using Varispeed. If you are using MIDI tracks and trying to alter the speed and the pitch of the project, this is the mode to use.
You can alter the display of the Varispeed value in the Varispeed Value menu, which you open by clicking the percent symbol in the Varispeed value field. Figure 5.52 shows the Varispeed Value menu.
Figure 5.52 The Varispeed Value menu.
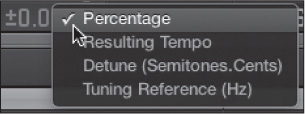
© Apple Inc.
The Varispeed Value menu options are as follows:
![]() Percentage: This displays the Varispeed value as a percentage of the original tempo.
Percentage: This displays the Varispeed value as a percentage of the original tempo.
![]() Resulting Tempo: This displays the Varispeed value as the tempo that will result from the current Varispeed setting. This view mode is good for trying out new tempos.
Resulting Tempo: This displays the Varispeed value as the tempo that will result from the current Varispeed setting. This view mode is good for trying out new tempos.
![]() Detune (Semitones.Cents): This displays the Varispeed value as the amount of detuning incurred in semitones and cents.
Detune (Semitones.Cents): This displays the Varispeed value as the amount of detuning incurred in semitones and cents.
![]() Tuning Reference (Hz): This displays the Varispeed value as the actual tuning of the project compared to 440.0 Hz. This mode is great for working with instruments tuned to a different standard than A440 and having them fit in projects recorded with A440 as the standard tuning note.
Tuning Reference (Hz): This displays the Varispeed value as the actual tuning of the project compared to 440.0 Hz. This mode is great for working with instruments tuned to a different standard than A440 and having them fit in projects recorded with A440 as the standard tuning note.
Now that you have a good sense of how to use the Transport, how to use some of Logic’s playback features, and how to record takes, it’s time to dig into the next chapter on the main window, including more detail on comping.