
The Arduino environment has been designed to be easy to use for beginners who have no software or electronics experience. If you are new to Arduino, this chapter will help you get started but you will need to consult the Arduino online help and a good book on Arduino will be a big help (the author's "Arduino Cookbook" is highly recommended as reference.)
Note
If you’re already familiar with Arduino, please feel free to skip the introductory material in this chapter. However, you will need to install the libraries that are included in the download the code available from: http://shop.oreilly.com/product/0636920028024.do. The section Installing Third-Party Libraries has details on installing the required libraries.
Arduino is best known for its hardware, but you also need software to program that hardware. Both the hardware and the software are called “Arduino.” The combination enables you to create projects that sense and control the physical world. The software is free, open source, and cross-platform. The boards are inexpensive to buy or you can build your own (the hardware designs are also open source). In addition, there is an active and supportive Arduino community that is accessible worldwide through the Arduino forums and the wiki (known as the Arduino Playground). The forums and the wiki offer project development examples and solutions to problems that can provide inspiration and assistance as you pursue your own projects.
The information in this chapter will get you started by explaining how to set up the development environment and how to compile and run an example sketch.
Note
Source code containing computer instructions for controlling Arduino functionality is usually referred to as a sketch in the Arduino community. The word sketch will be used throughout this book to refer to Arduino program code.
The Blink sketch, which comes with Arduino, is used as an example sketch in this chapter. If you have already assembled the robot and downloaded the source code for this book, feel free to use the HelloRobot sketch described in Chapter 6, Testing the Robot's Basic Functions.
Warning
If you don't have the Arduino software and driver installed on your machine, wait until Connecting the Arduino Board to plug the Arduino into your computer.
Computer with Arduino 1.0.1 or later installed
Leonardo (or Uno) Arduino board
Motor Shield (see Chapter 2, Building the Electronics)
USB cable
Software programs, called sketches, are created on a computer using the Arduino integrated development environment (IDE). The IDE enables you to write and edit code and convert this code into instructions that Arduino hardware understands. The IDE also transfers those instructions to the Arduino board (a process called uploading).
The Arduino board is where the code you write is executed. The board can only control and respond to electricity, so specific components are attached to it to enable it to interact with the real world. These components can be sensors, which convert some aspect of the physical world to electricity so that the board can sense it, or actuators, which get electricity from the board and convert it into something that changes the world. Examples of sensors include switches, accelerometers, and ultrasound distance sensors. Actuators are things like lights and LEDs, speakers, motors, and displays.
There are a variety of official boards that you can run your Arduino sketches on and a wide range of Arduino-compatible boards produced by members of the community.
The most popular boards contain a USB connector that is used to provide power and connectivity for uploading your software onto the board. Figure 5-1 shows the board used for the robots in this book, the Arduino Leonardo.

You can get boards that are smaller and boards with more connections. The Leonardo is used with these robotics projects because it is inexpensive but you can use other boards such as the Uno if you prefer.
Note
If you want to use an Uno board (or earlier Arduino boards), you may need to use a s slightly higher voltage (an additional battery) to power the robot, see Appendix D).
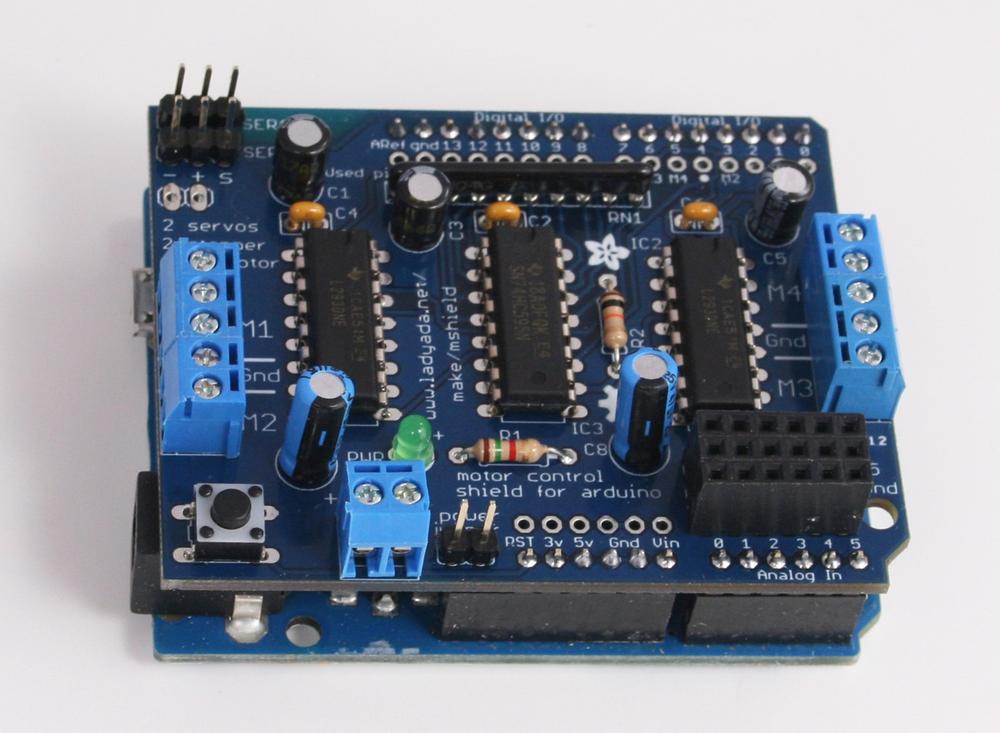
Add-on boards that plug into Arduino to extend hardware resources are called shields. The robots covered in this book use a shield that controls the direction and speed of the motors, see Figure 5-2:
Online guides for getting started with Arduino are available at http://arduino.cc/en/Guide/Windows for Windows, http://arduino.cc/en/Guide/MacOSX for Mac OS X, and http://www.arduino.cc/playground/Learning/Linux for Linux.
The Arduino software for Windows, Mac, and Linux can be downloaded from http://arduino.cc/en/Main/Software.
The Windows download is a ZIP file. Unzip the file to any convenient directory—Program Files/Arduino is a sensible place.
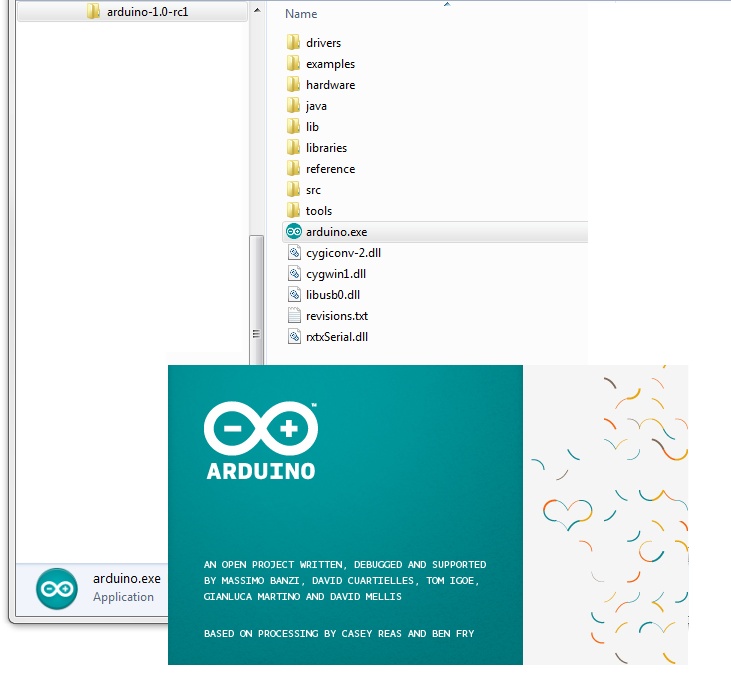
Unzipping the file will create a folder named Arduino-1.0.<nn> (where <nn> is the version number of the Arduino release you downloaded). The directory contains the executable file (named Arduino.exe), along with various other files and folders. Double-click the Arduino.exe file and the splash screen should appear (see Figure 5-3), followed by the main program window (see Figure 5-4). Be patient, as it can take some time for the software to load.
The Arduino download for the Mac is a disk image (.dmg); double-click the file when the download is complete. The image will mount (it will appear like a memory stick on the desktop). Inside the disk image is the Arduino application. Copy this to somewhere convenient—the Applications folder is a sensible place. Double-click the application once you have copied it over (it is not a good idea to run it from the disk image). The splash screen will appear, followed by the main program window (Figure 5-4).

Linux installation varies depending on the Linux distribution you are using. See the Arduino wiki for information (http://www.arduino.cc/playground/Learning/Linux).
To enable the Arduino development environment to communicate with the board, the operating system needs to use the appropriate drivers for your board.
On Windows, use the USB cable to connect your PC and the Arduino board and wait for the Found New Hardware Wizard to appear. If you are using a Leonardo or Uno board let the wizard attempt to find and install drivers.
If you are using an earlier board (any board that uses FTDI drivers) with Windows Vista or Windows 7 and are online, you can let the wizard search for drivers and they will install automatically. On Windows XP (or if you don't have internet access), you should specify the location of the drivers. Use the file selector to navigate to the FTDI USB Drivers directory, located in the directory where you unzipped the Arduino files. When this driver has installed, the Found New Hardware Wizard will appear again, saying a new serial port has been found. Follow the same process as before.
On the Mac, the latest Arduino boards can be used without additional drivers. When you first plug the board in a notification will pop up saying a new network port has been found; you can dismiss this. If you are using earlier boards (boards that need FTDI drivers), you will need to install driver software. There is a package named FTDIUSBSerialDriver, with a range of numbers after it, inside the Arduino installation disk image. Double-click this and the installer will take you through the process. You will need to know an administrator password to complete the process.
On Linux, most distributions have the driver already installed, but follow the Linux link given in Arduino Hardware for specific information for your distribution.
Note
If the software fails to start, check the troubleshooting section of the Arduino website, http://arduino.cc/en/Guide/Troubleshooting, for help solving installation problems.
Plug the board into a USB port on your computer and check that the green LED power indicator on the board illuminates. The location of the LED is indicated in Figure 5-5.

If you have a factory fresh board, an orange LED (labeled “Pin 13 LED” in Figure 5-5) should flash on and off when the board is powered up (boards come from the factory preloaded with software to flash the LED as a simple check that the board is working).
Note
If the power LED does not illuminate when the board is connected to your computer, the board is probably not receiving power.
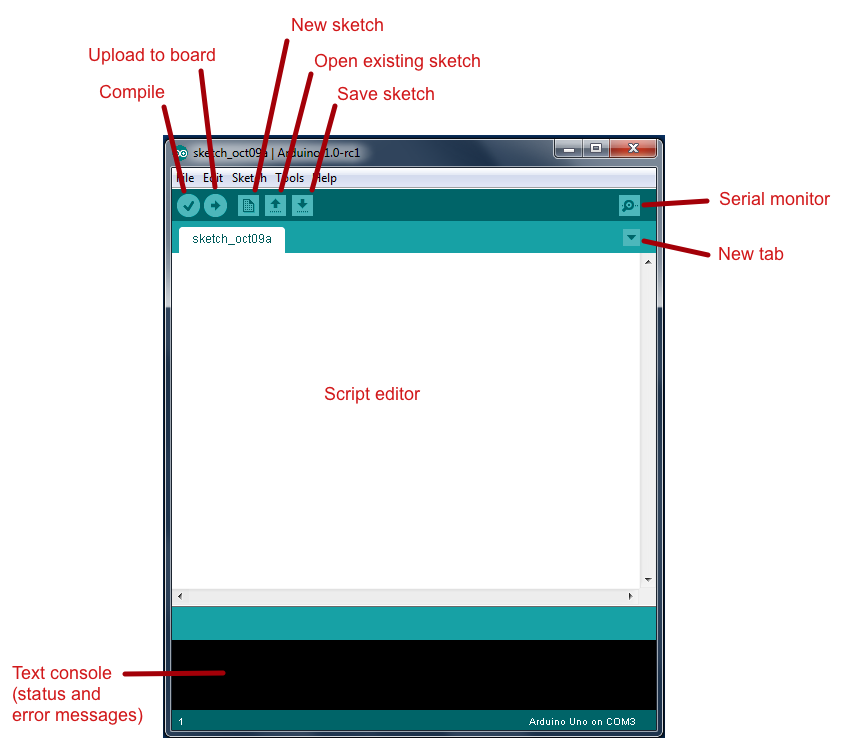
Use the Arduino IDE to create, open, and modify sketches that define what the board will do. You can use buttons along the top of the IDE to perform these actions (shown in Figure 5-6), or you can use the menus or keyboard shortcuts (some are shown in Figure 5-7).
The Sketch Editor area is where you view and edit code for a sketch. It supports common text editing keys such as Ctrl-F (⌘-F on a Mac) for find, Ctrl-Z (⌘-Z on a Mac) for undo, Ctrl-C (⌘-C on a Mac) to copy highlighted text, and Ctrl-V (⌘-V on a Mac) to paste highlighted text.
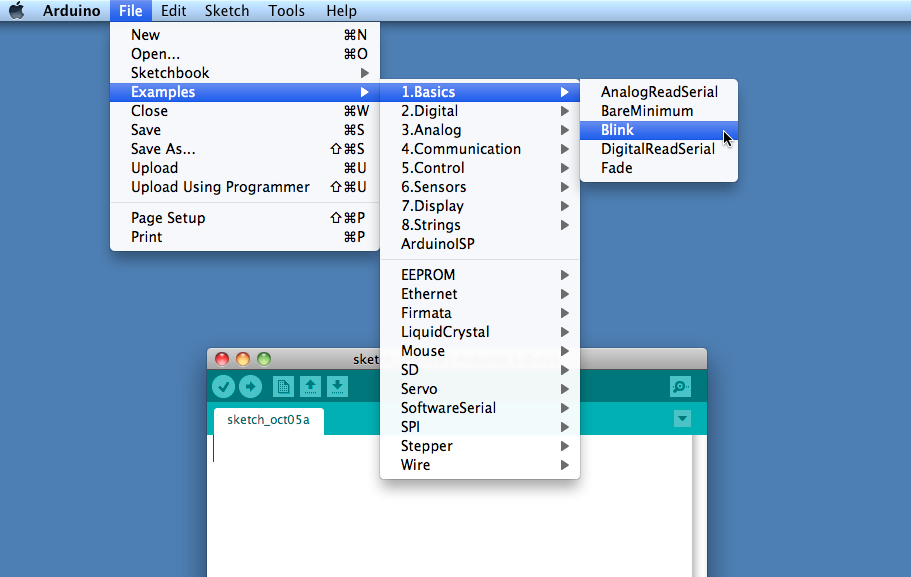
Figure 5-7 shows how to load the Blink sketch (the sketch that comes preloaded on a new Arduino board).
After you’ve started the IDE, go to the File→Examples menu and select 1.Basics→Blink, as shown in Figure 5-7. The code for blinking the built-in LED will be displayed in the Sketch Editor window.
Before the code can be sent to the board, it needs to be converted into instructions that can be read and executed by the Arduino controller chip; this is called compiling. To do this, click the compile button (the top-left button with a tick inside), or select Sketch→Verify/Compile (Ctrl-R, ⌘-R on a Mac).
You should see a message that reads “Compiling sketch...” and a progress bar in the message area below the text editing window. After a second or two, a message that reads “Done Compiling” will appear. The black console area will contain the following additional message:
Binary sketch size: 1026 bytes (of a 32256
byte maximum)
The exact message may differ depending on your board and Arduino version; it is telling you the size of the sketch and the maximum size that your board can accept.
The final message telling you the size of the sketch indicates how much program space is needed to store the controller instructions on the board. If the size of the compiled sketch is greater than the available memory on the board, the following error message is displayed:
Sketch too big;
see http://www.arduino.cc/en/Guide/Troubleshooting#size for tips
on reducing it.
If this happens, you need to make your sketch smaller to be able to put it on the board, or get a board with higher capacity. You will not have this problem with the Blink example sketch.
If there are errors in the code, the compiler will print one or more error messages in the console window. These messages can help identify the error.
As you develop and modify a sketch, you should also consider using the File→Save As menu option and using a different name or version number regularly so that as you implement each bit, you can go back to an older version if you need to.
To transfer your compiled sketch to the Arduino board, connect your board to your computer using the USB cable. Load the sketch into the IDE as described in Using the IDE.
Next, select Tools→Board from the drop-down menu and select the name of the board you have connected.
Now select Tools→Serial Port. You will get a drop-down list of available serial ports on your computer. Each machine will have a different combination of serial ports, depending on what other devices you have used with your computer.
On Windows, they will be listed as numbered COM entries. If there is only one entry, select it. If there are multiple entries, your board will probably be the last entry.
On the Mac, your board will be listed twice (you can use either one):
/dev/tty.usbmodemXXXXXXX/dev/cu.usbmodemXXXXXXX
If you have an older board, it will be listed as follows:
/dev/tty.usbserial-XXXXXXX/dev/cu.usbserial-XXXXXXX
Each board will have different values for
XXXXXXX. Select either entry.
Click on the upload button (in Figure 5-6, it’s the second button from the left), or choose File→Upload to I/O board (Ctrl-U, ⌘-U on a Mac).
The software will compile the code, as in Using the IDE. After the software is compiled, it is uploaded to the board. If you look at your board, you will see the LED stop flashing, and two lights (labeled as Serial LEDs in Figure 5-5) just below the previously flashing LED should flicker for a couple of seconds as the code uploads. The original light should then start flashing again as the code runs.
The IDE will display an error message if the upload is not successful. Problems are usually due to the wrong board or serial port being selected or the board not being plugged in. The currently selected board and serial port are displayed in the status bar at the bottom of the Arduino window
If you have trouble identifying the correct port on Windows, try unplugging the board and then selecting Tools→Serial Port to see which COM port is no longer on the display list. Another approach is to select the ports, one by one, until you see the lights on the board flicker to indicate that the code is uploading.
Tabs provide a convenient way to organize code when your sketch starts to grow. It enables you to keep functionally related code together and simplifies sharing this code across more than one sketch.
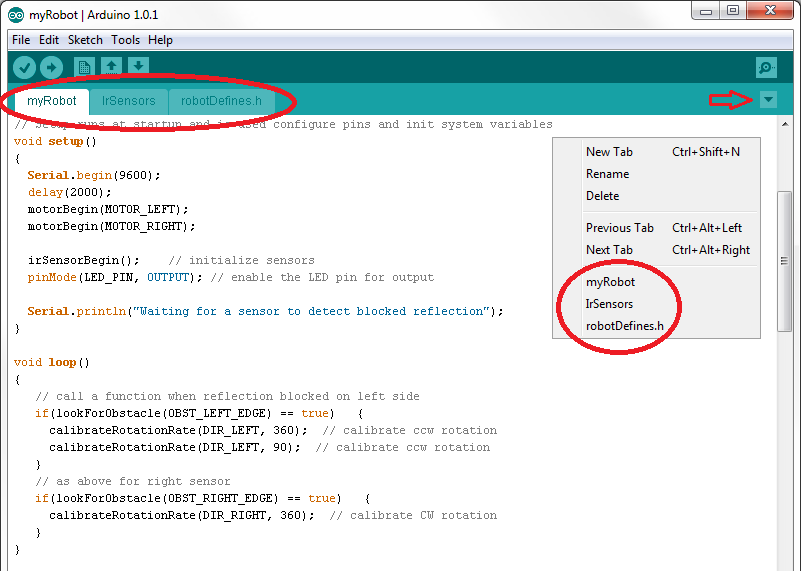
The arrow in the upper right of Figure 5-8 points to the button which invokes a drop-down window of tab related functions. This window displays the names of the tabs and offers a list of commands:
New Tabcreates a new tab that (you will be prompted to name the tab)Renameenables you to change the name of the currently selected tabDeletedeletes the current tab (you are asked if you are sure you want to do that)
Each tab is a separate file and when you copy these files to other sketches you add the tab to that sketch.
Because there are many functional modules used in this book and these are shared across most of the sketches, tabs are used extensively. Figure 5-8 shows the myRobot sketch, discussed in the next chapter, that uses tabs for infrared sensor code (irSensors) and for program constants and definitions (robotDefines.h).
The download code for this book (see How to Contact Us) contains three libraries that are required to run all the sketches described in the book. These libraries are in a folder called libraries in the zip. You need to copy these so they are in a folder called libraries inside your Arduino document folder. To find the Arduino document folder, open Preferences (Arduino→Preferences on Mac; File→Preferences on Windows) and note the sketchbook location. Navigate to that directory in a file system browser (such as Windows Explorer or the OS X Finder) or at the terminal. If no libraries folder exists, create one and put the folder you unzipped inside it.
If the Arduino IDE is still running, quit and restart it. The IDE scans this folder to find libraries only when it is launched. If you now go to the menu Sketch→Import Library, at the bottom, below the gray line and the word Contributed, you should see the library you have added.
If the libraries provide example sketches, you can view these from the IDE menu; click File→Examples, and the library's examples will be under the library's name in a section between the general examples and the Arduino distributed libraries example listing.
If the library examples do not appear in the Examples menu or you get a message saying “Library not found” when you try to use the library, check that the libraries folder is in the correct place with the name spelled correctly. A library folder named <LibraryName> (where <LibraryName> is the name for the library) must contain a file named <LibraryName>.h with the same spelling and capitalization. Check that additional files needed by the library are in the folder.