
At this point, we have the memory dump opened in IDA Pro and have the same unknown image mapped into a Calculator process. We will work with both tools by using IDA Pro for viewing the disassembly code and x86dbg for debugging.
In x86dbg, we have placed a breakpoint at the WinMain address of the unknown image. However, the instruction pointer is still at an NTDLL address. Hit F9 to make it continue and bring us to our WinMain.
Taking a detailed look at the disassembly codes from WinMain, we will notice an SEH anti-debug here:
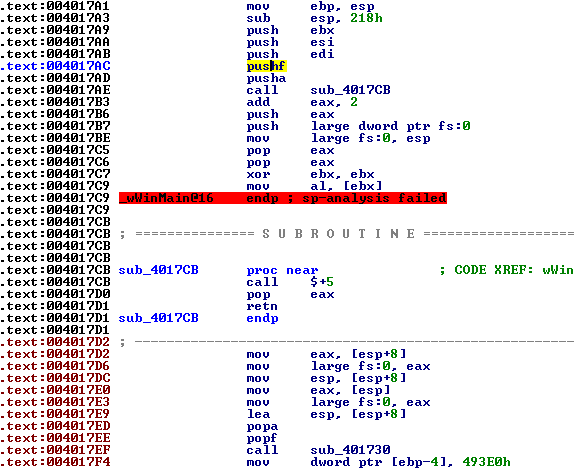
call sub_4017CB goes to a subroutine that has a call $+5, pop eax, and then a retn instruction. call $+5 calls the next line. Remember that when call is executed, the top of the stack will contain the return address. call sub_4017CB stores the return address, 0x004017B3, at the top of the stack. And again, call $+5 stores 0x004017D0 at the top of the stack. 0x004017D0 is placed in the eax register because of pop eax. The ret instruction returns to the 0x004017AD address. A value of 2 is added to the address stored at the eax register. As a result, the address in eax points to 0x004017D2. This must be the handler for the SEH being set up.
We can go through the SEH, or simply skip this in our debug session. Skipping it would be as simple since we can identify the pushf/pusha and popa/popf instructions and execute the same process as we did in the whatami.exe process.
Going through the SEH should also be simple. We can just place a breakpoint at the handler address, 0x004017D2, and press F9 until we reach the handler.
Our next stop is sub_401730. The following screenshot shows the code in sub_401730:

Debugging through this code reveals that LoadLibraryA and GetProcAddress is used to retrieve the address of MessageBoxA. Afterward, it just displays a message.

The next lines of code is an anti-automated analysis trick. We can see that the difference of the results of two GetTickCount is being compared to a value 0x0493e0 or 300000. Between the calls to GetTickCount, a Sleep function is also called.

A Sleep for 300000 means 5 minutes. Usually, automated analysis systems would turn a long Sleep to a very short one. The preceding code wants to make sure that 5 minutes really elapsed. As analysts debugging this code, we can simply skip this trick by setting our instruction pointer after the jb instruction.
Next is a call to sub_401500 with two parameters: "mcdo.thecyberdung.net" and 0x270F (9999). The routine contains socket APIs. As we did before, let us list down the sequence of APIs we will encounter.

For network socket behaviors, what we will be looking into are the parameters and results for gethostbyname, htons, send and recv. Again, before we proceed, taking a VM snapshot would be recommended at this point.
Keep on step debugging until we reach the call to gethostbyname. We can get the server to which the program is connecting to by looking at gethostbyname's parameters. And that would be "mcdo.thecyberdung.net". Proceeding with the call, we might encounter a problem with gethostbyname's result. The result in register EAX is zero. This means gethostbyname failed because it was not able to resolve "mcdo.thecyberdung.net" to an IP address. What we need to do is setup FakeNet to mimic the internet. Revert the VM snapshot to take us back before executing WSAStartup.
Before running FakeNet, disconnect the cable by selecting Machine->Settings->Network from the VirtualBox menu. Expand the Advanced menu and uncheck Cable connected. We are doing this procedure to make sure that there will be no interference for FakeNet reconfiguring the network.

The following screenshot shows FakeNet running successfully. FakeNet might require running in administrative privileges. If that happens, just run it as an Administrator:

Restore cable connection by checking the VM Network settings' Cable Connected check box. To verify that everything works fine, open up Internet Explorer and visit any website. The resulting page should be similar to the following screenshot:

Now, we can go back to our debugging at the gethostbyname address. We should now get a result in register EAX with FakeNet running.

The next API we are after is htons. This should give us information about the server's network port the program is going to connect to. The parameter passed to htons is stored in register ECX. This is the port number that will be used, 0x270F or 9999.

Going on with debugging, we encounter the connect function where actual connection to the server and given port commences. The connect function returns zero to register EAX if it was successful. In our case, this fails with a -1 return value.

The reason for this is that FakeNet only supports commonly used and few known malware ports. Fortunately, we can edit FakeNet's configuration and add port 9999 to the list. FakeNet's configuration file, FakeNet.cfg, is found at the same directory where FakeNet's executable is. But before updating this file, we will have to revert again to snapshot before WSAStartup is called.
Using Notepad, edit FakeNet.cfg. Look for the line that has the "RawListner" text. If not found, just append the following lines in the config file.
RawListener Port:9999 UseSSL:No
When this line is added, the config file should look like this:

Take note of the added RawListener line. After this, restart FakeNet then debug again until we reach the connect API. This time we are expecting the connect function to become successful.

Continue debugging until we reach the send function. The second parameter (look at the second entry from the top of stack) of the send function points to the address of the data to be sent. Press F8 to proceed sending the data and look at FakeNet's command console.

We highlighted the communication between this program and FakeNet. Remember that FakeNet here is a mimic of the remote server. The data sent was "OLAH".
Continue debugging until we reach another send or recv function. The next function is a recv.

The second parameter is the buffer that receives data from the server. Apparently, we are not expecting FakeNet to send any data back. What we can do is monitor succeeding code that will process the data in this recv buffer. But to make the recv call successful, the return value should be a non-zero number. We will have to change register EAX's value after stepping on the recv call, as we did in the following screenshot:

The next lines of code compare the data received with a string. See the following disassembly using the repe cmpsb instruction to compare the strings. This instruction compares the text string stored at the address pointed to by registers ESI and EDI. The number of bytes to compare is stored in register ECX. The supposedly received data is located at the address pointed to by register ESI. And the address of the string, "jollibee", is stored in register EDI. What we want to happen here is make both strings equal.

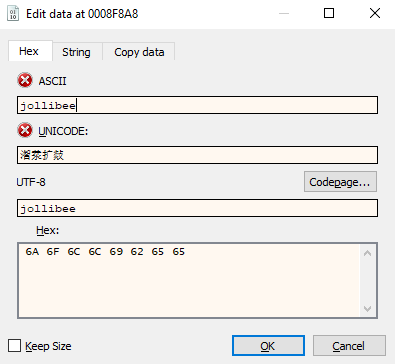
To do that in our debug session, we will have to edit the bytes at the received data address and make it equal to the 9 character string being compared to. Right click on the value of register ESI to bring up the context menu, select Follow in Dump. At the first byte of the data in Dump window, right click and select Binary->Edit.

This pops up a dialog box (shown in the following) where we can enter the string "jollibee":
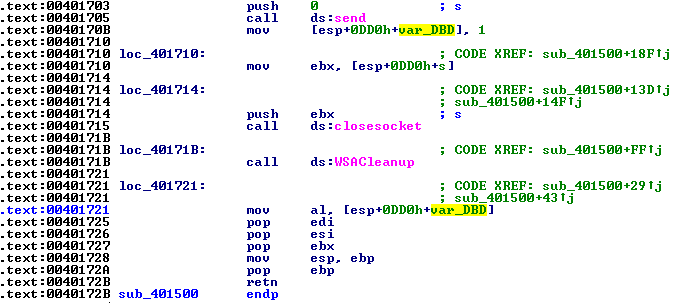
Hit F8 to proceed with the comparison. This should not go to the address where the conditional jump points to. Continue debugging until we reach another send function. Again, look at the data to be sent, which is the address that the second parameter points to. However, irrespective of whether this succeeds or fails, the result is not processed. The succeeding API closes the connection with closesocket and WSACleanup functions, sets EAX to 1, and returns from the current function. EAX will only be set to 1 after the last send function.
We've highlighted var_DBD in the disassembly code shown below to see that a value of 1 was stored after the sending data back to the server.
After returning to the WinMain function, it would be wise to do a VM snapshot.
Keep on debugging until we reach a call to address 0x00401280. There are two parameters that will be passed to the function with values stored in the EAX and ECX registers . The data is dumped under Dump 1, demonstrated as follows:
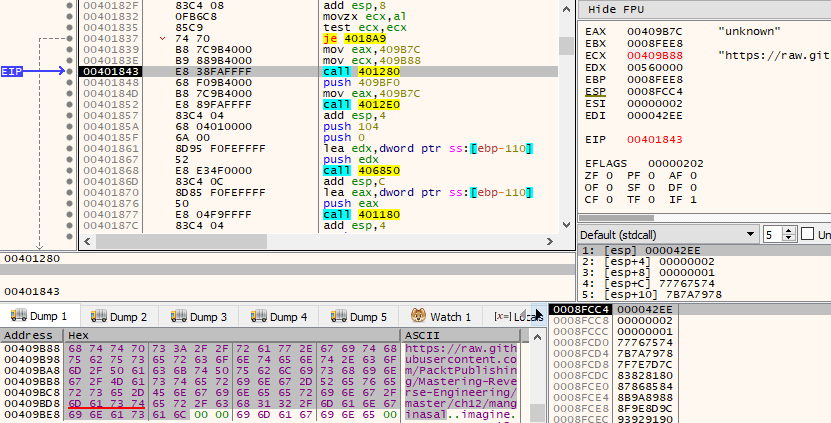
After entering function 0x00401280, we will only encounter a URLDownloadToFile function. The function downloads https://raw.githubusercontent.com/PacktPublishing/Mastering-Reverse-Engineering/master/ch12/manginasal and stores it to a file named unknown, as can be seen in the following screenshot:

Doing this, we get to encounter an error that fails to download the file. The reason is that we are still under a mimicked internet. This time, we will need to get a connection to the live internet. We will have to revert back to the snapshot before the URLDownloadToFile function happens.
In the FakeNet console, press CTRL + C to exit the tool. To test whether the live internet is up, visit http://testmyids.com from the internet browser. The result should be similar to the following screenshot:

Check VirtualBox's network configuration and Windows' network setup if the internet cannot be accessed.
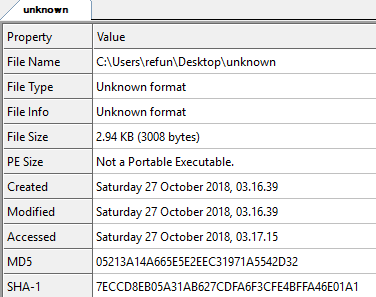
With the internet connection up, the program should be able to download the file successfully. The file is downloaded with the filename unknown. If we load this file in CFF Explorer, we get these file properties:
The following screenshot shows the file's content by selecting the CFF Explorer's Hex Editor:

The file seems to be encrypted. We should expect that the next behavior will process this file. Keep on debugging until we reach a call to address 0x004012e0. This function accepts two parameters, an address stored in EAX, and another address pushed to the stack. The function receives these imagine parameter strings from the top of the stack and unknown from the register EAX.
Entering the function reveals reading the content of the file "unknown". The disassembly code that reads the file in a newly allocated memory space is as follows:

Keep on pressing F8 until after the CloseHandle call. The next set of code shows the use of Cryptographic APIs. Let's list the sequence of APIs here once again:
.text:0040137A call ds:CryptAcquireContextA
.text:0040139B call ds:CryptCreateHash
.text:004013C8 call ds:CryptHashData
.text:004013EC call ds:CryptDeriveKey
.text:004013FF call sub_401290
.text:0040147B call ds:CryptDecrypt
.text:0040149D call ds:CreateFileA
.text:004014AF call ds:WriteFile
.text:004014B6 call ds:CloseHandle
.text:004014BE call ds:Sleep
.text:004014D9 call ds:CryptDestroyKey
.text:004014E4 call ds:CryptDestroyHash
.text:004014F1 call ds:CryptReleaseContext
Based on the list, it would seem that whatever is decrypted gets stored in a file. What we would want to know about this are the following:
- The cryptographic algorithm used
- The cipher key used
- The name of the file it stores data into
To identify the algorithm used, we should monitor the parameters used in either CryptAcquireContextA function. Keep on debugging until CryptAcquireContextA. The fourth parameter, dwProvType, should tell us what algorithm was used. dwProvType here is 0x18 or 24. For the list of provider type values, we can reference https://docs.microsoft.com/en-us/dotnet/api/system.security.permissions.keycontainerpermissionattribute.providertype. In this case, 24 is defined for the value of PROV_RSA_AES. Thus, the cipher algorithm here uses RSA AES.
The cipher key used for this algorithm should be the third parameter of the CryptHashData function. Look at the second parameter of the CryptHashData function in the following screenshot:

The key is this0is0quite0a0long0cryptographic0key.
For the final piece of information, we need to monitor CreateFileA to get the filename of where the decrypted data will possibly be placed. After debugging to CreateFileA, we should see the first parameter as the output filename, "imagine". The CryptDecrypt function accepts the location of encrypted data, the fifth parameter, and decrypts it at the same location. The process runs in a loop where every piece of decrypted data gets appended to the "imagine" file.
The following screenshot, an IDA Pro graphical view, shows decrypted data being appended to the output file:

The decryption ends by closing the cryptographic handles with CryptDestroyKey, CryptDestroyHash, and CryptReleaseContext.
Curious enough, let's use CFF Explorer to extract information from the "imagine" file:

Using the TrID tool, we get a more meaningful file type, as shown in the following screenshot:

The file is a PNG image file.
Continuing with the debug session, keep on pressing F8 until we reach a call to address 0x00401180. Press F7 to enter this function. This reveals the utilization of registry APIs in this sequence:
.text:004011BF call ds:RegOpenKeyExA
.text:004011E6 call esi ; RegQueryValueExA
.text:004011F3 call edi ; RegCloseKey
.text:00401249 call ds:RegOpenKeyA
.text:0040126A call esi ; RegQueryValueExA
.text:00401271 call edi ; RegCloseKey
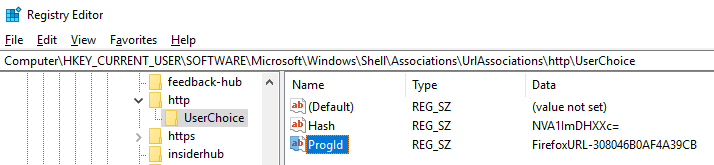
Basically, the registry functions here only retrieve certain values that exist in the registry. The disassembly codes shown below shows that the first query retrieves the data value of ProgId from the HKEY_CURRENT_USERSoftwareMicrosoftWindowsShellAssociationsUrlAssociationshttpUserChoice registry key:

If we take a look at the registry, this location points to the ID of the default internet browser used by the logged-in user. The following screenshot shows an example of the ID of the default internet browser set in Progid, which is FirefoxURL-308046B0AF4A39CB:
For the next registry query, RegOpenKeyExA opens the HKEY_CLASSES_ROOTFirefoxURL-308046B0AF4A39CBshellopencommand registry key, where FirefoxURL-308046B0AF4A39CB is the ID of the default internet browser:

The succeeding RegQueryValueExA has the second parameter, lpValuename, equal to zero. Refer to the disassembly as follows:
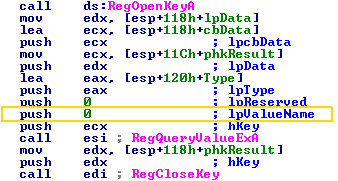
If lpValuename is equal to 0, the data being retrieved will be taken from the default value.
Looking at the registry, this is displayed as (Default), demonstrated as follows:

Hence, the action performed by the function was retrieval of the command line for the default internet browser.
The following lines of code resolve the full file path of the "imagine" file, and then pass the path to the final function, sub_401000, before exiting the process:

Debugging into sub_401000, we encounter more than a hundred lines of code that pretty much moves test strings around. But the bottomline is that it will run another process using the CreateProcessA. Taking a look at the parameters that will be passed to CreateProcess, the second parameter, which is the command line, that it will execute contains the path of the default browser passed with the full path of the "imagine" file as its argument. From the following screenshot, it can be seen that we dumped the command line in Dump 1:

As a result, this opens the "imagine" file using the default internet browser. The following screenshot is displayed:
