We already learned about the power of WMI Filters and the ways you can use those filters to make sure that your GPOs only apply to workstations that meet particular criteria. WMI Filters are scoped for the entire GPO, so once they determine true or false, they either grant or deny the entire GPO and everything inside of it.
Item-level targeting is a very similar idea, but at a very different scope level. Since this Common tab exists on all of your different preference settings, you can have a GPO that is a collection of numerous preference settings, but within each preference, you may individually determine criteria for which destinations these settings are allowed to roll to.
Item-level targeting is also a much more user-friendly interface than WMI Filters. Where WMI Filters need you to know and understand WMI query syntax (or at least be good at web searching for it), Item-level targeting is configured through a graphical interface. You make all of your filtering selections with your good old keyboard and mouse, and make the decisions on what criteria is necessary in order for these preferences to apply within that same interface. It is also easy to require AND/OR/NOT specs to enhance the filtering. In other words, you can easily do things such as, "apply this setting only if the computer is this AND that," "apply this setting only if the computer is this OR that," or even, "apply this setting if the computer is this one thing, but NOT this other thing." Let's walk through an example so you can see for yourself.
This same process can be completed inside whichever preference package you are currently dealing with. For me, I am still inside the new Power Plan that I was creating earlier. All I have done is navigate over to my Common tab, and select the checkbox for Item-level targeting. Then click the Targeting... button to dig into the details.
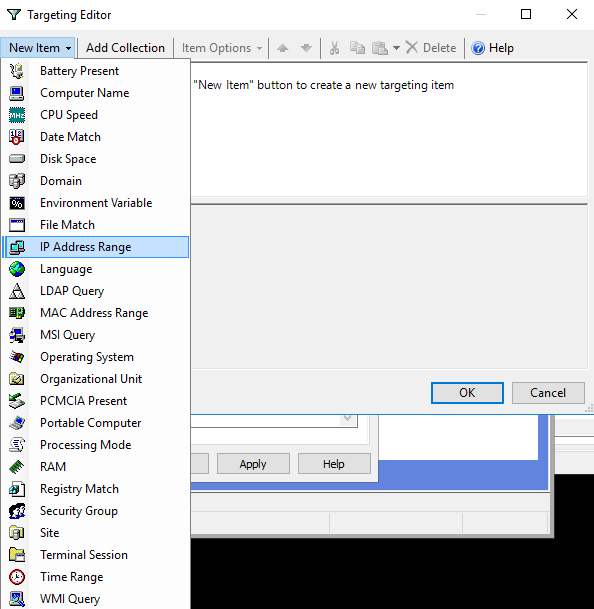
Here, we build the filtering criteria. Click on the New Item button, and make a selection. I am going to choose IP Address Range:

After inputting a range of IP addresses and clicking OK, I have now used item-level targeting to filter this preference package only to apply to machines within that IP range. Additionally, I could use a combination of the New Item and Item Options buttons to add more subnets, or to make exclusions within the ranges I have already specified. For example, here is what my Targeting Editor looks like after a few tweaks. I am now including 192.168.1.x as well as 172.16.1.x, but I am specifically excluding 172.16.1.20 through 172.16.1.30, so the handful of machines within that small IP range would not receive my preference settings:

You can see that there are many criteria from which to choose: whether there is a battery present, how much disk space is available, how much RAM a machine has, or even specific machine names or groups to which they are members. There are numerous ways that you could get creative with Item-level targeting to filter the scope of your preference packages.
