This gives you the facility to capture what you want to capture—others will be discarded. Capturing packets is a processor-intensive task, and Wireshark will acquire a quite good amount of primary memory as well. So, sometimes, we will have to save the resources for other processes, which can be utilized to analyze packets, and in some cases, we would like to capture only that data which meets our expression—rest of it will be dropped.
Wireshark offers some interesting options to configure an interface, which will be capturing traffic that meets only a certain expression, and this is achievable through the Capture Options window, as shown in the following screenshot:

Figure 2.1: The Capture Options dialog
Here, points list various capture options dialog related details
- Capture: In this window, you can choose the interface you want to capture packets from, and you can even select multiple interfaces at once to listen on all of them. The details for every interface are listed under separate columns such as Capture, Interface, the name of the interface, whether the promiscuous mode is enabled or not, and so on. Under the Capture dialog, you will see a checkbox to toggle the promiscuous mode, and you can even choose the promiscuous on all interfaces option to activate what you require in just one click.
- Manage Interfaces: This button facilitates addition or removal of a new interface for listening purposes you intend to. You can add even remote machine interfaces, where you would be required to have root level privileges.
- Capture Filter: By clicking on this Capture Filter button, you will be able to see a dialog similar to what is shown here. The already configured capture filters are listed by default, and here, we can create and save our custom capture filters as well.

Figure 2.2 :Default Capture filters
To start off, users can use these default filtering profiles and get an idea about how to create custom filtering strings. Once you are well versed with the basics, you can go ahead and use the same window to create your own custom filters, but make sure that you have followed the Berkley Packet Filtering (BPF) syntax. The BPF syntax is an industry standard and is used by multiple protocol analyzers, which make your filter's configuration file portable.
Let's create one together to get a better hold over it; consider a scenario where we have to capture packets originating from a web server that is located at 192.168.1.1 (change the IP address to the web server's address that you are monitoring), and follow the next steps:
- Open the Capture Options dialog.
- Click on Capture Filter.
- Click on New.
- Write
Web server 192.168.1.1inside the Filter name textbox. - Write
host 192.168.1.1 and port 80inside the Filter String text-box
- Once you've done this, click on OK; if you've entered everything correctly, the textbox followed by the Capture Filter button will be displayed with a green background, as shown in the following screenshot:

Figure 2.4 :Creating a sample capture filter
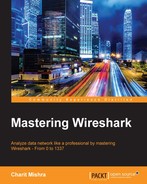
- Capture Files: This option gives you the flexibility to save your captured packets into the file(s) that already exists on your system. The captured packets will be added to the file of your choice if you don't choose any. A temporary file will be created, and data will be written to it, which can be saved to a user-specified location. To achieve this, write the name of the file that uses absolute path referencing or click on Browse followed by the File textbox to choose a location.
If you select the multiple files option, then you can save your packets in multiple files, where we can customize more options, which are stated as follows:
- Next File Every: After capturing a certain amount of data, Wireshark will create a new file and your data will be added to it. For instance, I want to create a new file after Wireshark captures 2 MBs of data.
- Next File Every: After a certain amount of time, Wireshark will create a new file and your packets will be added to it. For instance, I want to create a new file after every 5 minutes of the capturing process.
- Ring buffer: Using this option, you can restrict the creation of a new file. Wireshark uses the First in First Out (FIFO) option to write data to multiple filesets. For example, you have selected the Ring buffer option and increased the number of files to
5, and you have configured that after every 5 MBs, a new file should be created.
Now, according to this configuration, once you start capturing packets, after every 5 MBs of data, a new file will be created and the packets will be written to it. Once the limit that you specified in the Ring Buffer area is exceeded, Wireshark will not create a new file; instead, it will roll back to the first file and append data to it. The following screenshot shows a similar kind of configuration:
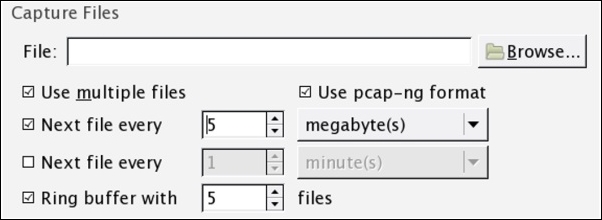
Figure 2.5 : The Capture Files option
- Stop Capture Settings: This option lets you stop the capturing process after a certain condition is triggered; we have four different kinds of triggers. Activating these can stop Wireshark from capturing new packets, and they are stated as follows:
- Packet(s): Stop capturing after a certain count of packets is reached
- File(s): Stop capturing after the creation of a certain number of files
- Megabyte(s): Stop capturing after capturing a certain amount of data
- Minute(s): Stop capturing after running for a certain period of time
There might be one question that you may want to ask: what if we select more than one option at a time? For instance, as shown in the following figure.
You can activate more than one option at a time; Wireshark will stop capturing whichever condition is met first.

Figure 2.6 : The Stop Capture options
- Display Options: There are a few options available in this section that can be configured to restrict how the packets and their corresponding information will be displayed in the Packet List Pane option and the Protocol hierarchy window. Refer to the following figure to see this.
If you select Update list of packets in real-time, you will observe that Packet List Pane is updated as soon as Wireshark captures a new packet, and the pane will be scrolled upwards automatically. Choose these options if needed; otherwise, the resources acquired by these two tasks can be used for other processes.
If you check the Hide capture info dialog box, the Protocol Hierarchy window, that shows the statistics (in percentage) , will be hidden. If you don't have any specific purpose, I would recommend that you uncheck all these options.

Figure 2.7: Display Options
- Name Resolution: If selected, this feature can resolve the Layer 2, Layer 3, and Layer 4 addresses to their corresponding names; for better understanding, refer to the following screenshot:
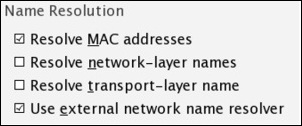
Figure 2.8: Name Resolution
Capturing only traffic that meets your requirement is really useful when you have a large volume of packets flowing around. Creating your own custom capture filters can come in really handy while you analyze a production environment. Capture filters are applied before you initiate the actual capture process. In general, every packet captured by Wireshark is passed to the capturing engine so that it gets translated to a human-understandable format, but if you have applied a capture filter, Wireshark will drop the packets that don't meet your expression. All these dropped packets won't be passed to the capturing engine, . In comparison, display filters are much more specific and powerful; while using capture filters, you should be careful, because there is no way of recovering dropped packets that do not meet the expression that you created.
The Berkley Packet Filter (BPF) syntax is used to create capture filters, and several protocol analyzers use it as well, thus maintaining industry standards. It is significantly easy to learn and practice, just use the basic format to structure an expression.
Using the BPF syntax earlier, we created a simple capture filter through the capture filter dialog; let's discuss it in detail because it is really crucial to know about BPF, as it is used by a variety of analyzers.
If you're using the BPF syntax, you have to follow a certain format structure, which is a combination of two arguments: identifiers and qualifiers, which are explained as follows:
- Identifiers: This is the value that you are looking for in your packets. For example, if you are filtering the packets for a certain IP address, then your capture filter will look something like
host 192.168.1.1, where the value192.168.1.1is an identifier. - Qualifiers: These are categorized into three different sections:
- Type: There are three types of type qualifiers:
host,port, andnet. In short, a type qualifier refers to the name or the number that your identifier refers to. For example, in yourhost 192.168.1.1filter,hostis the type qualifier. - Direction: Sometimes, when you need to capture packets from a particular destination or source, we can specify direction qualifiers as well. For example, in the
src host 192.168.1.1capture filter,srcspecifies that we've to capture packets originating from a specific host only. Likewise, if you specifydst host 192.168.1.1, would capture packets only destined tohost 192.168.1.1. - Proto: This refers to protocol qualifiers that give us the feature where we can mention the specific protocol that we want to add in our expression for capture purposes. For example, if you want to capture
httptraffic coming from your host192.168.1.1, then your expression will look something likesrc host 192.168.1.1 and tcp port 80.
- Type: There are three types of type qualifiers:
In the previous example, we combined two expressions together using the concatenation operator (&/and). Similarly, we've the alteration operator (|/or) and the negation operator (!/not), which can be used to combine and create complex filters.
For example, as per our previously created filter src host 192.168.1.1 and tcp port 80, all the packets originating from 192.168.1.1 and going to port 80 will be captured.
If you add the or operator between src host 192.168.1.1 or tcp port 80, then when an expression in your filter matches, then the packet will be captured. This means that every packet originating from 192.168.1.1 or any packet associated with port 80 will be captured regardless of the second condition.
In the case of the not operator, a capture filter such as not port 80 states that any packet associated with port 80 should not be captured.
Once you start working in a production environment, you will see how common it is to combine filters using the AND, OR, and NOT operators.
Though you have a variety of filters available in Wireshark itself, which can give you an overview of the BPF syntax, to access the present filters by default, go to Capture | Capture Filers or click on the Capture Options button in the main toolbar and then click on Capture Filter. From the same window, we have an option to create new filters that we already discussed.
Refer to the following table for sample capture filters:
|
Filters |
Description |
|---|---|
|
host 192.168.1.1 |
All traffic associated with host 192.168.1.1 |
|
port 8080 |
All traffic associated with port 8080 |
|
src host 192.168.1.1 |
All traffic originating from host 192.168.1.1 |
|
dst host 192.168.1.1 |
All traffic destined to host 192.168.1.1 |
|
src port 53 |
All traffic originating from port 53 |
|
dst port 21 |
All traffic destined to port 21 |
|
src 192.168.1.1 and tcp port 21 |
All traffic originating from 192.168.1.1 and associated with port 21 |
|
dst 192.168.1.1 or dst 192.168.1.2 |
All traffic destined to 192.168.1.1 or destined to host 192.168.1.2 |
|
not port 80 |
All traffic not associated with port 80 |
|
not src host 192.168.1.1 |
All traffic not originating from host 192.168.1.1 |
|
not port 21 and not port 22 |
All traffic not associated with port 21 or port 22 |
|
tcp |
All tcp traffic |
|
Ipv6 tcp or udp host www.google.com ether host 07:34:aa:b6:78:89 |
All ipv6 traffic All TCP or UDP traffic All traffic to and from Google's IP address All traffic associated with the specified MAC address |
Capture filters can be created on the basis of offset values present in protocol header fields. The syntax to create such filters looks like proto[offset:size(optional)]=value. Here, proto is any protocol that you want to filter, offset is the position of the corresponding value in the header, size is the length of the data you are looking for, and value is the data you want to find.
Say, for instance, we want to capture only ICMP reply packets; now, if you observe the following figure, you will note that the ICMP header type is located at the first place and the offset counting starts from 0. So, the offset value will be 0 in this case, and the size of the field is 1 bytes. We have all the required information to create a capture filter, so now, the resulting expression will look like icmp[0:1]=0.
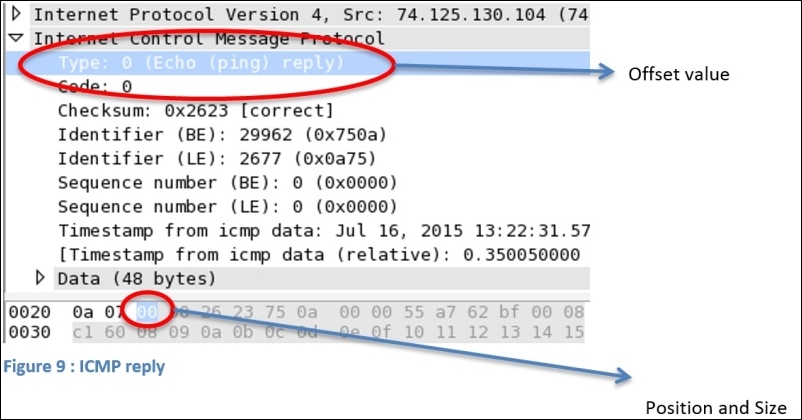
Figure 2.9: ICMP reply
Let's try to apply the same to Wireshark; we will then ping www.google.com to check whether it works.

Figure 2.10 : ICMP capture filter
Let's ping www.google.com and check whether it works.

Figure 2.11: Browse google.com
As a result, Wireshark will capture only the ICMP reply packets. Using the same technique, you can filter out traffic on the basis of the protocol header value:

The following table lists some sample bytes-based capture filters for TCP and ICMP; try practicing them too:
|
Filter |
Description |
|---|---|
|
|
ICMP request packets |
|
|
ICMP reply packets |
|
|
ICMP destination host unreachable packets TCP SYN flag packets only |
|
|
TCP SYN/ACK flag packets only |
|
|
TCP URG flag set packets only |