Display filters are much more flexible and powerful when compared to capture filters. Display filters do not discard any packets; instead, the packets are hidden to make viewing convenient or convenience. Discarding packets is not a very effective practice because, once the packets are dropped, they cannot be recovered. When you apply the display filter, only those packets that meet the specification of your filter will be displayed. In the the second column of the status bar of the Wireshark window, you will see a number of packets displayed after you apply a filter.
A display filter can be used for a capture file in the Filter dialog box located above the Packet List Pane. Display filters are more popular than capture filters. The syntax used for display filters can be easily adapted and applied. For new users, a display filter is like a super power that gives you the functionality of hiding inappropriate packets in run-time that do not meet your requirements as per the current scenario.
Display filters can be created on the basis of several different constraints such as the IP address, protocols, port numbers, and header values in specific protocols. There are lot of conditional tools and concatenation operators that can be used to create complex expressions. You can combine different sets of expressions to get more specific sets of packets that we are looking for. Each and every packet shown in the Packet List Pane can be filtered using the fields that a packet contains.
Display filters do not delete data; instead, packets are hidden, which can be made visible again once the filter in the Filter dialog above the list pane is cleared. For instance, to display only ICMP packets, just enter ICMP in the filter dialog and click on Apply; it's really simple, isn't? If you want to see all packets again, just click on the Clear button and everything will be back to normal.
Wireshark has a very awesome feature that can assist you while creating your filter. Just click on the Expression button at the end of the Filter dialog box, choose the protocol you want to filter, and specify the value if there is one.
Using the filter expression dialog is really easy, and if you are a beginner, then this is a boon for you. Let's learn how to use the expression dialog.
Figure 2.12 : The filter expression
- As show in the preceding screenshot, click on the Expression button.
- Now, you will be presented with the Expression window like the one shown in the following screenshot:
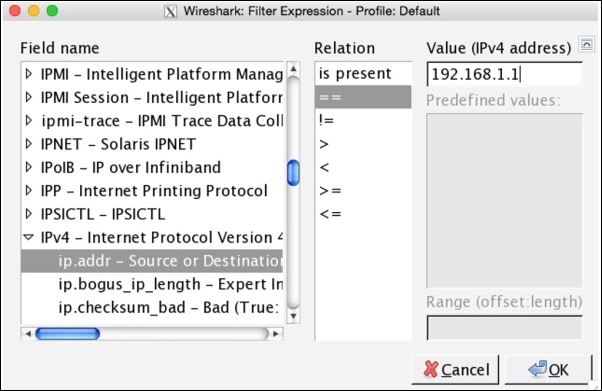
- For example, if you want to see only packets associated with
ip:192.168.1.1, then just scroll down in the Field Name to find IPv4. Then, expand the section and choose the ip.addr option. - Then, from the Relation box next to it, choose the operator you wish to add in your expression.
- At last, write the IP you are looking for in the Value (IPv4 address) box.
- At last, just click on OK. If you've followed all the steps up to here correctly, then you would be able to see the packets originated from the
ipthat you mentioned (change 192.168.1.1 to your IP address). - Below the Value box, there is a Predefined value box that is used when a certain protocol restricts us to use only a specific set of values. You can choose a value form here.
- Below the Predefined Value box, there is a Range box that allows us to enter a range of values such as
1-78, 0-5, 120-255if the protocol allows the same.
This is one of the easiest ways to create a display filter; there is one more way following which we can also create such filters. Entering filters manually can drastically increase the speed of your work, but it requires a bit more skill than there are in a novice user.
Before we start digging into creating filters manually, I want you to know about a few more things, such as comparison and logical operators. These can be used to create simple and the most complex filters for Wireshark.
The following table lists the comparison operators used to create display filters:
|
Operator |
Description |
|---|---|
|
==/eq |
Equal to |
|
!=/ne |
Not equal to |
|
</lt |
Less than |
|
<=/le |
Less than equal to |
|
>/gt |
Greater than |
|
>=/ge |
Greater than equal to |
Next, let's have a look at the logical operators that are used to combine different conditions together. The following table lists all of them:
Sometimes, you will have a requirement where having access to previously created filters would make your work easy and fast enough. Wireshark gives you the facility where you can retain your display filters through their saved names and use them at a later point of time whenever required. This option will save you the great amount of time and effort required to type some of the complex display filters. To create one for yourself, follow the given steps:
- Go to Analyze | Display filters; this will give you a window like the one shown in the following screenshot:

Figure 2.13: Adding Display Filters
- Now, click on New, enter the values in the Filter name and Filter string fields. For instance, we want to create a display filter for no ARP packets. Then, the values will look something like the following screenshot:

Figure 2.14 : Creating a new filter
- After entering the same, click on Apply. Now, in the list of default filters present you would be able to see NO ARP, which can be used later.
- Make sure that the Filter String box is shown with a green background, which denotes that your expression is correct; if it is in red color, then you need to recheck it, and if it is in yellow, this denotes that the results can be unexpected. Now, you can click on Apply and then click on Ok.
- If you need assistance to create any filter you want, simply click on the Expression button next to the Filter string box, where all the protocols and majorly used filter expressions can be found.
- The Delete button will assist you in deleting an existing filter from the list.
- The Cancel button will discard any unsaved changes and close the window.
- The Ok button commits Save and will close the window.
- Now, let's try applying the filter we just created. Navigate to Analyze | Display Filter | (Scroll and select ) Display Filter | Apply.
Try following the same and create your own display filter that you might want to reuse.