
File system or disk location publishing is generally used to "copy" a site from one location on your computer or local network to another. You might find yourself needing to use this method in order to move a site from a folder location where you work on sites to another folder location where you archive finished work; or you might want to move a site from its existing folder location to a network share on your local network so that you can view it through a browser.
The method of publishing from disk location to disk location is superior to copying in Windows Explorer, because publishing will ensure that all of your files that are necessary are moved and that none of the unnecessary ones are moved. It’s the best way to move a site and not run into problems with the metadata that Expression Web uses to manage sites.
Note
USE the CH9 sample site. This site is located in the DocumentsMicrosoft PressExpression Web SBSSample Sites folder.
OPEN the CH9 site if it is not already open.
On the File menu, click Publish Site.
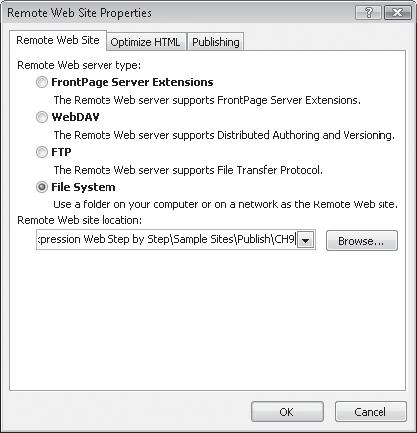
The Remote Web Site Properties dialog box opens.
Click File System, click Browse, and then navigate to the local folder in which you want to publish the site.
Create or select the folder you want, and then click Open.
In the Remote Web Site Properties dialog box, click OK.
Expression Web switches to Remote Web Site view.
At the top of the Remote Web Site view, click Remote Web Site Properties. Then in the Remote Web Site Properties dialog box, click the Optimize HTML tab.
To enable the HTML optimization options, select the When publishing, optimize HTML by removing the following elements check box.
Important
These options are self-explanatory. In many cases Expression Web will rely on these comments and attributes being in the page code, and that’s why they’re only removed when they’re published to the server. If you strip out comments and attributes that Expression Web needs and then publish from the remote site to your local system, you will experience some usability issues when you edit the site in Expression Web.
In the Remote Web Site Properties dialog box, click the Publishing tab.
Note
The options on this tab are also self-explanatory. Generally a user will change them from their defaults for issues relating to publishing speed or a publishing strategy.
For example, if the application takes too long and times out comparing files on the server to files in the local Web, a user can select the option to use time stamps rather than comparison. This will never be an issue in File System publishing. If the user’s local site contains subsites, he or she may choose the option to publish subsites on certain occasions. In general, the Publish tab default settings don’t require change.
Take some time to familiarize yourself with the options on this tab.
Another useful option that you can use is to choose whether you want the publishing operations to be logged and provides a link to view the log file.
Click OK to close the dialog box.
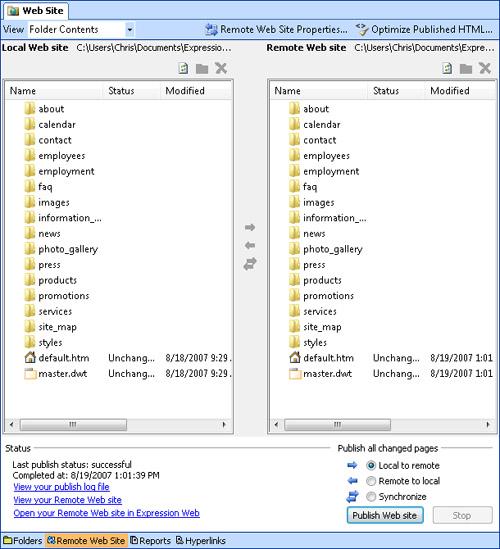
At the bottom of the Remote Web Site view, click Publish Web site.
During the publishing operation, the Status area in the lower-left corner of the workspace displays messages regarding the files being published.
Because the publishing operation is from one local folder to another local folder, you will find this operation to be the fastest publishing method.
Note
If you attempt to publish a local site to another local folder as this exercise does and the local site contains dynamic pages such as classic ASP or ASP.NET, you will be warned. The warning only alerts you to the fact that the dynamic pages won’t function as they would on a server. There aren’t any such pages in this sample site, but you should be aware of the possibility.
Note
When using the Changed Pages Only option for publishing, if Expression Web finds files or folders on the server that aren’t present in the local site, you will be asked if you want to remove them. If you aren’t absolutely sure you want the files or folders removed, click No.
Publishing finishes, and your Remote Web Site view shows a status message that indicates this status. There are also links below the status message to view the publish log file, view the remote Web site, or open the remote Web site in Expression Web.
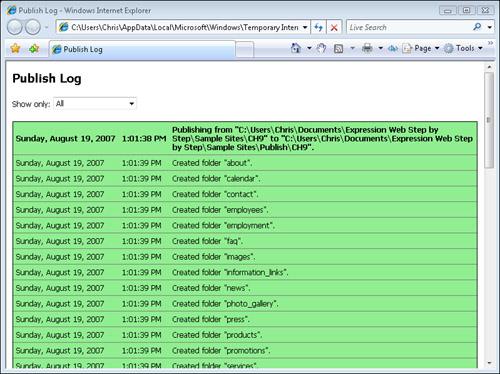
Click View your publish log file beneath the status message.
Your publish log opens in a browser. This log has an option box that enables you to filter the results for certain operations and makes deducing certain information easier.


Tip
Because this publish log file appears in a browser window, you have all the common browser file operations available, such as save and print. This functionality can be helpful if you need to save a record of publishing operations for a customer or to send information to the server administrator to report a problem.
You have now published a local site to a file system location by using Expression Web. All of your local files were moved to a secondary local folder, and you have viewed the publish log file.