Now that you have seen the power of the Report Wizard, you can use it to create reports that are relevant to your business needs. Business needs change over time, and your reports will need to change accordingly. Additionally, you will often want to make small tweaks to the reports you have already built. For example, you might want to add a column or a grouping level, or you might want to modify the sort order. You can use the same interface in the Report Wizard to modify existing reports without having to start over.
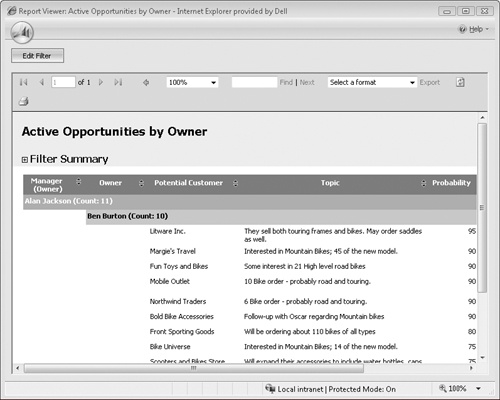
In this exercise, you will modify the Active Opportunities By Owner report that you created in the previous exercise. Specifically, you will modify the filter to include only those opportunities with a closing probability greater than 50 and group results by manager in addition to record owner.
Note
USE your own Microsoft Dynamics CRM installation in place of the Adventure Works Cycle site shown in this exercise, and use a user account that has privileges to create and update reports.
BE SURE TO use the Internet Explorer Web browser to navigate to your Microsoft Dynamics CRM Web site, if necessary, before beginning this exercise.
In the Workplace area, click Reports.
Select Active Opportunities by Owner without opening it, and click the Edit Report button in the grid toolbar.
The Report form opens.
In the Report form, click Report Wizard to launch the Report Wizard.
On the Get Started page of the Report Wizard, leave the default selections to work from your existing report, so that your changes overwrite the original settings. Click Next to proceed to the next step of the Report Wizard.
On the Report Properties page, leave the current settings intact, and click Next to proceed to the next step of the Report Wizard.
The Select Records To Include In The Report screen opens, displaying the Status report parameter configured in the previous exercise.
Add a new row by clicking Select and then choosing Probability.
Select Is Greater Than as the operator.
In the Enter Value field, enter 50.
Click Next to proceed to the next step of the Report Wizard.
This selection refines your results to include only records with a probability value greater than 50.
On the Lay Out Fields page, revise the report format by clicking in the Click here to add a grouping field.
The Add Grouping dialog box opens.
In the Record type field, select Owner.
In the Column field, choose Manager.
In the Summary type field, select Count.
With these selections, you are adding the owner’s manager to the report as an additional grouping level.
Click OK to close the Add Grouping dialog box.
The new grouping level is added below the existing Owner grouping level in the report.
In the Common Tasks pane, click the Up arrow.
This moves the manager grouping level above the owner so that the opportunities for each sales owner are grouped by the sales managers.
Note
Troubleshooting You might see a warning message showing that the table exceeds the width of one printed page. This is due to the total pixel count of all columns in the report. To keep the report under one page wide for printing purposes, ensure that the sum of your column pixels is less than 960.
Click Next to proceed to the next step of the Report Wizard.
The Format Report screen opens.
In this screen and in the Report Summary screen that follows, click Next to maintain the current selections.
The Report Successfully Created confirmation page opens, indicating that you have successfully updated the report.
Click Finish to exit the Report Wizard.
The Report Wizard closes and you are returned to the Report form. The changes to your report are automatically saved.
In the form toolbar, click Run Report to view the report with your changes.
The report now includes an additional grouping level that shows total open opportunities at the manager level as well as at the owner level, and includes only those opportunities with a closing probability greater than 50. You can continue to refine your reports at any time with the Report Wizard.


